|
A-4K
"Kahu"
Part
One - Construction
by
Anthony Papadis
 |
|
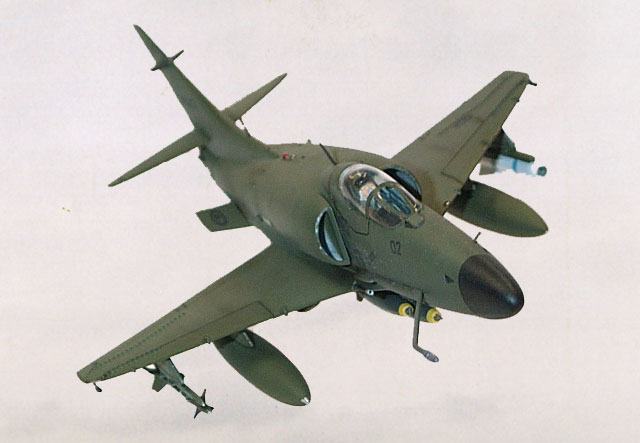
A-4K
"Kahu" Skyhawk |

Hasegawa's 1/72
scale Skyhawk is
still available online from Squadron.com
This conversion of Hasegawaĺs 1/72 A-4E/F kit (B9) to a Royal New Zealand Air
Force (RNZAF) A-4K was carried out as a warm-up to their latest 1/48 effort.
I used the now old kit (even though it is re-boxed with new art by the ever
inspiring Koike Shigeo) because I wanted a cheap kit and the excellent Fujimi
kit is as rare as the proverbial henĺs teeth. I managed to buy this kit for
approximately USD$5 at K-Mart.
I wanted to build a model of the A-4K in its latest and sadly, last colour
scheme, overall green (FS 34079) with black noses. In the early 1990s, RNZAF
A-4ĺs underwent a modernisation programme, with the resultant aircraft
re-designated A-4K, or ôKahuö, an indigenous bird of prey. The aircraft differs
externally in that the aircraft Ĺlostĺ their avionics Ĺhumpĺ, which had never
carried the additional avionics anyway. The aircraft were fitted with a
deriviative of the F-16ĺs attack radar, the APG-66. this menat the insrument
panel was signifigantly different to the standard scooter (or Ĺmodelĺ as they
were affectionately known here in Oz), having two large TV screens dominating
the instrument panel, and a larger HUD. The aircraft also feature an underwing
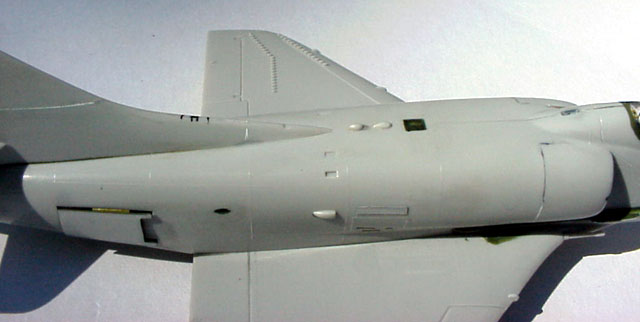
ECM blister at each wingtip, as well as at the tail above the tailpipe. The fin
was increased in size and took on the squared shape of later scooters. The
aircraft was going to be depicted in flight with gear up so all the
undercarriage components were also sent to spares.
The kit shows its age, being of the raised detail type and with very basic and
crude cockpit detail. the seat is little more than a lump of plastic and the tub
is just a shell, although decals are provided. All that aside, the basic outline
is correct, and includes a wide variety of ordnance. The kit has a full
complement of three drop tanks, 12 500lb bombs (very crude), a couple of bullpup
missiles and two AIM-7ĺs, who says Hasegawa kits donĺt include weapons!
Apart from the drop tanks, all the underwing stores were consigned to the spares
box. The kit fetaures a separate avionics Ĺhumpĺ, which was also not required.
I began with the cockpit.
After some test fitting, it became obvious that with a pilot and canopy
installed, very little could be seen of either the seat or insrument panel, so I
didnĺt bother to improve these further other than to add an ejection handle to
the top of the seat from fine wire.
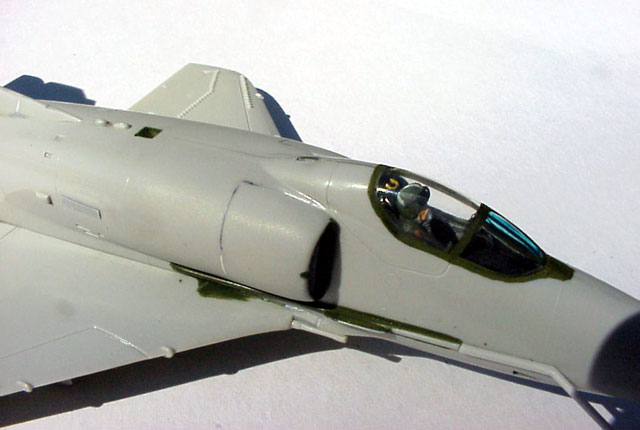
I used a Matchbox pilot figure as these figures depict the British helmet and
flight gear, which is closer to RNZAF gear than the US types.
The tail alterations now took place. I cut along the top of the fin, along
the top horizontal line on the left fuselage half, as far back as the rudder
hinge. I then cut down vertically following the rudder hinge as a guide. A piece
of plastic sheet was then glued in place and left to set overnight.
After the exhaust exterior was painted with metalliser steel. A piece of clear
acrylic rod , which had been pre-bent using heat from a hair dryer, was epxied
into the exhaust. this would form the mounting for the aircraft.
The tail was shaped to an aerofoil section and the front edge of the fin was
used as a guide to sand the fintip leading edge. I also added the rear ECM
blisters at this point, using some plastic rod and mounted them on bases made
from aluminium from a soft drink can.
The top of the fuselage should have a square opening for the bleed air duct. As
this would be covered by the avionics hump, Hasegawa never bothered to include
this detail. I cut open a square apeture and bixed it with some plastic sheet.
Kiwi A-4ĺs also feature a second , clear nav light directly in front of the red
rotating beacon. I used some shaped sprue for this.
Work now shifted to the underwing area. The main gear doors were glued in
place after cutting off the mounting tabs, and these fitted withno problems. I
decided to leave off the arrestor hook as well as all stores and pylons until
after painting and weathering were complete.
I noticed in my research that RNZAF scooters have the lower rotating beacon
(normally on the lower left undercarrige fairing) fitted to the lower right
undercarrige fairing. icarefully shaved this off and glued it to the opposite
side. There si also an underwing fairing on the lower left wing, which looked
alittle too thin, so this was also removed and a replacement was made from
re-shaped plastic sheet
.
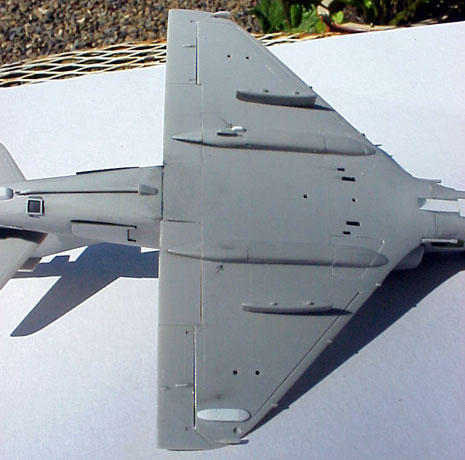
I needed to manufacture the wingtip ECM blisters and was rummaging through the
spares box when I came across a couple of ECM antennas from an old Hasegawa
F-16N (Top Gun ) kit. After a bit of filing, they became the wingtip ECM
blisters. There is also a light flush mounted to the wing just outboard of the
ECM antennas. I drilled small depressions in the wings to represent these.
Once the wing halves were attached, they were then offered up to the fuselage.
There was some filler required at the lower forward wing join. I then glued in
the nose gear door and at this point I noticed that the small rear nose gear
door opening was actually too short by about half! I cut away some plastic until
it fit. The main nose gear door is very flat and some filler was reqired to
blend in the underfuselage contours in.
I drilled out the wing cannons, and put these these aside until the end.
I wanted to give the kit a fairly tough looking load so I had to rob the
spares box. I used the following items, all of which came from the Hasegawa
weapons kits:
In addition I had to build the adapters (ADU 292) which fit between the wing
pylons and the launch rails. I used some strip plastic, although Ronĺs Resins do
make an A-4K conversion set, which includes the wingtip blisters and the LAU-7
and adapters.
Click here to go to
Part Two - Painting and Finishing
Model, Images and
Article Copyright ę 2002 by Anthony
Papadis
Page Created 08 March, 2002
Last updated 04 June, 2007
Back to HyperScale Main Page
Back to Features Page |
 Home
| What's New |
Features |
Gallery |
Reviews |
Reference |
Forum |
Search
Home
| What's New |
Features |
Gallery |
Reviews |
Reference |
Forum |
Search