|
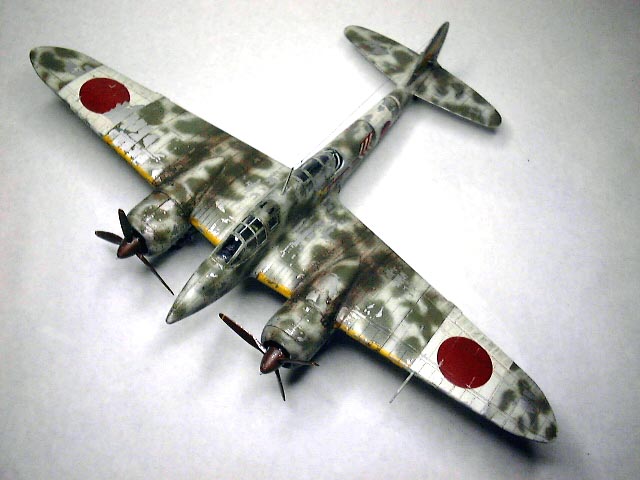
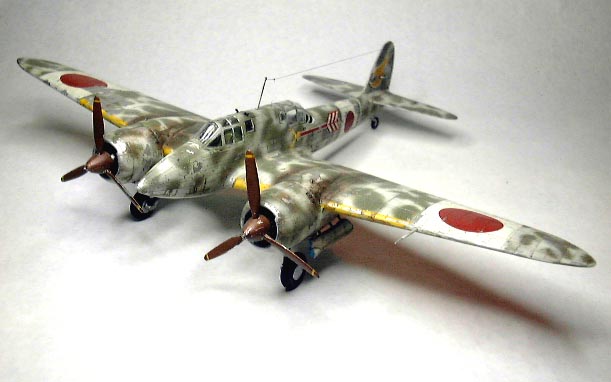
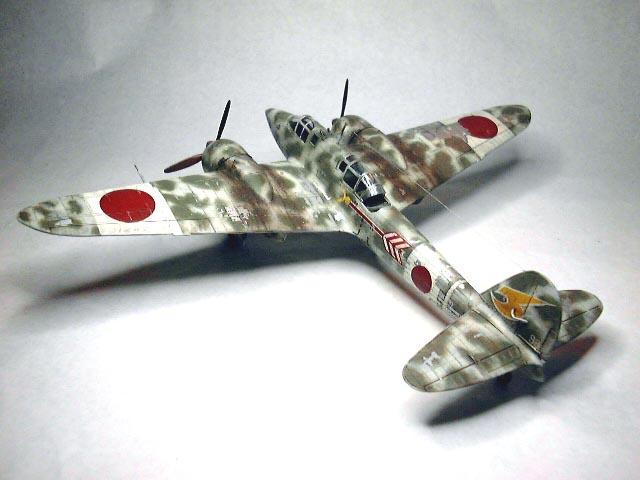
Kawasaki Ki-45 Kai-C Toryu “Nick”
by Thomas Choy
 |
|
Macchi C.202 |

Nichimo's 1/48
scale Ki-45 is available online from Squadron.com
Called the Toryu, or Dragon-slayer, and codenamed Nick by the Allies, the
Ki-45 was the first twin-engined fighter of the Imperial Japanese Army.
Designed at Kawasaki’s Gifu factory to meet a 1936 requirement issued in 1937,
the Nick went through a rather long development period, finally achieving
production after several engine changes (it initially started with the Nakajima
Ha-20B, which underdeveloped to begin with, to the Navy’s Ha-25 Sakae engine,
before finally settling on the Ha-102 engine) and design changes. I read
something about pilots not liking the landing gear, which was hand-cranked, but
I never found out if that was ever improved.
Although originally designed as a long-range escort fighter, the Nick never
operated in that role. Instead, it was used in almost every theater in the
Pacific, and modified to several versions, from nightfighting, where Nicks
claimed seven B-29 kills in 15 June 1944, to kamikaze fighters. About 1,700 were
built.
Anyway what I’ve got for you guys today is the Nichimo kit, which is almost
30 years old. However it doesn’t look its age, with engraved panel lines and
rivets (and there are a lot of rivets!!!). The cockpit is pretty bare, however,
and the landing gear detail is virtually non-existent. Scratchbuilders and
superdetailers will have a ball on this one.
The instructions on this are in Japanese, by the way, but the distributor puts
in a translated instruction sheet (which looks like it was done in the 80’s and
photocopied….waitaminute, I think it is) It’s pretty well written, but there
aren’t any diagrams on it so you’ll have to shuffle between the two a bit.
One of the really nice things about this kit is the ease of construction, with
only a few minor issues, such as the lack of locator pins. Yes, this kit has no
locator pins. But fear not!!! The parts align very well, and if you’ve build one
of Eduard’s recent kits, you’ll feel right at home. You start at the cockpit, of
course, and I painted the cockpit Nakajima Green, with a little black and zinc
chromate here and there to accentuate some of the details inside and drybrushed
a little silver here and there. I made some seatbelts out of masking tape. You
have to install the 20mm cannon, the 12.7mm guns and the two tiny side windows
before you close the fuselage up, so you’ll want to figure out a good way of
preventing the little windows from popping in once it’s closed.

The wings were next, and went together fairly well, but the leading edges are a
little thick and you might want to sand them down a little. The engine nacelles
go up next, and you have to install the landing gear before you close the
nacelles up. The landing gear itself is pretty complex, but is easily assembled.
I painted the cockpit with my own Aotake mix, which was thinned Testor’s Teal
sprayed over Testor’s Metalizer Aluminum Plate. The wing stubs are a little too
side for the fuselage slots, so you’ll either want to enlarge the slots or sand
the stubs down. I opted for the latter, and sealed it shut with some CA glue.
There was a small seam at the wing root, but a little filler soon cleared that
up. I then rescribed whatever detail was lost and also redid the rivet holes
with a no.11 blade, praying that I wouldn’t get my eyes crossed and drill the
holes in at an angle.
There’s only one major gripe I had with this kit. It doesn’t have the rear
gunner’s Lewis gun (or Lewis copy). I tried adding one from the Smer Walrus, but
the Smer looked just outright goofy and too big, so I decided to leave it out.
The rest of the kit went together really easily. The tail went up next, and once
that was done I masked the fabric surfaces (which is pretty well simulated by
the way) and cockpit, and sprayed the entire aircraft with Testor’s Metalizer
Aluminum Plate again. I then buffed it until it was fairly shiny, and then
sealed it. Then I set the model down and went off to get myself a Dr Pepper (it
makes the world taste better).
When the sealer was dried I painted the entire plane with Polly Scale IJN
Light Grey, and then switched to Polly Scale IJN Dark Green for the green
splotches. When that was dry I got some low-tack masking tape and masked the
wings and fuselage in order to paint the white bands.

The decals actually provide for the bands, but they were really thick and
translucent at the same time (more on that later). Other areas of color were the
yellow ID bands, which were Polly Scale IJN Yellow.
The markings are from the 53rd Sentai based in Matsudo, Chiba Perfecture,
assigned to the Shinten unit. Its mission in mid-1945 was primarily the
interception B-29s. One of these days I’ll have to find out which B-29 unit flew
against the 53rd and build on up in those markings.
As mentioned earlier, the decals were thick and translucent. Unfortunately an
aftermarket decal for this is no longer in production (Aeromaster made those)
but I did manage to get a set of Aeromaster’s IJAAF Hinomaru set (set no.
48-353). Those went on the white bands beautifully, and reacted beautifully with
Solvaset. The kit decals were another story entirely. They didn’t like setting
solutions too much, and too little has no effect while too much makes it silver
like mad, so I put tons to make it conform to the rivets (it did, eventually)
and then cut off the silvered parts and replaced it with paint chips. Pretty
sneaky huh?
I really dig filthy looking planes, as it has that “action” look on them and if
done well (not that mine was done very well) tells a story. Well here’s my
story.
When I lifted the tape, a giant gob the paint around the wing lifted. Oops!!!
Well, I had planned on weathering the aircraft with a lot of paint chips, but
this was ridiculous!!! Well, I looked at it one more time, and rather than
repaint the area, I decided not to worry too much about “accurate” weathering
and just had fun weathering it. I got out more masking tape, this time the
stickier stuff, and just went nuts on the aircraft, ripping off paint almost
everywhere, taking care to concentrate on the cockpit sides and areas that would
encounter the most friction. The result is what you see in the pictures. I
showed it to Mike Wolf (who does weathering really well) at my local IPMS
meeting, and he agreed that although the weathering might seem excessive, it did
look cool.

I also went a little crazy on the gun and exhaust stains, using black pastels
where the guns are and a mix of brown and black pastels for the exhaust stains.
I figured that at that point in the war, high quality fuel was not as easy to
get by so heavy exhaust stains were the norm. The ground crew also did not have
too much time to keep the planes clean, so I highlighted all of the rivets and
panel lines with a mixture of brown and black paint mixed in with water and
detergent. I spread the mess all over the place and wiped it off a few minutes
later. Neat! The plane now looks so filthy that I had to take a bath.
After two weeks of work, I had a filthy, oily, almost bare Ki-45 that looked
like it was almost ready to fall apart, ready to take on the imaginary B-29s
flying across my living room (it’s imaginary because I still haven’t gotten one
yet….hopefully someone will kit a new B-29 or rebox it). It was also just in
time for IPMS Kalamazoo’s theme night, which we cleverly called “That 70’s Kit.”
Everybody gave me that “oh, Tom got too enthusiastic with the weathering again”
look but thought it was pretty cool nonetheless. I got a “first prize” for it,
which was a pat in the back (pats in the back are cool), which was tied with two
other entries, so the other two got a pat in the back too.
At almost $25 retail it’s kinda pricey for a 30-year-old kit, but the fit is
pretty good and had practically no warpage. It’s also the only game in town as
far 1/48 goes. I would thoroughly recommend it, but bear in mind it’s not a
shake-and-bake. Its fun though! The Super Tom Fun-O-Meter gives it an 8 out of
10, which could have been a 10 if it wasn’t for the lack of a rearward facing
machine gun (hey c’mon, the guy on the boxart had one!) The Cool-O-Meter gets a
9, because it’s just so plain mean-looking. If you can live without the missing
gun or have a spare Lewis lying around, you could send me the extra Lewis or get
this kit and pop it in.
Model on, Modelrinos!!!!
Click the thumbnails below to view
larger images:
Model, Images and
Article Copyright © 2002 by Thomas Choy
Page Created 28 June 2002
Last updated 04 June 2007
Back to HyperScale Main Page
Back to Features Page |
Home
| What's New |
Features |
Gallery |
Reviews |
Reference |
Forum |
Search