 Home
| What's New |
Features |
Gallery |
Reviews |
Reference |
Forum |
Search
Home
| What's New |
Features |
Gallery |
Reviews |
Reference |
Forum |
Search
|
|
|
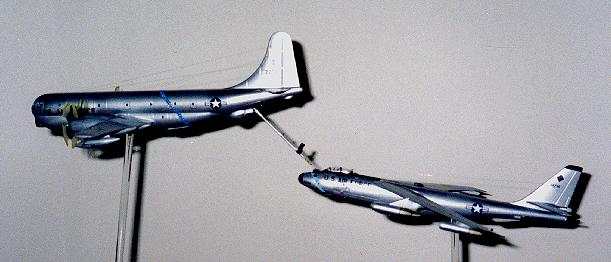
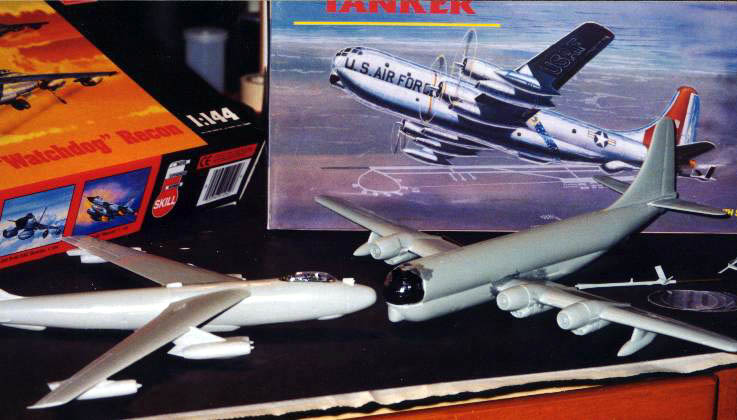
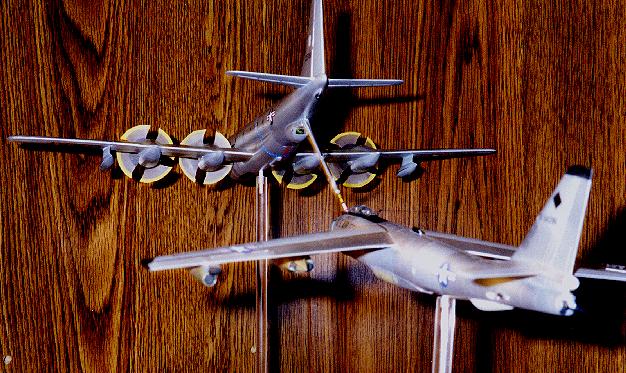
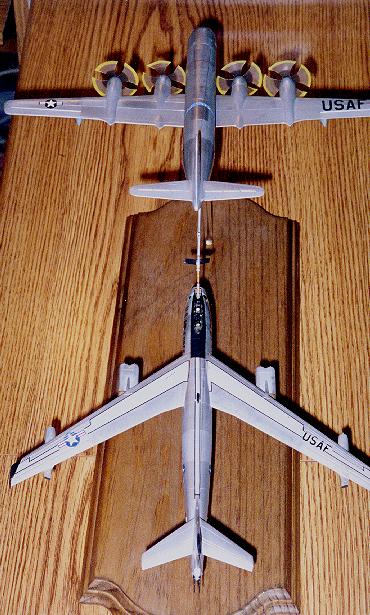
Boeing KC-97G Stratotanker and RB-47H "Watchdog" Refuelling by Don Russell
A unique air refueling operation is something I've wanted to model for some time. Hanging a fighter from my ceiling behind the boom of a 1/72 scale KC-135 was not what I had in mind any longer, and when new kits became available in 1/144th, I got an idea. Why not pair Minicraft's KC-97G with Hobbycraft's RB-47H, two rarely modeled or talked about airplanes, executing one of their routine yet secretive midair refuelings during the late 50's or early 60's? Not only that, the smaller scale made the size of the display much more manageable, and I thought it would be interesting to depict the dramatic angle of attack required for fast airplanes to stay in contact with slower tankers. With heaps of RB-47H reference material from fellow Hyperscaler Tim Kalina, I dug in. There were several "firsts" for me with this project. For one, I had never done a natural metal finish (NMF) before, I guess out of pure intimidation, lack of interest, and lack of a quality medium of paint. Second, I wanted to create the illusion of flight and motion in the KC-97 props, so I had to simulate that effect somehow. Third, I'd never mounted a model gear-up and in-flight. Next, I'd never strung long-wire antennas until this project. For that I used smoky clear nylon thread. Finally, it was the first time I'd ever built two models simultaneously for the same display. Thanks to increased confidence in my skills over the past couple of years, SnJ aluminum paint, and lots of tips from the Discussion Group on Hyperscale, I think I pulled it all off. Now if I can just work on my photography and computer graphics skills…
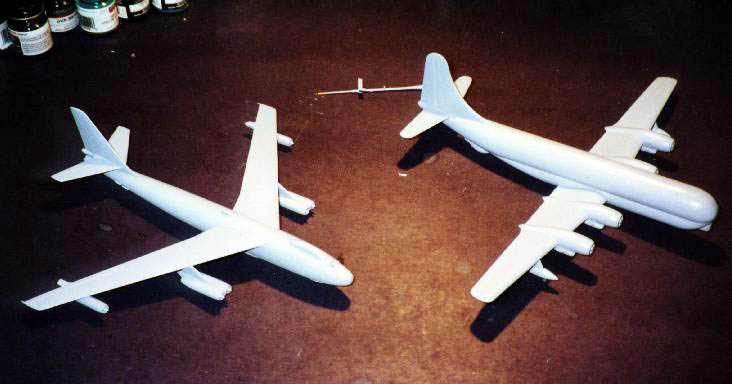
The Minicraft 1/144th KC-97G was not the easiest kit to build, but it wasn't bad by any stretch. Achieving a flush joint where the clear canopy section meets the fuselage took some care, as did smoothing out the engine cowlings and main landing gear doors in the closed position. I read in a kit review that its delicate landing gear struts are woefully true to scale, and thus a little fragile under the completed 1/144th Stratotanker with anchor weight in the nose. Luckily, I didn't have to contend with that. Another concern I read about is the crudeness of the -97's propeller blades and spinners. Again, I wasn't too concerned with this since I was going to replace those. The fuselage and wings went together fine and just a quick swipe with sanding pads took care of those seams. The notches in the fuselage sides that accept the wing tabs are too large for the wings, and the gaps were filled in with CA and smoothed out once the wings were inserted. Despite all this, with care you can produce a very smart looking small scale KC-97 using this kit. The decals in particular were a breeze and blended well against the polished SnJ NMF.
The Hobbycraft 1/144th RB-47H was a lot of fun to build. I did some minor upgrades to the cockpit area, to include instrument panels, throttles, side consoles, wiring, and better seats. Most of this became invisible once I closed the fuselage, but I'm glad I did it as I enjoy learning about the different airplanes I model. Also, I modified N-Scale train figures into two pilots, and gave them each helmets and oxygen masks using white glue and fine wire. Hobbycraft's nose for the "H" model was a little too stubby in my opinion, but otherwise the kit is fairly true to shape. The color of blue on the SAC noseband decal is too light, but there isn't much you can do about it. You are given options for two tail numbers, though they are similarly marked otherwise. The Hobbycraft kit represents the early version "H" model of the RB-47. Subsequent additions to the ELINT equipment on the airplane gave it several more antennas, aerials, and pods I didn't wish to scratch build. Besides, testimony from a former RB-47H crew member told me that all that additional equipment made the airplane too heavy to stay in formation with the prop-driven tanker…just in time for the KC-135's arrival in SAC. If you wish to build this additional equipment accurately, make sure you study pictures.
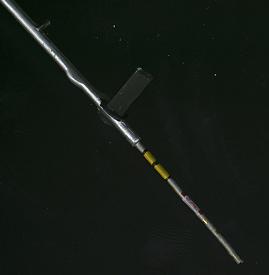
Constructing an air-refueling scene required a few small alterations. On the deployed refueling boom, I cut and rotated the ruddervators to better meet the wind stream during flight, and hollowed out the boom's tip and inserted a 1-Ľ inch brass rod to depict an extended nozzle. Accurate nozzle markings were found in color reference photos. At the receiving end, I carved and shaped a receptacle on top of the RB-47's nose, drilled a small hole to accept the brass rod nozzle, and made receptacle doors from thinned sheet. The RB-47H was at near stall speed when refueling behind the KC-97 and should probably have its flaps set slightly (20 degrees) for additional lift, but I made the conscious decision to overlook that technicality in favor of modeling simplicity.
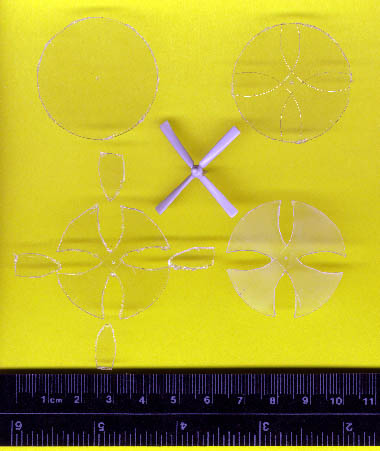
For the spinning KC-97 propellers I studied lots of pictures and briefly considered just cutting off the blades and leaving the spinner hub installed, but predicted I wouldn't be happy with the result. Instead, using a two-pointed protractor, I cut four disks from clear sheet the same diameter as the propellers, and then cut four wedges out of each as shown in the in-progress picture. A little sanding, some light black and yellow mist coats with the airbrush, and suddenly I had the effect I was looking for.
During model construction I drilled small holes in the fuselage bellies in a manner that provides structured support for the brass rod mounts. After painting, polishing, and decaling was complete, I secured the brass rods (protruding about Ľ inch from the bottom of the airplanes) into pre-drilled holes in clear acrylic rods. Finally, I measured out the distance and alignment with respect to the boom, altitude, and airplane separation on my display base (a process easier stated than done), drilled those holes in the wood, positioned the airplanes, and called it complete.
Click the thumbnail to view the
image full size.
Text and Images Copyright © 2000 by Don
Russell
|
 This
was one of the most enjoyable modeling efforts I'd ever undertaken, not
only because of the new techniques I learned (such as polishing SnJ NMFs,
wire antennas, spinning propellers, etc.), but because I learned so much
about a little known mission accomplished by a select group of unsung
heroes during the height of the Cold War.
This
was one of the most enjoyable modeling efforts I'd ever undertaken, not
only because of the new techniques I learned (such as polishing SnJ NMFs,
wire antennas, spinning propellers, etc.), but because I learned so much
about a little known mission accomplished by a select group of unsung
heroes during the height of the Cold War.

