Strange New Worlds
The Fantastic Plastic S.S. Botany Bay
Model, Text & Photos by Tim Nelson

I’ve considered myself a “Trekkie” of a sort since childhood. I was raised on The Original Series (TOS), enjoyed most of the later movies, and also became a fan of The Next Generation in the 1990s. My enthusiasm never reached the level of cosplay at a Comicon, but I’m still a fan.
One of the intriguing stories from TOS was “Space Seed” (S1/E22), in which the USS Enterprise encounters a derelict vessel which turns out to be a transport for exiled malcontents from 1990s Earth. These n’er-do-wells had been in suspended animation for over 200+ years, and turn out to be ambitious, “genetically optimized” humans cast out following the terrible “Eugenics Wars” of the late 20th Century. The Enterprise crew re-animates the survivors and mayhem predictably ensues. The leader of the bunch is Khan Noonien Singh, played by a young (and ripped) Ricardo Montalban. This is one of Khan’s best quotes, to Capt. Kirk:
“Captain, although your abilities intrigue me, you are quite honestly inferior. Mentally, physically. In fact, I am surprised how little improvement there has been in human evolution. Oh, there has been technical advancement, but, how little man himself has changed…Yes, it appears we will do well in your century, Captain.”
After the dust settles, the miscreants are once again exiled, this time to their own planet (Ceti Alpha V). What could go wrong? Lots, as it turned out - trouble would brew again years later in Star Trek II: The Wrath of Khan.
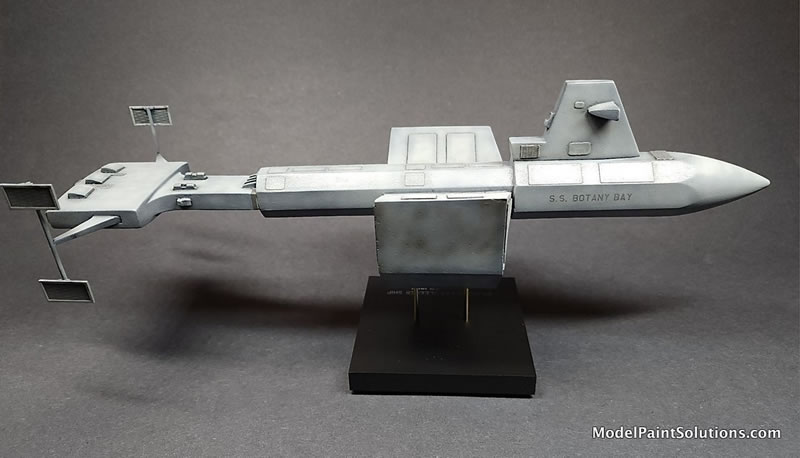
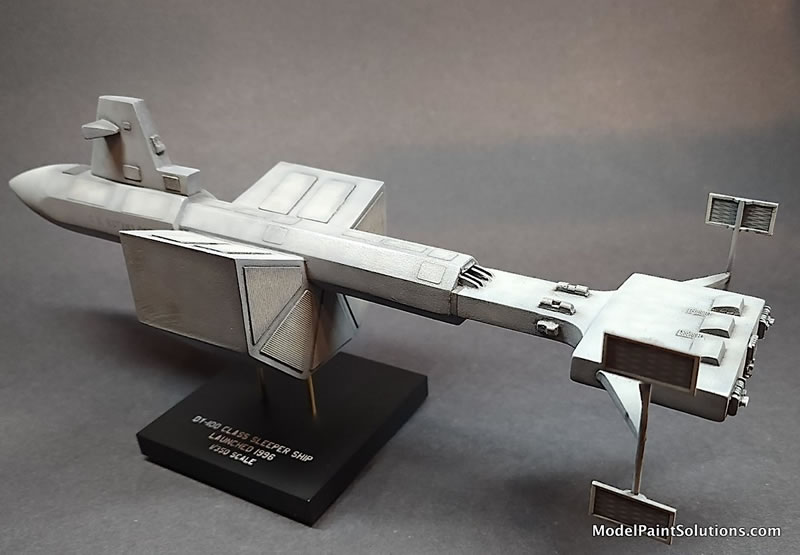
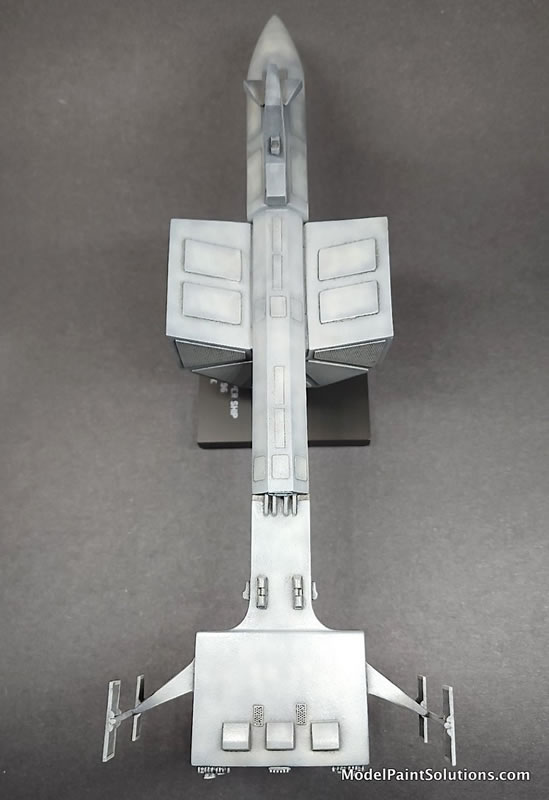
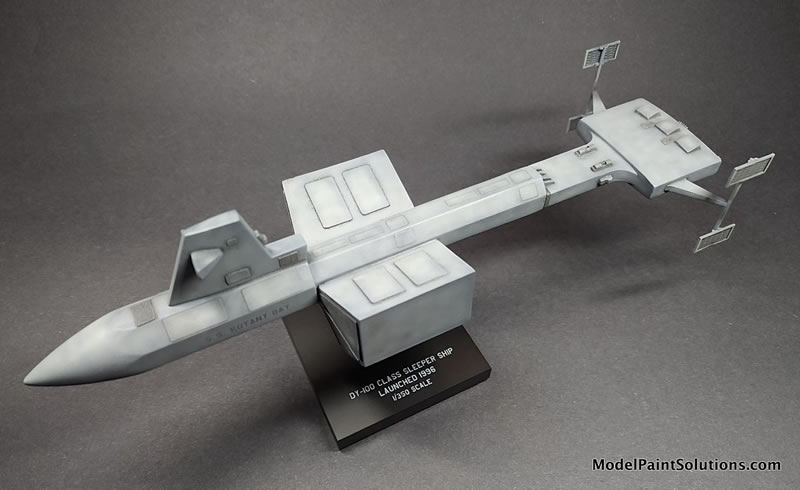
The derelict ship was the S.S. Botany Bay, a DY-100 Class “sleeper ship” named in honor of Australian penal colony parallels from days of yore. It was an interesting looking ship, evoking a cool submarine vibe for no apparent reason. Since its outcast crew would be traveling VERY far away in a vessel incapable of warp speeds, they were required to be placed in suspended animation, hence the “sleeper ship” label. As an automated spacecraft with no conscious passengers or crew, there would have been a conspicuous absence of entertainment, cuisine, beverages, or casinos on board…
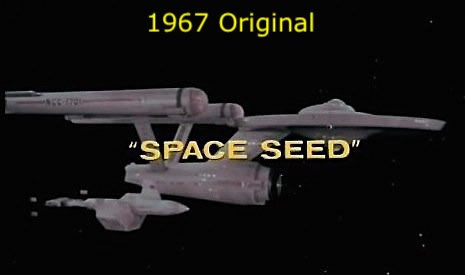

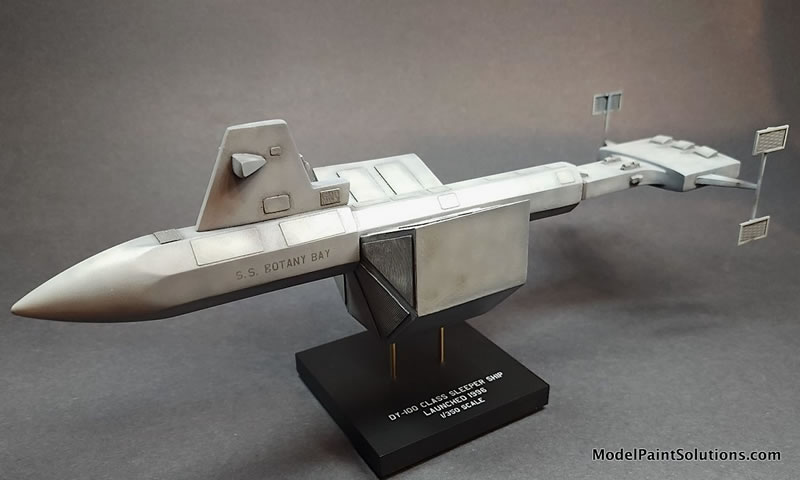
In addition to my longtime fascination with this ship, I viewed this project as a canvas to do more weathering than most of my usual subjects call for. The original 1967 depiction of the ship, which used a real model in production, was relatively clean – as a ship in the frigid cold and absolute darkness of interstellar space likely would be. When Paramount remastered all TOS episodes in 2009 with updated special effects, the new CGI version of the Botany Bay was much more “beat up,” and it was this more interesting version that I chose to emulate.
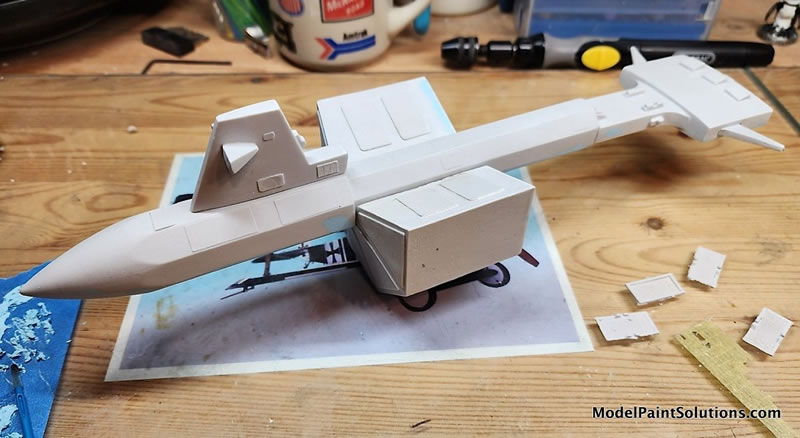
Fantastic Plastic, a limited run purveyor of resin space and science fiction kits owned by Allen Ury, introduced a kit of the Botany Bay in 2009. It consists of 6 significant solid resin parts, plus some shapes intended to represent the odd “fly swatter” structures, presumably thermal radiators, seen on the stern. When this kit went on a flash sale in mid-2024, I pounced on it like Khan seizing power.

I really wanted this to be a “quick side project,” not a long slog through a thick quagmire, so my aim was to clean up the most obvious issues and not get buried in detailing, accurizing, and other potential minutiae.The kit is classic limited run resin fare: cool subject matter, decent detail, many pour stubs to remove, and a multitude of surface imperfections, bubble holes, and pits. This kind of cleanup is never particularly fun, but nothing that can’t be done with some motivation and grit. I always start a resin project with a thorough cleaning in a warm bath of Dawn, followed by a scrub-down with denatured alcohol. (I repeat the alcohol scrub just prior to priming as well.)
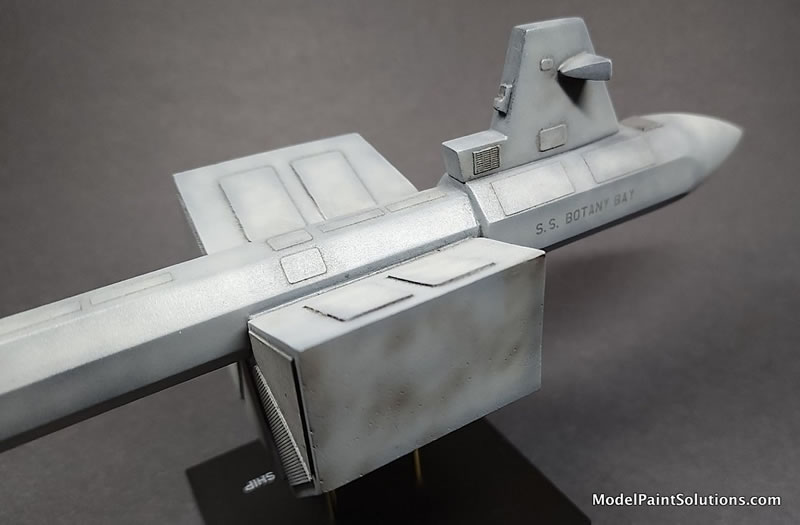
Major assembly consisted of joining fore and aft hull sections, affixing the “sleeper” section in the midship area, attaching the “conning tower,” and then setting the struts for the radiator structures to come later. As a resin subject impervious to “hot” fillers, I broke out my old tube – still a lifetime supply – of 3M Acryl Blue automotive putty. The fit of the “sleeper” section to the hull was not great – the hexagonal cross section in that area did not align for mating, so I did some creative filling with epoxy and putty. Close enough was good enough for this build.
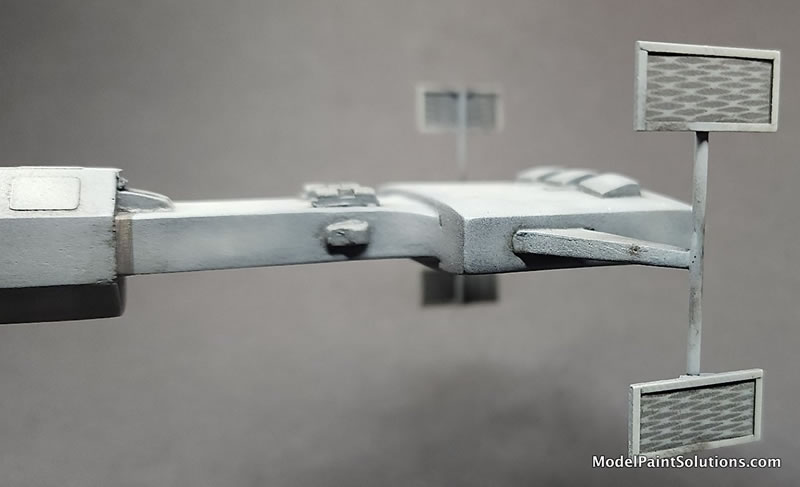
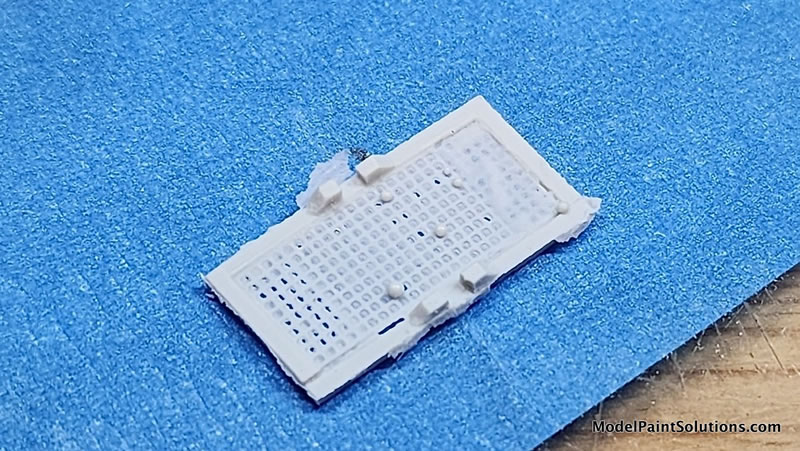
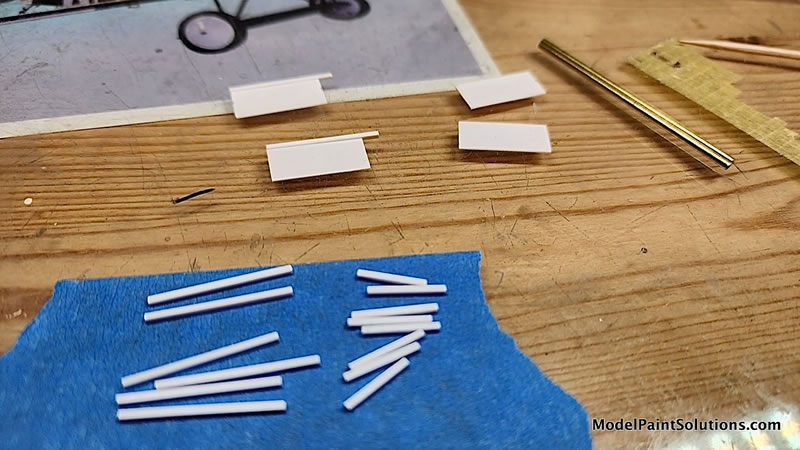
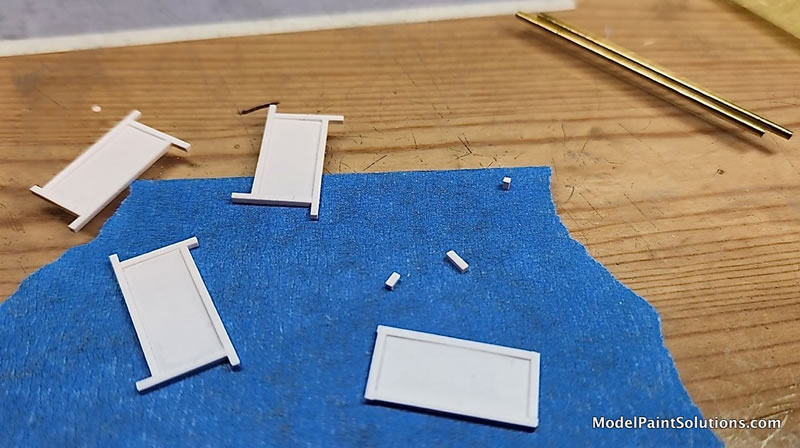
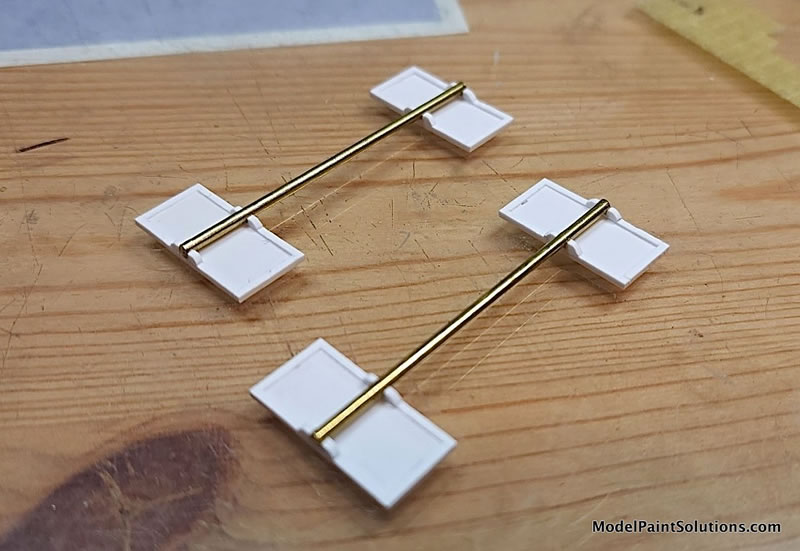
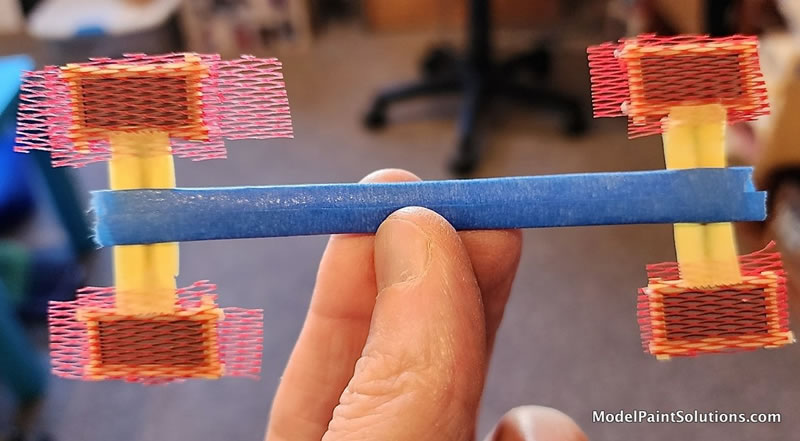
The kit radiators were unusable so I decided to scratch-build some replacements from strip and sheet styrene, and 1/16” brass rod. There was never a good, clear closeup of these assemblies in either the 1967 or 2009 versions of the “Space Seed” episode, so I was freed to use a little imagination to come up with something convincingly “radiator-ish.” More on that below…
P a i n t i n g a n d F i n i s h i n g |
After cleanup and basic assembly, I primed the model with rattle can Krylon ColorMaxx Paint + Primer in Satin Black. Another round of putty and sanding was needed, then I spot treated the affected areas with Mission Models MMS-001 Black Primer, thinned about 50% with Createx 4011 Reducer plus a few drops of Tamiya Acrylic Retarder (this excellent acrylic primer was guaranteed not to interact with the previous Krylon surface.)

I began the weathering by applying a pre-shade of mottling all over the model with Tamiya XF-55 Deck Tan, significantly thinned (about 4 to 1) with Vallejo Thinner, again with a few drops of Tamiya Acrylic Retarder. I used a Harder & Steenbeck Infinity airbrush with a 0.15 mm tip installed for this phase, set up for low volume but using a pressure of about 12 psi. This was followed by a base coat of AK Real Colors RC289 RAF Medium Sea Grey (chosen by “Kentucky Windage” comparison of screen shots with my vast collection of many grays/greys). The key when applying a base coat over pre-shading is THIN paint, applied in many layers. In this case, the AK grey was thinned about 4 to 1 with AK High Compatibility Thinner, once more with a few drops of retarder. My usual technique here is to apply a layer, look the model over, and decide whether another layer is needed. When I think just 1 more layer is appropriate, that’s my usual sign to stop.
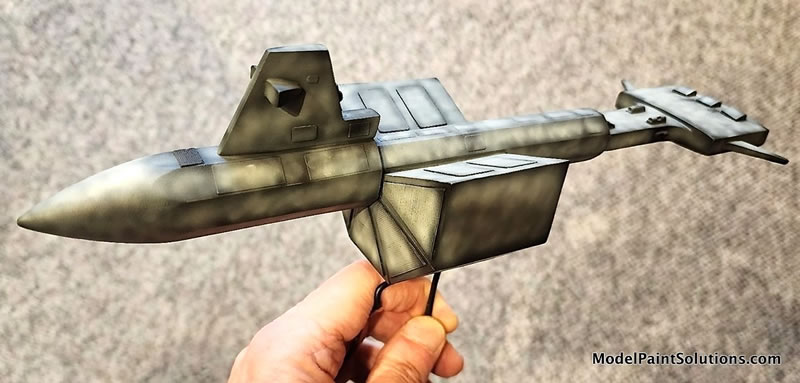
Depending on the look you’re after, some post-shading with some lighter shades of the base coat can be effective. In this case, seeking to break up the monochromatic grey, I post-shaded with some more of the Tamiya Deck Tan, even more thinned than before. Again, the watchwords are THIN and LAYERS – post-shading is easily overdone.
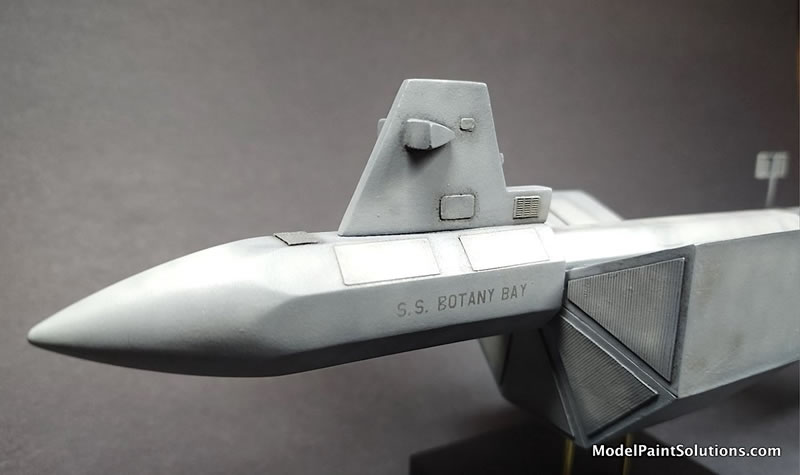
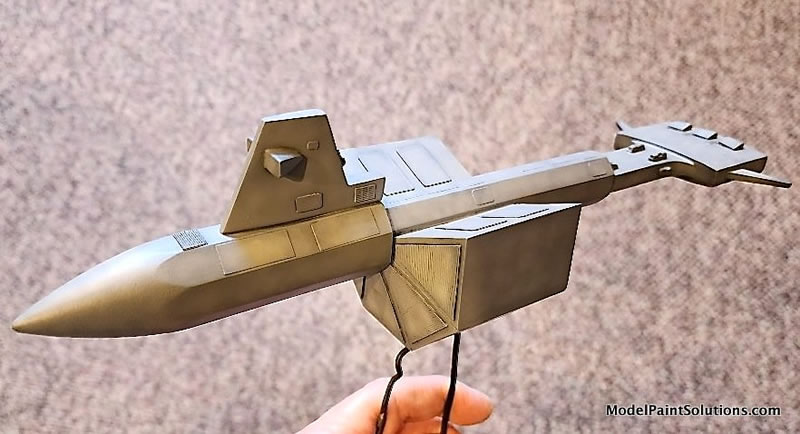
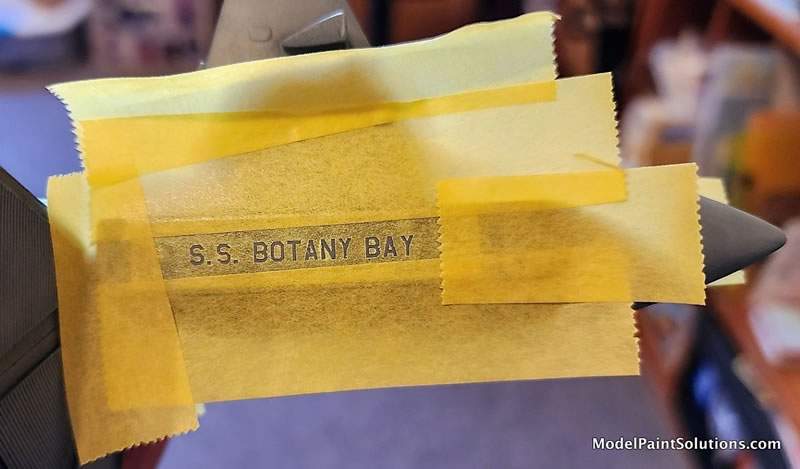
To apply the ship’s name to the sides, I created custom masks using my Silhouette Cameo. This was not apparent in the 1967 version but can be made out in the 2009 CGI rendering and I liked the look of it. I painted it in mottled fashion with Mission Models MMP-105 Worn Grey, thinned about 50/50 with a 70/30 mix of Createx thinner and Mission Clear Primer, plus the usual retarder.
Returning to the radiators, I opted to depict some kind of a grid surface using the same overall grey as the rest of the ship, then spraying Mission Worn Gray over a carefully applied mesh repurposed from a small cherry tomato bag I saved years ago. I was pretty pleased with the results, and it was far easier than any sort of textured surface that I might have fabricated. Attaching these assemblies at the end was a challenge, due to very small mating surfaces and 3 dimensional alignment challenges. I started with 5 min epoxy and was happy, until knocking both off – at that point I resorted to CA glue and hope that future avoidance of contact will preclude ever having to reattach again.

Very late during all of this activity, I discovered numerous pits on the starboard side of the sleeper section, which I’d somehow missed earlier. In the spirit of this project, rather than try to make them all disappear, I enhanced them with airbrushed discoloration, to perhaps suggest a transit through some interstellar nebula or meteor shower. Let’s go with that
.
Having achieved most of the basic look I wanted, I clear-coated the model with Alclad Aqua Gloss. After allowing for curing, I treated all the nooks and crannies to a wash of (in this case highly appropriate) Abteilung “Starship Filth” oil paint thinned about 10 to 1 with Mona Lisa odorless thinner.
Needing a base, I reached into my collection of miscellaneous small acrylic blocks to select one of the right size and physical stability. I primed it with Mr Finishing Surfacer 1500 rattle can primer (this is EXCELLENT stuff, by the way). I used the Silhouette to create a label, which I painted a medium gray to avoid stark contrast with the black background. After drilling holes for two 3/32” brass rods, using a drill guide to ensure perpendicularity, Khan’s ship was mounted and the “quick side project” completed.
I ended up spending 23 hours on the Botany Bay, very much on the low end of the spectrum for my projects, even if more than I’d planned. It was a fun diversion, and I learned a few things – which is a goal of every project.
Now Mr. Sulu, let’s get the hell away from Ceti Alpha V…
For more on this review visit ModelPaintSolutions.com
https://modelpaintsol.com/builds/fantastic-plastic-s-s-botany-bay
Text and Images Copyright © 2025 by Tim Nelson
Page Created 11 April, 2025
Last updated
11 April, 2025
Back to HyperScale Main Page
Back to Reviews Page

|
 Home
| What's New |
Features |
Gallery |
Reviews |
Reference |
Forum |
Search
Home
| What's New |
Features |
Gallery |
Reviews |
Reference |
Forum |
Search