Heller 1/72 scale
Fieseler Fi 156 C-2
by Steven Hustad

Building the Heller 1/72 scale Fieseler Fi 156 C-2 |
I had never built a Fi-156 before, and I had the old (dating from 1976) 1/72nd scale Heller kit in the stash along with a mountain of aftermarket for it, so thought, why not?
Yes, the Academy kit is a more recent tooling (1998), but I feel it is less accurate than the Heller kit in numerous areas. For some reason, Academy either hits a home run, or strikes out – there seems to be no in-between with them…my opinion. Airfix released a ‘Storch” kit in 1/72 in 1967 (shudder), and AZ Model’s versions are all re-boxings of the Heller kit as far as I can tell.
Despite having collected many references on the Fi-156 over the years, I was shocked at just how many there were when I gathered them all together! The Valiant Wings Airframe Album #11 being the best, plus a Mushroom Publications ‘Walk Around’ was also very helpful.
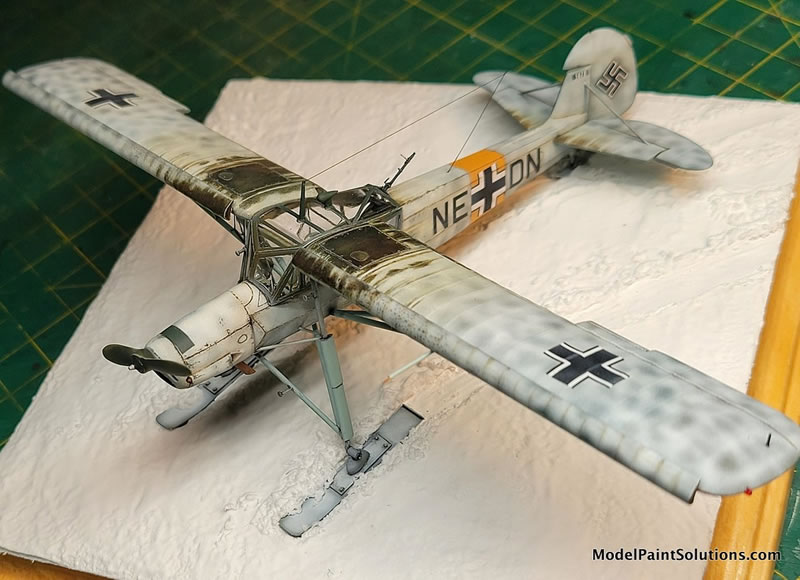
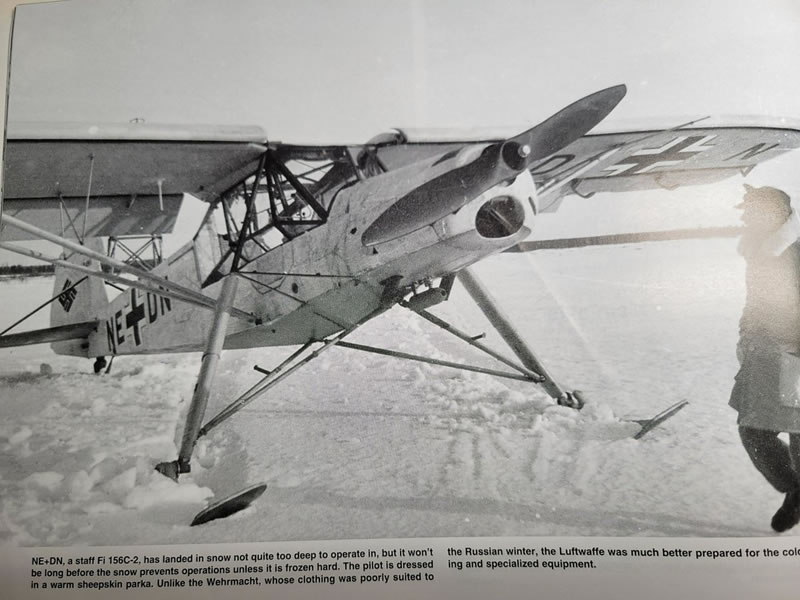
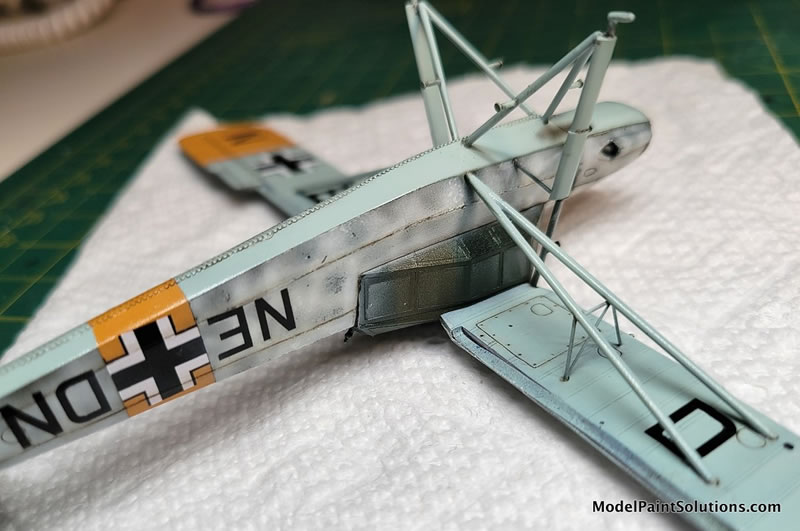
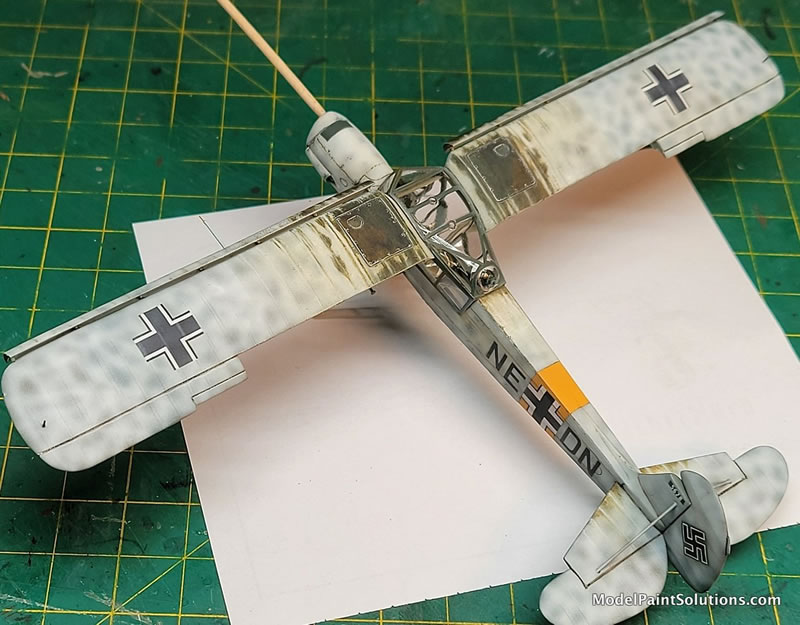
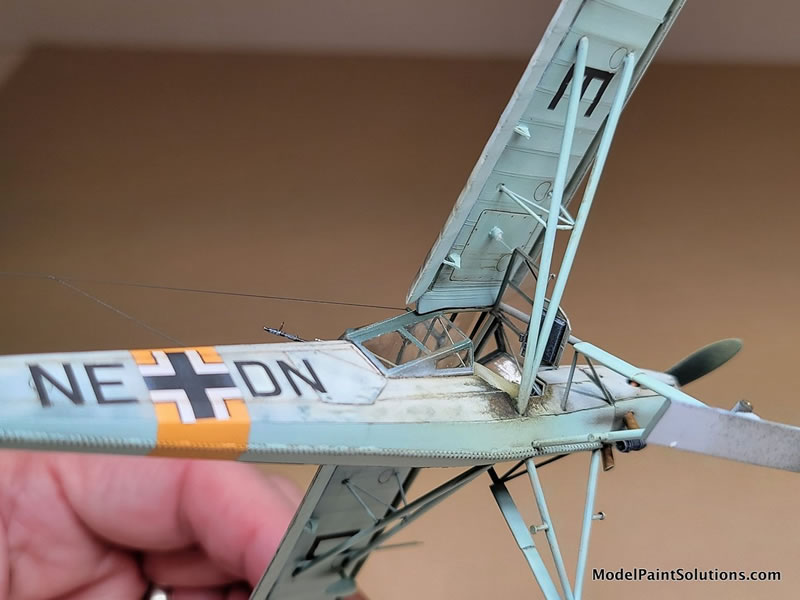
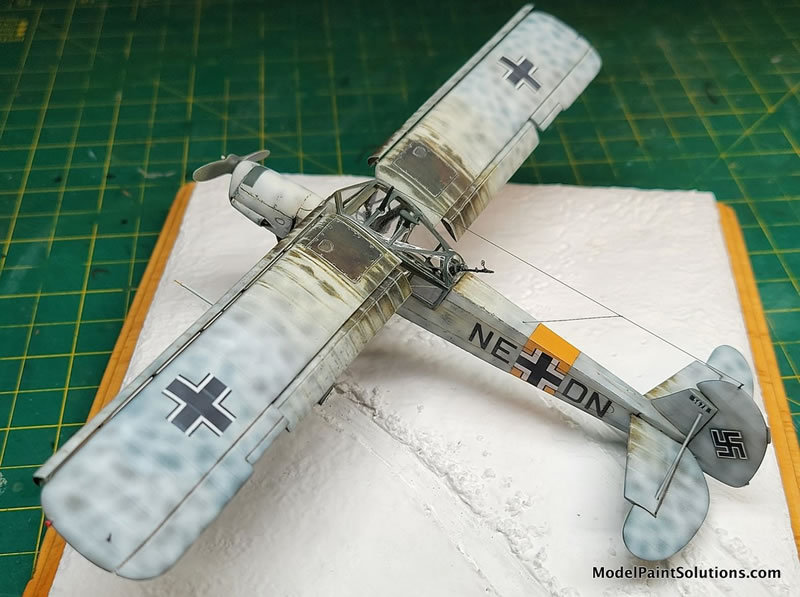
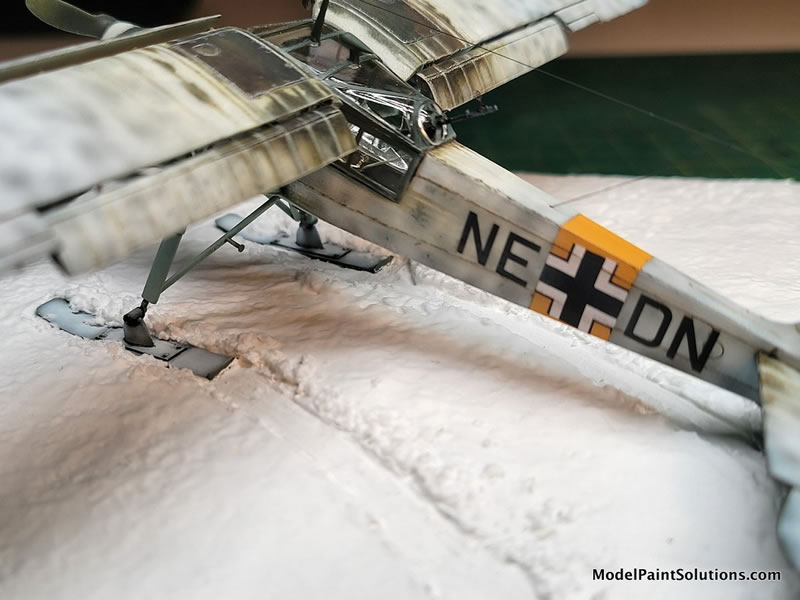
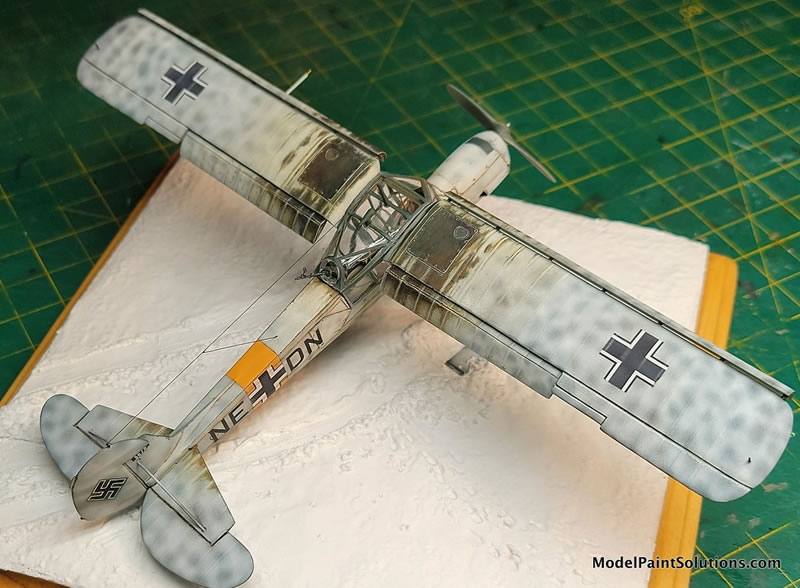
I wanted to do a temporary winter white scheme over the usual RLM 70 Black Green/RLM 71 Dark Green, and wanted it to be on skis as well. So, after looking through the eight+ references I had on hand, I’d Post-It noted (is that a verb?) several possibilities, ignoring those that had the winter scheme I wanted to do, but had wheels, or had skis, but was still in its summer dark greens scheme. I settled on a Staff liaison aircraft; “NE+DN”, during the winter of 1941/2 at a snow buried airfield near Gomel in South East Belarus, in the USSR.
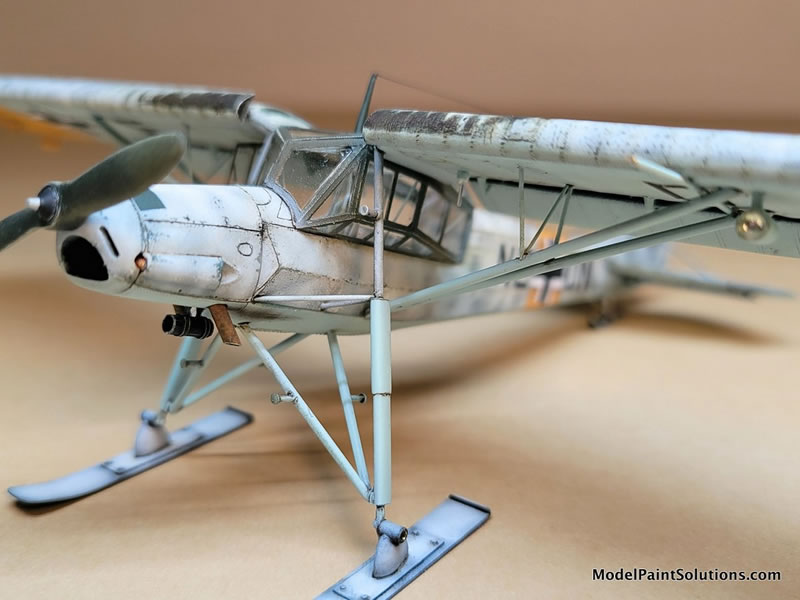
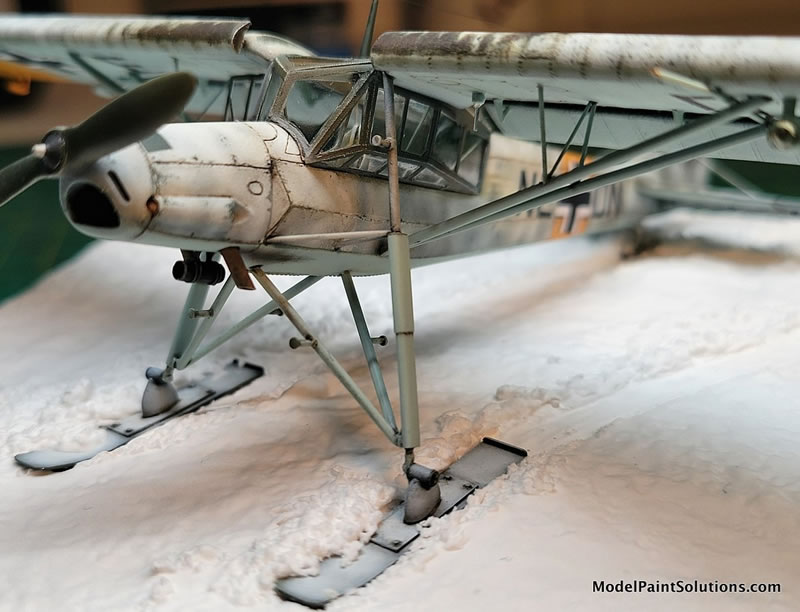
The Heller kit does not come with the needed skis & tail skid ski, so those would have to be scratchbuilt. But they are simple affairs. The references are clear, and it didn’t look too difficult (and I didn’t trust the resin aftermarket ski options available for the Fi-156 - those being of very suspect quality).
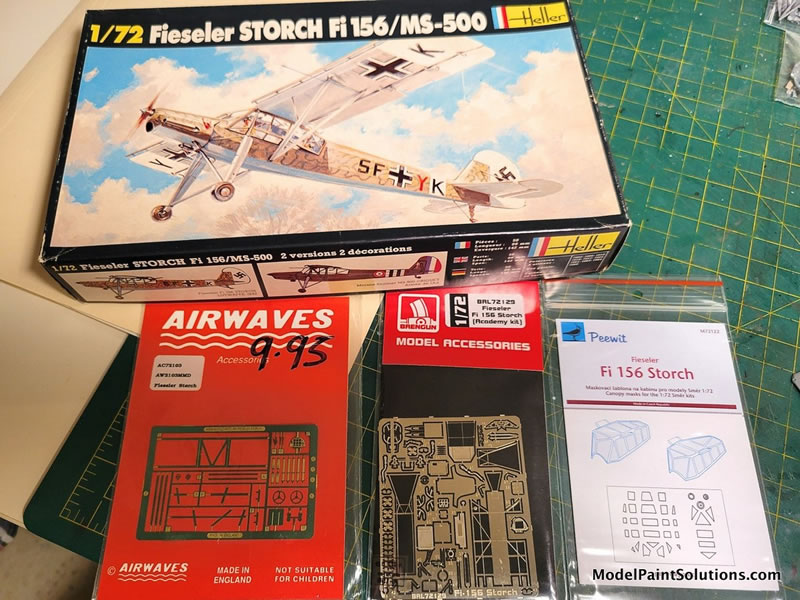
I used the following base kit, notable kit modifications, and aftermarket accessories with this build:
1) 1/72 Scale Heller/Aurora Kit No. 227 / 6611 from 1977. Oddly, the box was 100% Heller, while the instructions said “Heller/Aurora”.
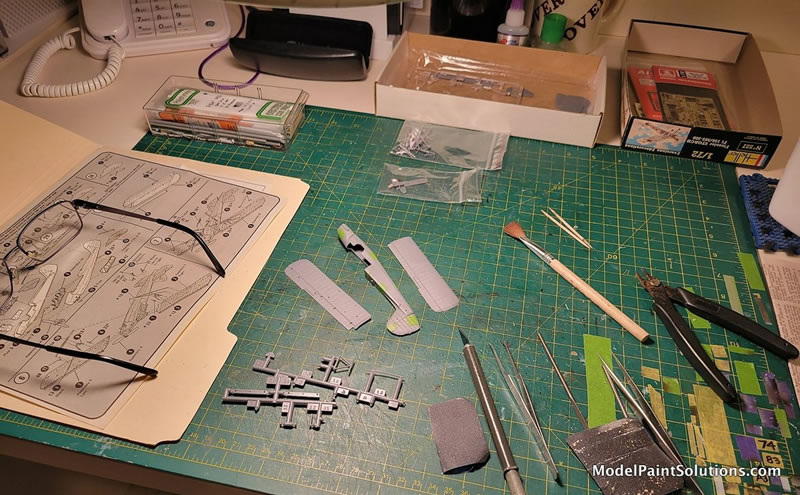
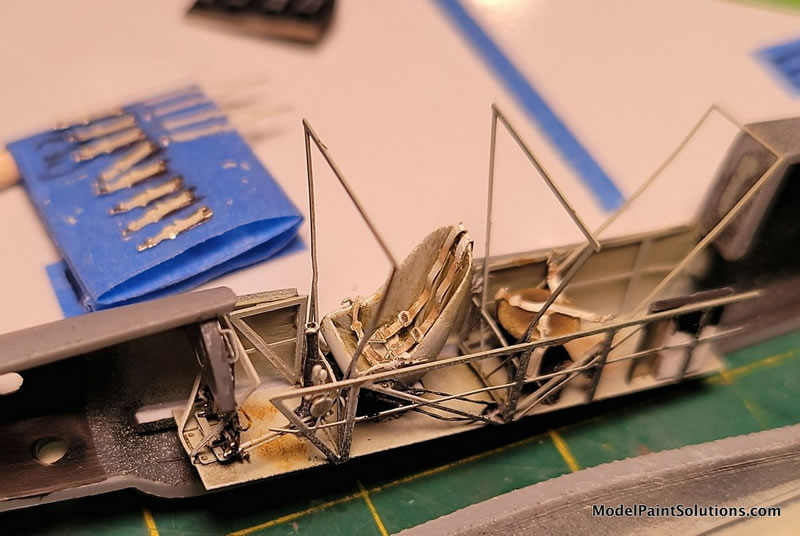
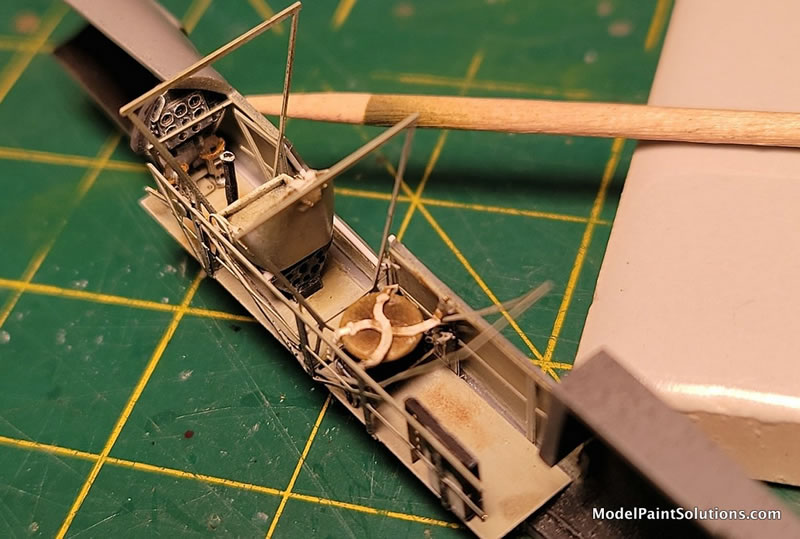
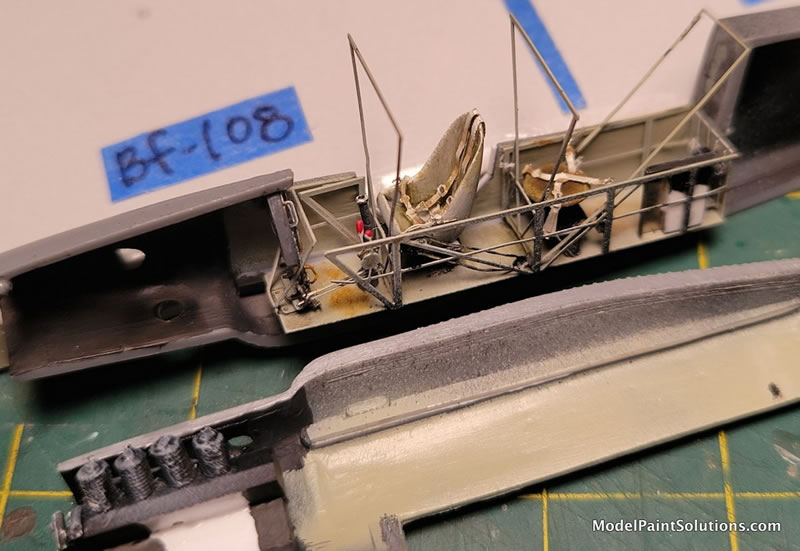
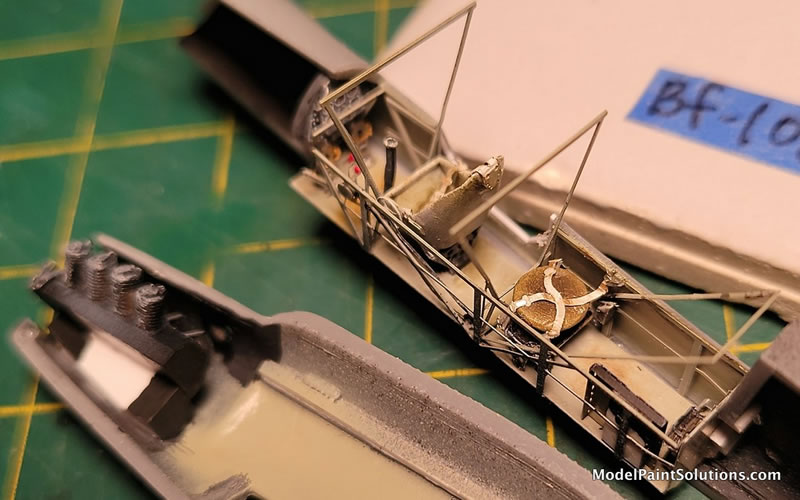
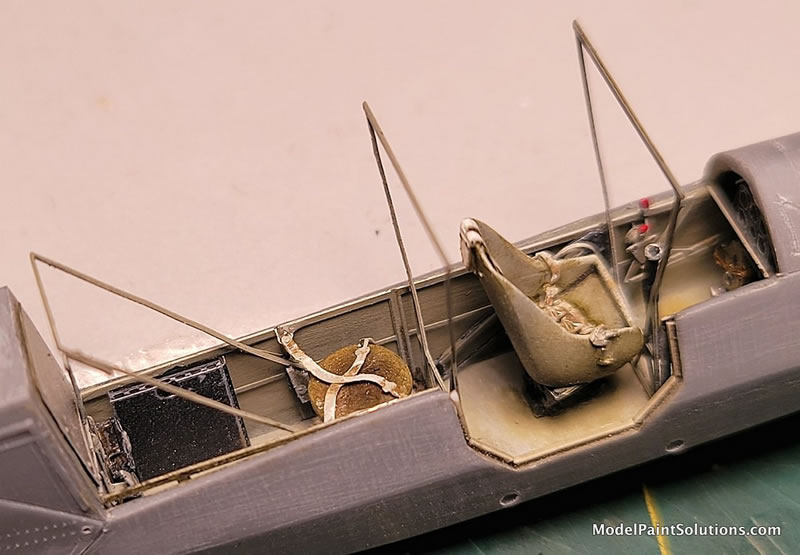
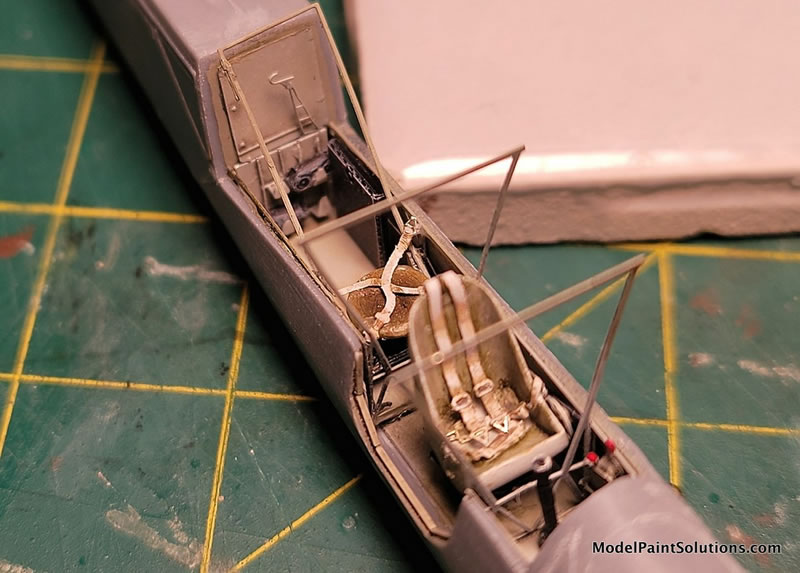
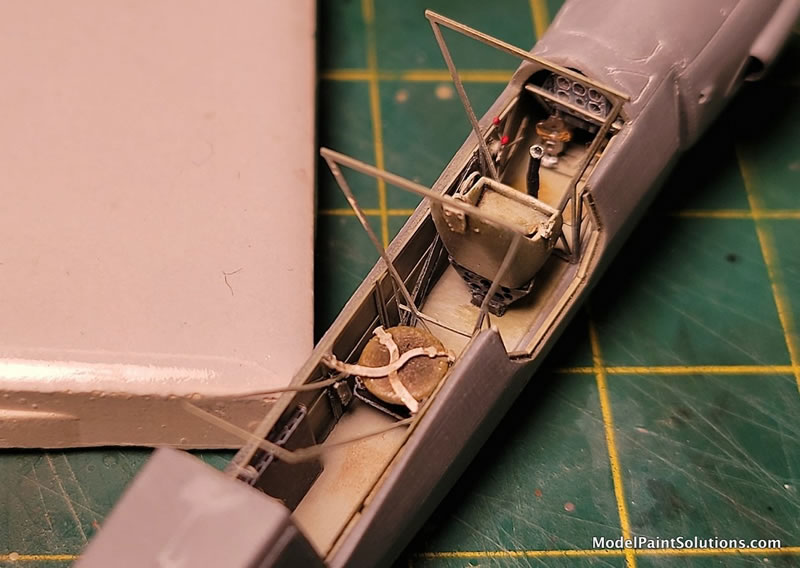
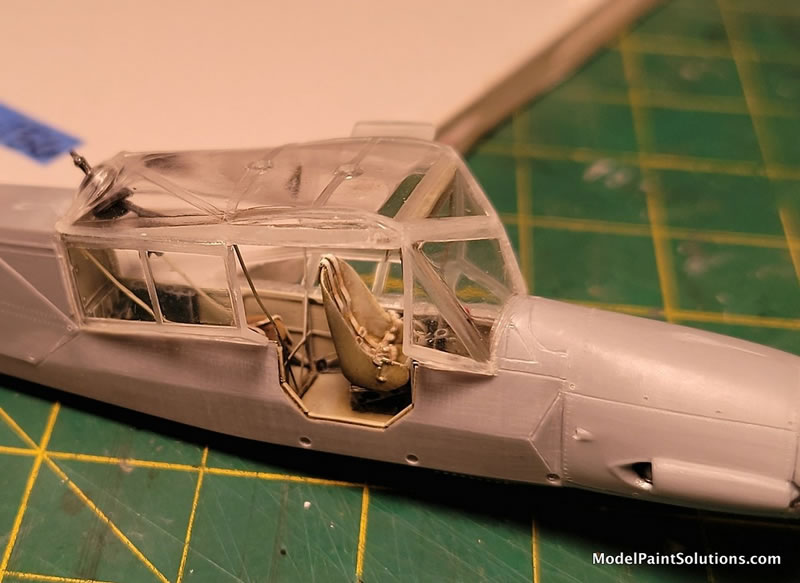
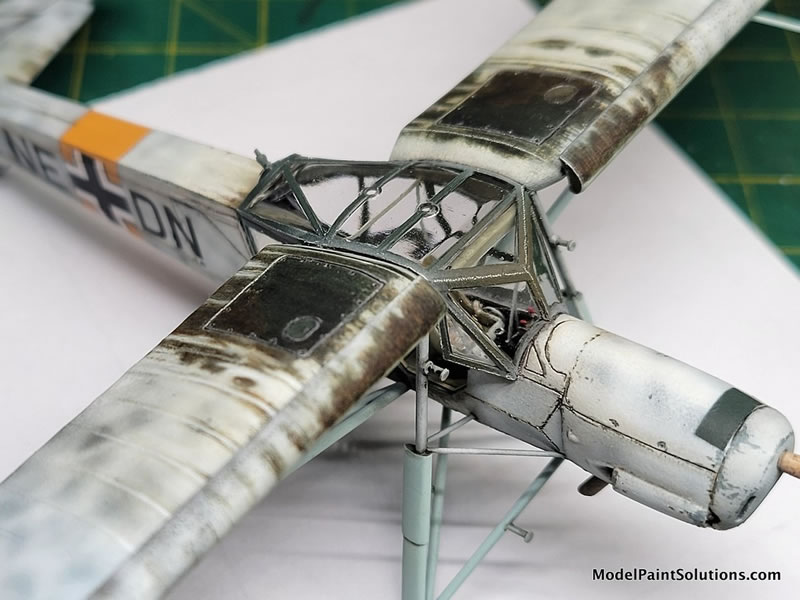
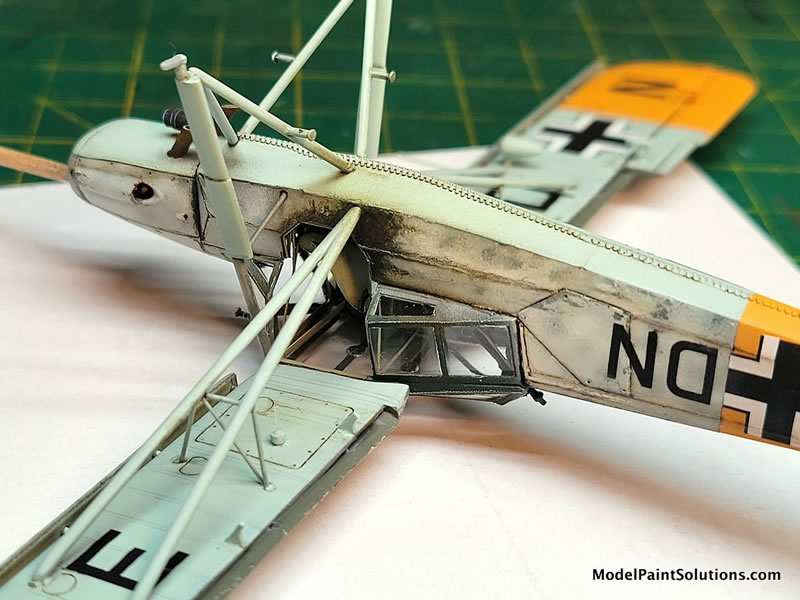
2) The Brengun photo-etch set No. BRL 72129 (intended for the Academy kit, but adapted to the Heller with minor modifications) was used to augment additional cockpit detail including floor board, sidewall structure, cockpit glazing structure, rear bulkhead w/ammo cans, rear seat (pilot’s seat is modified ‘spares box’ item), rudder pedals, seat belts, and opening access door surface details. Additional cockpit detailing was provided using plastic strip, rod, wire, misc. PE ‘bits’, and sheet stock plastic. Whew!
The cockpit was airbrushed with Tamiya’s RLM 02 Light Gray/green (which is a bit dark, so I lightened it), and a few hours later an oil paint pin wash was applied to bring up structural details. This was followed by a dry-brushing using oil paints applied in several layers each a day apart. Seats and seat belts installed, instrument panel, rudder pedals and control stick were added at this stage. The rear observer’s gun was detailed and put aside. After detailing and weathering the cockpit, it was time to join the fuselage halves. What became immediately noticeable was a decidedly built-in ‘twist’ in the Heller fuselage that needed to be ‘un-twisted’! Some judicious bending and clamping solved most of that while the glue set. But the vertical stab still needed further straightening, so a cut was made along the base on the right side. The vertical stab was bent to a true vertical position, and a plastic infill strip was added in the cut followed by a generous application of Gunze’s Mr. Surfacer 500 as the final cure needed. Once sanded things looked good!
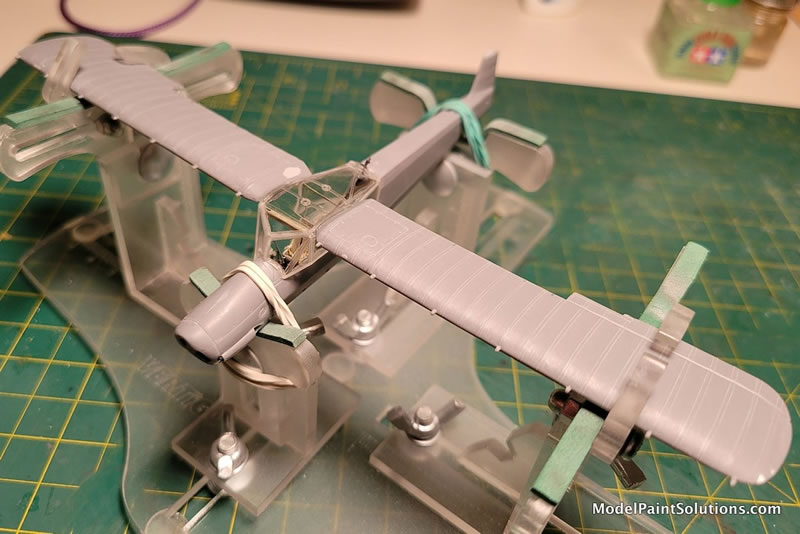
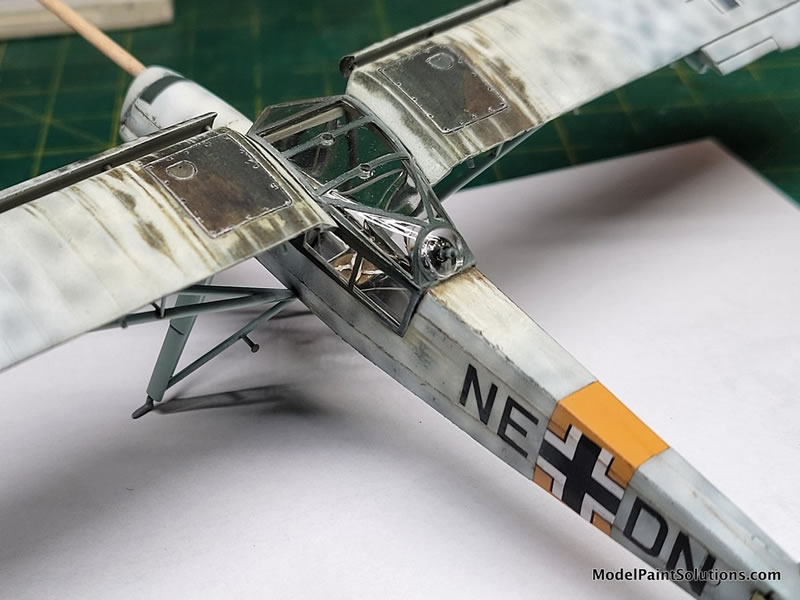
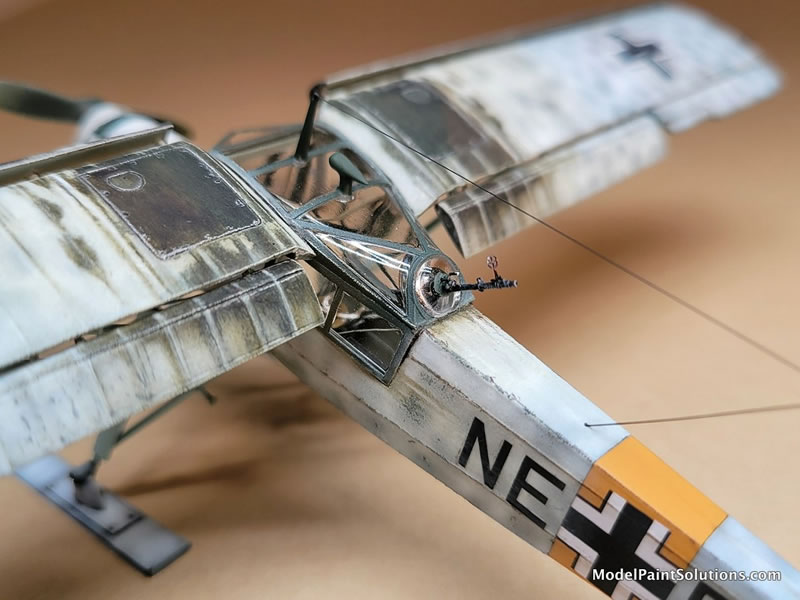
Now was the time to add the multi-piece clear canopy parts which looks REALLY challenging. Five pieces needed to be put together into a fairly complex shape, but without glue smears and without gaps while meeting the fuselage on all four mating surfaces. So I taped the two large clear sides to the fuselage and then glued the top section to those two using Tamiya Extra Thin cement by capillary action – so be sure you adjust things ahead of time so that you have a nice tight fit before applying the glue. Some sanding and scraping was indeed required, but we got there! Letting that set overnight, I had a solid basis for applying the rest. The main wings tab into the fuselage through the top sides of these two large side glazings, so this is an important step to make sure its done right because the main wing alignment depends upon it. Some canopy seam clean up followed (masking the adjacent clear areas) and then carefully sanding those tricky clear seams…There’s a decided and inaccurate ‘sweep’ introduced to the wings if you follow exactly the wing-to-tab joint connection as-is, so plan view adjustment is required here as well.
The wing flaps were cut away and rebuilt into an articulated position for interest. Brass pins replicate the attachment points while ensuring a strong connection. I used plastic ‘half-rounds’ on the flaps leading edges which compensated for plastic lost during separation from the wings, and provided a nice join for the ‘flaps to wing’ connection.
The entire airframe was sanded to reduce the fake fabric texture the Heller kit provides. Metal paneled areas were sanded smooth and re-scribed using a 003 UMM scriber. Metal paneled areas (all pretty much only around the engine and cowling areas on this bird) were riveted using a .040 “Rosie the Riveter’ tool.
The cowling front was drilled out and hollowed with a Dremel tool, and the bottom half of an Argus AS 10 scratchbuilt engine was installed, as this should be partially visible through that main cowling opening. Front and rear cowling side exhaust cooling outlets were also opened up, and bent styrene rod was used inside to replicate the inner engine exhaust piping visible from the exterior through these openings. The undercowl oil cooler was replaced with a scratchbuilt item, straps are from wine bottle foil.
Exhausts stacks were replaced with plastic rod stock, hollowed out and painted with Tamiya XF series Red/Brown and weathered with oils The same techniques that armor modelers use for tank exhausts – ala “Uncle Night Shift”, techniques!).
Peewit canopy mask set #M72122 was used for masking all of the clear parts. The fit was quite good, and the masks behaved well. These are of a ‘Tamiya tape’ substance.
Insert photo 16.
All main struts were dramatically thinned down for proper scale, and the two sets of the smaller strut groupings were replaced with scratchbuilt struts made from tapered .015 Plastruct rod stock for a more correct scale effect. Which reminds me…:
Note: One piece of modeling advice I always give is – if you have to make a choice between using something that is a little too big/thick vs. something that is a bit too thin/small, ALWAYS chose the more delicate option. Your model will thank you for it. And, it will always impart a greater sense of realism, and therefore ‘scale effect’.
The rudder was cut out, re-formed to correct shape, trim tab and tail light added and then repositioned to articulate.
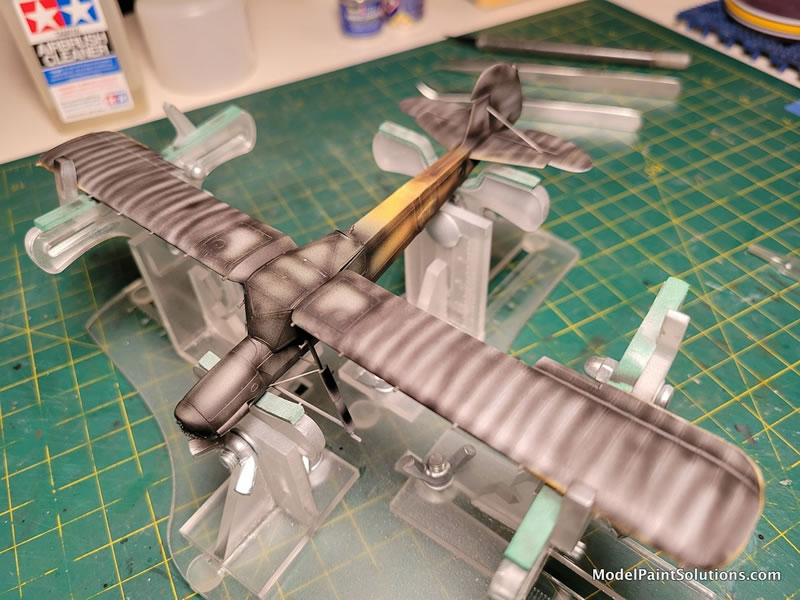
After I airbrushed more RLM-01 Light Gray/Green on the exterior of the canopy framing (so that it would show on the inside), the entire airframe was given a pre-shading of sorts using Mr. Surfacer 1500/black airbrushed into all panel/fabric lines, crevices and shadowed areas.
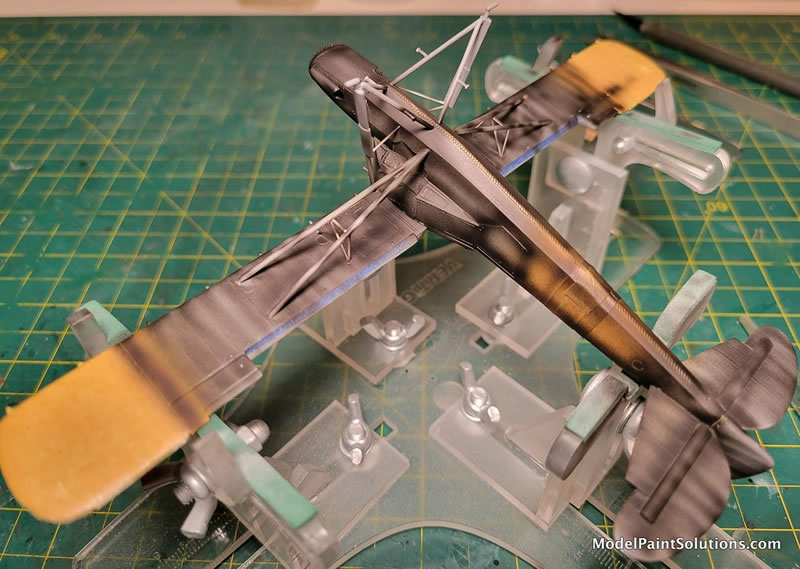
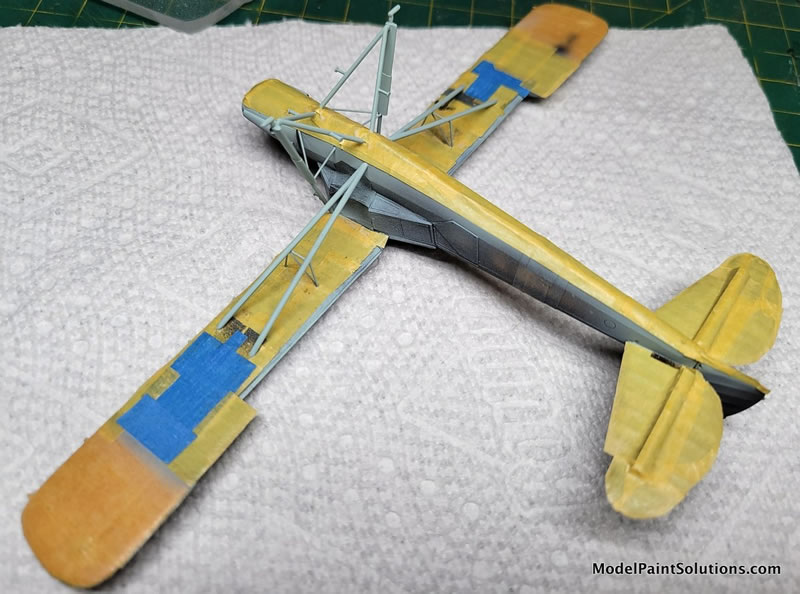
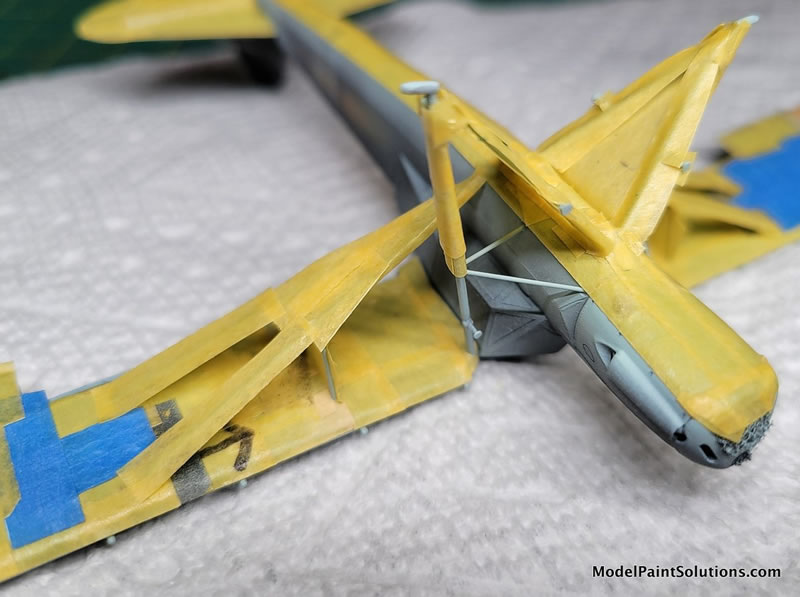
The yellow campaign color wingtips and fuselage band were painted a custom yellow mix atop flat white – all Tamiya XF series acrylics. These were later masked.
Insert photos 20 & 21 here.
A complex underside masking job followed, greatly complicated by the forest of struts and odd underside shapes of this aircraft in preparation for the main topside colors.
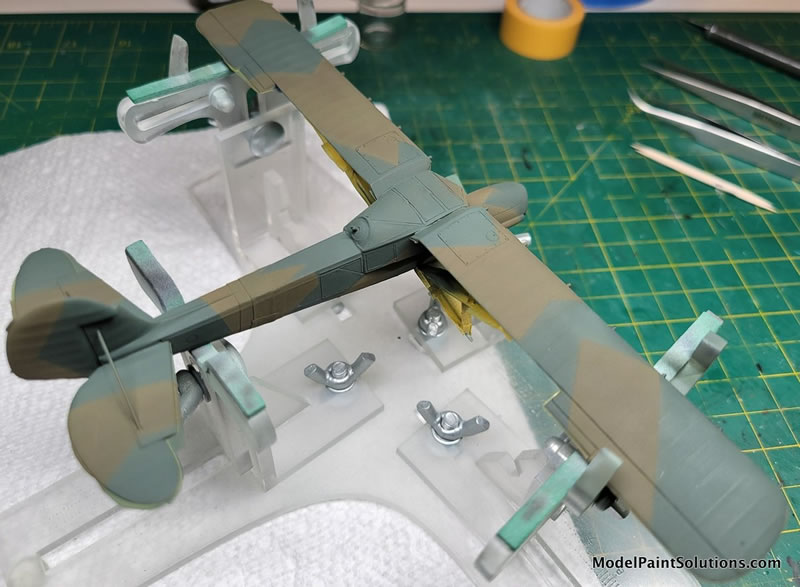
Humbrol enamels were used for the RLM 65 light blue undersides, and for the RLM 70 & 71 topside “splinter scheme” colors under the temporary winter scheme. No particular reason, other than I already had some mixed up in the color tints I like. Plus, having enamels under an acrylic clear coat, and then the following chipping fluid followed by an acrylic flat white ensures that one layer will not attack the other – especially during the subsequent weathering stages. Another armor weathering technique learned.
I wasn’t that careful with the 70/71 camo pattern, as this would be nearly entirely covered up with the white, but I gave it a go anyway and got somewhat close anyway I think?
Next up was airbrushing two thin layers of AK’s chipping fluid (another primarily armor modeler’s technique!). The stuff started ‘beading up’ on me, so I contacted “Dr. Strangebrush” (John Miller) of Model Paint Solutions fame and he talked me down off the ledge…so I finally got an acceptable layer of the stuff laid down...but only onto the areas I would later be chipping.
Gunze’s Mr. Hobby Aqueous Flat White was airbrushed over the chipping fluid layer for the temporary white scheme. I used highly diluted paint - 75% Mr. Color Leveling Thinner (MCLT) to 25% Flat White. I also added eight to ten drops of Gunze’s Mr. Mild Retarder (Are you Mr. Confused yet?), and airbrushed it on using an H-S Evolution fitted with a .20 fine tip/needle using around 8 to 10psi of air pressure. One thing to keep in mind here is that when acrylics are airbrushed atop chipping fluid you need to apply the paint in smaller areas and work each section individually before the acrylic paint sets up such that it no longer chips easily. So you need to work a bit quickly. So I did the wings separately from the fuselage.
Chipping was then selectively carried out using a small, but stiff(ish) brush on the top wing and flaps nearest the fuselage where re-fueling occurred. Some was also done on the inside leading edges of the horizontal stabilizers as well. Fuselage chipping was confined to around the cockpit entry door, and a bit more around the engine access panels.
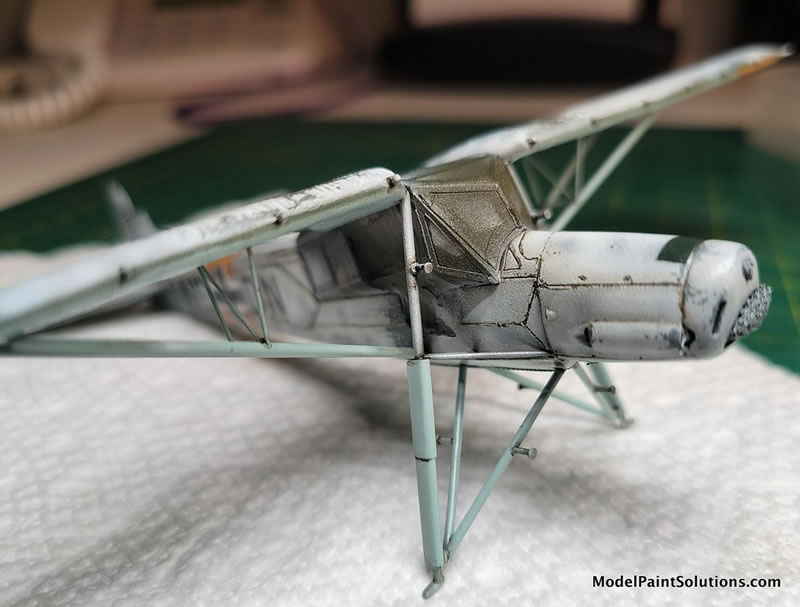


One nice thing about this is that if you think you’ve gotten too aggressive with the chipping in places, you can go back over it and soften things a bit by airbrushing some more of the acrylic Flat White.
The temporary white camo and chipping was then sealed with a clear acrylic gloss overcoat in preparation for the decalling to follow. I used Future thinned to about 25% with MCLT.
Decals were primarily from “Tally- Ho’s” nice collection of Luftwaffe codes in black of numerous sizes (Now OOP?). National markings were taken from an old Aeromaster sheet. From photographs of the real aircraft it appears that the markings and codes were carefully masked off before the temporary winter camo was applied. However, the swastika on the rudder appears to have been sprayed around so there is a soft halo effect around those markings. I did that with a square bit of masking tape raised about 2-3mm off the surface with more tape before the white was airbrushed at 90 degrees to the mask.
The decals were then sealed in with an airbrushed clear acrylic coat of semi-gloss in preparation for the aggressive oil paint weathering that would follow. Satin or flat finishes hold too much paint during weathering, whereas straight gloss doesn’t hold it well enough. So I’ve settled on semi-gloss as a good compromise.
Initial weathering was carried out primarily by oil paint filters and panel line pin washes. Also, oil paints were used for individual maintenance personnel wear areas using armor modeling techniques. I used custom mixed colors of oil paints to soften further some of the chipping and wear effects that were exposed. It’s amazing the level of control oil paints give you in the weathering process. Dark greens, dark browns and white oil colors were used. Yes, they need to dry for about four days before you can overcoat them, but it’s worth it.
Now all the final details were added; flaps, flap and aileron balances and visible connectors, the skis, tail ski, pitot tube and so on, you know – that time consuming tedious stuff!
Once dry, the whole mess was given an airbrushed overcoat of Testors Dullcote thinned to about 30% with ‘hardware store’ lacquer thinner. I have an ancient Paasche H airbrush with a wide tip (around .40 to .45 or so?) that I reserve for all (and only) clear coat applications. This mixture imparts a nice finish somewhere between flat and satin – due to the high ratio of thinner I presume?
Now we’re down to the final stages…
Canopy masks were then carefully peeled off (always an anxiety inducing task until we know ‘all is right’ beneath!). Any issues with minor paint bleeding under the masks can be dealt with now using a toothpick with its tip cut to a sharp wedge shape and then used to gently scrape and straighten the painted canopy framing.
"Prismacolor" pencils were used for highlighting and shading raised and recessed edges, and also for areas/edges worn down to aluminum around the cowling – using a silver Prismacolor for those areas. Pastels were used to augment previously airbrushed exhaust stains, and fuel stains. The aerial wire is stretched sprue tightened with the hot smoke from a blown out match, then painted. Insulators are tiny dabs of PVA glue, painted light gray.
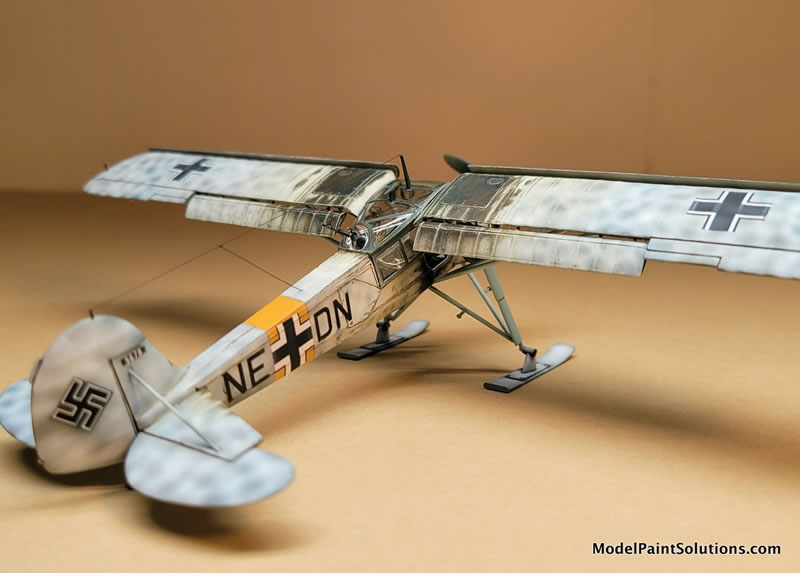
I wanted to put this bird ‘in its element’ on a very pure white and snowy base. It has skis after all, right?! So a very simple wood base was selected, edges stained and poly’d, then masked off. The ‘snow’ is the AK product “Snow” applied with a thin flexible painter’s spatula. Then wetted and smoothed with a baby spoon. I tried to carve in the path of the skis and the tail skid/ski pattern jerking to a stop in the snow to closely match the reference photo. Footsteps from the cockpit entry door leading away from the aircraft were added using a pair of legs/boots from a random 1/72 scale figure – applying the impressions while the “snow” was still uncured, but still pliable.
And that’s it!
A fun and somewhat different, but challenging project.
Steve Hustad
(aka: “The Mad Norseman!”).
For more on this review visit ModelPaintSolutions.com
Text and Images Copyright © 2025 by Steve Hustad
Page Created 17 October, 2025
Last updated
17 October, 2025
Back to HyperScale Main Page
Back to Reviews Page

|
 Home
| What's New |
Features |
Gallery |
Reviews |
Reference |
Forum |
Search
Home
| What's New |
Features |
Gallery |
Reviews |
Reference |
Forum |
Search