Sword's 1/72 scale
Mitsubishi G4M1 “Betty”

by Steven Hustad

Description:
The Sword 1/72 Mitsubishi G4M1 “Betty”
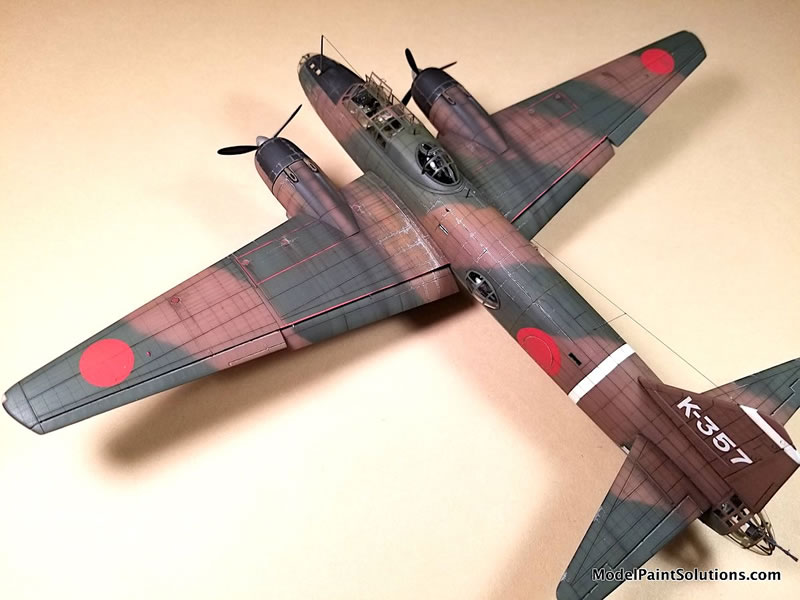
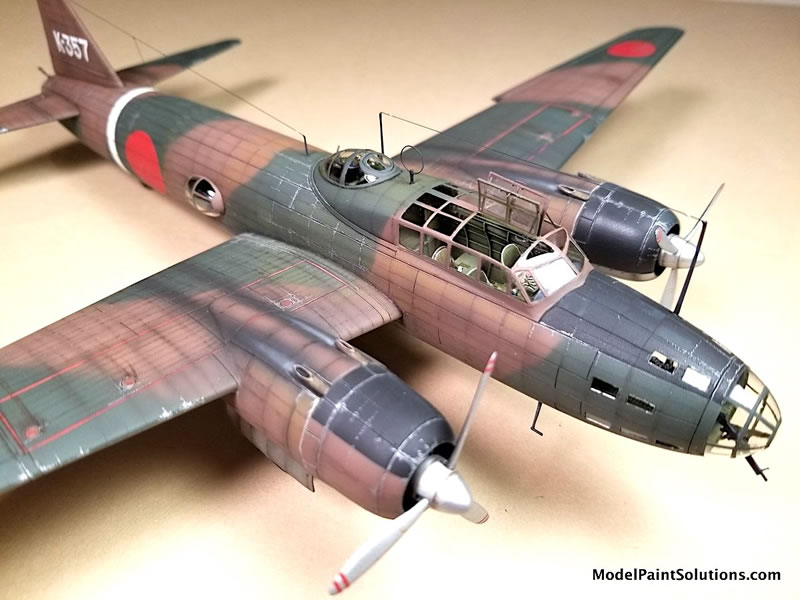
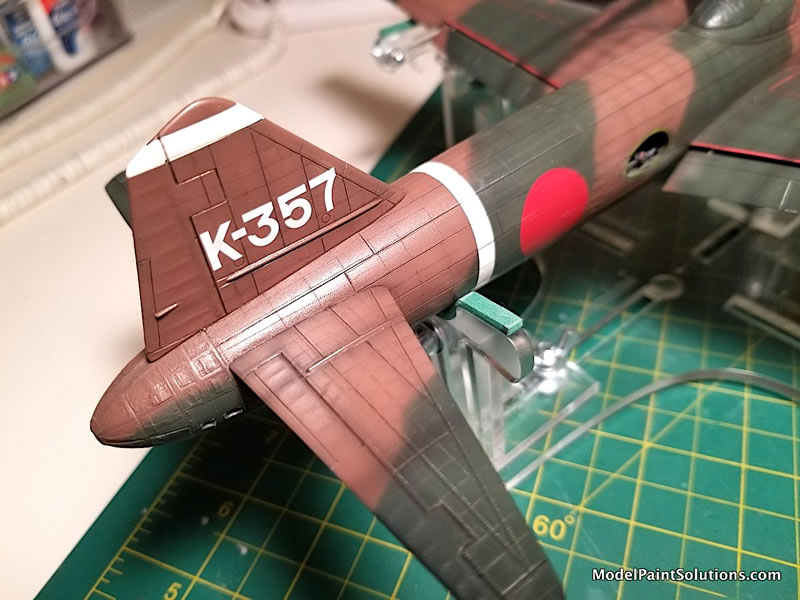
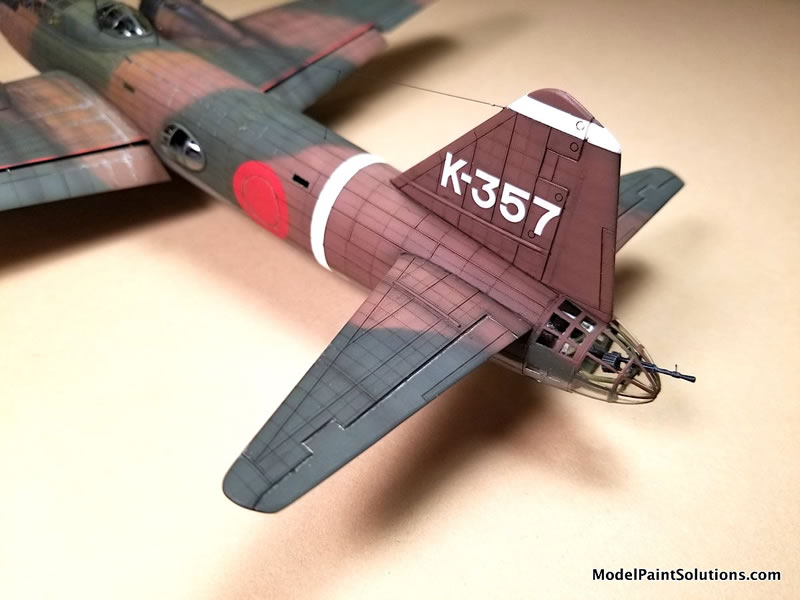
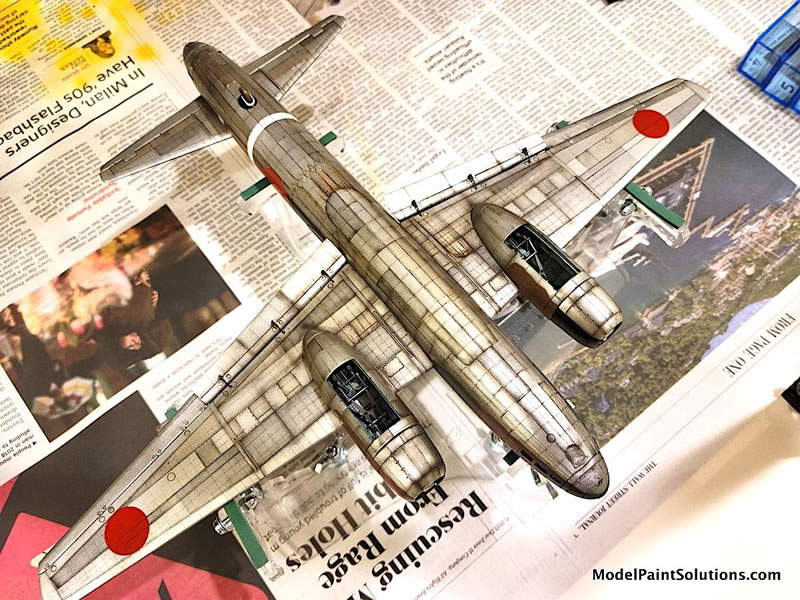
‘K-357’ of Kanoya Sora Naval Air Squadron No. 1, Unit 57.
Kanoya Kokutai, 4th Chutai, Buna Kanau airfield, Rabaul, 1942
Scale:
1/72
Review Type:
Build
Introduction
I started the Sword 1/72nd scale Mitsubishi G4M1 “Betty” (#SW72144) a while back now so thought it was time to do a proper write-up. This is a new(ish) kit I think released in early 2022, but oddly has had absolutely ZERO support from any aftermarket detail set manufacturers – so far!
This kit replaces the now very ancient version from Hasegawa that was first released in the early 1970’s. Sword is a ‘limited run’ Eastern European manufacturer that fortunately for us WW II Japanese enthusiasts has a number of nice kits in this genre’. Despite its limited run status, it’s a definite improvement over the Hasegawa, refining many aspects, correcting others and providing some additional needed details that the Hasegawa lacked. But, it has proven to be a bit of a challenge…
Like I said, ZERO aftermarket for this kit is available. But one very fortuitous benefit that I discovered is that the old Falcon vacform canopy set made for that hoary old Hasegawa kit fits this new Sword kit - LIKE A GLOVE! And it’s a very needed glove as this kit’s clear parts, though mostly nice, suffer from being too thick, thus showing distortion and obvious ‘thickness’ where you don’t want it (i.e., especially at the nose cone, side blisters, and the tail clam-shell gun position, etc.). So other than an unintended old Falcon vac canopy set and the Eduard colorized “Zoom” photo etched cockpit detail set #SS390 (which is also intended for the elderly Hasegawa kit, see below), we’re on our own.
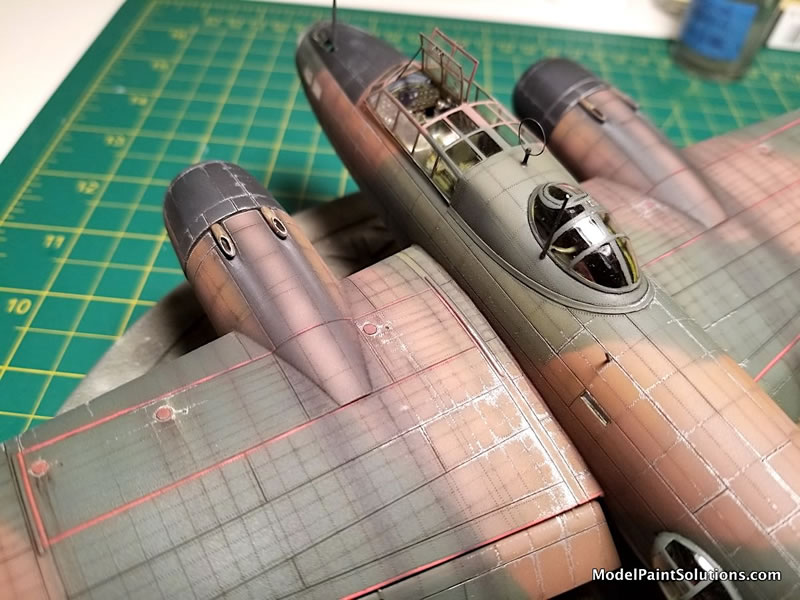
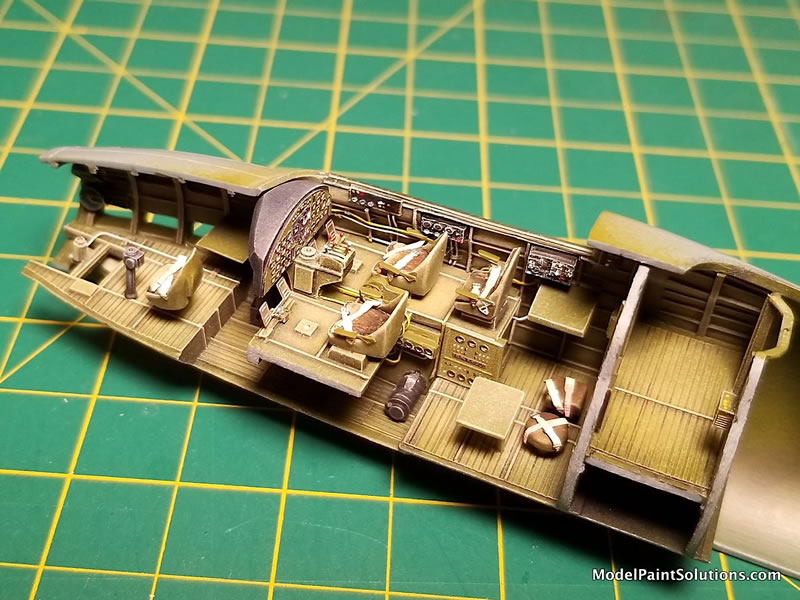
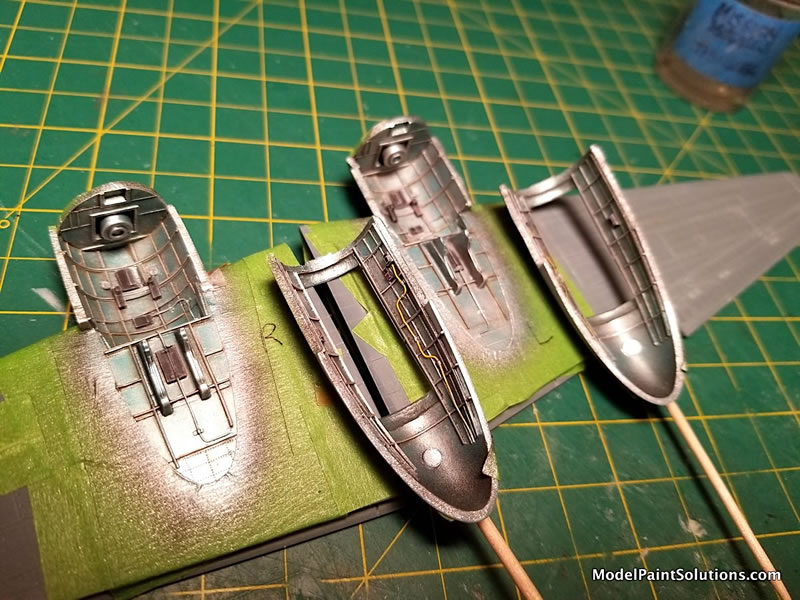
Therefore, I scratch-built the cockpit and crew positions using Evergreen and Plastruct plastic strip stock and sheet. But first you need to grind off the molded-on, oversized internal structural ribs and stringers, which is a pain. The floor boards and bulkheads are at least useable (and accurate) as a basis. The Eduard set was used for the instrument panel, rudder pedals, seat belts, and some random radio and other misc. cockpit ‘boxes’ that are strewn about, so that helped a bit. I also added some resin detail parts found in the spares box that looked like a reasonable fit given my references. Some 32 gauge copper wire bundles were added for all the piping visible in photos completed the interior. But in any case - finally a decent early Betty!
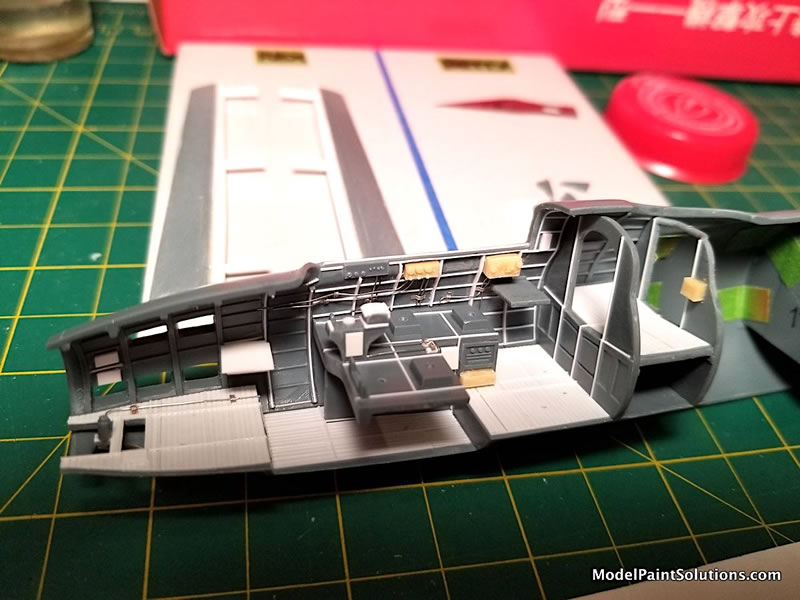
This 2022 kit is far better than the prehistoric Hasegawa effort, but it still has some significant fit issues. The interior floorboards and bulkheads actually joined up quite well, but that’s where the fun stops. So, be prepared with some Mr. Surfacer 500 and Ave’s Apoxie Sculpt 2-part putty as fillers.
After a primer coat of Mr. Surfacer 1500 Black on the interiors, I finished with a coat of Mission Models ‘Mitsubishi Interior Green’, which went on well using their own proprietary thinner. A dark brownish/black oil paint pin-wash followed to accent the structure, nooks & crannies. This was followed by some light dry brushing using oil paints and a very soft brush. The Zoom PE set’s instrument panel, radio box faces, seat belts and rudder pedals followed.
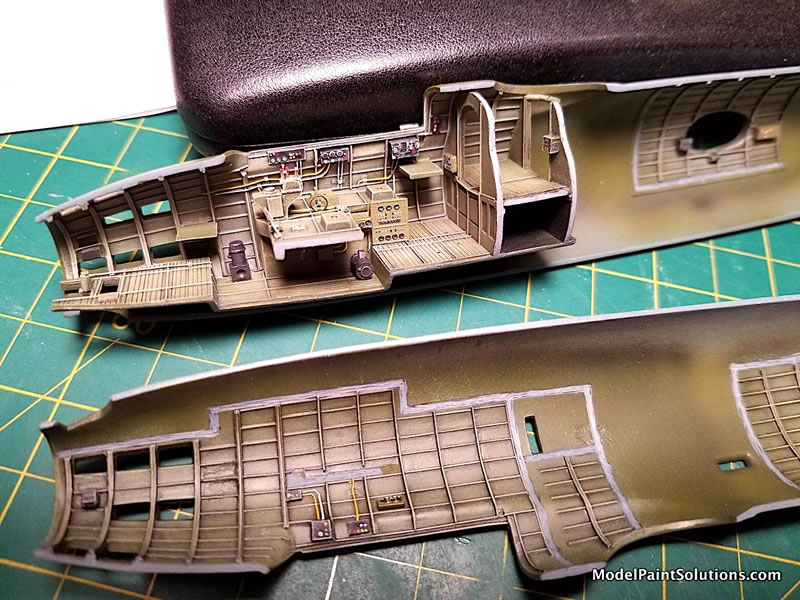
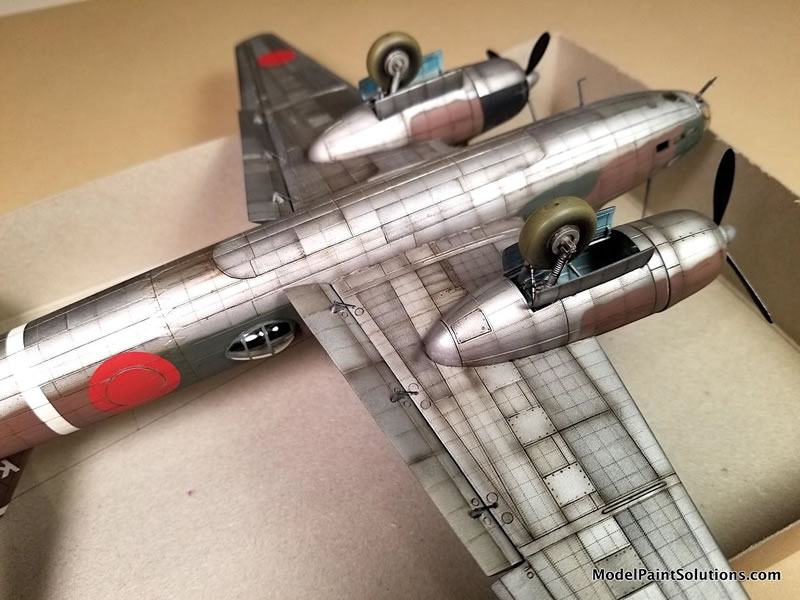
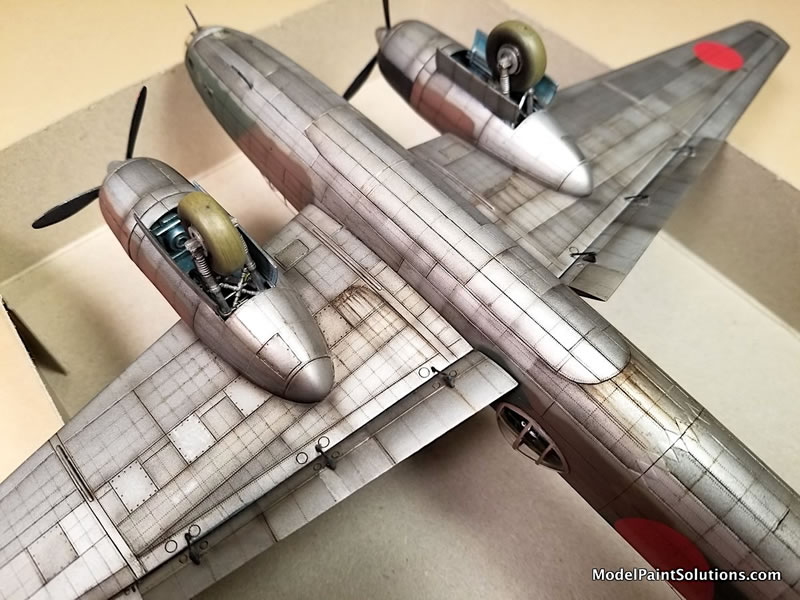
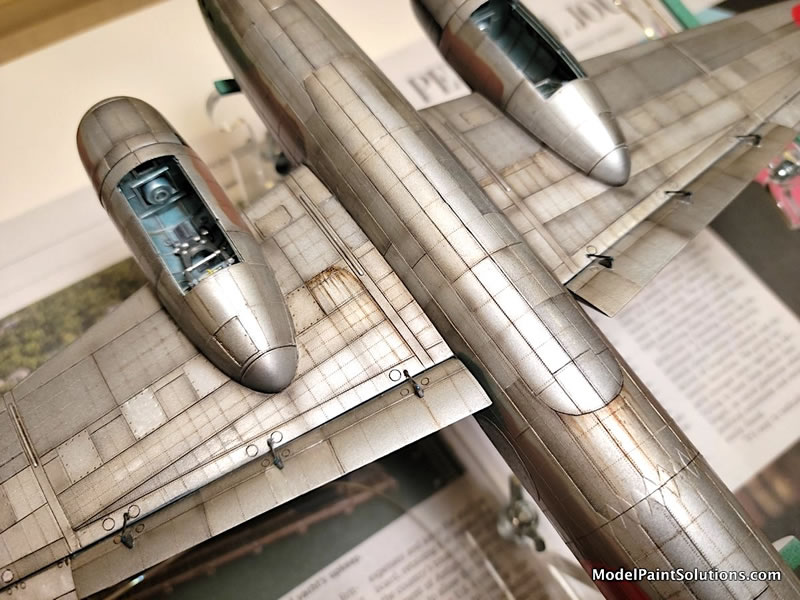
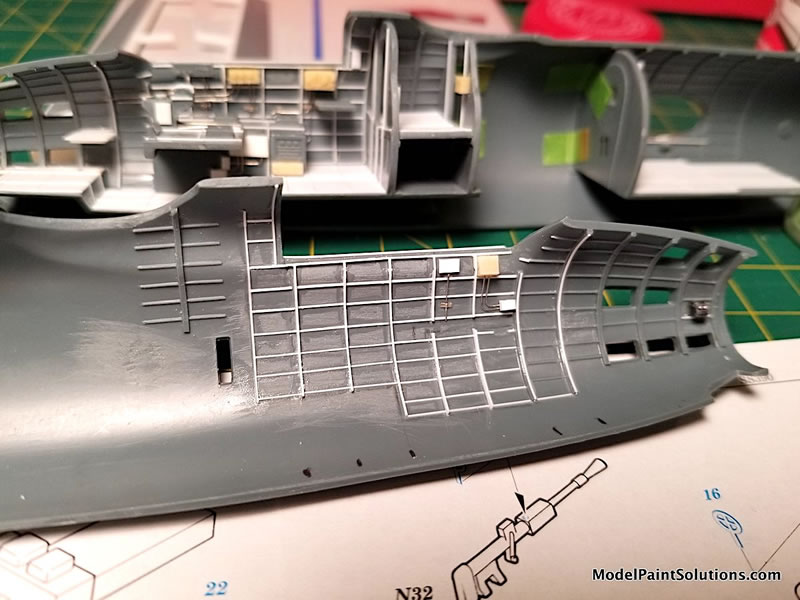
The wheel wells were detailed in much that same way as the cockpit/interior areas but using more wire and plastic strip for structure. Not much is provided with the kit. The old Maru Mechanic on the “Betty” was very useful for this stage of the build. The wheel wells were then airbrushed with Mission Models Japanese greenish/blue metallic shade.
The landing gear were painted in aluminum (AK Xtreme Metal Paint). Both were then given dark oil paint pin washes and gently dry-brushed with Rub & Buff silver to pop out the detail and edges. Further details were picked out or highlighted/shadowed using oil paints and a fine brush.
Of the basic construction that followed, the worst issue was the provided wing spar and it’s so-called “fit” to/into the wings. This spar is thoughtfully provided so that the modeler ends up with the correct dihedral for the main wings. But it required enormous amounts of trimming down so it would even get 2/3rds the way into the wings! I ended up breaking the starboard side of this spar trying to force the situation because (after trimming it down enough to fit all the way into the wings) it was providing an asymmetrical dihedral anyway. Maybe my fault for over judicious trimming? Maybe. Anyway, I corrected to problem, and we move on…
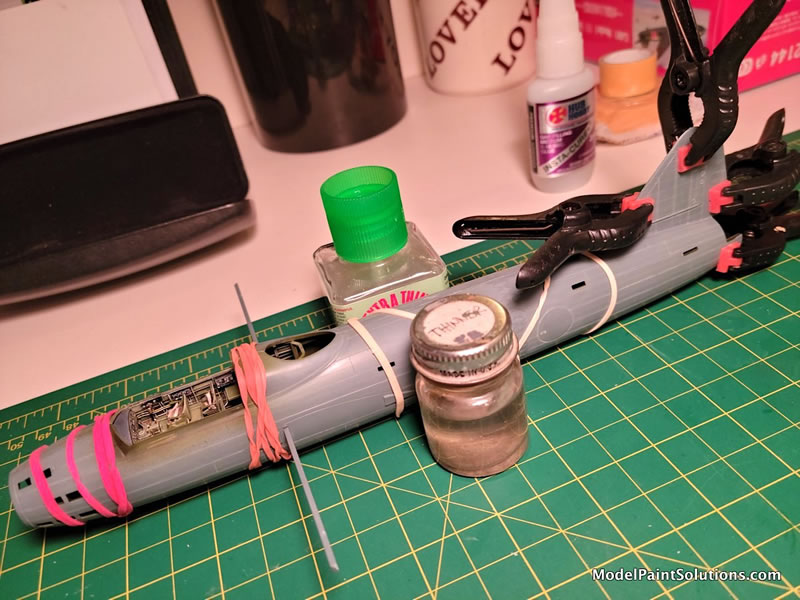
Once the fuselage is together (requiring a few strong rubber bands to keep things aligned while the glue sets up!), and the wings and tailplanes are on it was time for riveting this whole model. I used a .040mm 'Rosie the Riveter' tool which makes for a very nice and realistic final finish I think (thanks for the recommendation Barry!).
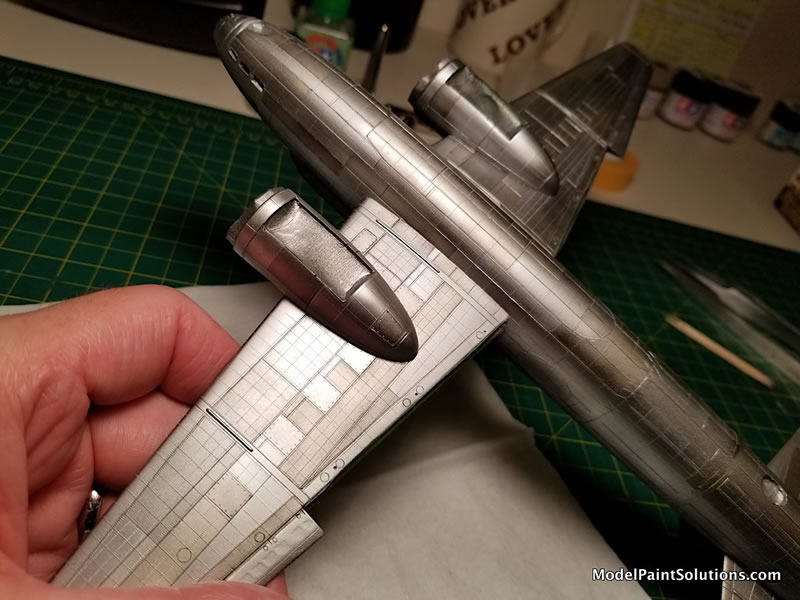
The Falcon set of clear parts actually fit quite closely, but still required some minor adjustments. The overall widths, lengths and shapes match up well, but some corners and edges needed re-shaping, or small amounts of filler once in place – nothing very daunting though. These vac clear parts were attached with ‘clear Gorilla glue’, which allows time for correct positioning, dries absolutely clear and gives a very strong bond – even for these thin vacform parts. Filling needed at this point was accomplished using Gunze’s Mr. Surfacer 500. An Eduard canopy masking set, (again meant for the Hasegawa kit), was used and required some adjustments, trimming and additions due to substituting the Falcon vac canopies.
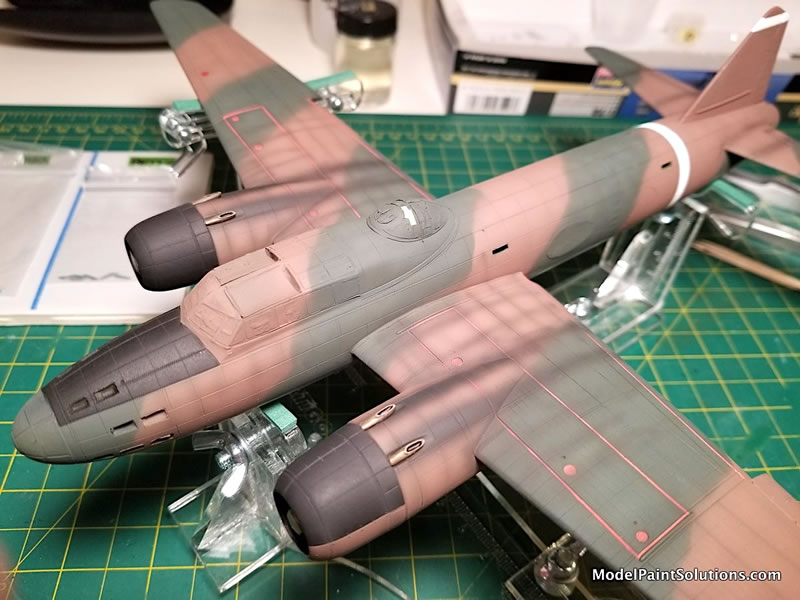
Now it’s time for some exterior paint – but first we spray the interior canopy framing color on the outside of all the clear parts so that the correct color shows later on the insides (I used Humbrol #159 here - an excellent match - because enamels adhere better to clear vacform plastic than acrylics do). After that I sprayed an enamel white for the narrow fuselage and vertical stabilizer bands and as a base color where the red wing walk areas will be sprayed following. After masking those areas this was all followed by an overall ‘semi-primer’ coat using Gunze’s Mr. Surfacer 1500/black on all panel and rivet lines, and seams, inside & outside corners, etc.
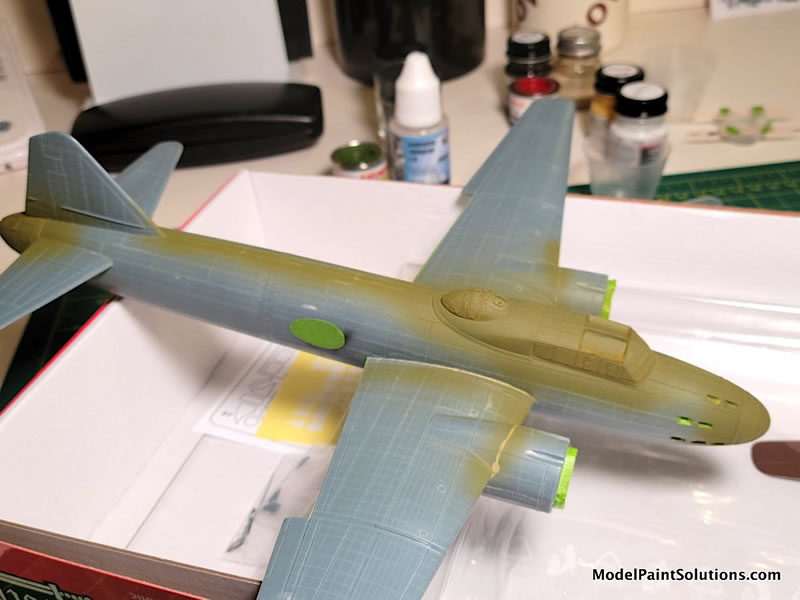
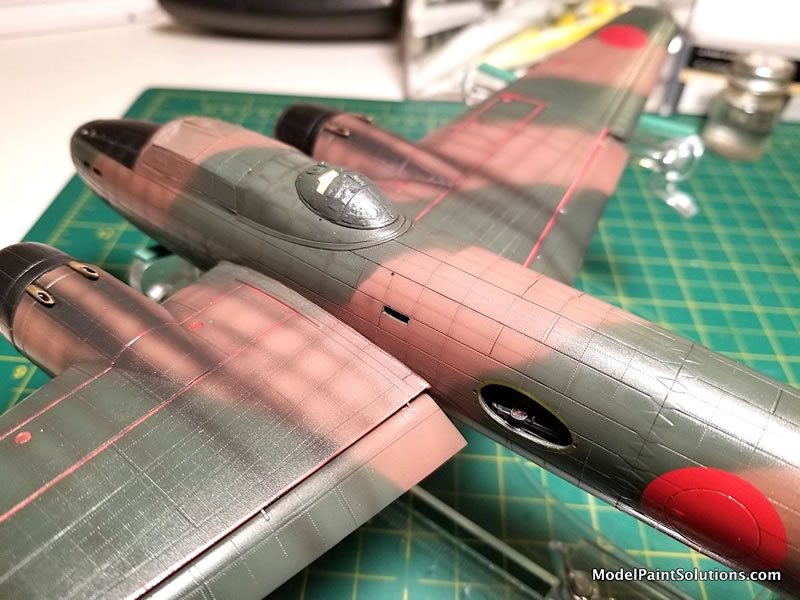
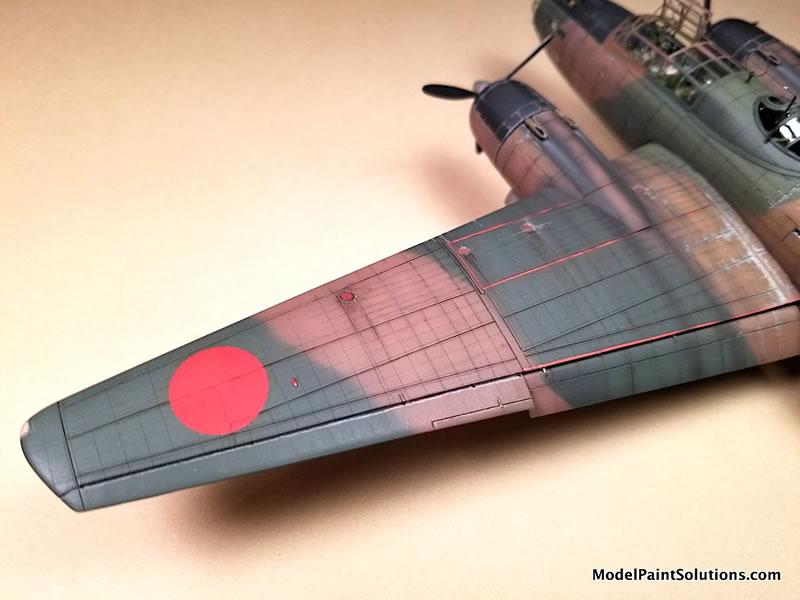
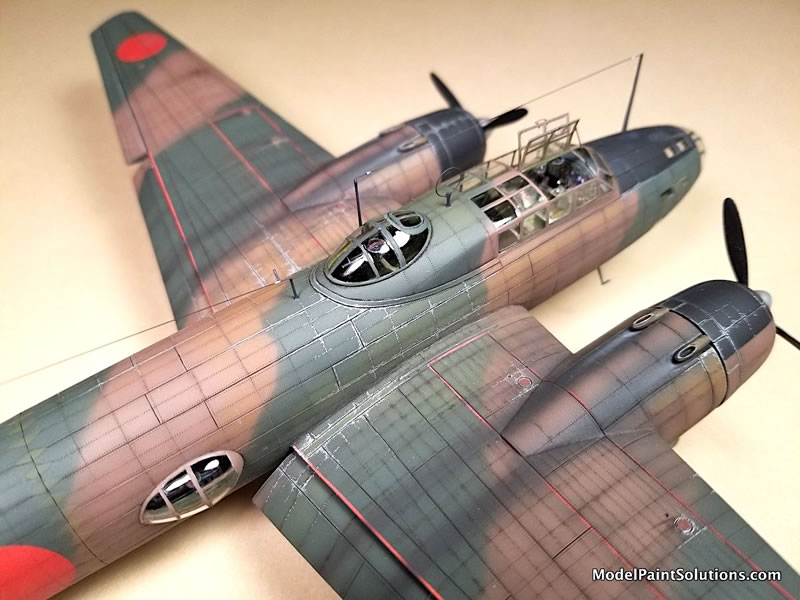
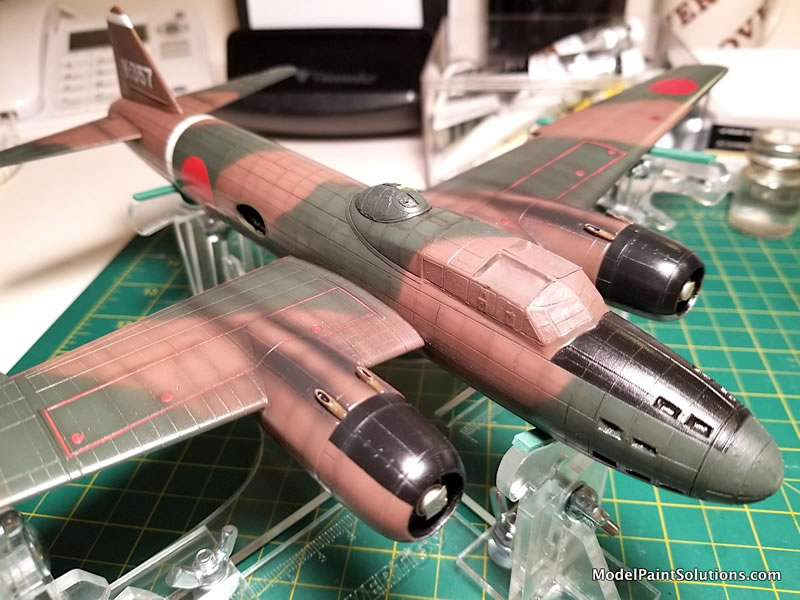
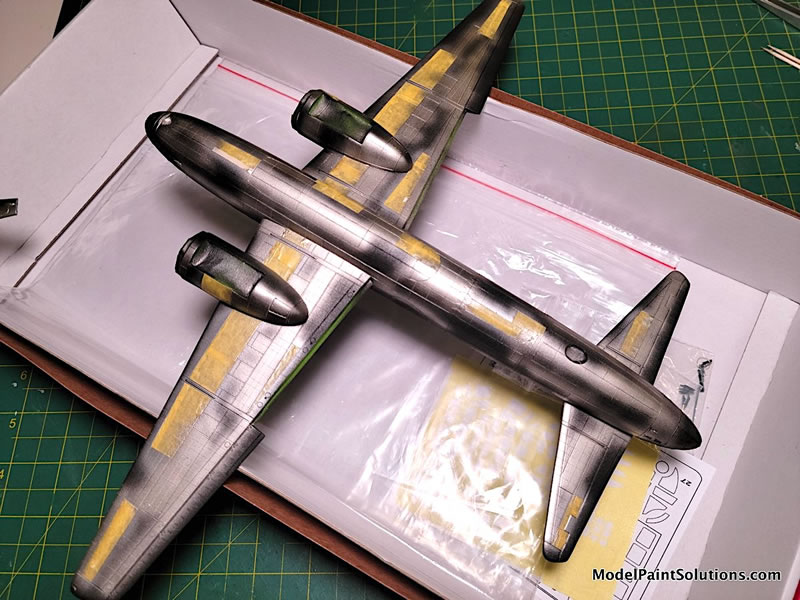
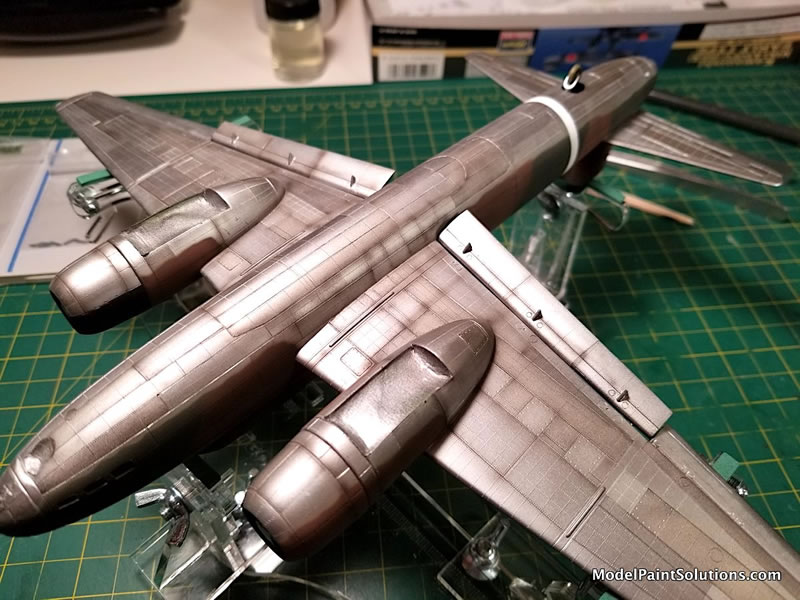
The model I wanted to build had that cool “China Camo Scheme” of dark green and brown topsides in a cloud pattern. Some of these had IJN Light Gray, or natural aluminum undersides (sources vary on this opinion). Studying photographs it looks to me that vast majority of these early ‘China scheme’ Bettys had natural metal undersides, so I pulled out my selection of AK’s Xtreme Metal paints to have a go at it! This paint thins beautifully with AK’s own Xtreme Thinner, or their ‘Nitro’ thinner. AK’s own online YouTube videos on the use of this line of paint indicate that thinning is not necessary, but since ‘old habits die hard’ I thinned them slightly by about 25% experimenting with both the Xtreme Metal Thinner, and their ‘Nitro’ thinner.
I laid down AK “Aluminum”, “Dark Aluminum”, and “Duraluminum” in subsequent layers, masking between each color with the low-tack Mig/Ammo “Soft Velvet” masking film/tape worked well. I used that masking because this paint does have a tendency to hang onto a masking tape’s adhesive, and this very low-tack tape does lessen that tendency. Once the natural metal undersides were completed, they received the final overall masking attention.
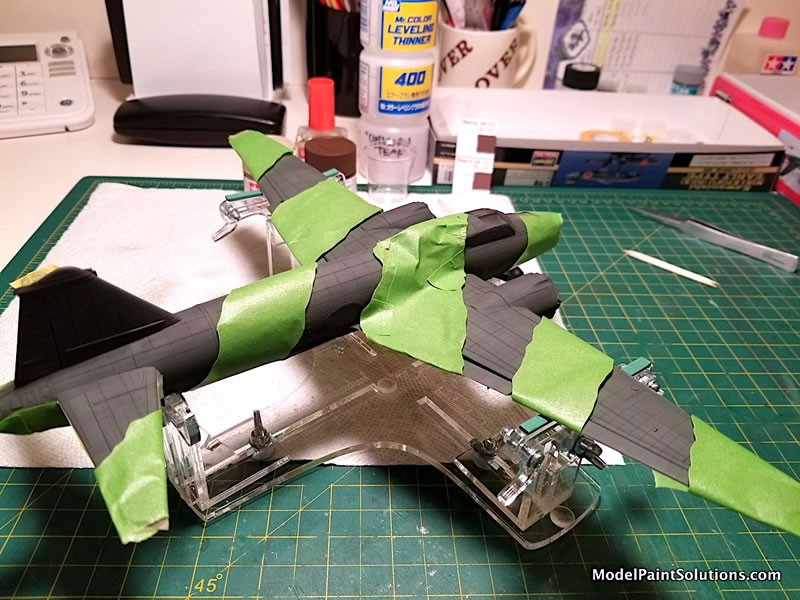
The two topside colors of brown and dark green are custom mixes using Tamiya’s XF series of acrylic/liquor hybrid paints.
I airbrushed the dark green overall first – masking the lower surface aluminum with a raised mask at the color changeover to the dark green in order to get the desired soft demarcation needed. For the brown shade, I masked the dark green of the desired pattern (there are several common patterns to this “China scheme” so consult your references!) with 3M painter’s tape. The masking was kept about 2mm above the surface to give a tight, but still impart a soft camo separation.
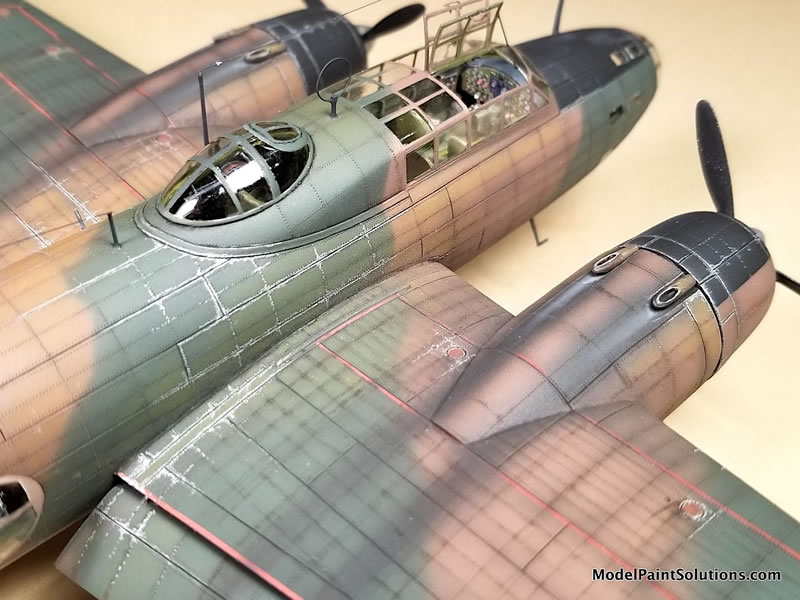
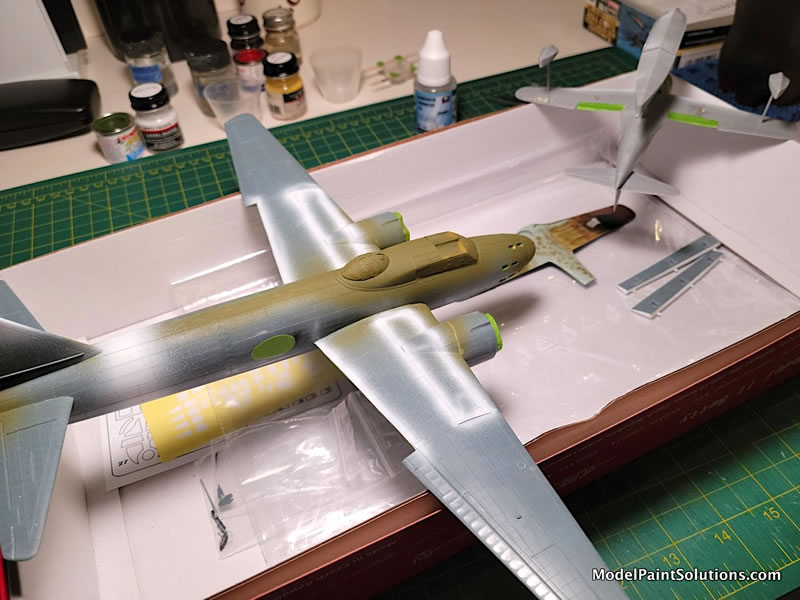
Once the two topside colors were laid down and the masking removed, I mixed up a lighter version of each color using a light olive for the dark green, and a buff color for the brown (both from Tamiya’s XF range). These shades were selectively airbrushed inside of panel and riveted areas concentrating on the mid fuselage and inner/upper wing surfaces where the most wear would occur. This step also accentuates the panel and rivet lines leaving them slightly darker. You want to be subtle with this step so as not to be too eye-catching.

Next, the weathering continues with the airbrush, hitting the inner wing and fuselage panel and rivet lines with some Gunze Mr. Hobby Aqueous very dark gray (I used their RLM 66) – thinned with Mr. Color Leveling Thinner, (“Unicorn Tears” according to my friends Dave & Mike at the Plastic Model Mojo Podcast). And then Tamiya’s XF-10 and flat black was mixed to achieve an exhaust stain color that was then airbrushed to replicate the exhaust patterns seen in photographs.
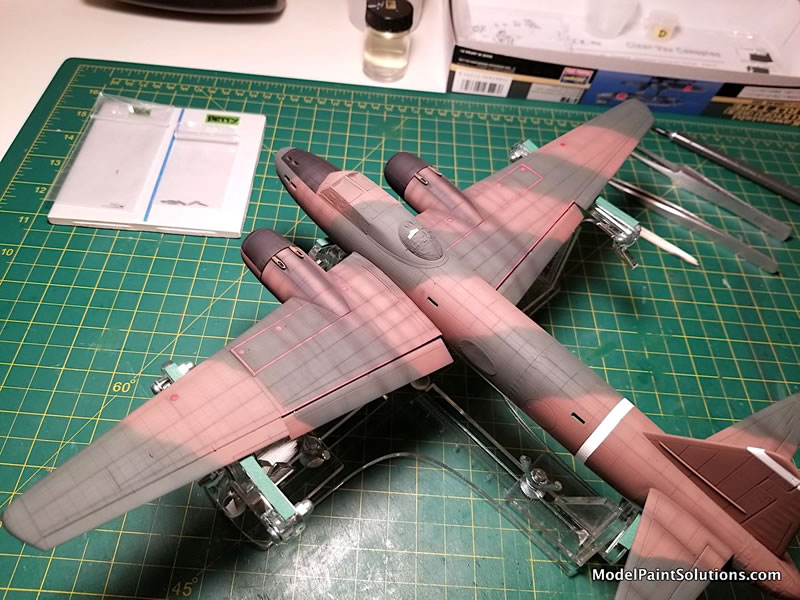
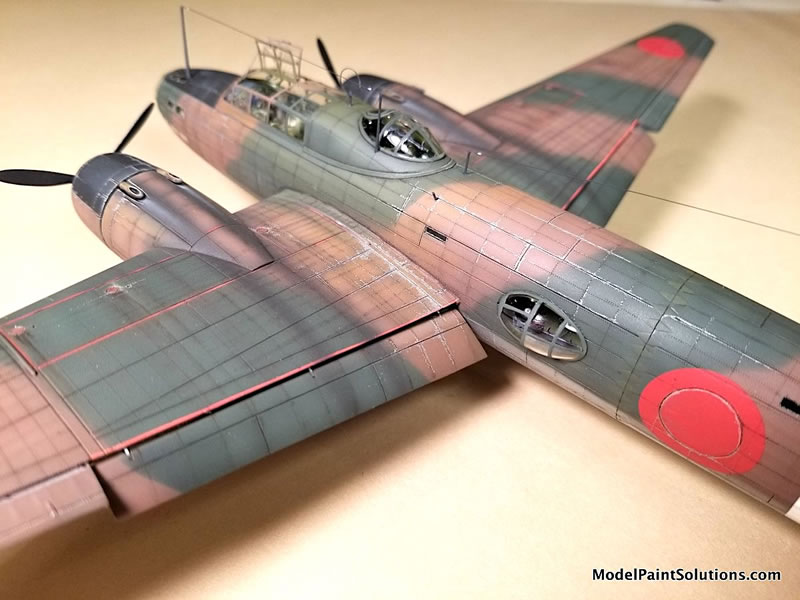
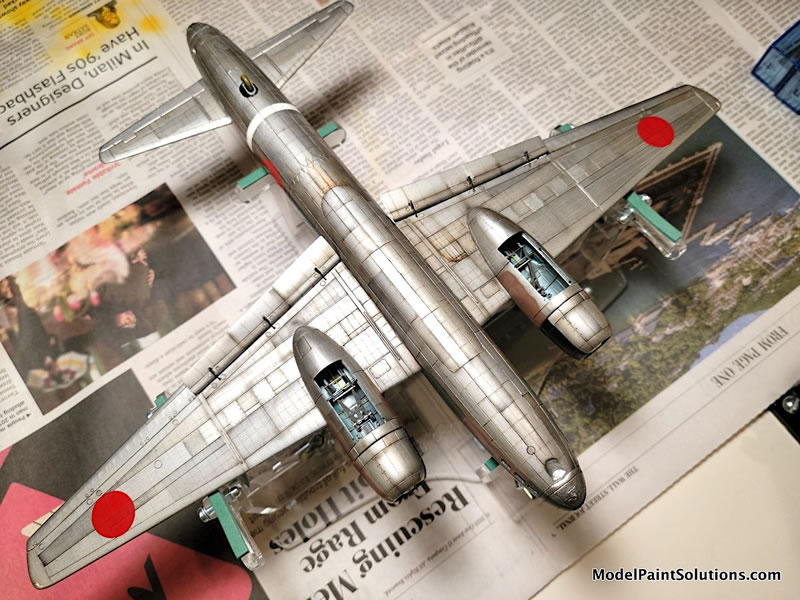
The decals were the next step, and the scheme with the markings I wanted were available from both Rising Decals and Techmod. I used Techmod’s sheet # 72155 because I liked the color of the Hinomarus better (why oh why don’t decal manufacturers produce a variety of faded & weathered Hinomarus???).
After an overall protective coat of Gunze’s Mr. Color GX-100 gloss clear the decals went on flawlessly using Microscale’s traditional Micro-Set and Micro-Sol setting solutions. The decals were then sealed in and protected from the weathering stage to follow with another coat of GX-100, but this time with a bit of clear ‘flat base’ added so as to result in a satin to semi-gloss finish that takes oil paints better.
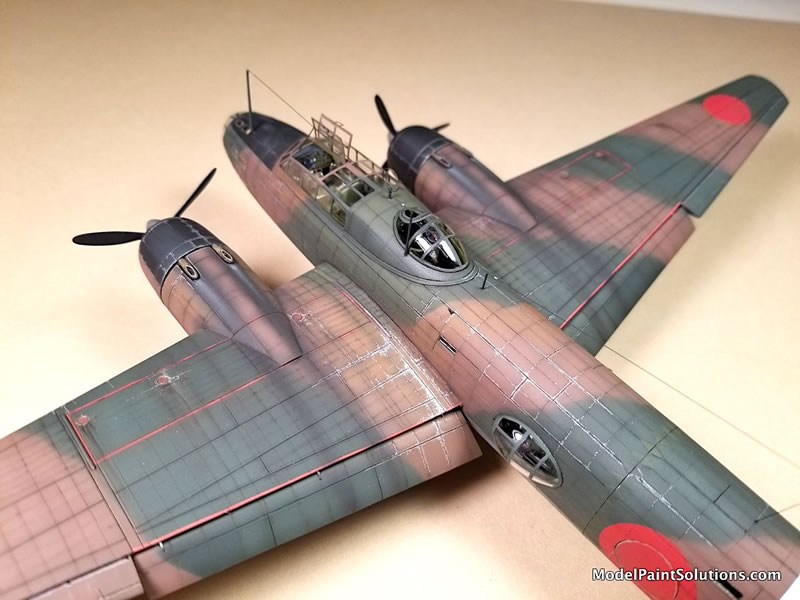
Our big girl “Betty” is now all painted & decalled, and the weathering was started - pre-decalling - with the airbrush, but is now ready to get underway using oil paints. Oil paints are my favorite for pin washes (panel & rivet lines). I like them for imparting ‘filters’ for changing the tone of the colors slightly in certain areas that receive more wear and dirt from the attention of ground crews, etc. and especially changing the tone of worn, but still in place, paint. Betty got the full treatment starting with the undersides. Down here, I took a bit simpler approach because less wear would be evident, but perhaps more fluid staining would be present. Oil paints; black and burnt umber washes around the wheel wells and especially to the rear of the engine cowlings gives a good grimy ‘oil & gas-leaky’ appearance. (And Japanese WW II engines were famous for leaking oil and other various fluids).
The topsides inboard of the engines received four colors – a lightened & darkened brown and a lightened and darkened dark green. Oil paints are great for mixing these highlights and shadows from commercially available oil paints, as nearly any shade can be custom mixed and then lightened and darkened. These were selectively applied with a 000 brush, darker into panel & rivet lines and lighter versions at the center of panels outlined by panel lines and/or rivet lines, keeping things subtle.

I altered the colors used around the engines, vs. those used to show fading on the fuselage (for example). Experimenting on a ‘paint mule’ is my best advice here. A large very soft bristled brush can be used to soften and blend this effect. A Prismacolor silver pencil was used to delicately and deliberately place worn paint areas in logical places and where they commonly occurred based upon photographs. The weathering was followed by some pastel work to accentuate the exhaust stains and soften oil leak areas and spills.

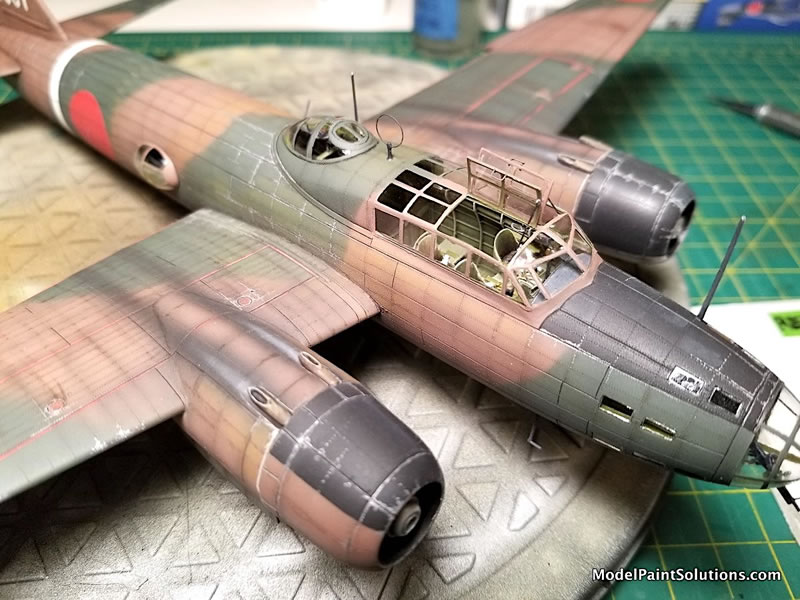
Finally, the props, landing gear, gear doors, tail wheel, antenna masts and aerial wires (from stretched sprue) were all added to complete this big girl.
This Sword kit is not an inexpensive item, but Hannants had the best price, so it wasn’t long before it was on its way to me! And it’s FAR better than Hasegawa’s now truly ancient G4M1 kit. There are some fit challenges, and it will benefit from extra detailing to the interiors, wheel wells and engines, but the basis is here for a nice model. It’s just a shame the aftermarket companies have (to date) ignored this attractive release.
Steve Hustad
(aka “The Mad Norseman!”)
For more on this review visit ModelPaintSolutions.com.
https://modelpaintsol.com/builds/sword-72-mitsubishi-g4m1-betty-72144
Text and images copyright ©2024 by Steve Hustad.
Text and images copyright ©2024 by John Miller/Model Paint Solutions.
Text and Images Copyright © 2024 by Steve Hustad
Page Created 4 October, 2024
Last updated
4 October, 2024
Back to HyperScale Main Page
Back to Reviews Page

|
 Home
| What's New |
Features |
Gallery |
Reviews |
Reference |
Forum |
Search
Home
| What's New |
Features |
Gallery |
Reviews |
Reference |
Forum |
Search