Suggestions for
Masking, Painting, and Chipping Anti-Glare Panels
Text & Pictures by John Miller

Anti-glare Panels—those Black, Olive Drab, or similarly dark-colored panels painted in front of or around aircraft canopies were used on many WWII aircraft; especially on those with a natural metal finish. Examples that quickly come to mind include the P-38, P-47, P-51, B-25, B-26, Ki-67, and Ki-84; there are many, many, more.
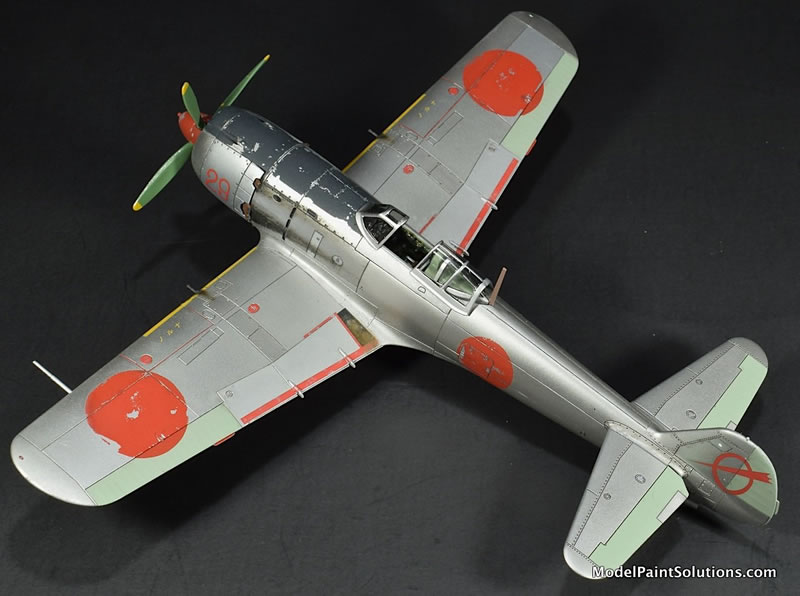
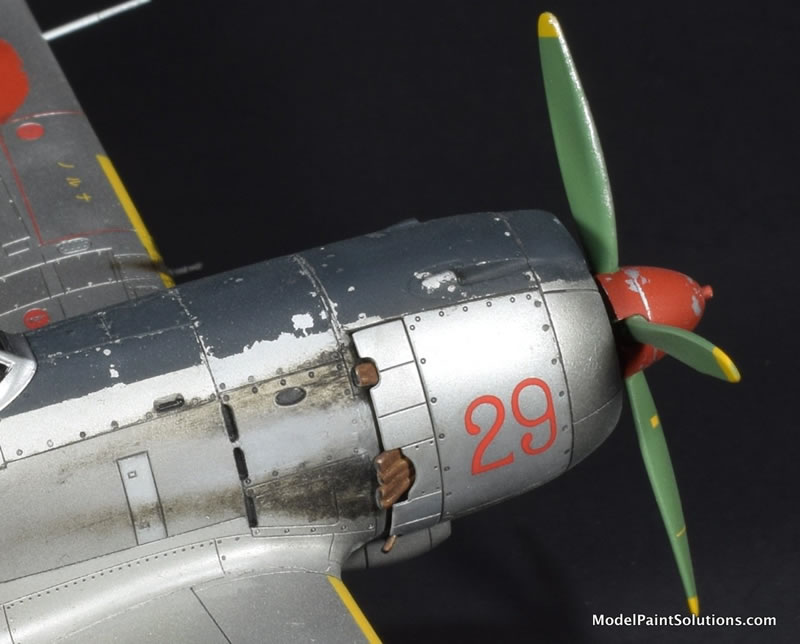
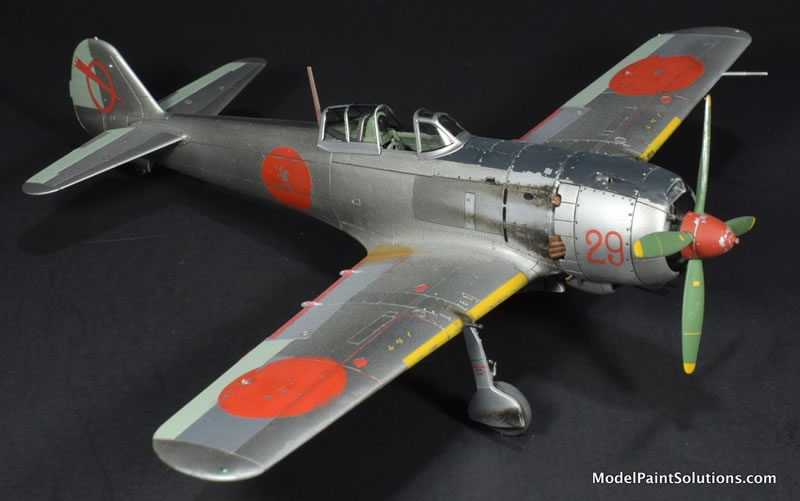
Whether the anti-glare panel is Black, Olive Drab, or Blue-black (as on the Ki-84), the close proximity of anti-glare panels to clear canopy parts (that just beg for close inspection by onlookers) justifies a bit of extra effort to produce a realistic and scaled appearance. One way to do this is to replicate wear in the form of fading or chipped paint. An example of my attempt at chipping an anti-glare panel can be seen on the ARMA 1/72 Ki-84; a beautiful model of a beautiful airplane. This kit flies together with little effort and the result is a stunning build right out of the box; highly recommended. Go Here for a complete Build and Painting Review.
The model was built straight from the box and after a few short days on the bench, moved into the paint booth; my favorite part of any build. The airframe panels were masked and painted multiple shades of aluminum, all of which were custom-mixes prepared by combining different volumes of AK-XTreme-Aluminum, -White Aluminum, and -Dark Aluminum. Once prepared, the mixes were stored in MPS 6ml bottles until use. For spraying, each mix was diluted to 70% paint with AK Nitro Thinner and applied at ~12psi with H-S Infinity or Evolution airbrushes fitted with either 0.15 or 0.20mm tips. Once the metallics were allowed to dry ~24hrs, a little character was added to the scheme by masking, painting, and chipping the Hinomaru’s and the very prominent Blue-Black anti-glare panel.
Masking Straight and Even Anti-Glare Panels
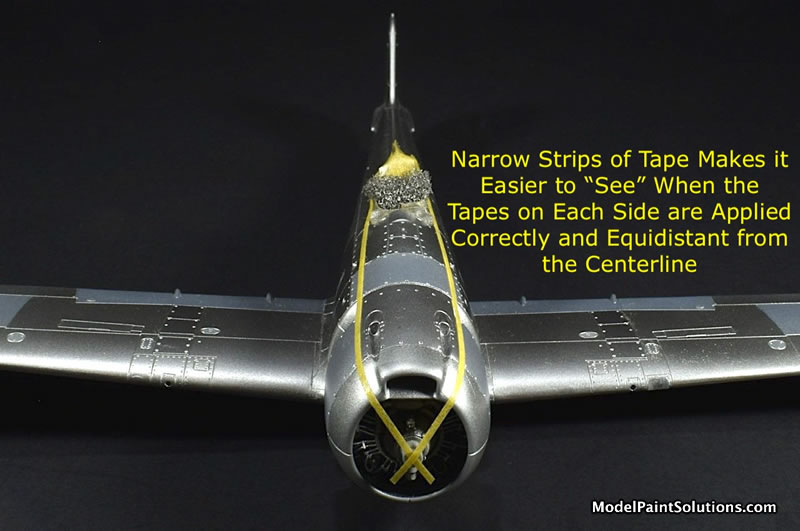
It’s critical that an anti-glare panel be masked so as to be centered, even, and straight when viewed from head-on, above, and
from the sides (left and right). Mistakes such as the panel being lower on one side of the cowl or a slight wiggle in what is supposed to be a straight line, will be easily seen on the completed model. That wouldn’t be the end of the world, of course. As Bob Ross said—“We don’t make mistakes, we have happy, little accidents.” As this can be applied to modeling, I tend agree, most of the time…. Should a mistake be made when masking an anti-glare panel, one option would be to buff out the previous tape line, re-tape, and re-paint; not ideal but, it would work. Or, you could apply the tapes, centered and straight, from the get-go using a simple and easy trick—Use Thin Strips of Tape.
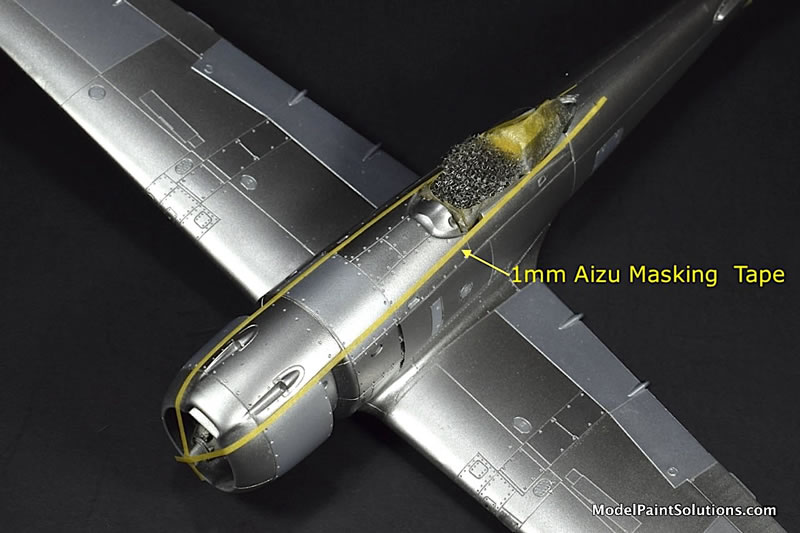
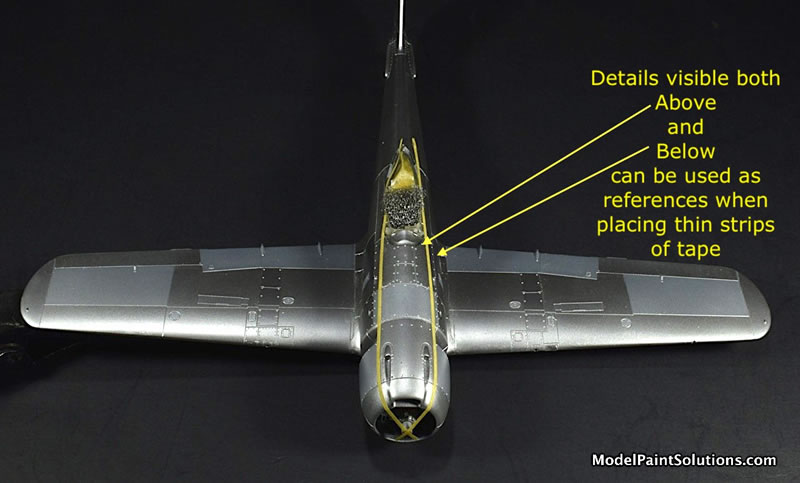
As a wee lad I was fortunate to assist my stepfather, who had a side-business painting cars. This man was a talented, master-of-all-trades and one of his many masking and painting tricks was to use thin strips of masking tape when laying out pin stripes or similar schemes. He did this because while looking down the length of a thin strip of tape, it’s easier to “see” if the resulting pin stripe will be straight, even, and sag- or wiggle-free. Conversely, wider strips of masking tape make this more difficult to see. Once the pin stripes were laid down with thin strips of tape, thicker strips would be added to mask the surrounding areas preparatory to spraying the car. As this can be applied to modeling, thin strips of tape make it easier to see that a piece of tape, placed on the left side of a cowl or fuselage is mirrored (or identical) to a strip on the right. This works, in large part, because thin strips of tape allow surface details such as rivets and fasteners that are both above and below the tape to be easily seen and used as guides. Many of these details would be covered if a wider strip of tape were used. Thus, delineating the dimensions and placement of an anti-glare panel with thin strips (~1mm) of masking tape first is a simple trick that makes it much easier to apply tapes that are even, straight, and equidistant from the centerline. This is especially true when viewing the model from head-on using the Mark-1A eyeball; a trick with which most modelers have experience.
Sufficiently thin strips of tape can be easily prepared from any Tamiya-tape-like masking material i.e., Tamiya Tape, AK Masking Tape, and a good cutting surface (glass on my bench), a straight cutting guide (preferably metal) or a ruler with metal guide (strip of thin steel on my bench), and a brand new #11 X-Acto blade or scalpel ( I go with a scalpel; just don’t drop it in your lap……). I cut thin strips of masking tape for years using just these tools and did just fine, thank you very much ;) That sad, Aizu has a line of Micro Masking Tapes that are crisply cut, incredibly thin (0.40 to 2.5mm—that’s not a typo), and have a “stickiness” comparable to Tamiya or AK Masking Tape. Aizu Tape of 1.0mm-wide was used to layout the dimensions of the anti-glare panel on the Ki-84.
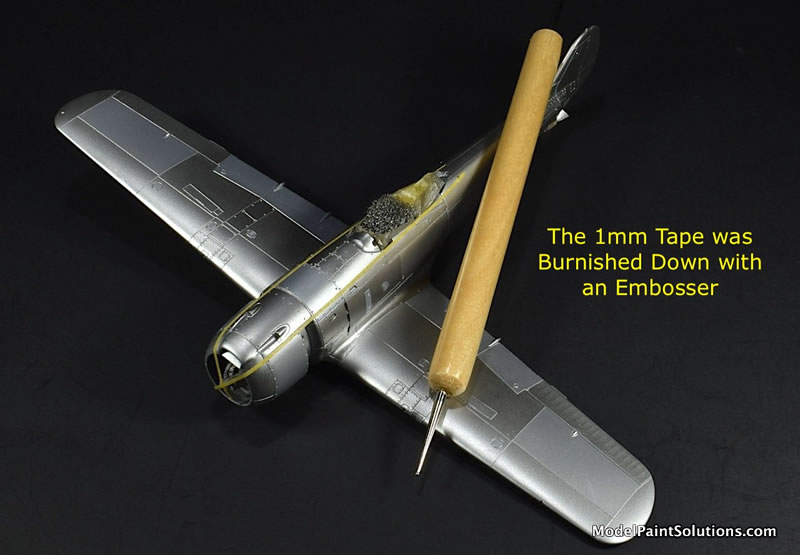
Once the anti-glare panel has been laid out with thin strips of tape, the strips are burnished in place with an embossing tool or similar. I like the smooth, spherical stylus, and the control provided by a good metal Embossing Tool but a smooth toothpick can be used as well. The thin strip was burnished onto to the model quite snugly as this is a huge opportunity to lessen the chances of wet paint wicking under the tape later when spraying.
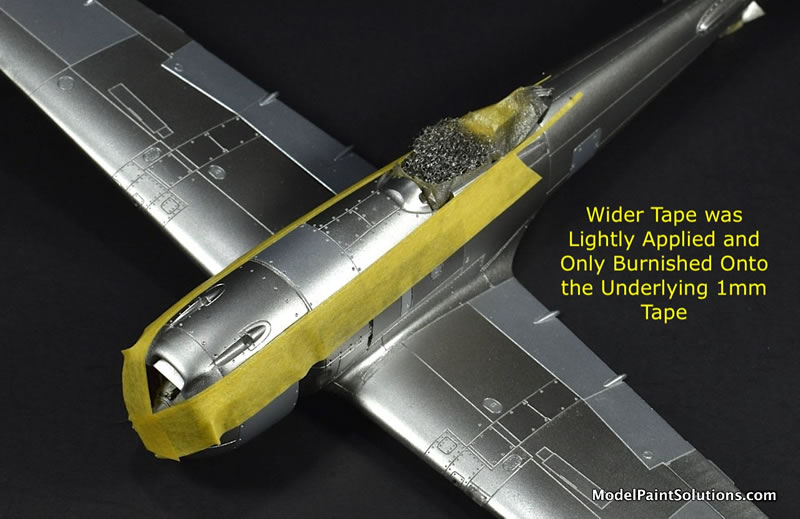
Once the thin strips are burnished down, wider strips of tape are applied on top of them, taking care to press the wider strips onto the model with only as little pressure as required; this is an important tip. Most importantly, each of the wider strips should be de-tacked prior to placement. De-tacking, for me, involves repeatedly rubbing my oily fingers over the adhesive side of the tape until it has a “stickiness” comparable to a used Post-it-Note, which make a great masking material by the way…. With the wider tapes aligned with the underlying 1mm tape, I grab my Embossing Tool and carefully burnish the wider tape onto the thinner one only where they overlap. In other words, don’t emboss the wider tape onto the model other than on those areas where there is an underlying strip of thin tape. This is one way to lessen the chances of pulling paint off when removing the masking tapes.
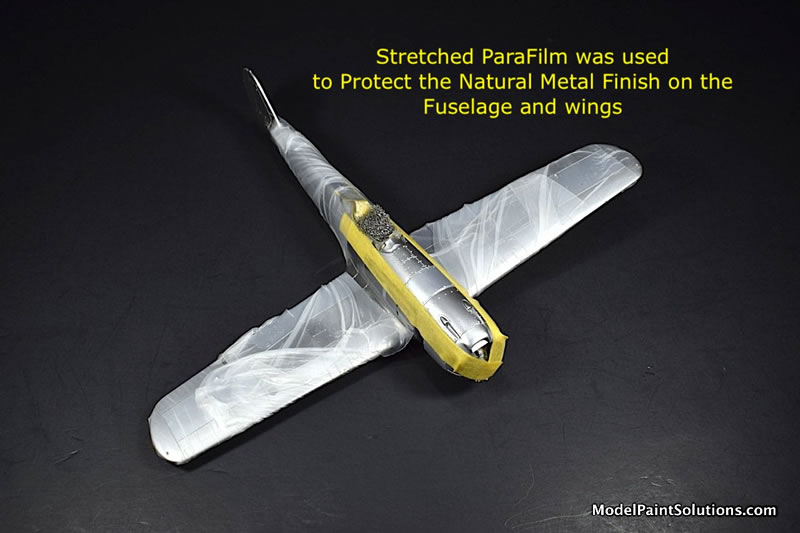
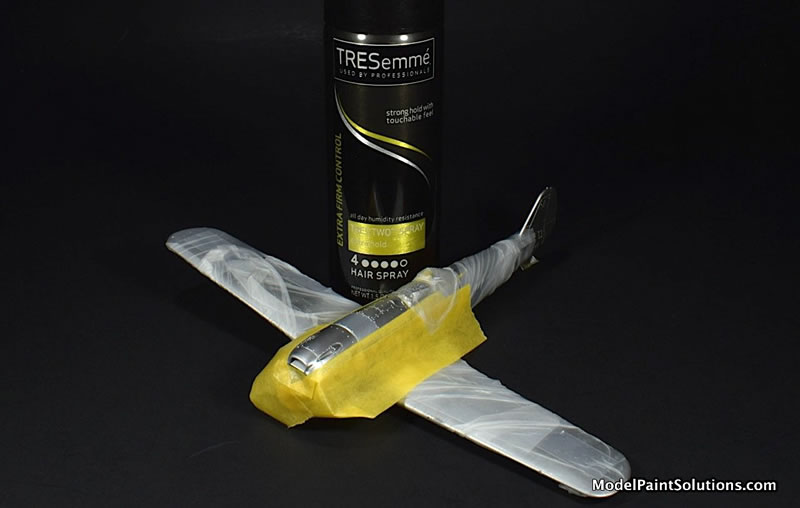
To ensure I wouldn’t get a nice patina of Blue-Black on my natural metal finish when spraying the anti-glare panel, the wings and aft fuselage was wrapped with a stretched piece of ParaFilm; this is really handy stuff for quick and easy masking of large areas.
Choosing the Paint and Applying the Hairspray
Now, I’m not much of a “chipper,” if you will, but fortunately, I have access to Mike “The Weatherman” Millette and Eric “The Tank Man” Christianson; both are accomplished armor modelers with chipping experience and fortunately, both provided very useful tips on how to make chips(sorry).
First and foremost, chose a paint that chips well. From my experience, both Tamiya and AK Real Colors lend themselves to chipping very nicely. There are other paints that can be used for chipping but they lay outside this article, which focusses on using AK Real colors over hairspray, which behaves very much like Tamiya in my hands.
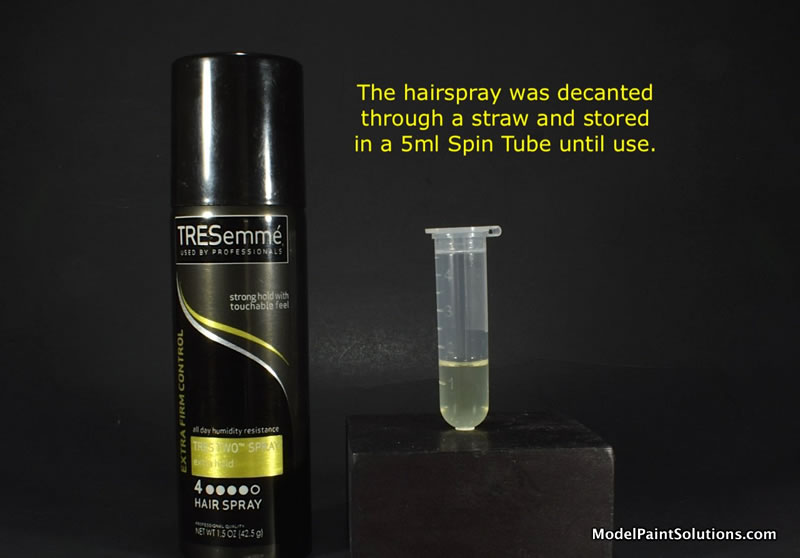
Second, undercoat the paint you wish to chip with a coat of Tresemme’ hair spray i.e., shoot hair spray then shoot the paint to be chipped. Spraying Tresemme’ hair spray straight from the can proved to be too much of a fire hose for my taste, especially for such a small area as the Ki-84 anti-glare panel.
To provide more control, the hairspray was first decanted through a drinking straw and stored in a 5ml Mixing Tube until it was shot as a dry- followed by a light wet-coat at ~12psi with an H-S Evolution fitted with a 0.20mm tip. The hair spray was cleaned from the brush with a few rinses of 70% Isopropyl Alcohol.
After the hairspray was allowed to dry (overnight), a custom mix of 90% AK Real Colors 6RP Black (RC-071) and 10% AK Pure Blue (AK-010) was diluted to ~30% paint in AK High Compatibility Thinner (with 5% Liquitex Flow-Aid by volume). This was applied at ~10psi first as a dry-coat followed by multiple, over-lapping, semi-wet coats (meaning wet but not soaking, shiny wet). This was shot with an Infinity fitted with a 0.15mm tip. The Blue-Black was allowed to dry for ~35 minutes prior starting the chipping process; this is key—If too much time elapses after spraying, the paint will not chip as easily and could result in damaging the underlying coat of paint. I’ve been told by master chippers that chipping should be completed within 1-2 hours of spraying; maybe sooner, depending and the paint dilution used and the drying rate, which is usually determined by local temperature and humidity. Therefore, as with many modeling techniques involving paints, use the previous dilutions/drying times as starting points and identify the best technique for your particular environs by testing on a paint mule; always time well-invested.
Chipping Tools
Having a good chipping brush is key to making small, appropriately scaled, chips with control. I made my chipping brush by shortening the bristles of an old trim brush with a scalpel blade. Note that the brush used was small (~1.5mm in diameter) and, once cut to ~2mm in length, the bristles were sufficiently stiff to make chips of a correspondingly small diameter. An additional trick for making a small chipping brush is to cut the bristles at an angle (say ~45 degrees) producing wedge-shaped chipping bristles.
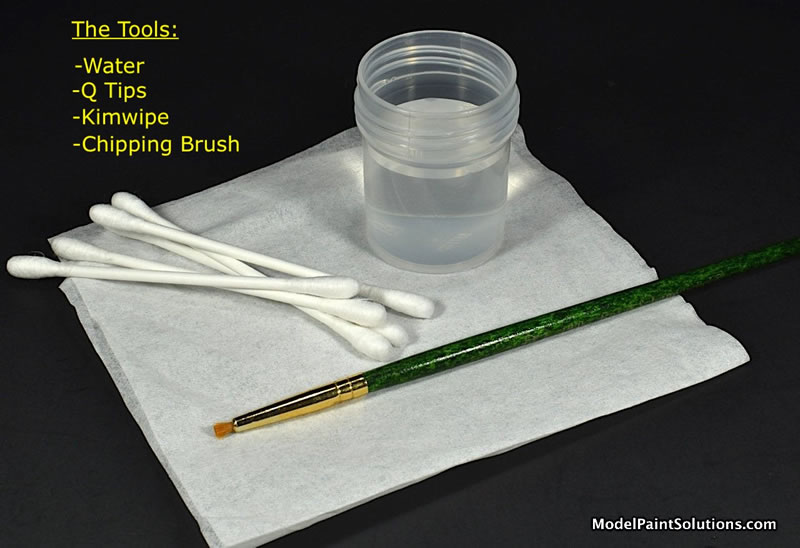
For delivering small amounts of water to areas being chipped, I prefer using a small Swab. As the chipping progresses, I find it best to remove the resulting chips quickly before they stray onto painted areas making a potential problem——chips can be sticky. Therefore, I periodically clean the area of chips using, a Q-Tip or, again, a Swab, depending on the area being worked on. I’ll also periodically clean the area with a Kimwipe to lessen the chances of chips sticking and fouling surface details.
Let the Chipping Begin!
Prior to chipping, all masking tapes were removed to give good access to the edges of the panel where chipping is often found. To chip the Blue-Black paint, a small amount of water was applied on the area to be chipped. This was allowed to sit for ~30 seconds, after which the chipping brush was used in a pecking motion along panel lines and other surface details that would normally show wear. The pecking motion is akin to tapping dots on a piece of paper with a soft-lead pencil using sufficient force to leave a dot without breaking the lead. Care was taken to not make any chips larger than ~1mm. I didn’t always succeed…
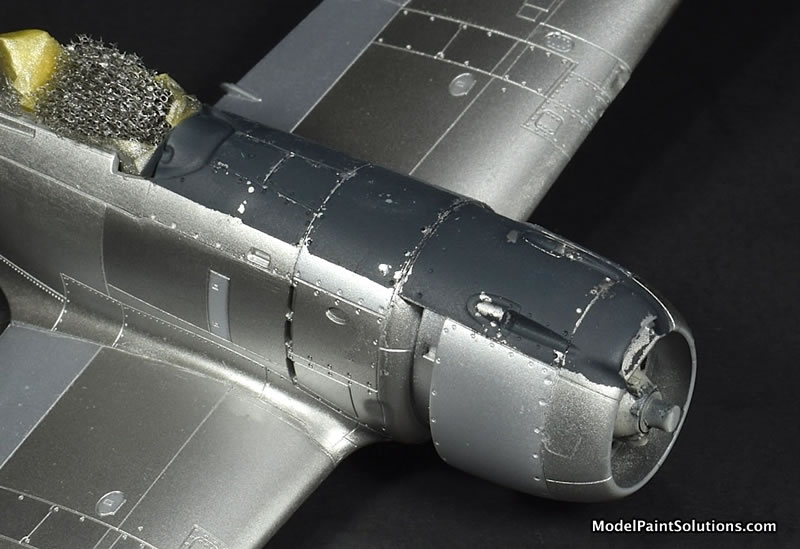
As the chipping progressed, chips were removed from the area with a Swab, Q-tip, or a swipe with a clean, folded Kimwipe. After 4-5 minutes of work, the panel was chipped to my satisfaction and I called ‘er done!
Chipping paint is a handy trick to have in your tool box of modeling techniques. I shied away from trying this technique for many years in fear I would ruin a hard-earned paint job; glad I got over that. The technique is especially handy when used to replicate wear commonly seen on details like aircraft anti-glare panels as long as the chips are not too large. A key consideration is the size of the chips that would be appropriate for the scale you’re working in; the smaller the scale, the greater the challenge of making scale appropriate paint chips in my hands. That said, making paint chips look to scale is doable with a few easy tricks including using the correct paint, the right hairspray, and chipping within 1-2 hours of spraying. Most importantly, chipping with an appropriately sized brush.
Thanks for reading along!
I hope you found something useful :)
—John
For more on this review visit Modelpaintsolutions.com.
https://modelpaintsol.com/guides/suggestions-for-masking-painting-and-chipping-anti-glare-panels
Text and Images Copyright © 2023 by John Miller / Model Paint Solutions
Page Created 3 August, 2023
Last updated
3 August, 2023
Back to HyperScale Main Page
Back to Reviews Page

|
 Home
| What's New |
Features |
Gallery |
Reviews |
Reference |
Forum |
Search
Home
| What's New |
Features |
Gallery |
Reviews |
Reference |
Forum |
Search