Academy's 1/48 scale
McDonnell Douglas F-4N Phantom II
by Jon Bryon
|
McDonnell Douglas F-4N Phantom II
|

Hobby Boss's 1/48 F4U-7 Corsair is available online from Squadron.com
Academy 1/48 McDonnell Douglas F-4N Phantom II
with Quickboost resin seats and Hypersonic resin tailplanes and AC intakes
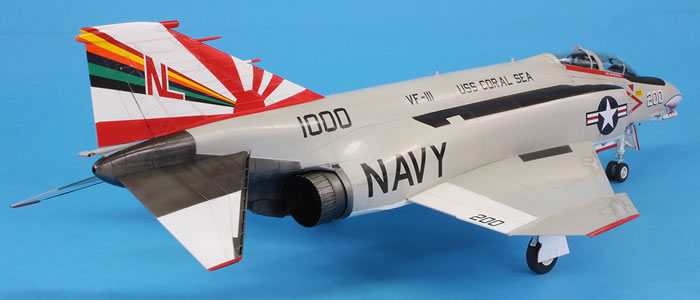
VF-111 ‘Sundowners’ US Navy USS Coral Sea 1975
The F-4B and N in VF-111 Sundowners markings are, in my opinion, the best scheme the Phantom has ever flown in. I just love it. And I’d been frustrated for years that Hasegawa had never seen fit to update their F-4B/N with recessed panel lines and drag it out of the 1980s. They still haven’t. Fortunately, Academy decided they wanted a piece of the Phantom Pie and commenced their line of kits with…the F-4B in VF-111 markings.
Except they got it wrong. For some reason they decided VF-111’s markings from 1972 and 1975 were sufficiently similar that they could be considered interchangeable, but they can’t. So the instructions have you build an F-4B from 1972 and put markings on it (the only option provided in the box) for an early F-4N from 1975, without the cable ducting on the intakes. Despite everyone and his dog building and reviewing this kit in the modelling press, Academy’s faux pas has generally gone unreported in print and the correct information came to my attention from some of the once-bustling-but-now-less-frequented modelling forums. Further information can be found in the excellent publication CVW US Navy Carrier Air Wing Aircraft 1975-2015 Volume 1 by Mike Crutch.
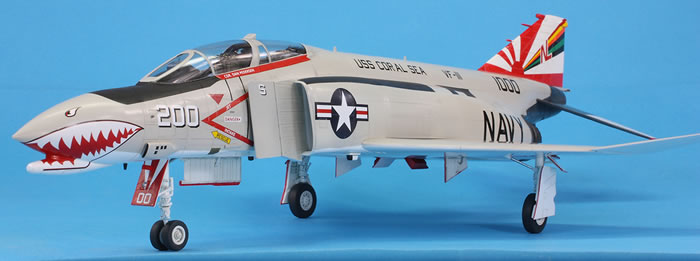
F-4N 151000 is a much photographed airframe from 1975 – a Google search will turn up multiple images; I found six I could use, plus another in slightly later markings. I wanted to build this aeroplane from that year, which is good news as that’s essentially what Academy provide the decals for. What is immediately clear is that you need to ignore the kit instructions and use one of the other undernose sensor pods. Other than that you’re good to go, and just need to make a couple of minor decal changes: leave off the small BuNo on the rear fuselage (the real thing didn’t carry it, which is good because you’d need it to say ‘F-4N’ if it did, and the decals say ‘F-4B’) and find some different style ejection seat triangles.
According to Scalemates.com there is an almost identical boxing of this kit out there that is for NL-202 (as opposed to NL-200) with subtly different box art and decal option that may be more accurate.
The Academy kit is considered reasonably accurate and well detailed. In many ways it is an improvement on the ancient Hasegawa tooling. The surface detail is far more comprehensive and the level of detail is generally greater. However, there are a few problems.
One is that the slotted tailplanes are not quite right. The little brackets that hold the tailplane leading edge to the main surface are oriented in the wrong direction, and the area of the unpainted metal area is too small. Hypersonic make a very nice resin replacement set.
Now, I’ve used this set and it comes with a warning: THIS IS A DIFFICULT SET TO USE! It’s beautifully moulded (as is everything from Hypersonic), but the casting block is along the leading edge. The leading edge is EXTREMELY FRAGILE and connected to the main tailplane by TINY FRAGILE BRACKETS. My first attempt to remove the block ended in failure: I destroyed the leading edge.
Eek! This is what happens if you’re not a surgeon…
I had no option but to buy another set (they are not cheap). I was EXTREMELY CAREFUL and yet…still ended up with a less than perfect parting line. Don’t look too closely at my tailplanes! I cannot blame Hypersonic for this – their parts are so beautiful I assume this was the only way to cast them – but do be warned: they punish the slightest hamfistedness.
The main benefit of the Academy kit over the Hasegawa moulding is that they provide some intake trunking. The intakes don’t fit that well, and getting it seamless is difficult, but it’s nice to have a proper trunk.
The cockpit coaming over the front instrument panel does not fit *at all*. I have no idea what Academy were thinking here, but I had to carve chunks out of it to get it to sit properly.
I generally like True Details seats for my Phantoms, but they don’t fit in the Academy kit if you want to close the canopy. I used some Quickboost seats instead. They are nice, but I still prefer the True Details ones.
The air conditioning intakes are a funny shape. Hypersonic make a very nice resin replacement set that I had no problem installing.
Whilst Academy make up for some of Hasegawa’s engineering failures – they provide a decent location tab for the tailplanes, for example – they introduce their own. One of these is that the intake splitter plates are not separate, and have to be added prior to painting. This makes getting decent and smooth paint coverage behind them very difficult.
But my main issue is with the undercarriage. Academy want you to install the main undercarriage very early on – before the wing halves are joined. There was no way I was going to do this, and so I made some cuts and figured out how to put the main legs in near the end of the build. This was a mistake; they just don’t fit properly if you do this. I ended up removing some of the main leg detail to get them to fit properly into various location holes and around the undercarriage doors and they don’t sit as vertical as they should. I do intend to build another one of these kits and next time will just have to resign myself to installing the main legs right at the beginning. I’ve no idea why kit designers do this: it’s not necessary and makes the model far more difficult to construct than it need be.
I should have added the inner pylons, as per the photos, but unfortunately I screwed them up and they ended up very wonky. I could not prise the parts apart and decided in the end it was better to leave them off and not match the photos rather than match the photos and have misaligned pylons.
The main finish is Mr Base White 1000 and Mr Color 315. The photos show an extremely clean, glossy finish. In the end I decided the best way to try and replicate this was to use Gunze GX100 clear gloss and polish it out. I did not want a super-glossy finish, so smoothed it all out with Micromesh finishing cloths. This left me with an imperfectly glossy finish that I was surprisingly pleased with. The main problem was some minor burn-through on areas of raised detail, which required a little bit of touch up.
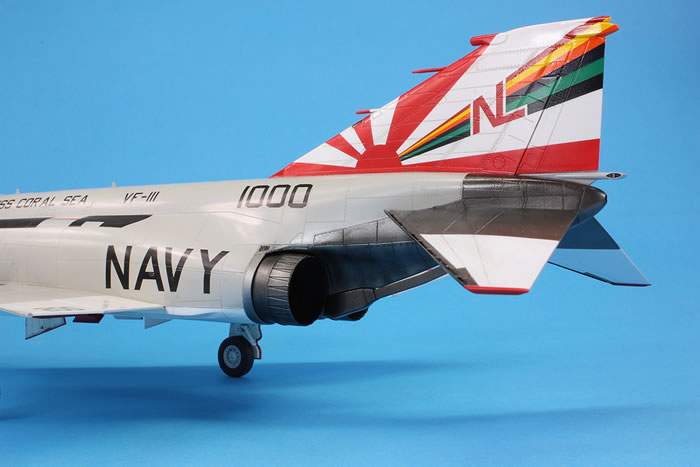
I did use a medium grey oil wash for the panel lines. This is not realistic, but I feel that without it the recessed detail just looks odd.
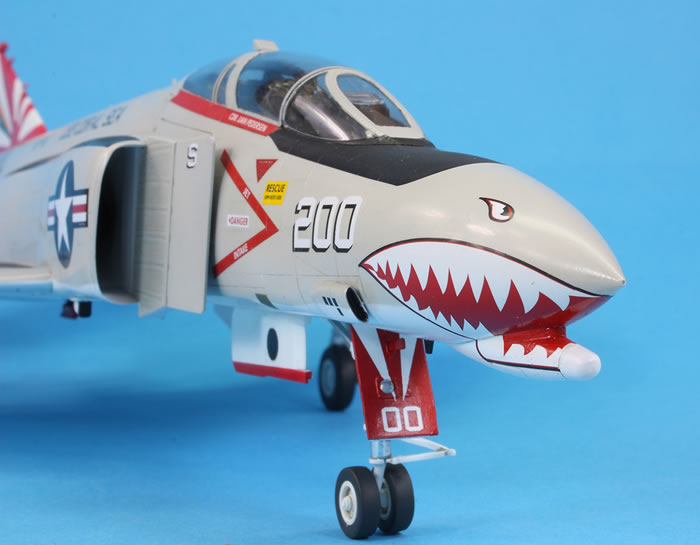
The decals were printed by Cartograf and were wonderful. Amidst all the awful Hasegawa decals I’ve been using recently it was a delight to use some that were thin, strong and settled into the detail nicely. There were some that were a pain: the shark teeth markings need to be cut in various places to conform to the compound curve, and the multi-coloured tail markings are a tricky fit around the rudder and tail tip. The decal for the nose gear door did not settle very well and is a little bit wrinkled. I wish they’d supplied the nose door ’00’ as a white decal, then I could have painted the nose door instead.
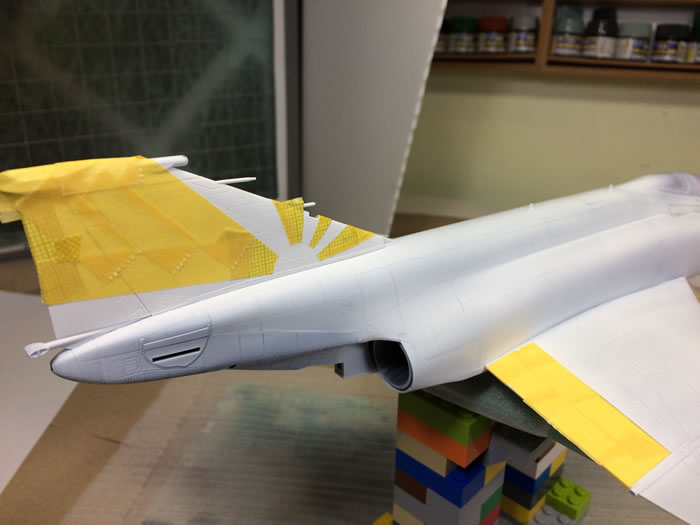
Actually, I should mention that, by-and-large, I abandoned the decals for the sunburst marking on the tail and decided to mask it. This was not a trivial exercise due to the conflicting demands of the colour and the shape. Shape wise, the easiest thing would have been to mask the red and then spray the white; getting a proper circle for the sun is just easier this way. But spraying white over the red would have been a nightmare, and so I decided to do the reverse. I did this by laying masking tape over the incorrect tail marking in the kit (Academy did supply a correction sheet) and using this as a guide. I knew the multi-coloured ray that incorporated the ‘NL’ would be too much effort to mask up properly and so I always intended to cut out this part of the decal and use it. The photos show how I went about it. I did worry that the red on the decal would not match the Mr Color 327 I used, and indeed it doesn’t (the decal is darker) but unless you’re looking for the mismatch it doesn’t jump out too much…though now I’ve told the world…
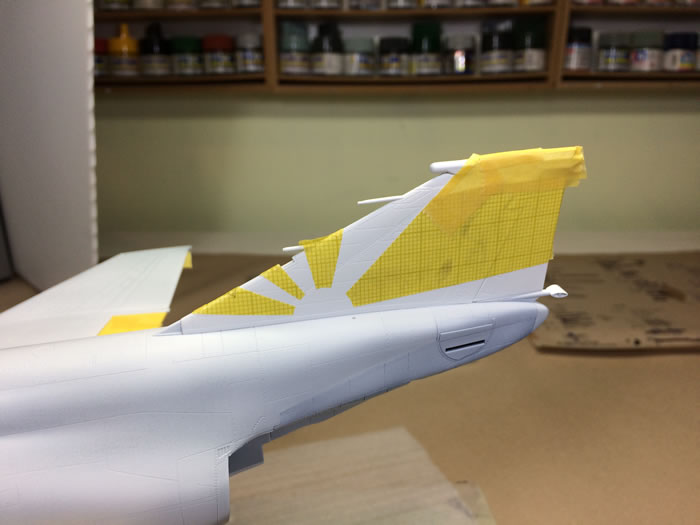
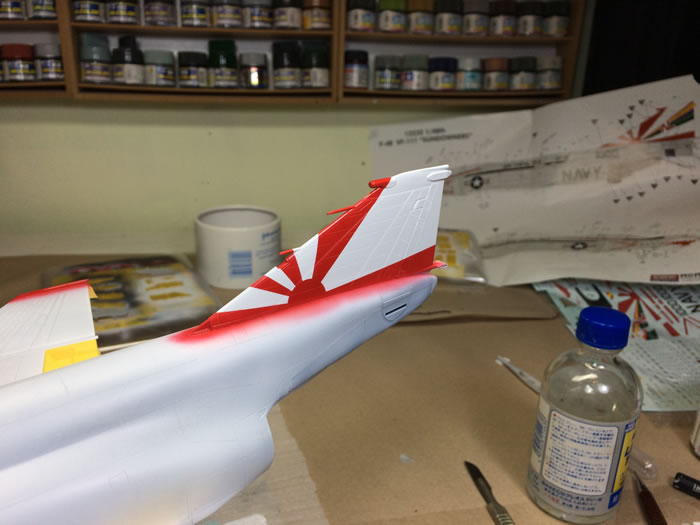
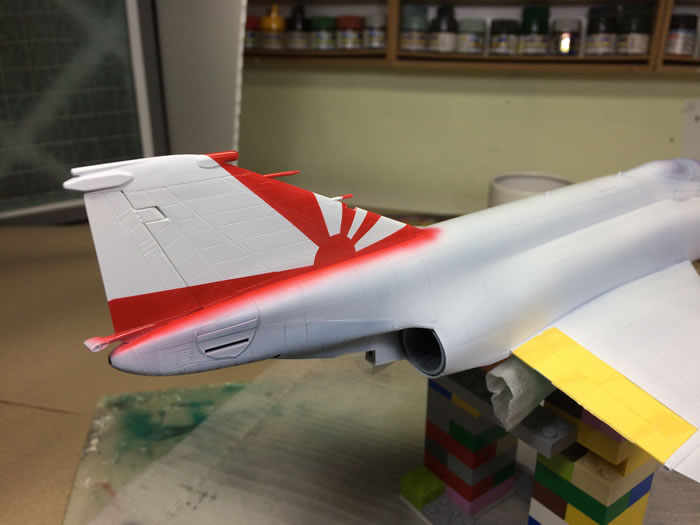
On the subject of masking, I also decided to mask and paint all the walkway markings in black rather than use decals. I tackled the anti-glare panel the same way, but found I really couldn’t get the shape right. In the end I used the decal, which blended in better than I thought it would under a coat of Gunze GX113.
The decals did need adjusting to accurately represent 151000. The ejection seat markings on the real thing are an isosceles triangle rather than equilateral, and only one on each side. I found suitable examples from an old Hasegawa A-4 sheet. The canopy rails should have crew names in white on both the front and rear, but the kit only provides the front name. I couldn’t find out what should be on the rear rail and so left it blank, but this omission does really irk me. There is a strange gap between the R and A in ‘CORAL SEA’ which is not present on the real thing and I only noticed this after the decals had dried. The kit comes with extensive stencils but I could not see any on the seven images I had of 151000 and so left them all off. There are some black markings on the AC intakes that I had to add with spare bits of decal stripe.
One weak area of both the Hasegawa and Academy F-4 kits is the moulded in tail pitots. I always manage to snag them and snap them off. You would have thought I’d have learned by now to stick some masking tape over them to protect them. This F-4N was no different; during decalling I caught one of the pitots with my finger and snapped it off. Repair was difficult and not entirely successful as the plastic Academy use has a lot of give in it and was very distorted around the break, plus the tail markings were already done.
The canopy mirror is, I think, oversized and poorly shaped to fit the curve of the transparency. I should have used a spare Hasegawa part for this.
Like the Hasegawa kits I built alongside this Phantom, the end result is somewhat indifferent. I do like the overall sheen and the clean look I achieved, and I love the markings. In some areas the Academy kit is better than the Hasegawa; in others not so good. I regard the Hypersonic tailplanes and AC intakes as essential additions. Overall I have the say the fit of this kit was very good, and the surface detail is much better and more complete than in the older Hasegawa kits. The only remaining Phantoms I want to build are the FG.1 and an F-4B. For the latter I will get another Academy kit one day – hopefully moulded in grey and not the annoying multi-coloured plastic this kit came in – and make use of the broken Hypersonic tailplanes I’ve already got with the slotted leading edge sanded off.
This ends what was a pretty mammoth project for me: four 1/48 Phantoms built in under six months alongside each other.
As individual subjects they have suffered for this: the finishes have been a little rushed and there are numerous small errors that I could have corrected but didn’t. Individually I would describe each of them as workmanlike.
However, had I built them consecutively I would never have managed to get through them so quickly, and I would have lost interest and motivation.
With advancing years and 156 kits in the loft waiting to be built, what matters to me at the moment is finished models, and by the end of November I’ve managed nine completed this year so far. I don’t plan on repeating a project of this scale too often, but there are four 1/48 Hasegawa A-4 kits waiting to be built that I hope to do concurrently within the next couple of years…
For more modelling articles like this, please visit my website www.jonbryon.com
Text and Images Copyright ©
2019 by Jon Bryon
Page Created 3 January, 2019
Last Updated
10 January, 2019
Back to
HyperScale Main Page

|
Home
| What's New |
Features |
Gallery |
Reviews |
Reference |
Forum |
Search