Kinetic 1/48 scale
Dassault Mirage IIIO
by Roger Hardy

Revell's 1/72 Shackleton is available online from Squadron for only $35.99!
S u m m a r y |
Item No. |
Kinetic Model Kits Item No. K48050 - Mirage IIIE |
Contents and Media: |
More than 270 parts in grey plastic and 15 parts in clear; markings for five schemes. |
Scale |
1/48 |
Price: |
£32.99 from www.hannants.co.uk and other hobby retailers |
Review Type: |
Full build review |
Advantages: |
Great detail and sharp panel lines; accurate detail; extensive weapons load; crisp decals |
Disadvantages: |
No typical Mirage III underwing fuel tanks; no Matra 530 Air to Air missile. |
Recommendation: |
A superb kit of the Mirage IIIE series and definitely the best on the current market. Highly Recommended. |
Background
For a full history, have a look at: http://en.wikipedia.org/wiki/Folland_Gnathttps://en.wikipedia.org/wiki/Dassault_Mirage_III
The Mirage series was an innovative attempt by the French aircraft industry to catch up with aviation development after World War II. The company’s founder and Mirage designer, Marcel Dassault, was born Marcel Bloch, to Jewish parents, and led a successful aircraft company in the pre-war years. During the war he refused to collaborate with the Nazis and was sent to Buchenwald concentration camp, where he was lucky enough to have survived. Dassault was the codename used by his brother, General Darius Paul Bloch, when he served in the French resistance, and is derived from ‘char d'assaut’, French for "battle tank".
The delta Mirage series was a parallel development to the Mystère/Etendard series which had conventional tailplanes and both were successful. Contrary to much popular British opinion, the Mirage was not copied of the Fairey Delta 2 but was an independent development based on German research by Alexander Lippisch, amongst others. The first Mirage I flew in 1955 and was progressively developed into the much larger Mirage III. Unlike UK fighter development, Dassault tried to keep the overall dimensions and weight as low as possible so, comparing the Mirage III to the contemporary English Electric Lightning, the Mirage did much the same job with half of the thrust and weight (and cost). It was a massive export success.
In the Box
This kit was given a full in-box review by Mick Evans: (http://www.hyperscale.com/2015/reviews/kits/kinetic48050reviewme_1.htm) so I won’t repeat it here except to endorse his first impression of accuracy and quality, although there a little more flash than you might expect.
I have previously built the Heller IIIC and Eduard’s IIIE so the bar was set quite high.
Of these, the Heller offering is dated but good whereas Eduard’s is wonderful in detail (I built the Royal Edition) but poor in rather obvious areas such as the absence of internal formers in the fuselage making a seamless fuselage-to-wing joint difficult to achieve.
This model looked to be sufficiently good that I decided to build it straight-from-the box with only the addition of Caracal’s new decal sheet CD48067 as I wanted to do an RAAF example but with the early natural metal finish.
The decal options in the kit are for the dowdy grey finish adopted later. Note that, for the early schemes, the short-range missile option would be the Sidewinder AIM9 rather than the Mara R550 Magic missiles. Both are provided.
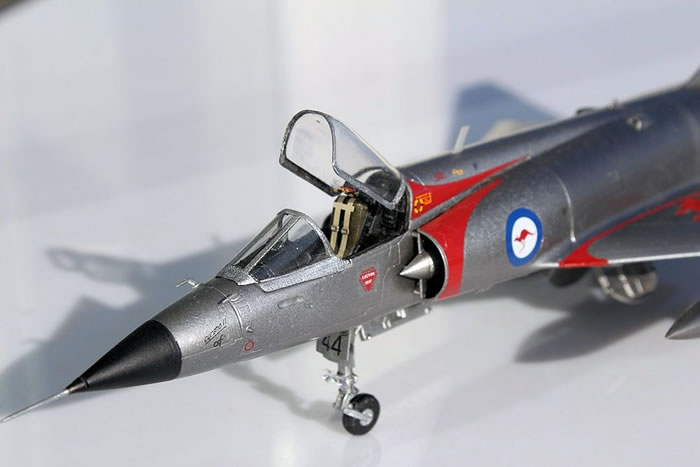
Cockpit and Fuselage
The first thing you notice is the nice detail in the cockpit, then you realise that you’re going to have to paint all those little instruments with a 000 brush as there is no decal (or Eduard do a nice pre-painted p/e ockpit set for this kit if you prefer: https://www.hannants.co.uk/product/EDFE742). People’s opinions vary regarding decals. Personally, I prefer to use p/e panels, even though they are too two-dimensional. In the absence of that, a decal is a nice lazy option. The last resort is brush-painting! Needs must. Next question: what colours? The instructions are rather imprecise but Mark Lynch did a nice job at 1/32 scale here:
http://www.hyperscale.com/2009/reviews/accessories/fishera3204wfreviewbg_1.htm, so you need look no further. The cockpit interior is black, by the way. Then you realise (of course) that you also need to find some harnesses but then you expected that, didn’t you? I used a 1/48 Luftwaffe WWII bomber harness which looks about right on the seat. The finished cockpit looks good, although probably not up to the same standard as Eduard’s Royal Edition but it’s good enough for me.
The fuselage clicks together with precision and the prospect of a seamless join seems possible. The instructions don’t remind you to add a nose weight; maybe the Mirage III doesn’t need one but it’s safer to add one. If you forget, there’s no problem because the nose cone goes on last of all and you can put one in there. The jet pipe assembly does not need to be cemented just now as it can be popped in at the final stage so you don’t need to mask it when the remainder is sprayed.
Wings and Intakes
I have made enough Mirages to know that the joints between the intakes/fuselage and wings are fraught with difficulty so I did not attach the intake outer parts just yet and waited until the wing was in place. The wing parts fit together with a satisfying click and the upper wing panels have little hooks on the attachment tags to ensure that there is no gap with the fuselage sides. A very thoughtful touch; this kit is very well engineered. I have to confess that I left the upper wing parts off until the lower wing was in place and I think this was a mistake because I had to cut away the hooks and ended up with a less god fit and some small gaps between the upper wing and fuselage which I had been trying to avoid. Best to stick to the instructions.
The intake outers were then added and it was easier to ensure good joints here, although there is still a slight mismatch where the join the lower intake parts. I used a little viscous primer to seal the joints; I use Alclad’s grey primer which I have allowed to evaporate a bit, then it can be brush-pained and seems easier to use than Gunze Sangyo’s Mr Surfacer, which is the nearest equivalent. The latest generation of kits fit together so well that I have started to use this method of gap filling instead of the more labour-intensive superglue or Milliput. To get a smooth joint all it takes is some rubbing down with fine wet-and-dry or Micromesh. For those who don’t know, Micromesh is like exceedingly fine wet-and-dry and comes as strips of flexible cloth with a rigid sponge to act as a support. There are various grades and, used wet, it is possible to get excellent finishes with them as they ultimately polish the plastic.
Undercarriage
I decided to assemble as much as possible before painting so next comes the nose undercarriage. Note that the leg angles rearwards slightly and this is correct. The rear door D33 has some locating lugs on it but they don’t locate into anything so you need to cut them off for the door to sit at the correct angle. This door has the retraction jack moulded into it which is another thoughtful touch. The main undercarriage slots together nicely and remember that there is nothing approximate about the fit of the parts on this model; if it doesn’t fit, you’ve probably got it the wrong way round. Everything is handed. The wheels themselves are in multiple parts so that they can be painted before assembly and this makes it easier to paint the hubs. They are not weighted, however. I left all the wheels off until final assembly. The main undercarriage legs cant inwards although the wheels are vertical.
Last Bits and Pieces
There are all sorts of aerials, scoops and suchlike to add but you may want to leave most until after painting to avoid damage. You have the choice of flaperons up or down; I chose down as they are often like that on the ground although the inboard sections are usually deflected a bit less. The airbrakes can be added at any time and are usually cracked open on the ground but not normally fully deployed except for landing.
I applied Alclad grey primer (a wonderful product - as good as Tamiya's rattle-can primer but at a fraction of the price) to check for blemishes. I originally intended a highly polished surface and a blemish-free finish is essential. I then used the Alclad 2 gloss black lacquer but the finish was orange-peel. I tried again with the same result and was then concerned about the thickness of the underpainting, now three coats. I thought it might be OK but should have learnt from experience! These finishes need a blemish-free and truly glossy finish to work properly. Read what it says on the tin! So, for me the problem is getting a glossy black finish so I got in touch with Tony at Alclad 2 and he advised that the gloss black lacquer must go onto bare shiny plastic, not on grey primer, which is absorbent and stops the true shine coming through. Tony advises that he uses primer over the joints only, to check them, then rubs them back using Micromesh until he gets a good shiny plastic finish. Problem solved! Well, not this time but now I know. Actually, I was not pleased with the finish I got and I put the model aside for a couple of months and it nearly ended up in the bin. If I’d watched these videos first, I’d have had no troubles: http://alclad2.com/how-to/video-instructions/. I know that Alclad finishes are not the easiest to use or get right but if you want an effect that looks like metal, not silver paint, they are the probably still the best choice.
I carried on and applied some different tones of Alclad metal finished to get some variety and left it to cure. These went on beautifully but I wish I had had the same overall perfect experience as with my recent Airfix Meteor (simply Alclad grey primer and Aluminium). Incidentally, the Kinetic instructions include a specific painting guide for Alclad finishes if you want to get an accurate representation of a polished example - another nice touch.
The only thing the painting instructions don’t tell you is the colours of the Sidewinder AAMs. They are normally light grey with a darker grey seeker head and front fins.
As an aside, many modellers, like me, keep some acrylic paints for years (I only use acrylics, mainly Tamiya or Gunze if I can get them) and they normally remain usable although they may need a little thinners. Alclad finishes use a really volatile solvent and, even if unused, can have a shelf life. If opened and partly used the life can be reduced. However, Tony at Alclad 2 advises: "I kept bottles from the original batch (1999-2000) and tried them over a period of years. Polished and Chrome stayed as new for about 5 years, the basic aluminiums got tired after 3-4 years-I think as the bottles depleted solvents evaporated into the empty space which thickened the lacquer."
Colours and Markings
The kit markings supplied are as follows:
French Air Force:
Mirage IIIE 4-BB of Squadron EC 1/4 “La Fayette” of the Armee de l’ Air BA 116 based a Luxeuil in 1967. This aircraft appears to be in a high speed aluminium scheme.
Mirage IIIRD 4-BB of Squadron EC 1/4 “La Fayette” of the Armee de l’ Air BA 116 based a Luxeuil in 1967. This aircraft is finished in natural metal.
Royal Australia Air Force:
Mirage IIIO Serial A3-7 of No 2 Operational Conversion Unit of the Royal Australian Air Force based at Williamtown in 1987(?). This aircraft is finished in an early Grey scheme as an experimental for the new F/A-18 Hornets.
Spanish Air Force:
Mirage IIIEE Serial C11-6 of Ejectito del Air "ALA11" based at Manises Air Base in 1986.
The only kit markings I used from this sheet were those for the missiles which have to wrap around the slim missile body. They don’t! Well, they do…in the end.
The Caracal markings for RAAF aircraft (https://www.hannants.co.uk/product/CD48067) are printed by Cartograf, so quality is guaranteed. They provide markings for 20 options, but it should be possible to build many more RAAF Mirages using the markings on this sheet. The comprehensive stencil sheet features several styles of markings for maintenance stencils as applied to the RAAF Mirage IIIE fleet over its entire service period. Caracal also provide enough ejection seat warning triangles should you wish to build a twin-seat Mirage IIID using the conversion kits in the market. Similarly, the serial number sheet features four distinct styles of serial numbers for the entirety of Mirage III operations in the RAAF.
The options on this decal sheet are:
-
Mirage IIIO A3-21, 75 Sqn, RAAF 1965
-
Mirage IIIO A3-38, 75 Sqn, RAAF 1966
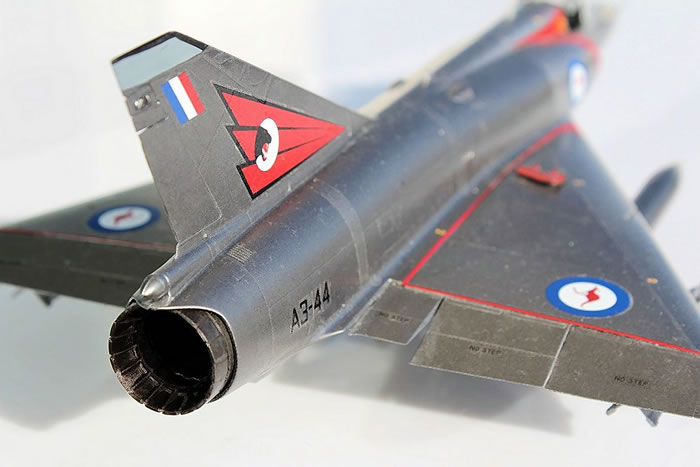
-
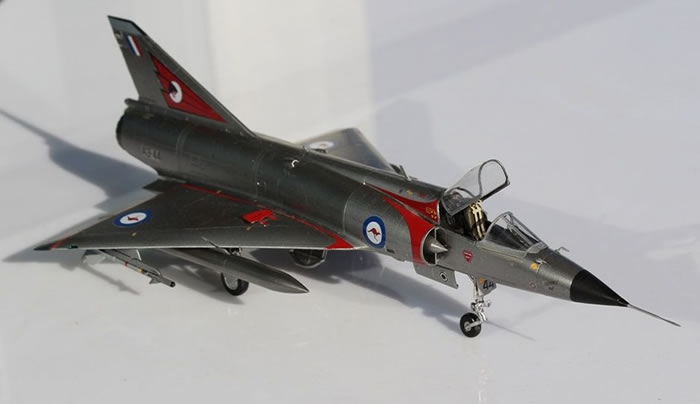
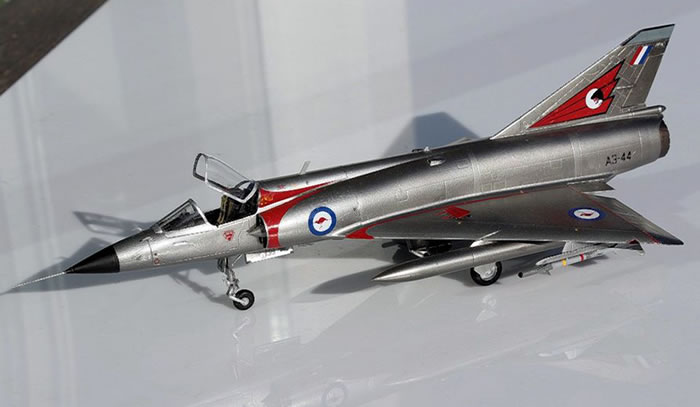
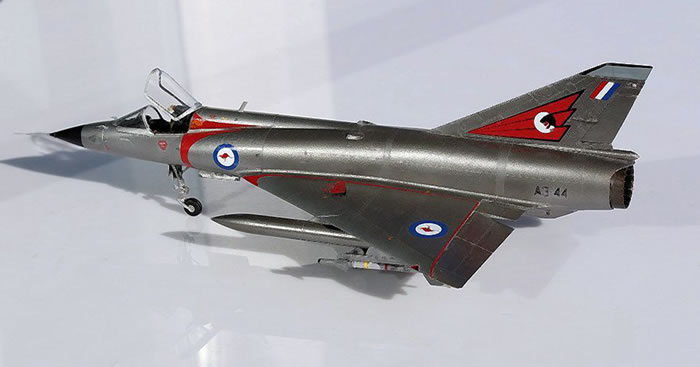
Mirage IIIO A3-44, 76 Sqn, RAAF 1973
-
Mirage IIIO A3-3, 2 OCU, RAAF 1965
-
Mirage IIIO A3-41, 77 Sqn, RAAF 1971
-
Mirage IIIO A3-84, 3 Sqn, RAAF 1974
-
Mirage IIIO A3-4, 77 Sqn, RAAF 1971
-
Mirage IIIO A3-100, 3 Sqn, RAAF 1975
-
Mirage IIIO A3-54, 77 Sqn, RAAF 1975
-
Mirage IIIO A3-21, 3 Sqn, RAAF 1978
-
Mirage IIIO A3-40, 76 Sqn, RAAF 1974
-
Mirage IIIO A3-24, 75 Sqn, RAAF 1977
-
Mirage IIIO A3-68, 79 Sqn, RAAF 1986
-
Mirage IIIO A3-15, 75 Sqn, RAAF 1986
-
Mirage IIIO A3-20 "Matilda", 77 Sqn, RAAF 1986
-
Mirage IIIO A3-90 "Charlotte", 2 OCU, RAAF 1983
-
Mirage IIIO A3-31, 3 Sqn, RAAF 1985
-
Mirage IIIO A3-49, 77 Sqn, RAAF 1987
-
Mirage IIIO A3-34, 79 Sqn, RAAF 1986
-
Mirage IIIO A3-2, ARDU, RAAF 1986
There are so many variations possible that you are referred to their website for additional information on decal placement, which is a bit of an inconvenience if your modelling bench is not next to your computer. I think that the Mirage in RAAF markings looked the best of all the colours this aircraft carried.
Final Assembly
There’s not much to add except that you need to check your references as to which aerials and sensors you need to add. I used the supersonic tanks and Sidewinder missiles. The fit of the windscreen to the fuselage left a bit to be desired and I trimmed mine away inside to get a better fit, though it’s still not perfect.
Well, I’m glad that it didn’t end up in the bin because it has a realistic metallic look, although not the polished perfection that I had intended. This is probably the best 1/48 Mirage kit around and has spawned a number of kits of most Mirage /Kfir variants. I preferred it to the Eduard offering as the engineering and fit is better. Any build problems were down to me, not Kinetic who seem to be producing great kits. Nice to see a resplendent early RAAF Mirage!
Highly Recommended
Model, Images and Text
Copyright ©
2017 by Roger Hardy
Page Created 20 February, 2017
Last Updated
21 February, 2017
Back to HyperScale Main Page
|
 Home
| What's New | Features | Gallery | Reviews | Reference | Resource Guides | Forum |
Home
| What's New | Features | Gallery | Reviews | Reference | Resource Guides | Forum |