F-101C Voodoo
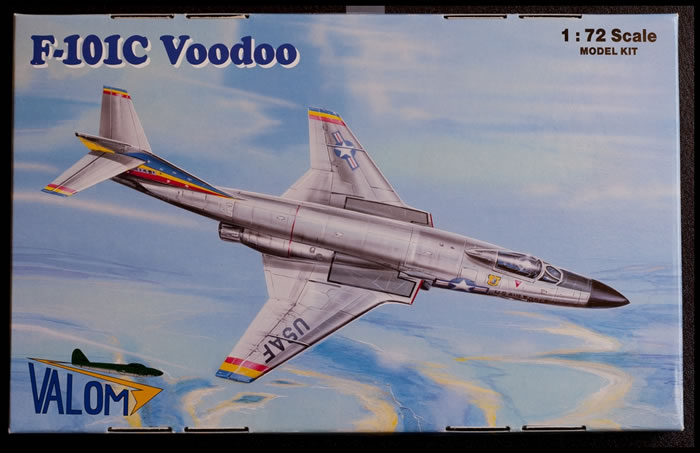
Valom, 1/72 scale
S u m m a r y : |
Catalogue Number: |
Valom Kit No. 72095 - F-101C Voodoo |
Scale: |
1/72 |
Contents & Media: |
Plastic, photo-etched and resin parts, |
Price: |
£26.92 (Export) or £32.30 (EU) plus shipping available online from Hannants |
Review Type: |
First Look |
Advantages: |
Crisply recessed surface textures; good detail. |
Disadvantages: |
A number of detail issues. See text and images for details. |
Conclusion: |
I like these kits a lot and recommend them over the older Hasegawa kits. |
Reviewed by Scotty Battistoni

Sword's 1/72 scale Ki 44 Shoki is available online from
Squadron.com
We 1/72 scale builders have waited for a while for an updated single seat F-101 kit.. Haseagawa originally released theirs back in the 1960's. This kit still holds up well to this date in outline, and will build up into a respectable kit. But it will take some elbow grease to do so, I myself having just done this a few years back. Finally Valom from the Czech Republic has helped us out with a new tooled single seat kit. Was the wait worth it, in my opinion yes.
Valom has released two kits of the single seat Voodoo's in 1/72 scale. Kit # 72093 (RF-101) and # 72095 (F-101). Let me start off by saying that technically the kits are actually "A" variants as far as the vertical tail is concerned. But this is a really easy fix by adding a small air scoop pipe like fitting on the leading edge of the vertical tail. More on this later. Both of the kits are the same contents wise save for the decals and boxart.
So depending on which RF-101 livery you want to build your kit in will decide on which kit to buy. Valom provides the modeler with 65 grayish tan colored styrene parts with fine recessed panel lines.. Also you get 13 clear styrene parts on which is a closed or open option canopy.
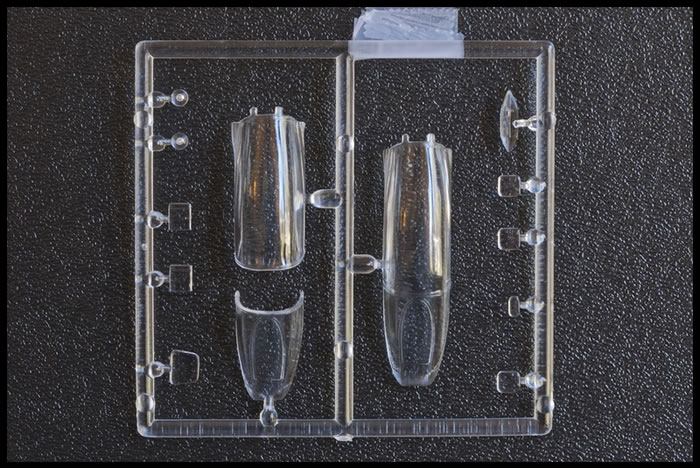
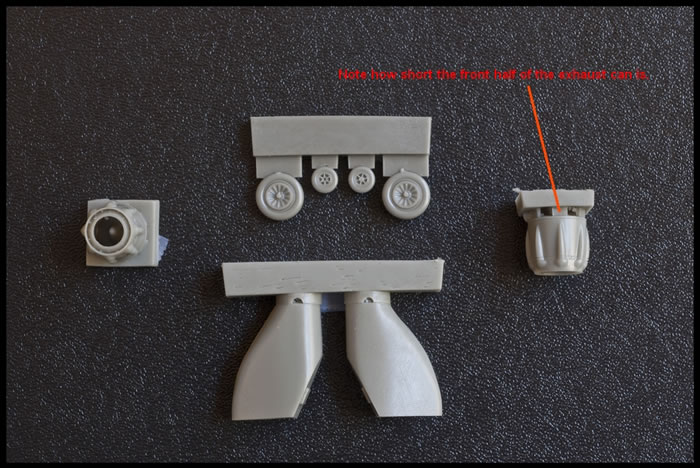
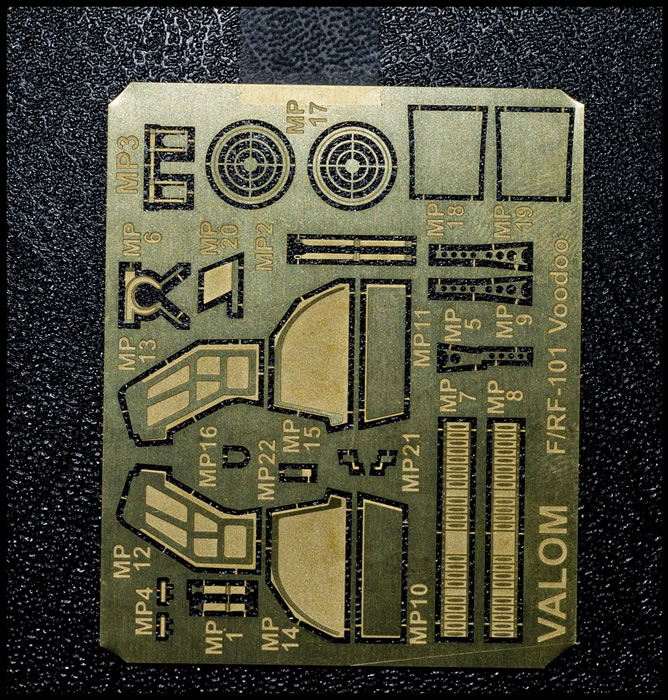
You also get polyurethane air intake ducts, exhaust nozzles and wheels, along with a photoetch fret. The decal sheets are nicely printed and in register and appear to be nice and thin.
Now let me start off with some bad news on the kits. Valom really goofed and left the wing fences off of the kits. It appears they intended to do these with photoetch but to no avail.
I have emailed Valom from two different email accounts asking about this oversight, but have yet to receive a response. The other two most obvious errors and it seems to be a common one for the single seaters are the fact that the exhaust sections are not captured correctly detail wise and length.
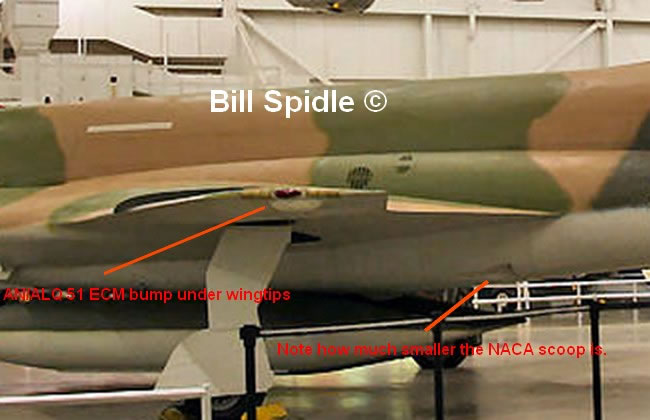
And there are two NACA inlets on the bottom of the fuselage underneath each engine section towards the rear. Valom made these too large. To me this shows that the engineers are only looking at drawings and not actual photos. The original Hasegawa kit and the new Kitty Hawk 1/48 kit both suffer from the same exhaust can problem.
So let us work our way around the kit starting with the Tail section (empennage) and work forward. As stated earlier the kits vertical tail is actually that of an "A" variant. Have a look at the photo to see the small scoop that denotes the "C" variants.
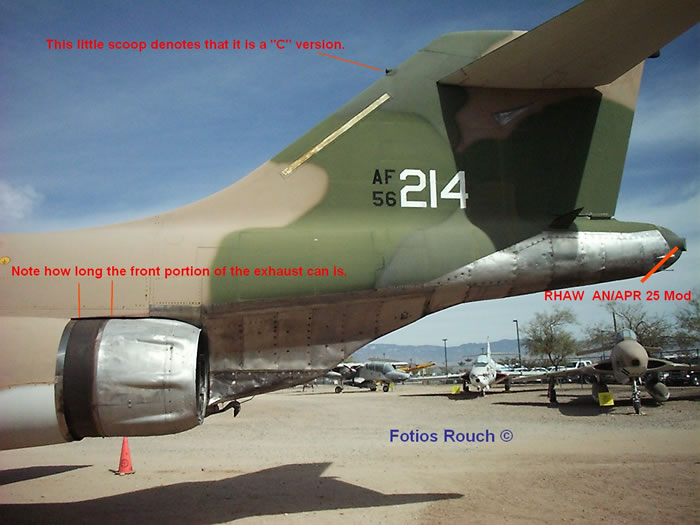
Another little glitch is that on real F-101's the tail end of the upper vertical stab ends in a clear navigation light. Otherwise Valom nicely captured this rear area. Some modelers may complain about lack of airbrakes. But these were very rarely left open after use. I do like how clean the horizontal stab pivot section is on the Valom kits versus the older Hasegawa kits. And the so called "alligator skin" plating around the lower fuselage is nicely done as well.
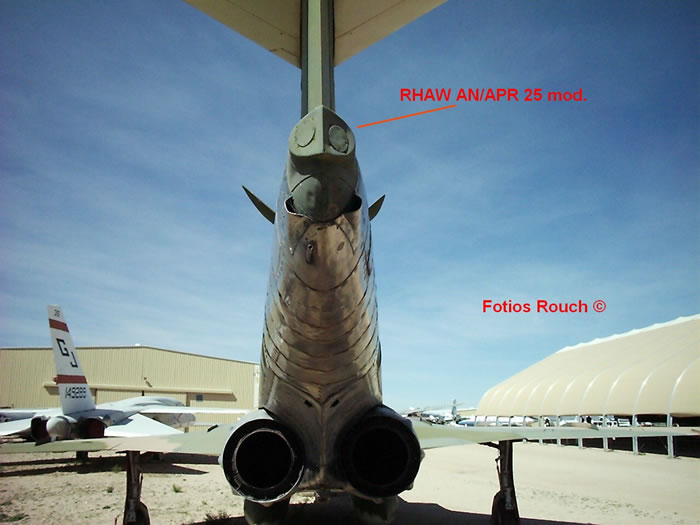
But on a sour note as previously stated the actual exhaust cans are not quite right.. Compare the photo with your kit exhaust cans at the point where the cans join the fuselage. You can see that the resin ones are shorter at the front end attachment point. Two things to watch out for.. If I were you I would clip my horizontal stabs off of the parts sprue as soon as you get your kits in.. The sprues are warping the stabs on both of my kits. Next thing is not all F-101's had tail hooks installed.. You will need to check photos to see if your bird that you are modeling had the hook in place.
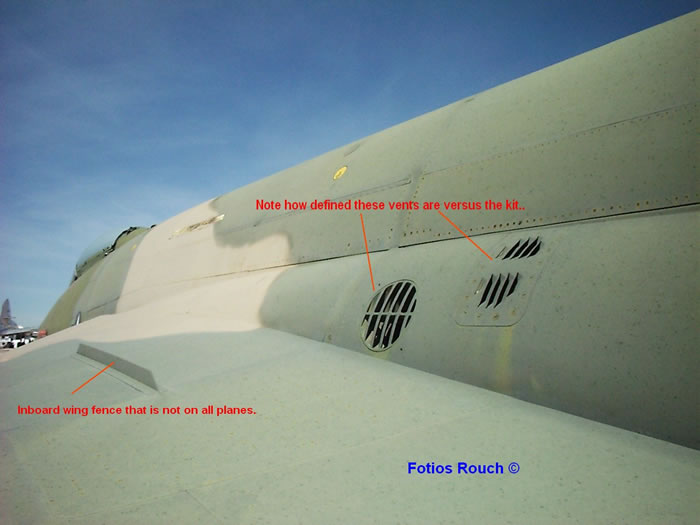
Mid fuselage section / main wings. Valom actually gives you boxed in wheel wells and nicely detailed landing gear on their kits. However as previously stated they made the lower NACA intakes far too big. These should be about 30% smaller in size. One other little thing and at least Valom attempted it is the fact that there are vents about mid chord at the wing root section on the fuselage.. These are a little soft but present in their representation. This is more of a result of limited run tooling so I cannot fault Valom too much on this.. Valom does give you decals for the vents should you decide to go that route. The air intakes to my eyes appear to be correct as does the shape of the splitter plate. Valom does give you air intake ducts and engine faces also to fill that big void. My one little worry has to do with the landing gear as there isn't much post wise for the wheels to glue to (on both main and nose). The Voodoo is a beast, so in the long run this may prove a weakness on many a built kits due to weight of the model. The other thing that some may hate are the PE doors. And in some respects the photoetched doors are actually too thin for the Voodoo with the exception of the outer mains.. Now for the biggest complaint, the AWOL wing fences, yes they can be made, but they shouldn't have to be. Speaking of wing fences though a special mention needs to be made.. The outboard main fences were on all production birds. But it appears that all single seat variants and at least some 101B's were built initially "without" the inboard fence that is over the wheel well. I believe this is actually a wheel well stiffening rib that was added at some point in the Voodoo's lifespan.
Forward fuselage area. Valom should have technically split the fuselage aft of the canopy to have done it correctly as there are subtle but easily added differences between the fighter and recce variants.. Some details on the fighter variants are still vague such as were there shell ejector chutes? This I cannot answer.. What I can tell you is that the radar nose looks good but there should be some gun gas purge doors scribed in on the side of the fuselage below the cockpit. Also two small NACA inlets (one under the left side in front of the air intake and one under the right side just aft of the nose cone).. These are missing from the fighter variant. The recce nose section is actually representative of what is called a Project 1181 camera fit.
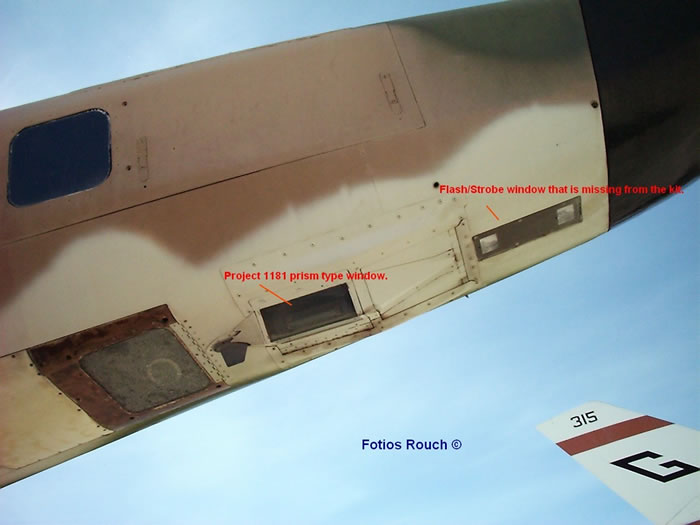
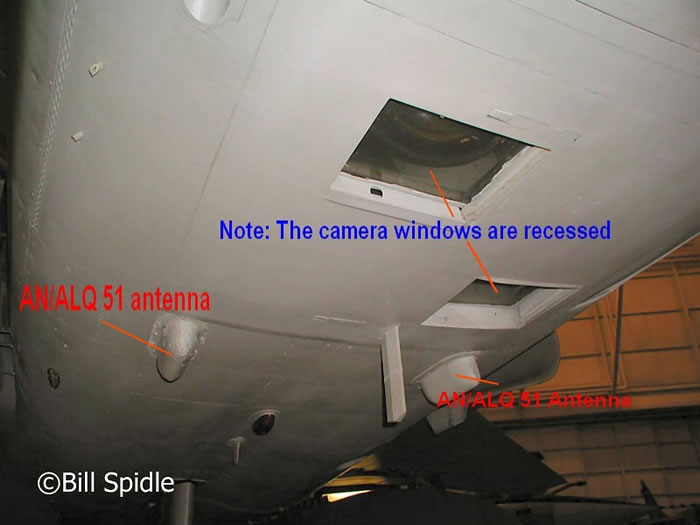
Which puts the kit on a time frame of 1963 onwards. So it will take some minor work to do an earlier RF-101 A or C variant that is pre Project 1181. Basically sand the prisma type window off and replace it with a flat camera window.. Also missing from the recce variants is the same said NACA vent on the left lower side in front of the air intake. Another little glitch is that RF-101's also had a built in flash/strobe section that is missing from the kit. The is a small rectangular type window just in front of the Project 1181 window (see photo).. One thing to mention is the kit gives you the rear camera windows. These are actually recessed on the real planes. And they are normally covered on the ground with built in shutter type doors to prevent damage during takeoff and landings. The kit gives you a cockpit tub, seat, glare shields (two types) and instrument panels (two types). The basic shapes are there but are void of any details. The recce variant glare shield should have some stiffening ribs added to it to correctly capture the look on the real bird. Valom does give you nicely done decals for the consoles and panel should you choose this route. Also a True Details F-101 seat would benefit your kit as well. Valom also gives you a nice boxed in nose wheel well area. One other small detail that is missing are the AOA vanes on the sides of the fuselage. Valom gives you a closed canopy and open canopy option as well along with clear camera windows
Now let me discuss other things that are missing from the kit, but are not true game stoppers.
F-101's have a center pylon that is missing from the kit. These are almost always installed on the fighter variants, especially those operating in the USAFE areas. Their purpose was a sinister one at that for the fighter variant... The recce variants also used a centerline pylon in which to mount a photo flash pod taken directly from the RF-84F squadrons. Some RF-101's had small wing pylons mounted on which ALQ pods were employed during the Vietnam war. Note though that these pods and pylons were not popular with the pilots as they caused wing warping and slowed the recce birds down. However, they were used in the SEA theatre on several occasions despite the problems.
Final note is that many RF-101's received RHAW and ECM upgrades to them due to the ever increasing SAM threats. First, many RF-101's got the AN/APR 25 RHAW receivers that were denoted by a bump with two nodes attached to the parachute door on the tail as well as two Nodes protruding from the left and right side of the recce nose cone. The AN/APR 25 mods started in Spring of 1966.
Next in the Spring of 1967 came the use of the US Navy's AN/ALQ 51 ECM mods being mounted on RF-101's. These mods can be detected by looking for two small rectangular bumps just aft of the rearmost camera windows on the lower fuselage. Also there will be a bump out protrusion underneath each wingtip. One other little bump that I cannot find out what it is pertains to is the one on the fairing aft of the canopy. Some F-101's do not have it yet at some point it was added.
F-101 livery. As stated earlier which RF-101 you want to model may be helped by buying the regular fighter variant in order to get the wing walk decals for the NMF or Aircraft gray birds (remember both kits are the same save for the decals). Speaking of NMF finishes, the F-101 family did not get the Project Look alike Silver lacquer. However, F-101's and RF-101's quickly started to suffer from corrosion. Several years ago I spoke with the late Dave Menard about the blotchy panels on Voodoo's Dave told me that he personally saw RF-101's and F-101's with some type of gray paint on various panels in order to help prevent corrosion. This can be confirmed in some color photos. What type of gray paint is up for questioning, but Dave did say it was a matte finish. Many books claim that Silver lacquer was also used on various panels to stop corrosion. This I cannot verify... What eventually happened though for corrosion control is that the RF-101 birds were painted in overall aircraft gray, and then went onto the SEA scheme. What few F-101C's there were left in the late 60's got the overall Silver lacquer and at least one was painted in the SEA scheme.|
So in conclusion it may sound as if I have nit picked the new Valom kits to the nth degree. And it may sound as if they are not worthy of buying. But that is not true.
I do indeed like these kits a lot and recommend them over the older Hasegawa kits. Shape wise / dimensional accuracy-wise, I am not sure of the best drawing on the market but the kit does fall right in line with the Detail & Scale drawings. However the kit does not line up with either the Warpaint drawings or the Squadron Signal Modern Military Aircraft drawings in their Voodoo special book. (The Warpaint and Squadron drawings do not match each other) The wingspan is quoted at actual 39' 7" where as the kit measures 39" 5". Length (fighter variant) as actual 67' 4", the kit measures 67" 5". So to me .013 to .026 thousands of an inch off is negligible to discuss or hold against Valom.
Acknowledgements
I would personally like to thank Bert Kinzey, Fotios Rouch, Bill Spidle, and the late Dave Menard for allowing me to use their expertise or photos.
Please note: there are plenty of good RF-101 and F-101 photos you can find on Google searches. Especially is you Google search RF-101 SunRun, this will let you see an early camera layout.
Review Text & Images Copyright © 2015 by Scotty Battistoni
Page Created 25 November, 2015
Last updated
26 November, 2015
Back to HyperScale Main Page

|
