Trumpeter's 1/48 scale
F-100D Super Sabre
by Roger Hardy
 |
F-100D Super Sabre |

Trumpeter's 1/48 scale F-100D Super Sabre is available online from Squadron
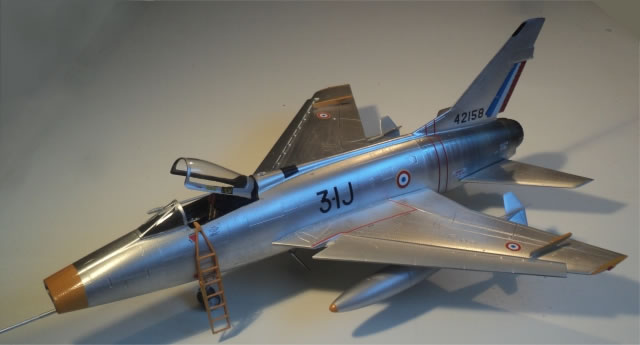
 Trumpeter 1/48 North American F-100D Super Sabre in French Air Force colours using Alclad II Trumpeter 1/48 North American F-100D Super Sabre in French Air Force colours using Alclad II
Kit: 2839
Price: £32.99 from http://www.hannants.co.uk/
Decals: Four options
Reviewer: Roger Hardy
Notes: Injection moulded, straight-from-the-box
Brief History
The North American F-100 Super Sabre was a supersonic jet fighter aircraft that served with the USAF from 1954 to 1971 and with the Air National Guard (ANG) until 1979. The first of the Century Series collection of USAF jet fighters, it was the first USAF fighter capable of supersonic speed in level flight. The F-100 was originally designed by North American Aviation as a higher-performance follow-on to the F-86 Sabre. Adapted as a fighter bomber, the F-100 also served in other NATO air forces and with other U.S. allies.
France's Armee de l'Air was the first foreign air force to receive the Super Sabre. The first Armee de l'Air Super Sabre arrived in France on May 1, 1958. It was an F-100F two-seater. Eventually 85 F-100Ds and 15 F-100Fs were supplied to France. They were assigned to two squadrons, Nos. 3 and 11. Since at that time France was a full member of NATO, French Super Sabres were initially attached to the NATO 4th Allied Tactical Air Force and were stationed in Germany.
Long before American involvement in Vietnam, French Super Sabres had already flown combat missions, these being strikes flown from bases within France against targets in Algeria.
When President Charles De Gaulle pulled France out of NATO's command structure in 1967, German-based Armee de l'Air F-100s were transferred to air bases on French soil, these bases having recently been vacated by USAF personnel.
The last French Super Sabres were withdrawn from service in 1977-78, and were replaced in service by Jaguars. Surviving Armee de l'Air Super Sabres were returned to American control and they were flown to Great Britain for scrapping.
I wanted to build this as a French aircraft with a natural metal finish. One, because I like aircraft with roudels; Two, because I find the USAF marking too flashy or (camouflaged) too dull and; Three, I wanted to try Alclad shiny metallic finishes again.
In the Box
I suppose that Trumpeter are still the new kids on the block and some love ‘em, some loathe ‘em. I am in the former group but with some reservations. I like the surface detail. I like subtle indented rivets, I like the perfection of the moulding; I like a model that doesn’t need filler. I don’t like glossy decals or to have little choice over deployment of control surfaces. I like to think that my kits have been produced by enthusiasts rather than businessmen and I sometimes get the impression that the guys at Trumpeter know what aeroplanes look like but not how they work.
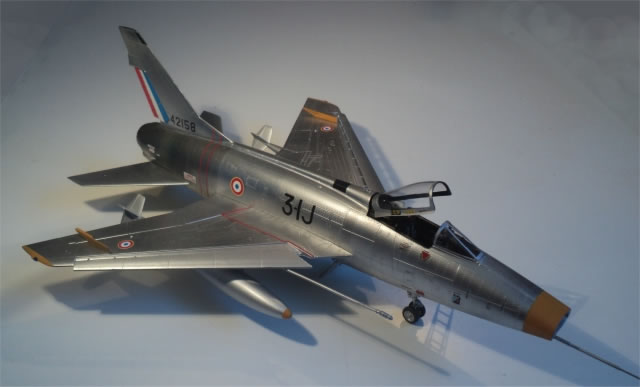
Molded in light grey styrene, this kit is presented on seven sprues plus two sprues of clear styrene parts. This kit features finely scribed surface details and no sign of the 'mad riveter'. There are 168 parts to make up this kit, including 4 Sidewinders, banana fuel tanks, abuddy-buddy in-flight refueling pod and different speed brakes. You also get a boarding ladder but no stores for the outer pylons. All of the control surfaces are separate, including the leading edge slats which were often deployed when the aircraft was parked.
Markings are provided for two natural metal and two camouflaged versions:
-
F-100D-25-NA, 55-3668, 20 TFW Commander's aircraft, RAF Weathersfield
-
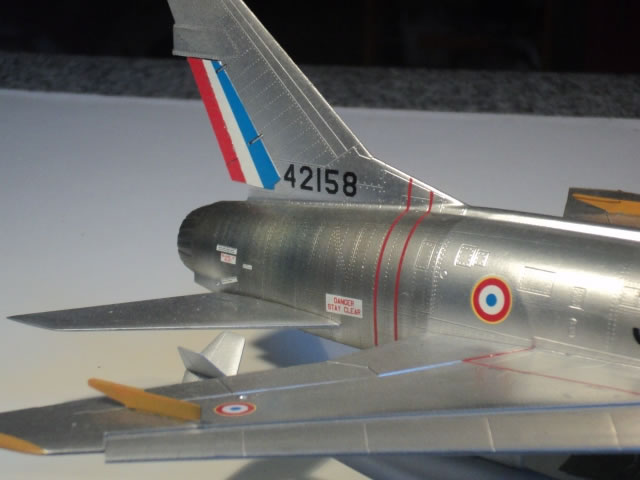
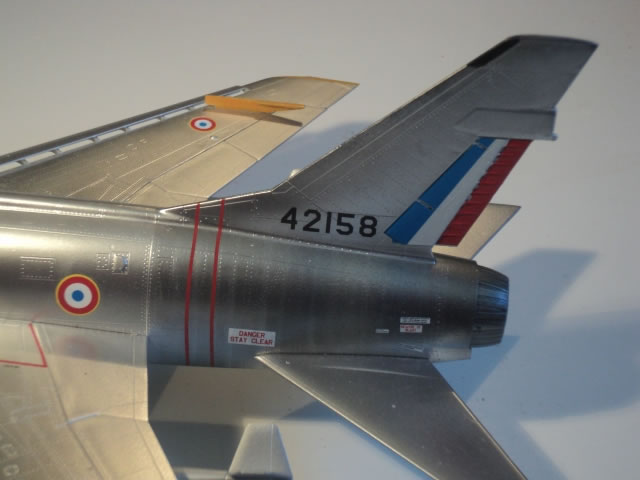
F-100D-10-NA, 54-2158, 3-IJ ‘Navarre’, French Air Force (this is the one I modelled)
-
F-100D-25-NA, 55-3634, 308 TFS/ 31 TFW, Tuy Hoa AB, RVN
-
F-100D-10-NA, 54-2154, 11-YK, French Air Force, Sharkmouth
Incidentally, this kit does not include the F-102 afterburner nozzle which was fitted after 1975 to ANG D and F models. If any modeler needs one, he’ll have to get the Trumpeter F-100C as one is included there (not that it was an option on the real C).
I defied normal practice and followed the instructions. As is usual with my reviews, I will concentrate on the good and the bad and what to avoid. The construction starts as ever with the cockpit and the instrument panels and side console details are provided as multi-part decals. These actually look very good and avoid the two-dimensional look common when decals are used like this. The secret is to realize how three-dimensional cockpits are and Trumpeter have worked this out. The ejector seat looks fine to me but I’m sure that some aftermarket replacements will improve the look. I used the kit parts but added some generic Eduard seat belts because every seat needs some belts because they’re what you notice first when looking into the office.
The cockpit assembly sits on the intake trunking which needs to be painted before closing up. The assembly of the fuselage is straight-forward but the instructions tell you to install the open speedbrake at this stage. DO NOT DO THIS (or mount it retracted). You can do it at the end and avoid the inevitable destruction of the retraction jacks. I had to make replacements. You do not need any nose weight. The remainder of the assembly is simple apart from the many undercarriage doors, but the attachments are clear and obvious and it’s easier than you’d expect. The kit provides pylons for double Sidewinder missiles and outer pylons but I couldn’t find any pictures of French aircraft so equipped, so filled in the holes, leaving only the ones for the big banana drop tanks. The leading edge slats are provided as separate items and can be modelled extended or retracted with the former as the standard. I checked references and saw that these aircraft often sat on the ground with the slats deployed so went for this option as the easy way out. I don’t know whether retracting them would be good as I didn’t try it because you need to remove the actuators. You also get two in-flight refueling probes for probe-and-drogue refuelling, one straight , the other kinked and I used the former as it appears that the French aircraft were fitted with those.
I didn’t need to use any filler anywhere. This is one of the nice things about Trumpeter kits. I set all of the control surfaces neutral as they would be on the ground. Incidentally, it was normal to see the undercarriage doors and airbrake open on the ground. This is also common to other North American aircraft such as the Sabre and Mustang. Undercarriage doors would be closed when the aircraft was under power but would gradually fall open as pressure drained away. The airbrakes were usually open for maintenance purposes, I think, as they provided access to various systems. I left the tailplanes off but had the main undercarriage centreline doors installed and the airbrake closed. The rest of the undercarriage I installed later. The cockpit was masked. Now for the Alclad treatment.
Alclad II is probably the best way to get a natural metal finish on a model and it is quite easy to use if you follow the rules. You need to make sure that there are no blemishes or obvious areas where you can see filler, then you need to prime the model to get an even and consistent surface texture. The better the surface, the better the final result will be. I use Tamiya rattle-can surface primer which is perfect for the job and dries quickly to a satin finish and can be polished if desired. If the surface is even slightly rough or absorbent (or matt), the metal finish may be disappointing, looking more like silver paint than real metal.
Alclad recommend polishing the primed surface with very fine grade wet and dry or micromesh.
There are a range of different colours available and the choice can be bewildering but don’t be put off; most of the shades are very similar and quite subtle variations between them. The ones I use the most are aluminium, white aluminium (for fabric-covered aircraft), duraluminium, steel, pale burnt metal and jet exhaust. These are referred to as ‘regular Alclad’ finishes.
Paints were applied with my Testor Aztek A470 airbrush.
High Shine Finishes
If you want a highly polished finish, then you have to use the ‘high shine Alclad’ polished aluminium or chrome but the technique is different because you need to first spray the model with a gloss black lacquer (Alclad can supply this). If it’s not high gloss black, you won’t get the highly polished effect. Believe me. Even if you spray the high shine finish on regular Alclad, you won’t get the high shine finish. You only get it by spraying onto gloss black.
Incidentally, Alclad can only be sprayed. The paint itself is a suspension of microscopic real metal in a lacquer medium and can be sprayed directly onto the model in two or three light coats. It dries almost immediately and regular Alclad can be masked after only a few minutes.
I don’t have a spray booth but spray next to an open window or outside (I live in sunny Portugal). Alclad paints smell unique and the volatile medium is probably the kind of chemical you don’t want to breathe too much of. In addition, when I’ve sprayed indoors and the sunbeams have shone through the window, I could see the microscopic metal dust floating around and I’m pretty sure that’s not really good to breathe either. I researched the health risks and note that in California, there is a cancer warning, but then everything causes cancer in California but not elsewhere in the world, it seems. Here’s some advice from a doctor:
-
The idea is to minimize CONCENTRATED exposure if repeat exposures are necessary. Use ventilation...this will dilute the concentration of the bad stuff by mixing it with regular stuff in the air, thereby making it a less potent toxin.
-
Use proper protection...if you've got no windows near, it's freezing or you just don't want to open a window, wear a mask with a filter. This will ...duh… filter out (hopefully) the bad stuff.
-
Take breaks...allow your body time to recoup from long bouts of filtering paint fumes and fuzzy fur dust.
-
Don't worry too much...these precautions are really only for hardcore modelers who spend hours every day for years. The bad stuff needs time to accumulate so don't worry if you're not one of those. So, I don’t worry too much.
Finally, you can mask regular Alclad; I use kabuki tape and it never damages the surface. You can also use decal softening solutions without fear. However the high shine finishes cannot take masking or decal solutions, so don’t even think about it.
The other thing to bear in mind is that you’ll probably get through more paint than you expect and I reckon that a model the size of the F-100 probably got through the equivalent of one bottle (I sprayed different shades in various places).
OK, now I’m still new to Alclad myself but did the right thing with the gloss black, then sprayed highly polished aluminium. This looks really good but I then wanted some variation in the different panels so made the mistake of masking. This damaged the high shine affect. Damn. I managed to remedy these problems but it meant spraying again and the repair coats were not as polished as the first. The F-100 always has a discoloured rear fuselage where the heat of the afterburner affects the metal; this is a very noticeable feature of all F-100s and has to be replicated. I did this using steel, pale burnt metal and jet exhaust in different places. I noted from photos that the metal is paler where the frames are, so I masked the gaps between them with blu-tack and sprayed a light coat of aluminium. I then removed the blu-tack and added some gold and blue discoloration which you see from photos. Overall I’m happy with the result but my next effort will be better!
I was pleased to note that this model does not need nose weight but was only sure when I’d attached the undercarriage. The decals went on fine although the instructions are a little unclear about which roundels apply to the wings; I used the mid-sized ones as the smaller options applied to the French camouflaged version. You will need to hand paint the black area at the top of the fin leading edge as the kit decal is the wrong shape but that’s easy. I brush-painted the yellow parts to avoid the masking problem. The remainder of the undercarriage got a little complicated with the tiny doors on the diagonal struts but the assembly was foolproof. Add the fuel tanks, boarding ladder and canopy and it was finished. Overall, I’m happy with the result but need to get more practice with Alclad finishes. As for Trumpeter’s kit, it’s another great model from China and I would unreservedly recommend it to any ‘Hun’ enthusiast.
Model, Images and Text
Copyright ©
2015 by Roger Hardy
Page Created 6 February, 2015
Last Updated
6 February, 2015
Back to HyperScale Main Page
|
 Home
| What's New | Features | Gallery | Reviews | Reference | Resource Guides | Forum |
Home
| What's New | Features | Gallery | Reviews | Reference | Resource Guides | Forum |