Airfix 1/72 scale
Douglas Dakota Mk. IV
(New Tooling)
by Roger Hardy
 |
Douglas Dakota Mk. IV |

Hasegawa's 1/72 scale B-47E Stratojet is available online from Squadron
S
u m m a r y |
| Catalogue Number: |
Airfix Kit No. A08015 - Douglas Dakota Mk. IV |
| Scale: |
1/72 |
| Contents and Media: |
Injection moulded. Five sprues of 124 light grey plastic parts; one sprue of 18 clear parts; markings for two aircraft. |
| Price: |
£20.83 (Export) or 24.99 (EU price) plus shipping from Hannants
and specialist hobby retailers worldwide |
| Review Type: |
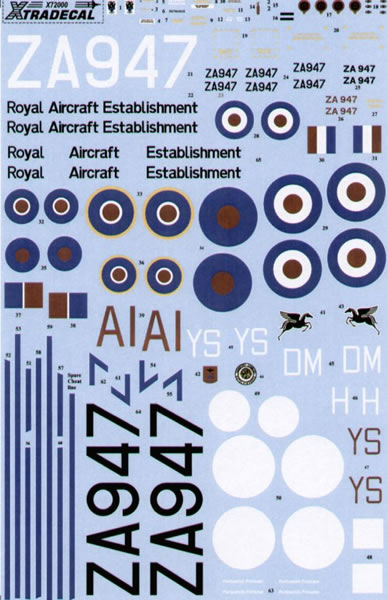
Full build review straight-from-the-box plus Xtradecal X72084 |
| Advantages: |
Current technology kit, accurate, comprehensive, well detailed. Slick and precise fit of parts, well-engineered. |
| Disadvantages: |
No passenger seats, simple ‘blanked-off’ exhausts (it needs a resin replacement to match the quality of the rest of the model), cargo doors are rather a loose fit. |
| Conclusion: |
Certainly the best 1/72 C-47 currently available and difficult to improve on. A quick and easy build, stress-free with a very satisfying result. Highly recommended. |
Background
 Well, what can you say about the C-47? Here’s what Wikipedia says: Well, what can you say about the C-47? Here’s what Wikipedia says:
http://en.wikipedia.org/wiki/Douglas_C-47_Skytrain.
They have a separate entry for the DC-3:
http://en.wikipedia.org/wiki/Douglas_DC-3.
The differences between the two were the cargo door, astrodome, a reinforced floor and a modified rear fuselage for glider-towing. Production of the DC-3 stopped in 1942 and most post-war aircraft that are referred to as DC-3s are, in fact, ex-military C-47s. Some had the cargo door removed and the passenger door installed by STC.
This model is named Dakota Mk IV; the UK referred to the aircraft as the Dakota because the Brits like giving names to aircraft, rather than numbers. This name stuck.
My personal view of the DC-3 is that this design was one of the most significant leaps forward in aviation history, successfully putting together all of the aerodynamic and structural developments of the early 1930s. It first flew (in the form of the DC-1) on July 1, 1933.
The prototype DC-1 had a robust tapered wing, retractable landing gear, and two 690 hp (515 kW) Wright radial engines driving variable-pitch propellers. It seated 12 passengers. TWA accepted the basic design and ordered twenty DC-2s having more powerful engines and a bit more length, to carry 14 passengers in a 66-inch-wide cabin.
Apart from the cantilever monoplane layout and retractable undercarriage, it had a stressed skin structure. Compared to the DC-2, the DC-3 had a wider circular fuselage and greater span and was initially known as the DST, the ‘Douglas Sleeper Transport’.
It was the most successful piston-engined airliner in history; total production of all variants was 16,079, including Russian and Japanese copies.
More than 400 remained in commercial service as late as 1998.
The Kit
My first Dakota model was the old Airfix 1960 kit in Silver City markings. I was nine years old and wanted a Dakota because I was obsessed with the kid’s TV programme ‘Garry Halliday’. Anyone remember that? I thought the model was great and it had a retractable undercarriage that actually worked! I had Garry Halliday in the cockpit, of course. I had to get a friend’s dad to paint it and I recall that he didn’t do a great job. Later I built the Italeri DC-3 (I used BEA markings from the Glencoe Viscount) which I thought was pretty good, but this new offering by Airfix moves the goalposts again.
Hyperscale have featured the C47 in a build forum:
http://www.network54.com/Forum/578046/thread/1400082528/New+Tool+C-47+Skytrain which covers the model in the box pretty well. The parts are well moulded and I know that some have criticized the engraved panel detail but it looks OK to me. Anyone who has walked around a DC-3 will know that it is a patchwork of overlapping panels which are raised and prominent. This is replicated on the model and I really appreciate this. You have choices of two props, narrow and broad tipped but an obvious omission is the passenger seats for what is meant to be a passenger-carrier; this model is clearly identical to C-47 A08014 which was a troop carrier with side-facing bench seats for parachutists. This is the only option for this model as well, which must have really upset the passengers of Dan-Air who were never provided with parachutes, despite their protests. However, I’m pretty sure that little will be seen inside the finished model so I thought I’d live with what Airfix provide. The model includes skis for some future release….RCAF? The control surfaces have restrained and realistic fabric effect; the elevator and rudder are positionable but the flaps and ailerons are not.
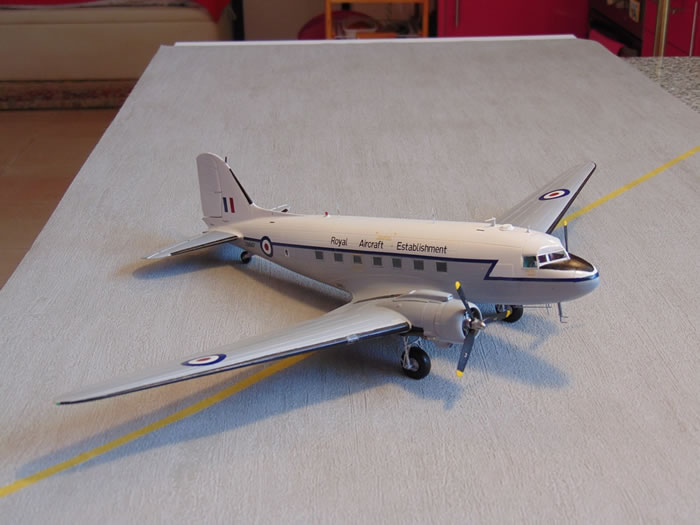
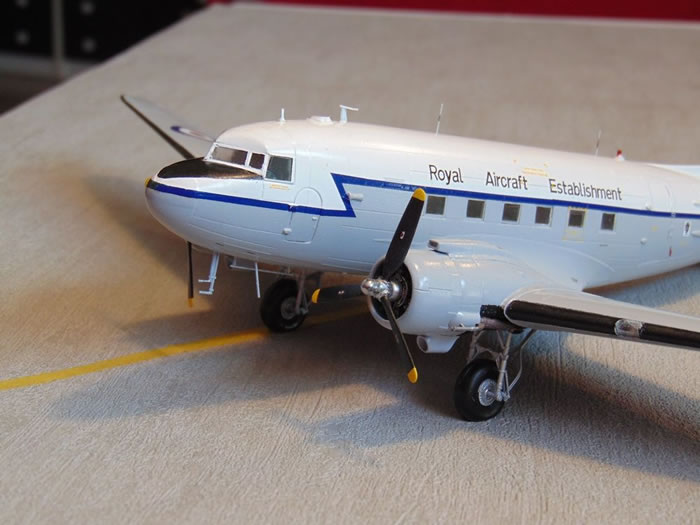
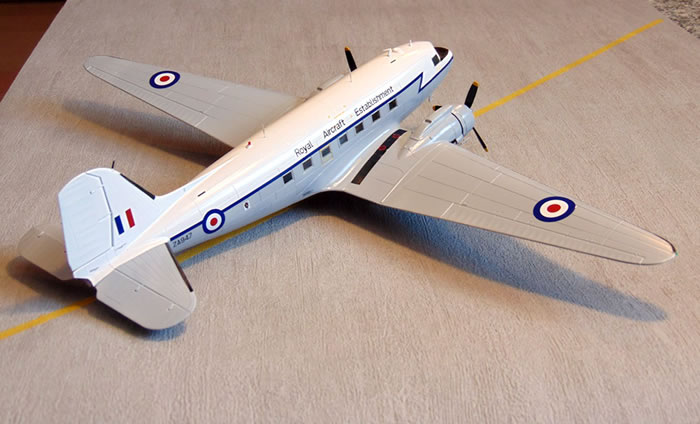
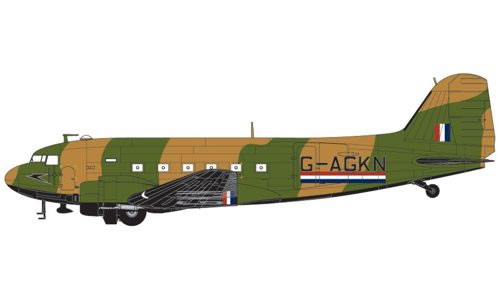
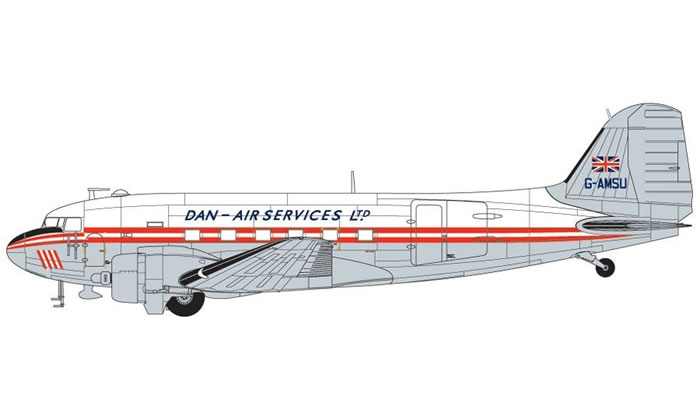
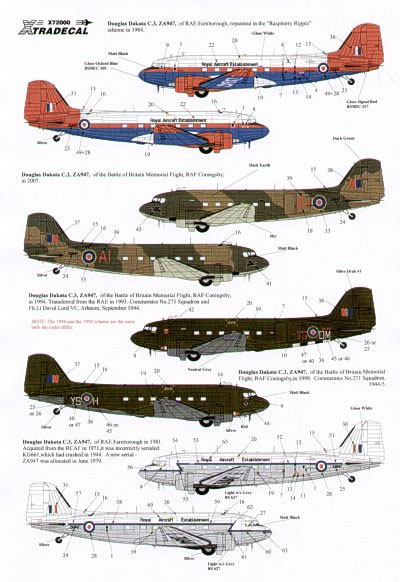
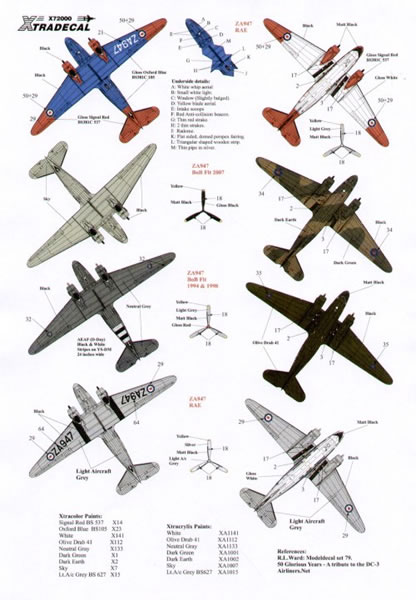
There are two marking options: An example, G-AMSU, from Dan-Air, UK’s first budget carrier, and the other is a camouflaged BOAC aircraft, G-AGKN. I didn’t fancy either of these so procured Xtradecal’s X722084 which provides markings for the RAF Battle of Britain Memorial Flight (BBMF) aircraft, ZA947. I planned to use the RAF Transport Command colours from 1981 because it reflects the markings of the Dakotas I used to see as a kid in the 1960s. ZA947 may seem a bit recent for such a grand old lady but this aircraft was procured from the RCAF in 1971 and was initially marked KG661 until it was pointed out that this aircraft crashed in 1944 so the next contemporary serial number was assigned, ZA947. It served with RAE Farnborough before moving to BBMF. I can confirm that this aircraft in RAE service was not fitted with conventional forward-facing passenger seats so was happy to have live with the freight sidewalls provided with the kit as I thought that it was unlikely to have been fitted for parachutists. Think that in early BBMF service it is used to ferry people about so some seats were fitted although apparently in 2004 it reverted to an authentic WWII parachutist configuration.
Okay, my normal gripe: I know that Airfix is part of Hornby who also want to sell Humbrol paints but I prefer to use Tamiya so it’s necessary to refer to paint-equivalent charts. This is probably the best one: http://www.ipmsstockholm.org/colorcharts/stuff_eng_colorcharts_humbrol.htm although it doesn’t include their latest authentic colours.
The cockpit interior is comprehensive and goes together well although I suspect that little will be seen on the finished model and I’d planned to pose it with the crew door open for this reason. I’d also planned to the do the RAE/BBMF aircraft which was an ex-RCAF transport so I assumed that the troop-carrier seats and cargo floor would be appropriate. The purists will probably want to add passenger seats but I’m not sure how much will be seen through the side windows. It’s possible that both the BOAC and Dan-Air aircraft were freighters, although I doubt it in the case of the BOAC version and all the photos I’ve seen of Dan Air’s G-AMSU on the ground show passenger steps. Airfix provide two crew figures which don’t appear to be as good as their current offerings in other new kits.
Taping up the fuselage, I found that a fair bit of the cockpit interior could be seen through the windscreen, open door and astrodome so decided to add shoulder straps to the seats which are quite visible. The instrument panel is a decal but cannot, in all honesty, be seen. The interior is mostly interior green with a grey floor. I didn’t bother with weathering or dry-brushing. The fuselage goes together with a satisfying click and everything seems very precise and tight. The instructions have you add the DC-3 tail cone which was not fitted to the versions on the decal sheet or on the RAE/BBMF aircraft, so check your references. Incidentally, the main fuselage has comprehensive internal frame and stringer detail so that if you decide to pose the freight doors open you see a nice realistic interior.
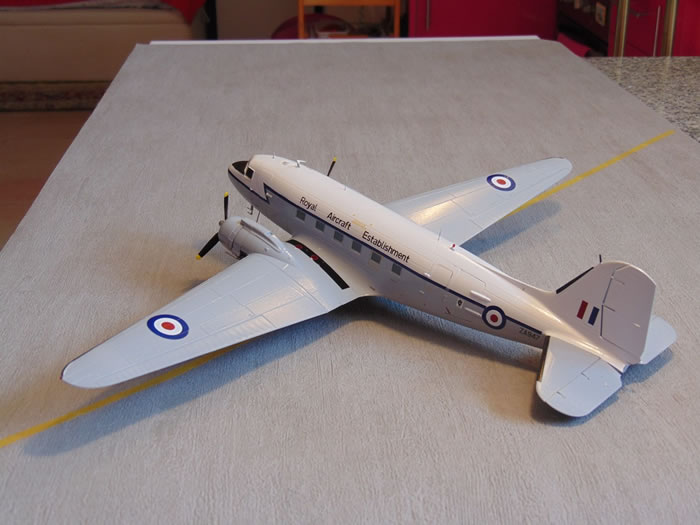
The precise fit of the parts continues with the wing assembly with separate wing root fairings as Tamiya sometimes do. In general, the individual parts join along existing panel lines, so, if you’re careful, very little filler is needed; I used a bit of Tamiya filler along the top fuselage seam for what would be a white-top aircraft. I was amazed to find that after about two-and-a-half hours, the fuselage and wings were all together and I could let them set overnight. The tailplanes, elevators and rudder are self-jigging and can be positioned to add a bit of life to the model. A nice touch is that the control surfaces have the correct aerodynamic balance ahead of the hinge and this pokes out into the airstream when the surface is deflected.
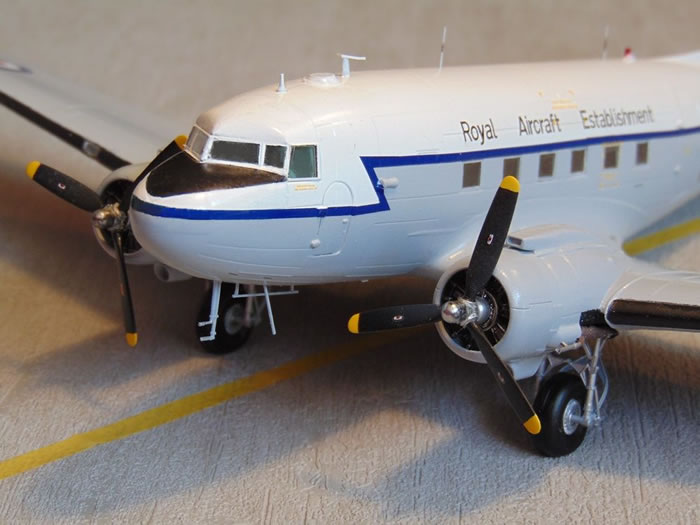
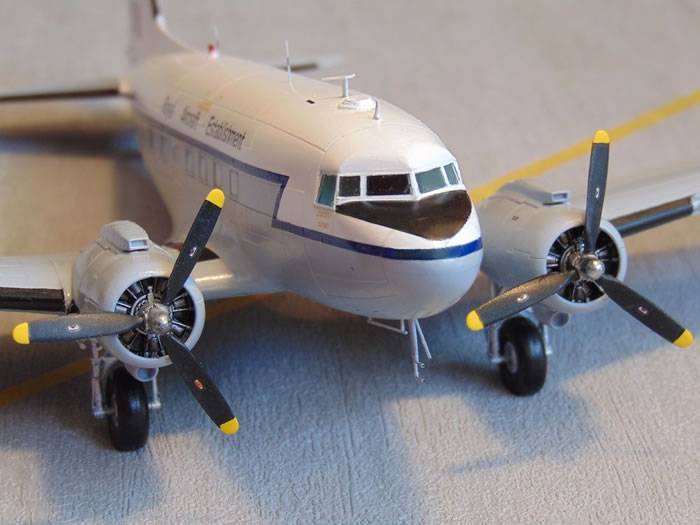
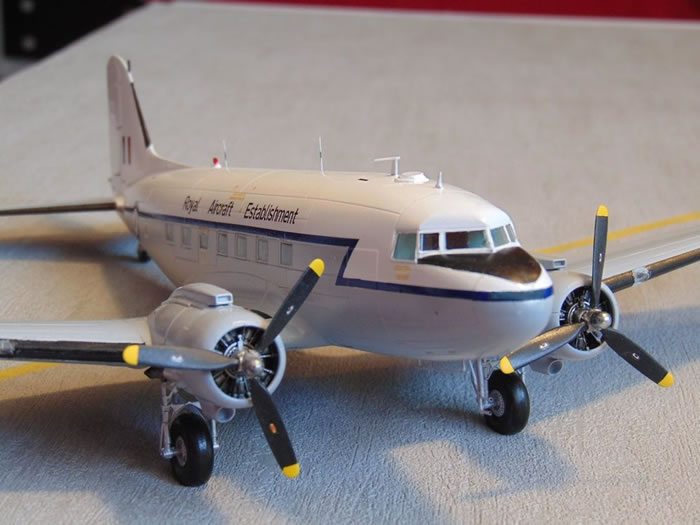
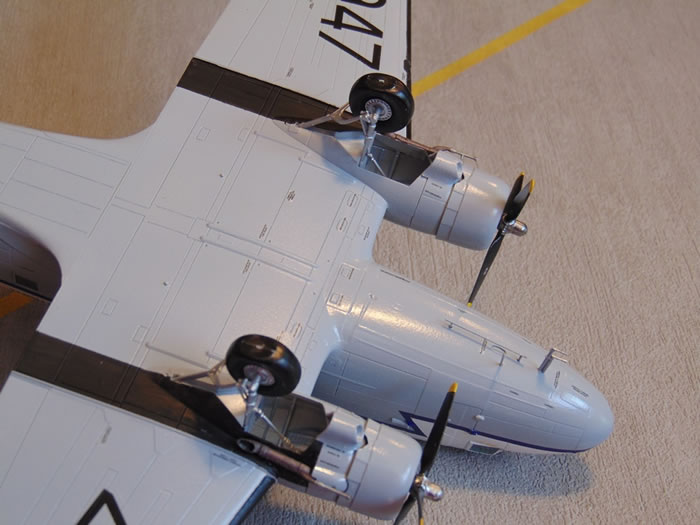
I normally assemble as much of a model as possible to ensure stronger joints (so avoiding sticking plastic to paint) so assembled the engine mounts to the wing and the undercarriage. The 2-row Twin Wasp engines are perfectly adequate but a little basic with no cooling fins moulded into the cylinders so I suppose there will be resin replacements for the fastidious. I simply sprayed them Alclad White Aluminium then applied a black wash to give a nice realistic effect. No doubt Mr Eduard will add lots of ignition harnesses, etc as the engines are quite visible. The upper intakes have small sink marks but nothing to lose too much sleep over. One criticism: the exhausts have no attempt at having a hole at the curvy end. It’s as if we are expected to simply paint it black which I was really reluctant to do so managed to Dremel out a more realistic appearance but this needs care and a resin replacement is really required. This oversight surprises me because the rest of the kit is so good. One nice surprise of this kit is how well-detailed the undercarriage and wheel bays are; no scope for resin improvements here, I think. There some fiddly little suspension parts D14 and D15 that look identical but are not; they are handed.
The rear cargo door is very slightly undersized but can be posed open. I cemented the front and rear together as I intended to have only the small door open. These doors have nice detail on the inside so can all be posed open if you wish. This was when I realized that, on the ground, the front cargo door is usually used, not the smaller door set into it which is a parachutists’ door and opens inwards (or is removed). Damn. Too late now so I decided to close them all. These cargo doors do not have the same precise fit as the rest of the kit and needed to primer brush-painted to fill the slight gaps. The front crew door does not have internal detail and to make matters worse has a large injection pin mark so I closed it off as well. I decided to fix the fuselage transparencies as they could be easily masked and the cabin windows have surrounds that need painting. Remember that the windows have a very slight curve and that there is a right and wrong way to install them. Basically, the engraved window is on the inside. Half of mine are wrong but it’s not noticeable apart from one emergency exit. The transparencies are thin, clear and are all a snug fit (especially the cockpit) with the exception of the astrodome which needs a lot of trimming to get it to sit in the circular rebate. I put a couple of MV lenses as landing lights before gluing the covers on the leading edge. Incidentally, these fit really well and I think this is the first time I’ve made a model where the landing light covers actually fit! Incidentally, the crew seats can be seen so it was worth putting in the shoulder harnesses but little else can be seen in the office. If there had been seats in the fuselage I think they would have been visible so there is an opportunity for the aftermarket boys to provide a cabin interior. Hmm….all of a sudden, it’s ready for masking and spraying.
Painting
I normally use the Aztek A470 air brush with turquoise nozzle (high volume - nothing fancy – never blocks!) and Tamiya colours plus Alclad’s metallic and general finishes. Just a brief word about these. Alclad are famous for their state-of-the-art metal finishes but they also now do a range of overall varnishes: matt, slight sheen, satin, gloss and ‘aqua’ (used for protecting the high reflective paints) plus the primers, grey and white. I’ve struggled for years to find reliable primers and general finishes (in particular, a good satin varnish) and had hit on Tamiya’s rattle-cans which are good but expensive. Alclad’s new general finishes are actually just as good but have the advantage that they come in BIG bottles (120ml…Tamiya paint jars are 10ml) and can be sprayed as they are already the correct consistency. On the model they give the correct sheen without giving any impression of depth, so you feel confident in applying multiple coats without seeing any build-up of thickness. Nice. They all work as advertised and I recommend them without reservation. The nice thing about the RAF Transport Command colour scheme is that little masking is needed so the paint job is easy.
I wanted to replicate the polished hubs of the propellers using Alclad Chrome so the process was:
-
Spray white primer
-
Spray yellow tips. Mask tips
-
Spray gloss black overall
-
Mask hub and spray satin varnish
-
Mask blades and spray Alclad Chrome over hub.
Easy, huh? Incidentally, in the early RAE colours the blades were black but when it was repainted in the ‘Raspberry Ripple’ colour scheme they were natural metal. There are also photos showing grey blades (as shown on the Xtradecal instructions) and these props were changes fairly regularly for servicing. I sprayed the interior of the undercarriage and bays Alclad White Aluminium, then masked them and the engine fronts. I used Tamiya Kabuki tape for the transparencies and masking fluid for the astrodome.
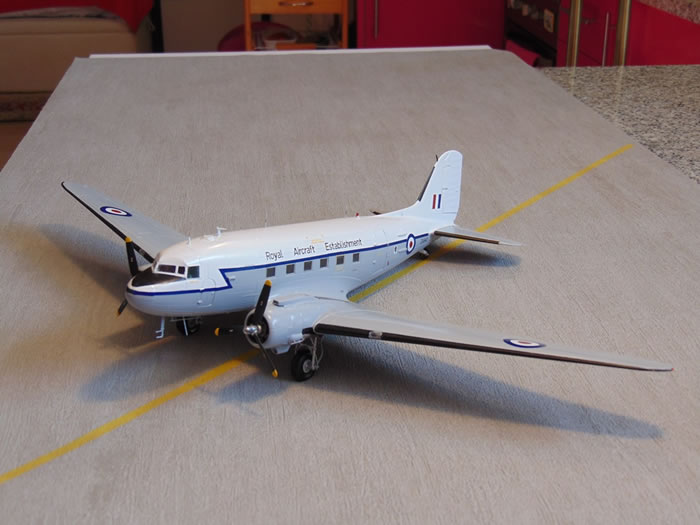
The aircraft colours were easy but I first primed it white, then sprayed the de-icing boots and anti-glare panel matt black, then Satin sheen, then masked them as the aircraft was to be otherwise glossy. This also meant that I could deal with any bleed-through before applying the main aircraft colours, rather than repairing them afterwards, which is always noticeable. You need to thin the paint to spray it, of course, and I find that, with modern engraved-detail kits, I always get some bleed through unless I seal the edges with varnish. In this case, there was a lot of bleeding so I’m glad I did the de-icing boots first, even though double-masking is a pain.
I sprayed the white top first (satin) then left it to dry overnight before masking. I mixed my own satin light aircraft grey from Tamiya colours for the rest of the airframe. I planned to rely on the Alclad varnish at the end of the process to gloss-up the model because this is always reliable and I didn’t want to risk gloss paints because my experience of them is not great (I’ve experienced tearing of Xtracrylix) and I always had a problem getting a high gloss finish when spraying thinned gloss paint.
I decided to use the Xtradecal sheet X72084: http://www.hannants.co.uk/product/X72084 and include some of Hannants artwork as well as the decal options for the basic kit.
The decals supplied by Airfix are very nice, well-printed and matt, which is appropriate for the camouflaged BOAC version but not for Dan-Air; a coat of varnish can remedy this.
I used most of the Airfix stenciled instructions.
Final Bits and Pieces
I realized too late that the aerial configuration of the RAE aircraft was not exactly as per the kit. The astrodome appears to have been blanked off although there is still a bulge and the aerials are different top and bottom. These are correctly shown on the Xtradecal artwork. I corrected them as best I could by sanding away the astrodome and applying a plastic card blanking plate then scratch-building the remainder. I added the anti-collision beacon on top of the fuselage and the navigation lights using MV lenses. Finally, I touched-up the paintwork and it was finished. Sit back. Glass of wine.
The C-47 has a shape that is incredibly well-known but actually quite difficult to replicate with complete accuracy but I think that Airfix have succeeded in doing it. The whole nose and windscreen shape looks perfect to me; the rest of the aircraft is also pretty well perfect and this model replicates correctly the dihedral which the Italeri kit failed to do.
Overall, it looks right and sits right and I’m very pleased with the finished result, although the panel lines are a bit more prominent than I would have liked.
This is certainly the best 1/72 C-47/DC-3 currently available and would be difficult to improve on. It’s a simple kit but impressively detailed and goes together easily and with precision. It’s a quick and easy build, stress-free with a very satisfying result.
Highly recommended!
Model, Images and Text
Copyright ©
2015 by Roger Hardy
Page Created 15 April, 2015
Last Updated
4 May, 2015
Back to HyperScale Main Page
|
 Home
| What's New | Features | Gallery | Reviews | Reference | Resource Guides | Forum |
Home
| What's New | Features | Gallery | Reviews | Reference | Resource Guides | Forum |