Hasegawa 1/72 scale
Boeing B-47E Stratojet
ARDC re-issue
by Roger Hardy
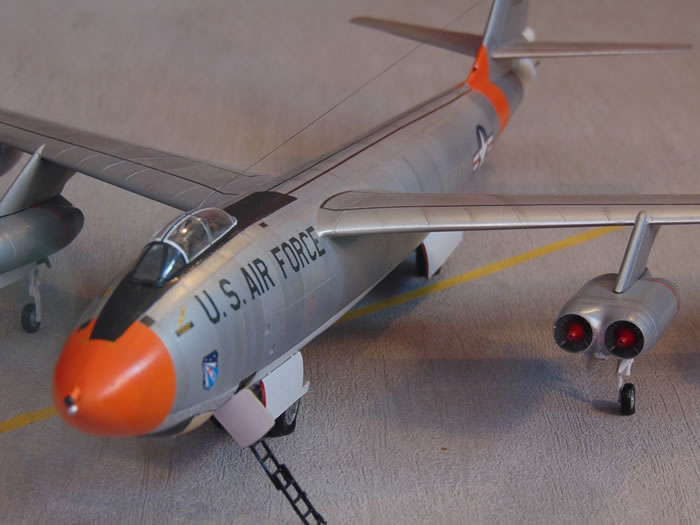 |
Boeing B-47E |

Hasegawa's 1/72 scale B-47E Stratojet is available online from Squadron
S
u m m a r y |
| Catalogue Number: |
Hasegawa Kit No. 02120 - B-47E Stratojet |
| Scale: |
1/72 |
| Contents and Media: |
Six sprues light grey plastic parts; one clear; markings for two aircraft. |
| Price: |
£39.99 from Hannants
and specialist hobby retailers worldwide |
| Review Type: |
Build Review |
| Advantages: |
This is the only kit of a B-47 in this scale. Accurate in shape. |
| Disadvantages: |
1960s kit – good for its age. Old technology not updated, raised panel lines, basic cockpit, engine, wheel well and bomb bay detail. My decal sheet was seriously flawed with areas where there was no carrier film. |
| Conclusion: |
To make a really nice model requires aftermarket extras for the cockpit. Take your pick whether you use the aftermarket sets for engines, wheels and undercarriage. A labour of love. |
Background
 The Boeing B-47 Stratojet (company Model 450) was a long range, six-engine, jet-powered strategic bomber designed to fly at high subsonic speed and at high altitude to avoid enemy interception. The B-47's primary mission was to drop nuclear bombs on the Soviet Union. Fortunately, it never had the opportunity. The Boeing B-47 Stratojet (company Model 450) was a long range, six-engine, jet-powered strategic bomber designed to fly at high subsonic speed and at high altitude to avoid enemy interception. The B-47's primary mission was to drop nuclear bombs on the Soviet Union. Fortunately, it never had the opportunity.
In May 1945, the von Kármán mission of the Army Air Forces inspected the secret German aeronautics laboratory near Braunschweig. On von Kármán's team was the eminent chief of the technical staff at Boeing, George S. Schairer. He had heard about the controversial swept-wing theory of R. T. Jones at Langley, but seeing models of swept-wing aircraft and extensive supersonic wind-tunnel data generated by the Germans, the concept was decisively confirmed. He wired his home office: "Stop the bomber design!", and changed the design of the B-47 wing.
Analysis work by Boeing engineer Vic Ganzer suggested an optimum sweepback angle of about 35 degrees. Boeing's aeronautical engineers modified their Model 432 design to include swept wings and tail, resulting in the "Model 448", which was presented to the USAAF in September 1945. The Model 448 retained its four TG-180 jet engines in its forward fuselage, with two more TG-180s in the rear fuselage. The flush-mounted air intakes for the rear engines were inadequate, while the USAAF disliked the installation of engines within the fuselage, considering it a fire hazard.
The engines were moved out to streamlined pods pylon mounted under the wings, leading to the next iteration, the Model 450, which featured two TG-180s in a twin pod mounted on a pylon about a third of the way outboard on each wing, plus another engine at each wingtip. The Army Air Force liked this new configuration, and so Boeing's team of engineers continued to refine it, with the outer engines being moved further inboard, to about 3/4 of the wingspan. The thin wings provided no room into which wheels could be retracted, so a "bicycle landing gear" was chosen, with the two main gear assemblies arranged in a tandem configuration and outrigger struts fitted to the inboard engine pods. As the landing gear arrangement made rotation (i.e., lifting the nose during takeoff) impossible, the landing gear was designed so that the aircraft rested on the ground at the proper angle for takeoff.
The B-47 also pioneered in-flight refueling and the subject of this kit is aircraft of the Air Research and Dvelopment Command (ARDC) which were used in these initial experiments that eventually resulted in the Boeing ‘flying boom’ system fitted to the B-50 tankers and later to the KC-135.
Production B-47Es were powered by six J47-GE-25A engines, which used a form of water-methanol injection. This was a scheme in which a water-methanol mix was dumped into the engines at takeoff, increasing mass flow and so temporarily kicking the thrust up to 7,200 lbf (32 kN). The engines left a trail of black smoke behind them when water-methanol injection was on.

The thrust-to-weight ratio of the B-47 was only around 0.2 (any modern airliner will have at least 0.5) so it was essentially underpowered and needed the ‘curvature of the earth’ to get airborne. Consequently, Jet-Assisted Take Off (JATO) installations were often used. The initial built-in JATO system was eliminated because of worries about having the rocket bottles so close to full fuel tanks, and in any case once the rocket bottles were exhausted they were just dead weight. The later jettisonable rocket bottle racks were expendable.
The B-47 was a truly revolutionary design with its swept, thin wings and podded engines, establishing the layout for most modern airliners. Remember that it first flew in 1947 when all other bombers were straight-winged piston-engined machines such as the B-29 and Lincoln. The Boeing production lines were making the B-50, a development of the B-29. The B-47 must have been like a space ship but the strange thing is that, when it first flew, the workforce at Boeing paid it little attention as it was regarded as an oddball experimental type, not the first cold war nuclear bomber and the forerunner of every modern airliner. The USAF was initially uninterested as their attention was on the B-50 and future B-52 but the B-47’s performance sold itself. In terms of speed and altitude, it could out-perform any fighter of the time.
The B-47 entered service with the United States Air Force's Strategic Air Command (SAC) in 1951. Total production eventually reached 2,032. Fortunately, it never saw actual combat as a bomber, but was the mainstay of SAC's bomber strength during the late 1950s and early 1960s, and remained in use as a bomber until 1965. Ironically, the B-47 turned out to be the premier cold war nuclear bomber even though it was always seen as a stop-gap until its replacement by the larger B-52. However, by the time the B-52 was in service, Gary Powers’ U-2 had been shot down and high altitude strategic bombing was already a thing of the past; the B-52’s nuclear role was taken by the Polaris submarine-launched nuclear deterrent and the B-52’s role in service was as a massive but conventional strategic bomber.
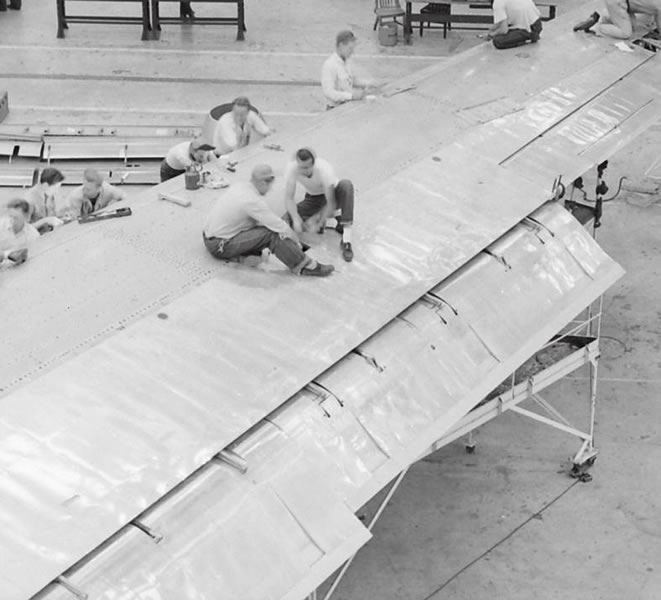
The B-47 was also adapted to a number of other missions, including photographic reconnaissance, electronic intelligence and weather reconnaissance, remaining in service as a reconnaissance platform until 1969 and as a testbed until 1977.
If you’re interested in reading more, I can recommend this book: ‘B-47 Stratojet – Boeing’s Brilliant Bomber’ by Jan Tegler, published by McGraw-Hill in the Walter J Boyne Military Aircraft Series.
Here is one of Hasegawa's earlier kits, first released as kit JS-23 back in the 1960s, and reflects the state-of-the-art of the time with poor detail and fit (but good for its day), thick glossy decals and raised panel lines which are very fine and are accompanied by light rivet detail (the B-47 was flush-rivetted throughout).
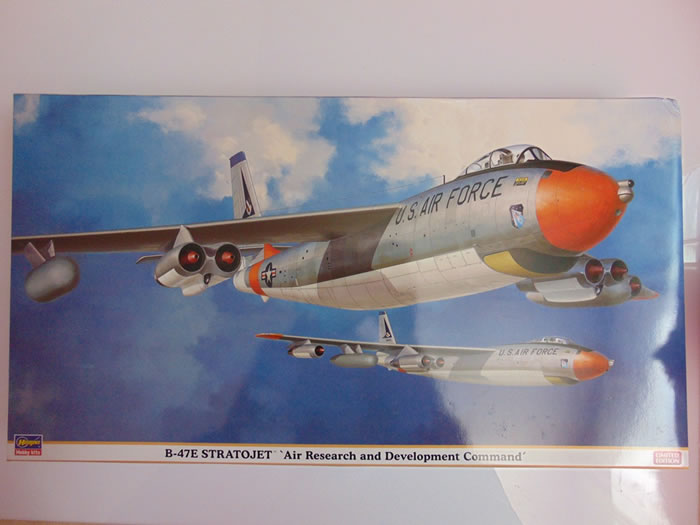
The plastic is rather thick and there are sink holes here and there but nothing to lose too much sleep over; in fact, it looks as if Hasegawa have made an effort to reduce the worst of these by modifying the moulds (mainly around the fuselage wing roots) and this has been partially successful. The kit was also issued by Frog as F277 in 1969-71; it was the largest Frog kit and also the least successful, only 15,000 being produced.
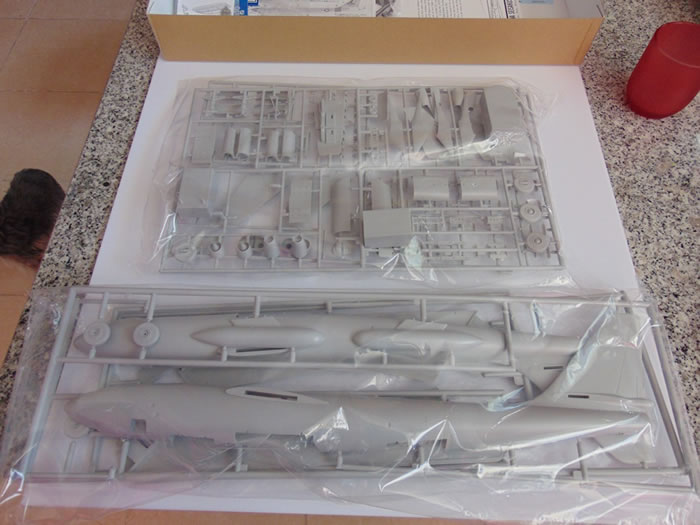
This model has never been popular, possibly because it was only used by the USAF (plus one in Canada) rarely sported fancy colour schemes and did not see action. It has consequently been poorly served by the modelling industry. If I recall correctly, these models have been produced:
-
Revell 1/112 without undercarriage, reissued by Revell GmbH around 2006
-
Frog/Comet 1/207 without undercarriage
-
Aurora 1/180 without undercarriage
-
Allyn 1/144 without undercarriage
-
Hobbycraft 1/144 current technology kit with undercarriage
-
Sanger 1/48 Vacform
Hasegawa has reissued this kit on a regular basis and this release represents two flight test aircraft but retains all of the original bomber parts. The kit is molded in light grey styrene and presented on six parts trees plus a single clear canopy. I was disappointed to see that Hasegawa have missed the opportunity to include more in the way of cockpit detail and a decent transparency for the rather high price. However, the use of Hasegawa’s traditional light grey plastic is an improvement over the original brittle silver styrene. The originals tended to have warped fuselage parts but I was pleased to see that there is no distortion either, which is a relief as this is a big model.
Among the features and options in this kit:
-
Positionable crew entry door
-
Optional boarding ladder
-
Positionable weapons bay doors but little internal detail
-
Simple conventional bomb load
While previous reissues of this kit provided operational combat aircraft marking options, this release represents two aircraft of the Air Research and Development Command (ARDC) which later became Air Force Systems Command (AFSC) in 1961.
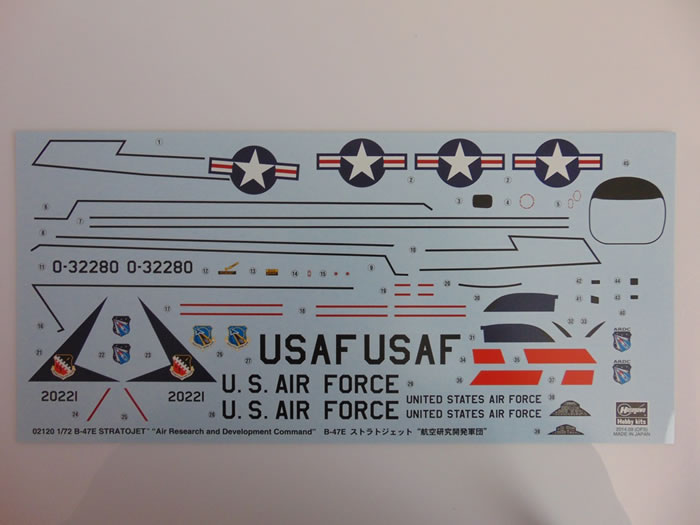
Markings are provided for two examples:
B-47E, 53-2280, ARDC, ASD, Wright-Patterson AFB
B-47E, 52-0221, ARDC, AFFTC, Edwards AFB
The decal sheet is satin and looks to be current state-of-the-art although there is a paucity of stenciled instructions (maybe the real aircraft has few) but please see my report on these decals later. I was amused to see that they have used the original instructions, which are a blast from the past, in mangled English only but retaining the instruction to paint the lower radome ‘Right Yellow’ plus this from the preamble: ‘Pilots seats in front and back were not reputable; dwelling was bad and degree of fatigue was big.’ So now we know.
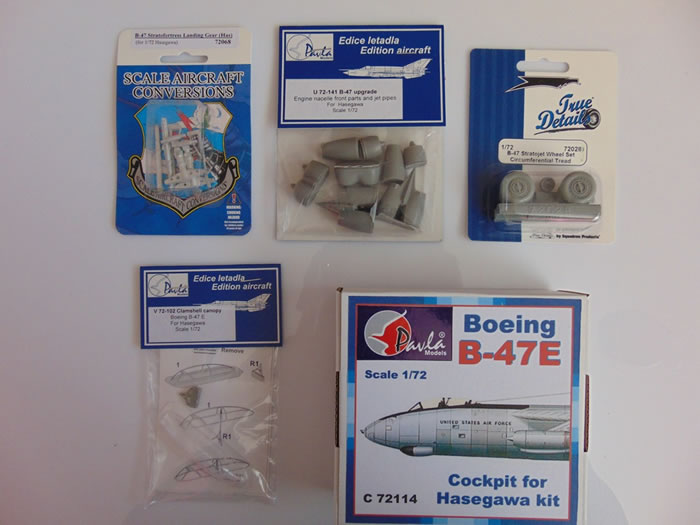
Since this kit has been reissued on a fairly regular basis, there are some aftermarket options for this kit including a nicely detailed cockpit canopy and engine details from Pavla Models, wheels from True Details and a replacement undercarriage set from Scale Aircraft Conversions:
PAVC72114 Boeing B-47E cockpit details (which includes PAVV72102 Clamshell canopy)
PAVU72141 Boeing B-47C Upgrade Engine Nacelles
TD72028 Boeing B-47E Stratojet wheels
SAC72068 Boeing B-47C Stratojet Landing Gear legs (actually not used)
There are also some aftermarket decal sheets from Warbird if you want to make an SAC aircraft or the colourful ‘Hurricane Hunter’ of the Weather Reconnaisance Wing but I feel that they are massively over-priced and the kit decals are fine.
I chose to use all of these even though it drove the total cost to a tad over £100. When I examined them I thought that, with the exception of the excellent Pavla cockpit, the remainder were not a vast improvement over the kit parts, the white metal undercarriage, in particular. The resin wheels are smaller in diameter than those in the kit which I assume are oversize.
I just had to have an iconic 1/72 B-47; one of my favourite aircraft. I started an original example of this kit a few years ago but found it too frustrating and never got beyond the basic assembly stage. At least this new release does not have warped parts which plagued the original releases but I knew that it was going to be a labour of love and resolved to finish it this time.
Incidentally, there is a good collection of detail photos of a B-47 by Howard Mason here:
http://www.primeportal.net/hangar/howard_mason/b-47b_50-0062/index.php?Page=1
and another good one from IPMS Nederland here:
http://www.ipms.nl/walkarounds/walkaround-vliegtuigen-jets/2012-walkaround-b47-stratojet.html.
This is a construction feature of a 1/48 Sanger vac-form model including detail of the flaps:
http://www.aircraftresourcecenter.co m/Gal7/6301-6400/gal6380-B-47-Aibara/00.shtm. I have also included some photos of real flaps in this review as these aircraft were often parked with the flaps deflected. Here’s a review on Hyperscale by ‘Bondo’ Phil Brandt for a conversion to an RB-47H:
http://www.hyperscale.com/features/2002/rb47hpb_1.htm.
Construction starts with the Pavla cockpit which is nicely detailed and even contains colour call-outs which seem to be correct.
The cockpit interior was basically olive green (not the yellowy US interior green) with black panels. It was fitted with ejection seats but they don’t look like Martin-Baker because they were by Weber. Those provided by Pavla are very nice indeed. In order to get the large cockpit insert to fit, you need to grind away a lot of the inside of the nose but be careful not to get rid of the front of the forward undercarriage bay. I actually found it necessary to remove great chunks around the rear of the resin insert in order to get it to fit into the fuselage halves, getting the access door to align and the cockpit to seat properly against the fuselage sides. It’s best to remove most of the rear of the casting to make room for the forward undercarriage bay; I took off a good 1cm (too much as it turned out). Once this is done it fits where it touches so positioning it with blu-tack is the best way to locate it properly before resorting to oodles of superglue gel. Incidentally, the instructions would have you glue the fuselage sides together then try to insert the bomb and undercarriage bays afterwards. I think this is almost impossible so it’s best to glue them to one fuselage side before sealing the coffin.
The fuselage halves go together quite well but I found it difficult to get a seamless joint under the nose, but there’s little detail there so the seam can be filled, sanded to shape and polished. I cemented the bomb bay doors closed.
I decided to deploy the flaps as there was enough information and the exercise didn’t look too complicated; the B-47 deployed the flaps for take-off and landing and were often seen deployed on the ground. These are big Fowler flaps and extend aft of the wing trailing edge, increasing the wing area. I cut out the flaps and cemented the wing halves together.
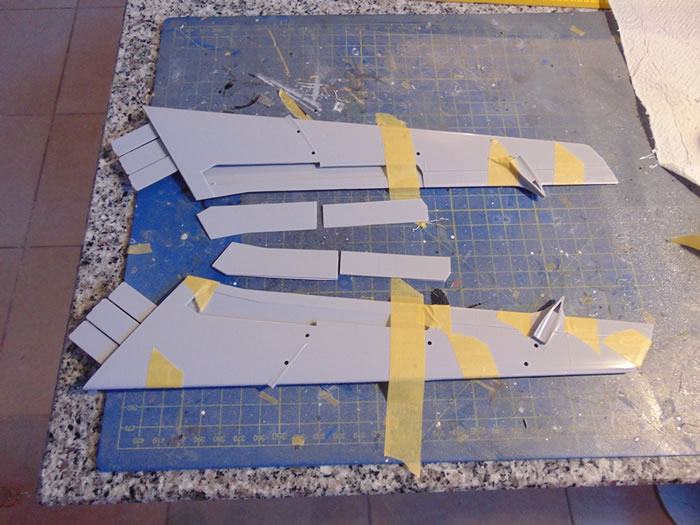
On my example, these were slightly warped and curved upwards a tad so this will need attention. The next stage is to provide the internal detail of ribs and stringers in the flap bay and this was done with strips of plastic card. Then the flaps need to be given the correct aerodynamic profile for the upper surface and this was again done with plastic card. For information, there are three heavy ribs in the wing that support each section of flap plus two for the screwjack actuators. The flaps themselves seem to have a slightly concave upper surface. Normal Boeing practice is for the internal structure to be rather ‘dirty’, ie, there is little in the way of concessions to internal aerodynamics. Have a look at this pic of a B-52 which has the same design concept for the flaps:
http://www.airliners.net/photo/1119469/L/.
Each finished flap segment has three double arms for mounting either side of a rib and two rods set at about 15 degrees, simulating the screw jacks, to be inset into double ribs. Thus each segment should be rigid and at the correct angle and can be attached without too much fuss after painting the model.
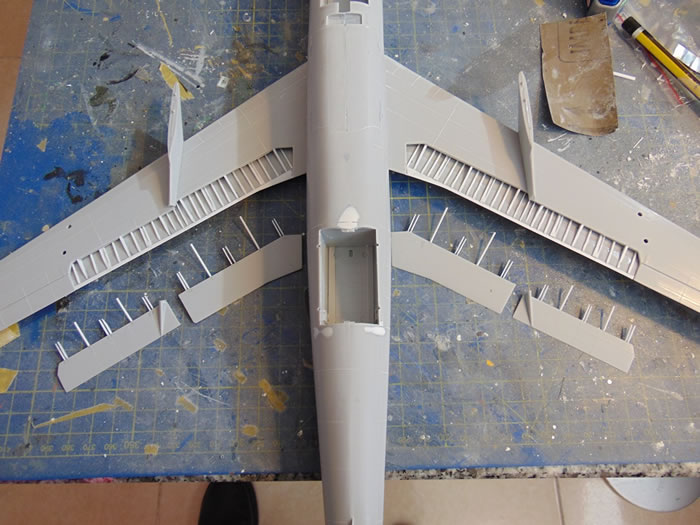
I then rescribed all of the panel lines using the raised detail as a guide; the B-47 was flush-rivetted throughout so raised rivets, even delicate ones, are inappropriate. This process was easier than I had expected because the model is large and a lot of the lines are straight, but I still had to resort to filling badly-scribed lines with superglue, then sanding back and repeating the exercise. Ho hum. More care next time. I then glued the wings to the fuselage and these needed a bit of filler, especially around the wing root leading edge where the sweep at the fuselage is not the same as that of the wing. The wings come together through interlocking tongues so are quite rigid but you need to make sure that the fin is vertical when the wings are in position.
The engines are simple but I found that the resin parts were not a great fit to the plastic parts and it would have been better if the resin pieces had been for the entire engines rather than just the intakes and jet pipes. Anyway, a lot of Milliput and a bit of sanding and polishing rectified the situation. Incidentally, the resin parts are a significant improvement over the kit parts but the kit parts also look OK and fit better. The resin intake and jetpipe lips are quite fine, so be careful not to damage them when sanding. Incidentally, the resin parts do not show the prominent landing lights between the engines (nor do the kit parts) so these will need to be and added; I used MV lensesThe pylons fixing the engines to the wings need a little fettling where they meet the wing leading edge.
I decided not to spend a lot of time detailing the undercarriage bays and concentrated more on those parts that can be seen more easily. The undercarriage doors have some internal details but also some rather prominent ejector pin marks which are very obvious and need to be removed or covered. Looking at photos of the real aircraft, there are few details on the insides of the undercarriage doors so I simply covered the insides with 0.015 plastic card. I was disappointed to find that the SAC white metal undercarriage leg set SAC72068 was pretty well identical to the plastic parts and offered nothing extra so I ditched the main legs but used the outriggers. Looking at photos, there is a prominent retraction jack on the front drag strut of each leg which I added. Then I raided the spares box and added some generic detail to make the big undercarriage bays look a bit busier.
I left the engines off to make them easier to spray but assembled as much as possible including the undercarriage legs and outriggers after first checking that, when the wheels are fitted, it sits on all four wheels. It does. Yaayyy!!
Painting
I sprayed the model using the Aztek A470 airbrush and mostly Alclad paints. I decided to make the Edwards AFB example (USAF ARDC Air Force Flight Test Center – S/N 20221) with the orange ID panels as it was more colourful.
First I primed with Alclad grey microfiller to check for joint/surface blemishes and the engraved panel lines. All looked OK. Because I wanted to do the Alclad metal finish last, to avoid damage by masking, etc, I decided to paint the rest of the model pretty well completely, so, first came the wheel wells and flap enclosures, then the white underside (Alclad white primer) plus undercoat for the orange bands, then the orange, then the radome. This necessitated a lot of masking, as you can imagine, as I wanted to retain the grey primer as part of the underpainting for the silver. It was then necessary to mask everything that wasn’t grey.
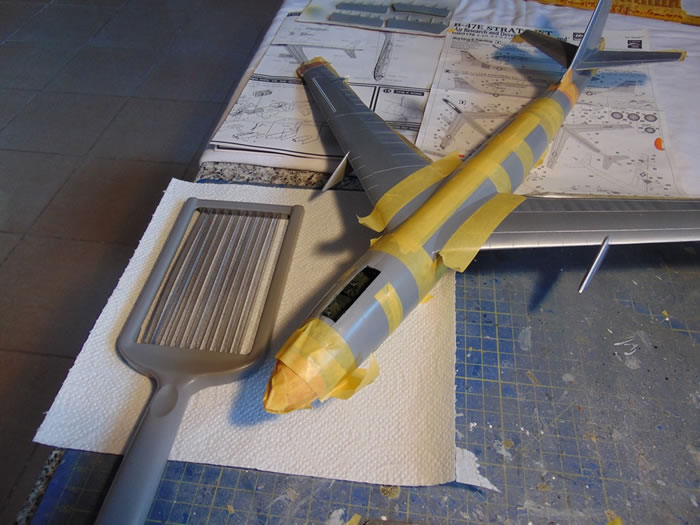
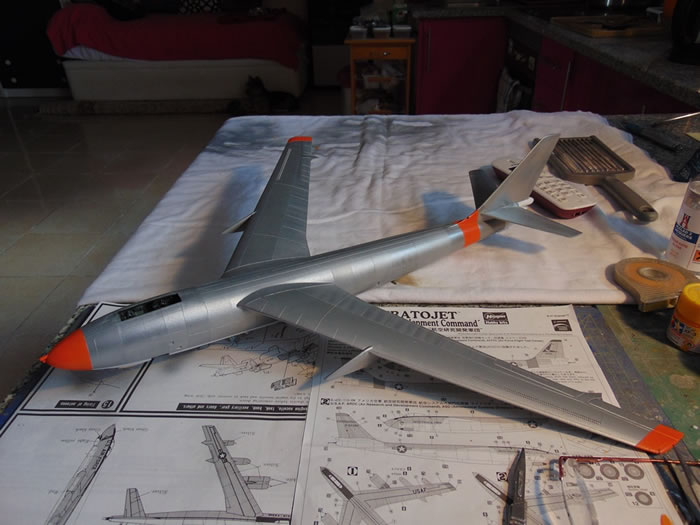
I had been experimenting with Alclad II highly polished finishes for some time and was confident enough to use these techniques on this model as it is mostly natural metal. To summarise, with the Alclad II highly reflective finishes (chrome, polished metal, etc) the degree of shine depends totally on the primer underneath. If it’s gloss black, then you get maximum shine whereas matt grey results in a normal unpolished metal finish. Therefore different shades of grey and different sheens will give the effect of different panel textures even though the top coat is the same paint overall; I decided to use Alclad’s ‘Chrome’ colour as I have had success with it before. The more logical choice might have been ‘Highly Polished Metal’ but I have never had any success with it as it seems to be too transparent and rather disappointing in its result. Instead of actually using 50 shades of grey, I used only the Alclad grey primer but buffed some panels with micromesh 8000 and spray-varnished others to give the necessary backdrop for the metallic coat of paint. In addition, I should make the observation that to paint different panels different colours is probably incorrect (except for obvious cases such as the rear end of an F-100). The colour of aluminium sheet does not vary much, but what does change is the degree of shine and rippling of the surface where the skin is thin. This gives the effect of different panel colours.
Looking at photos, the area between the front and rear spars is sometimes more matt (I used normal Alclad ‘Aluminium which could then be masked) but what is really noticeable is the rippling in the surface aft of the rear spar (over the retracted flaps) and on the rudder. I decided to replicate this by alternating matt and gloss grey primer, using macaroni (actually ‘macarronete riscado’ – thin macaroni in Portuguese) for masking…yes, real macaroni! It’s perfect for use but don’t eat it afterwards!
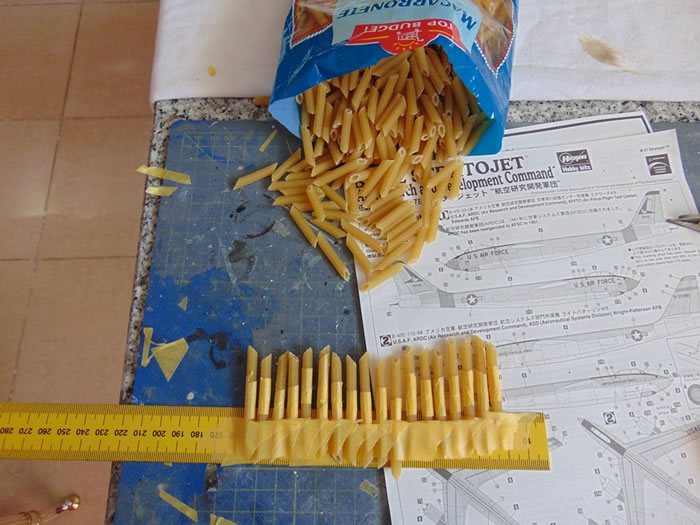
I later discovered a tomato slicer which works well on panels that are higher than they are wide, such as the fuselage. Overall, I was very pleased with the result which looks like metal but has quite subtle shading of different panels as well as the impression of ribs and frames.
Incidentally, you no longer need to worry about masking over these highly polished finishes because Alclad now have what they call ‘Aqua Gloss’ which can be sprayed over the metal finish to protect it. They say you can also dip transparencies in it, so I suspect that it’s actually an acrylic floor varnish like Johnson’s Kleer and I can confirm that it is water-soluble, unlike the Alclad metal finishes for which I use surgical alcohol.
Decals and Final Touches
I painted the undercarriage legs white, tyres black and assembled the wheels, doors, flaps, engines and fuel tanks. The True Details wheels are weighted but rather excessively so they look a bit too fat. The undercarriage doors have some prominent rods that attach the doors to the legs so that they get dragged closed when the undercarriage retracts, so I added these. Then I sprayed it overall in Aqua Clear but it was still a bit dull so I reinforced it with a light dusting of Gloss Clear. The last bit of painting was the black anti-dazzle panel over the front upper fuselage which I could mask over the Aqua Clear. That just left the cockpit to finish off, so I added the ejection seats, front, middle and rear coamings, then the vacform canopy. The canopy could be opened but crew access was actually by the crew door but most pictures show it closed. It’s disappointing that Hasegawa have not included decals for the white canopy framing as it rather prominent but I cut up some scrap decal strip. Apart from that, the frame appears to be black for aircraft with the large black anti-dazzle panel.
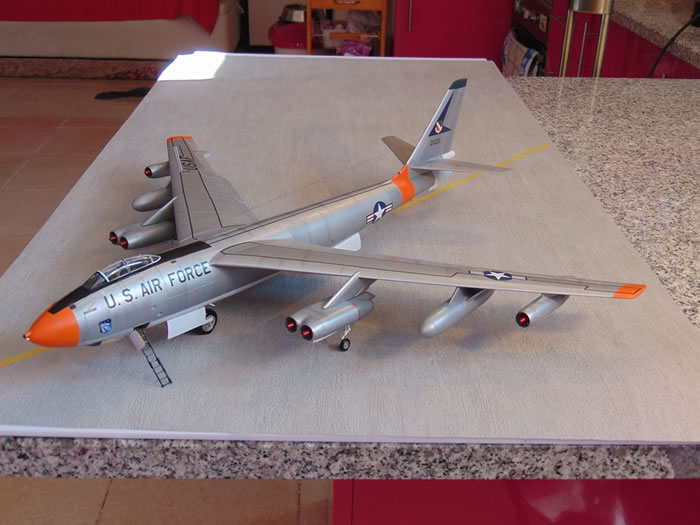
The decals were a major disappointment and whoever was responsible should be invited to commit seppuku. My sheet had numerous spots where there was no carrier film and parts of some of the decals remained stuck to the paper regardless of the amount of soaking or coaxing with a paintbrush. I had to cut away the damaged part of each one and try to repair the damage when the decal was on the aircraft by cutting bits from spare decal sheets. When I’ve forked out £40 for a 50-year old kit, I expect better than this, Mr Hasegawa-san. Gripes aside, the remainder went on well apart from the stars and bars on the wing where the vortex generators are but no surprise there. I painted the fin tip as I don’t like using 2-D decals for 3-D shapes. I was surprised to see that this aircraft has an aerial wire that runs from a tiny aerial mast at the cockpit to the fin leading edge. I used EZ line. The jet engine bullets for my Edwards AFB model are ‘metallic red’ and I painted them with Tamiya clear red over silver.
The canopy was attached using Micro Kristal Klear and I added a bit of light weathering using the Tamiya weathering set.
Well, it looks good…very good. It is an iconic and revolutionary aircraft and I’m pleased with the finished result. I’m particularly happy with the metallic effect and the impression of rippling in the metal skins. I have to admit that this model took me more time and effort than any other model I’ve built (about two weeks, part-time – and I’m retired…) but that’s what happens when you try to update a 50-year old kit to current standards.
I don’t suppose that the modelling world will see another 1/72 B-47 so, if you need one, this is it, but be prepared for a lot of work to get a good result! The model was always good and that hasn’t changed – it’s the global standards that have improved.
This model is largely original apart from the decal sheet which was disappointing.
Overall, it looks the part and, if you need a B-47 in your collection, then this is the one for you.
Model, Images and Text
Copyright ©
2015 by Roger Hardy
Page Created 9 March, 2015
Last Updated
9 March, 2015
Back to HyperScale Main Page
|
Home
| What's New | Features | Gallery | Reviews | Reference | Resource Guides | Forum |