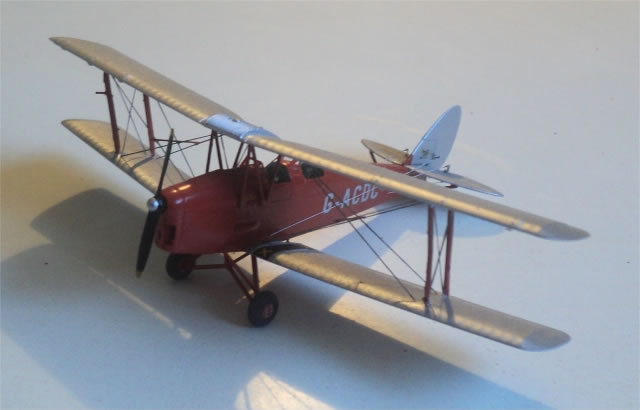
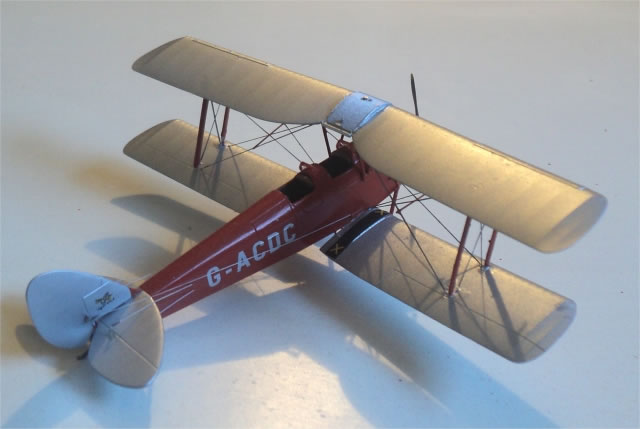
Airfix 1/72 scale
De Havilland DH82a Tiger Moth (Civil)
by Roger Hardy
 |
De Havilland DH82a Tiger Moth (civil) |

Airfix's 1/72 scale Spitfire Mk.22 is available online from Squadron
S
u m m a r y |
| Catalogue Number: |
Airfix Kit No. A01024 - De Havilland DH82a Tiger Moth (civil) |
| Scale: |
1/72 |
| Contents and Media: |
2 sprues in light grey styrene; one in clear styrene; photo-etch sheet; markings for four aircraft |
| Price: |
£5.99 plus shipping available online from Hannants |
| Review Type: |
Build Review |
| Advantages: |
GAppears accurate, nice surface detail treatment, bargain price. |
| Disadvantages: |
A better-engineered solution to fuselage surgery should have been used to cover the anti-spin strake option. |
| Conclusion: |
This is the best 1/72-scale Tiger Moth kit so far, and a bargain. |
 This was reviewed comprehensively by Mark Davies when first released so I won’t go into that detail again. This was reviewed comprehensively by Mark Davies when first released so I won’t go into that detail again.
A little history
The Tiger Moth was a standard RAF trainer during WWII and was developed from the DH60 Moth. The RAF insisted that both crew members should be able to leave the aircraft in an emergency and the only way that the front student in the front could get out with parachute was to move the whole centre-section of the wing forward then sweep the wings to maintain balance. After the war, these aircraft hit the civilian market, although there were many examples sold directly to the civilian market pre-war. RAF markings are provided in kit #A01025.
The Tiger Moth was one of the earliest kits that Airfix issued (1957!) and I made several as a kid. I’m retired now but that little model was still doing the rounds until a few years ago. It has many problems with shape and finesse but it was the best available for years until the cottage industry got interested. Now Airfix have trounced them all with this little gem.
Those Strakes
There is some controversy over the spin strakes fitted to many of these aircraft, introduced when the option for underwing bomb carriage was developed (but not used, thank God).
These were intended to avoid the flat spin by increasing the vertical drag of the rear fuselage and getting a more nose-down spinning attitude. They were fitted to all RAF aircraft. However, the example of this kit, the well-known G-ACDC (still flying in the UK) was a civilian aircraft and although it is certainly fitted with the spin strakes now (a CAA requirement for Transport Category aircraft), was not always fitted with them; there are plenty of photos around showing it in the red and silver Tiger Club markings without the strakes. This is good news because Airfix instruct you to remove the strake-less part of the rear fuselage and insert the straked part. This is messy surgery on such a small aircraft and was a bad decision as most people want to build an RAF aircraft which would have the strakes fitted.
It would have been better to have moulded the strakes in then remove them if necessary.
Those Struts
I defied normal practice by following the instructions (apart from the strakes) and there’s not much to say about the assembly of this simple and tiny model except to warn you about the struts. Everything in this model is tiny and petite, including the struts which are as close to scale thickness as possible. In addition, the interplane struts are moulded together but separated by an X piece which ensures that the correct wing alignment results.

The X piece is cut away after assembly. However, beware! These struts are incredible fragile and will snap unless treated with enormous respect. The very act of removing that X piece can cause a strut to break. I managed to break one set of cabane struts and two interplane struts, one so badly that I had to replace it with a brass one. They will also break after assembly if you accidently squeeze the wing tips together (as I did when rigging), they are that fragile. My recommendation is to replace the interplane struts with metal ones which are easy enough to make from wire, filed to profile. It only takes a few minutes and is well worth doing.
Rigging
I decided to rig this entirely, including all the cabane wires and control cables. This meant drilling little holes everywhere (0.3mm, then 0.4 when that broke, then 0.5mm which is really too big at his scale but I didn’t have any smaller) and inserting the cabane wires before assembly.
The remainder was rigged with haberdashers elastic thread of around 0.15mm diameter. This is lovely to use, is almost transparent, does not fray when cut and stretches if you poke your finger where it’s not supposed to be poked. I had already painted the aircraft (Tamiya red, Alclad White Aluminium). I rigged it through the holes and secured each end with superglue; this is another nice thing about the haberdashers thread – just a suggestion of superglue and it’s fixed immediately and for life. This rigging method requires that the holes be made good after the even and this was done with dabs of supergue, trimmed when dry with a new, very sharp scalpel, then the paintwork repaired. It’s not perfect but at this scale, I didn’t want to bother with Bob’s Buckles and all that complexity.
I then put on the decals then did the control cables to the rudder and elevator. The rudder cables should be doubled but I left them single. I painted the wires with a light coat of mid-grey then picked out the ends with dark grey to represent the turnbuckles. At this scale is works fine. Remember that the Tiger needs spacers between the flying wires and landing wires; I made these from stretched sprue and painted them red.
Conclusion
So, what’s the outcome? Well, it’s the best Tiger Moth in this scale by a long shot. The cockpit detail is adequate, the struts and undercarriage look to be scale thickness and the engine intake and exhaust are very well done. I have only one concern and that is that the nose seems to be a tiny bit droopy. The top line of the nose from windscreen to engine cowling should be a straight line. On mine, it is not and this is because the whole nose is a separate part, so the error is not really evident until final assembly. In the future, I’ll fettle this to ensure the correct line but I think it’s a fault with the kit, albeit an easy one to rectify.
My only other observation is that the decal sheet for G-ACDC is rather boring; they could have chosen a slightly more flamboyant example but I’m sure the aftermarket guys will step forward.
Overall, this is fine kit, well-engineered and good value.
Thanks to Airfix for this delicate little bird and for upping their game with these new models. Please keep it up!
Model, Images and Text
Copyright ©
2014 by Roger Hardy
Page Created 18 July, 2014
Last Updated
18 July, 2014
Back to HyperScale Main Page
|
Home
| What's New | Features | Gallery | Reviews | Reference | Resource Guides | Forum |