Hobby Boss 1/72 scale
Hawker Sea Hawk FGA Mk 6
by Roger Hardy
 |
Hawker Sea Hawk FGA Mk 6 |

Hobby Boss' 1/72 scale Hawker Sea Hawk FGA.6 is available online from Squadron
S
u m m a r y |
| Catalogue Number: |
HobbyBoss Kit No. 87251 - Seahawk FGA.6 |
| Scale: |
1/472 |
| Contents and Media: |
71 plastic parts in mid-grey plastic on 4 sprues, 3 clear parts on 1 sprue, decals for 3 aircraft plus a 3 page fold-out A4 instruction sheet with parts plan, 9 build diagrams and separate full colour paint/decal instructions on a double sided A4 sheet |
| Price: |
Purchased online from Hannants for £11.99 plus shipping |
| Review Type: |
Build Review |
| Advantages: |
Tamiya-quality moulding and surface detail. Good cockpit and wheel well detail and accurate in shape with an interesting decal spread. |
| Disadvantages: |
A small register problem on one of the two decal sheets, slightly see-through white, serials for upper surface of wing (!) No wing fold. |
| Conclusion: |
Highly detailed, accurate and easy to build - the best Seahawk in any scale. |
 History History
The Hawker Sea Hawk was the Royal Navy’s Fleet Air Arm’s first really successful jet fighter, following the Supermarine Attacker in service.
The prototype flew in 1951 and by the mid-50s the latest version, the FGA Mk 6 was in service but its only combat exposure was during the Suez crisis. As Hawker were pressed on Hunter production, most of the Sea Hawks were made by Armstrong Whitworth and around 500 were built. It also served with the navies of India, Germany and the Netherlands.
Full details at: http://en.wikipedia.org/wiki/Hawker_Sea_Hawk
The Kit
This model was reviewed comprehensively in the box by Glen Porter, so I won’t repeat it here, except to say that the first impression on opening the box is ‘quality’:
ttp://www.hyperscale.com/2011/reviews/kits/hobbyboss87251reviewgp_1.htm
For completeness, I should repeat that there is no wing fold option which will upset some FAA enthusiasts (but not me!). Wolfpack do a resin set for this kit: http://www.1999.co.jp/eng/10193469.
You have to decide early on whether you want to carry the unguided rockets as the holes in the wings need drilling. I wanted to do the HMS Albion 806 squadron markings and I have never seen any evidence of the rockets being carried in 1959-60 so only drilled the holes for the drop tank pylons.

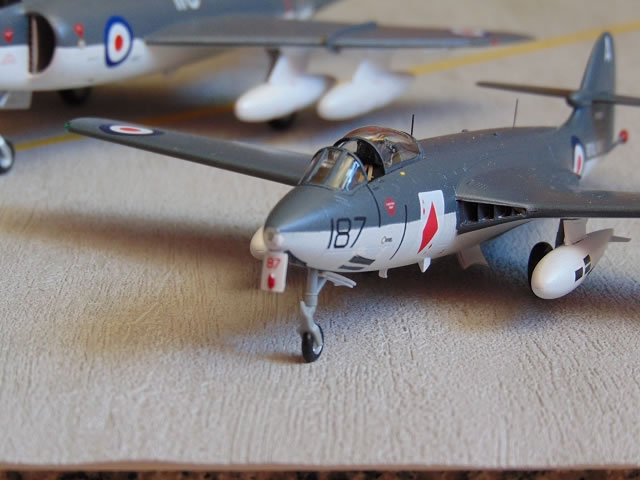
Note that you will need to add nose weight, which is not mentioned in the instructions and this has to be added aft of the cockpit assembly as the nose is tight and full of a realistic and deep nosewheel bay. The cockpit should be matt black overall as was normal for British aircraft of this vintage. I always find this too dark and, looking at photographs, it can be more realistically portrayed by a dark grey with black wash for the depths and dry-brush white for the highlights. For a good photo walkaround, have a look at: http://www.thunder-and-lightnings.co.uk/seahawk/walkaround.php. I used the kit ejection seat with some generic Eduard seat belts but I know that there are better resin seats out there. The instrument panel is a decal and looks fine but I didn’t use the decals for the side consoles as dry-brushing looks better.
The intake inserts have the vanes moulded into them and these need to be thinned-out and sharpened at the leading edge. The alternative is to replace them with plasticard; on the real aircraft, they were curved but it’s hardly noticeable from the front so I didn’t bother. The inserts need a tiny bit of trimming to allow the upper and lower fuselage parts to mate properly and I noticed that the trailing edges had a minute gap so would recommend scraping the insides of the wings near the trailing edges to get a better fit. The rear fuselage clicks into place nicely but I noticed a very slight step (a sliver of a millimeter) between the upper or lower fuselages, front and rear. You can get one but not the other so I aligned the upper and decided to trim the lower. Anyway, before you know it (less than three hours in my case), you have a Sea Hawk.
I left the undercarriage and tailplanes off for spraying. The joints needed little work and the only filler needed was a tiny bit to tidy up the jetpipe pen-nibs. A nice touch is that the mainwheels are not parallel to the legs, and the main undercarriage legs are not vertical which is correct. If they were, the tanks would not fit.
Painting, Markings and Finishing Touches |
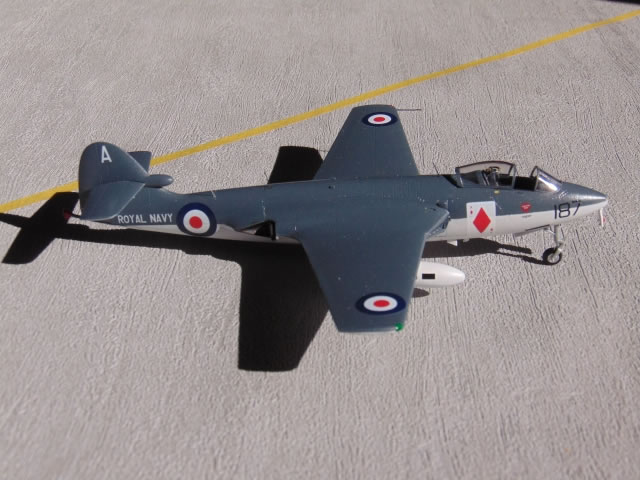
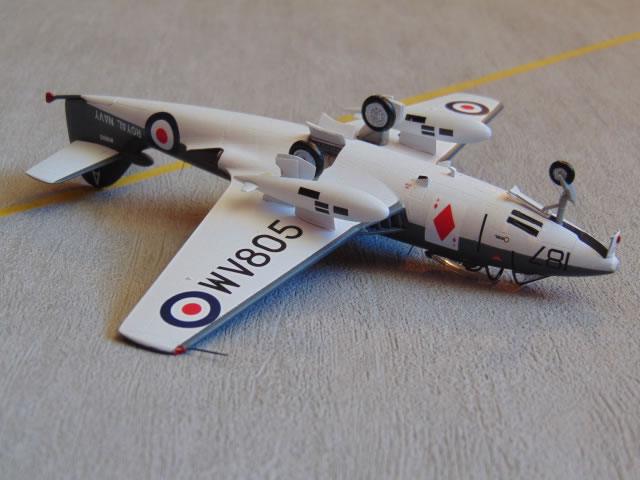
A word of warning: the colour scheme shows the HMS Albion version as having the undersurface colour as ‘E’ or ‘IJN gray’, whatever that is. It should, of course, be white and the aircraft is identical to ‘188’ which is the Royal Navy Historical Flight (RNHF) airworthy example, of which there are dozens of good colour photographs on line. Note also that the colour schemes in the kit show serials on the upper surface of the wing. DO NOT DO THIS! Serials were only on the lower surface.

The other FAA colour scheme refers to ‘H’ or ‘Duck egg green’ undersurfaces which is actually ‘Sky Type S’. Correct undercarriage colours are difficult to pin down as there are a lot of variations on preserved examples which may have been repainted incorrectly. Photos show both light blue-grey, Sky Type S and silver but the RNHF aircraft has blue-grey legs (not Sky ‘S’) with silver hubs which is good enough for me. I think that the earlier Sky undersurface colour may have also been used for the inside of the undercarriage doors but it’s unlikely to have been retained when the underside colour was changed to white. On the flying Sea Hawk, they are white. The wheel bays are generally agreed to be silver although some sources refer to Sky, so take your pick.
Paints were applied with my Testor Aztek airbrush.
The marking in the kit are taken from ‘Hawker Sea Hawk’ by Tony Buttler MRAeS. Warpaint Series No.29. Published by Hall Park Books Ltd. I checked the identity of WV805 and it is correct: 187. The ‘A’ on the fin is for HMS Albion and is not an individual aircraft letter.
The decals go on well enough but the red and white are a tiny bit out of register and the white is a little see-through as is the red where there is no white backing (ejection seat triangles). I used the kit decals but would advise getting some aftermarket markings for the best results. The decal numbers on the sheet disintegrate if touched and you can get little black bits everywhere, so cut these off before soaking! The fuel tank decals have been copied from the 1/48 Trumpeter kit and look crude and unnecessary; they should have instructions on them at least. When the decalling is finished, you end up with a mass of unused decals and it looks as if Hobby Boss have provided three complete sets to make the three versions, which is rather bizarre. Some Liquitex satin varnish brought everything together and it was almost done.
The various aerials should be of the ‘whip’ variety rather than the masts provided so it’s best to make these from stretched sprue. The canopy parts are thin and clear, so no problems there; they can be posed open which is what I usually do, and the fit is perfect. I added some wingtip navigation lights in Kristal Kleer and also the camera gun in the nose. Et…voilà!
Straight from the box, this was a stress-free build and the result is very pleasing.
This is a first class model at a reasonable price and I would recommend it without any serious reservation. This kit has reinforced my belief that there has never been a better time to be a modeller. We have great kits that I could only dream of 50 years ago plus whatever information we need on the internet just a mouse click away.
Modelling heaven!
Model, Images and Text
Copyright ©
2014 by Roger Hardy
Page Created 29 August, 2014
Last Updated
29 August, 2014
Back to HyperScale Main Page
|
Home
| What's New | Features | Gallery | Reviews | Reference | Resource Guides | Forum |