Sword's 1/48 scale
English Electric Lightning
F.Mk.1 / F.Mk.2
by Roger Hardy
 |
English Electric Lightning F.Mk.1 / F.Mk.2 |

Sword's 1/72 scale Lightning F.1/F.2 will be available online from Squadron
S
u m m a r y |
| Catalogue Number: |
Sword Kit No. 72081 - English Electric Lightning F.Mk.1 / F.Mk.2 |
| Scale: |
1/72 |
| Contents and Media: |
2 sprues 70 light grey plastic parts; 3 clear; photo-etched parts; resin parts; markings for two aircraft. |
| Price: |
£14.99 available online from Hannants
|
| Review Type: |
Build Review |
| Advantages: |
Crisp mouldings. Masses of cockpit and wheel well detail. Two variants. Great decals. Good fit, comprehensive and exceptional value for money. |
| Disadvantages: |
Minor quibble - no seat belts. |
| Conclusion: |
Sword should be congratulated on producing a first-rate model at a bargain price and I recommend it without reservation. |
 Background Background
For a full history, see http://en.wikipedia.org/wiki/English_Electric_Lightning
The English Electric Lightning is a supersonic jet fighter aircraft of the Cold War era. It was designed, developed, and manufactured by English Electric, who were subsequently absorbed by the newly-formed British Aircraft Corporation by government dictate. It was then marketed as the BAC Lightning and was only English Electric’s second design after the successful Canberra. It was an innovative design that took advantage of German research into swept wings but avoided the problems of tip stall and poor control effectiveness by cutting off the wings near the tip and aligning the control surfaces to the freestream. The boffins at the Royal Aircraft Establishment were so worried by these revolutionary new features that they separately commissioned Shorts to design and build the SB5 research aircraft to try out different wing sweep and tailplane positions. In the end, they found out that English Electric had got it right in the first place.
The Lightning was the only all-British Mach 2 fighter aircraft and was the first aircraft capable of supercruise. It was designed well before area-ruling was known about but when the aircraft’s cross-section was analysed, it was found to be pretty well perfect which means that, with the thin 60-degree swept wing, it could slip through the transonic region with no problems of compressibility. The Lightning was prominently used by the Royal Air Force (RAF) and the Royal Saudi Air Force (RSAF). Although it was the RAF's primary interceptor for more than two decades it was never required to attack another aircraft.
On the morning of 4 August 1954, the prototype P1A, WG760, piloted by Roland Beamont, flew for the first time from Boscombe Down. One week later, WG760 officially achieved supersonic flight for the first time, having exceeded the speed of sound during its third flight. During its first flight, WG760 had unknowingly exceeded Mach 1, due to position error the Mach meter only showed a maximum of Mach 0.95, the occurrence was noticed during flight data analysis a few days later.
The Lightning is powered by two Rolls-Royce Avon turbojet engines in a unique staggered stacked installation in the fuselage. The Lightning was developed to intercept increasingly-capable bomber aircraft, and thus has exceptional climb, altitude, and speed; pilots have described flying it as "being saddled to a skyrocket". This performance made the Lightning a 'fuel critical' aircraft meaning that its missions are dictated to a high degree by its limited range, being more of a ‘point defence’ fighter. Later developments provided greater range and speed along with reconnaissance and ground-attack capability. One of the Lightning’s other limitations was simply the small radar whose diameter was limited by the intake size so it could not take advantage of larger developments.
Following retirement in the late 1980s, many of the remaining aircraft became museum exhibits and, until 2010, three Lightnings were kept flying at "Thunder City" in Cape Town, South Africa. In September 2008, the Institution of Mechanical Engineers conferred on the Lightning its "Engineering Heritage Award" at a ceremony at BAE Systems' site at Warton Aerodrome.
I worked for the UK CAA at the time and regret to say that we would not allow these aircraft to have UK Permits to Fly because of the risk. I did, however, later manage to persuade my bosses to allow the Sea Vixen G-CVIX to get a Permit. When I worked for BAe at Warton from 1976 to 1985, I was privileged to have known two of the key players in the design of the Lightning, Sir Freddie (F W) Page and Ivan Yates, then Head of Projects. I remember once being in India on a Jaguar sales team with Sir Freddie and the Indians always called him ‘Sir Page’ because they felt it was too familiar to call a Knight of the Realm by his first name! The Chief Designer of the original Lightning was W E W ‘Teddy’ Petter who had designed the Canberra but by the time the first contracts for the prototype P1A had been awarded (1950), he had already resigned to become MD and Chief Designer of Folland where he designed the Gnat, a total contrast to the massive, powerful and expensive Lightning. F W Page became Chief Designer in 1950 so should really be credited with the Lightning’s success.
I remember seeing these aircraft at various air shows in the 1960s and also, as a school kid, 74 Sqn at Tengah in Singapore in 1967. The abiding memory is the take-off: the ground would tremble and the aircraft hurtle towards the end of the runway, leap from the tarmac and, whilst retracting its wheels, stand on its tail and blast vertically towards space, vanishing from view in seconds. Then silence. The initial climb rate was 50,000 ft/min and it could reach 36,000 ft in less than three minutes where the top speed of the early versions was Mach 1.7 (later versions >Mach 2). The ceiling was 60,000ft.
The Kit
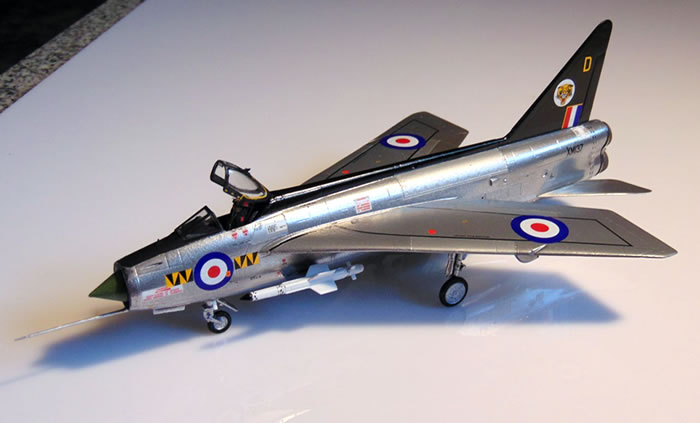
The last 1/72 Lightning I built was the Airfix one which was good for its day (1963, Series 2, 3 shillings….a mere 15p). I also built the 1/48 version which is superb. In 1/72 there have been offerings from Frog/Hasegawa, Matchbox/Revell and various other cottage industry outfits, most of which were creditable but none was perfect. Then came Trumpeter’s recent offering which many observers have been quite rude about but I haven’t seen it so won’t comment as I don’t want to upset the next world Superpower. Now, we have a true state-of-the art Lightning. Markings are provided for two aircraft, F1 XM137 of 74 Sqn and F2 XN768 of 92 Sqn.
The kit comes in a flimsy end-opening box that belies the quality within. I don’t like these cheapie boxes but have had to get used to them at the insistence of Revell of Germany. The contents are detailed above and are well moulded with delicate engraved detail and smallish moulding gates. This is actually a limited run kit but the quality is very much mainstream. Couple this with the beautiful decal sheet by Eduard, resin seat and jetpipes, coloured photo-etch fret and all for the price of a standard Airfix kit, and you start to get the feeling that Sword are really trying hard. I was pleased to see the canopy in two parts as these aircraft were usually parked with the canopies open. I was also pleased to see the airbrakes closed as they almost always were on the ground. Strangely, they give you separate flaps, although these were also usually up when parked. The ejection seat and jetpipes are resin and look very good. Two Firestreak missiles are provided which is correct for the F1/F2 as the Red Top (also provided but not for use) was carried by later variants. There is no intake trunking which means that the cockpit tub may be visible from the intake. The kit provides an air-to-air refueling probe but this was never fitted to the F1 (but it was optional for the F2) and the instructions do not refer to installing it.
There are no locating pins but the wing fits into slots in the fuselage which is a relief. The tailplanes are butt-jointed so will inevitably be weak and it is necessary to add brass rods (see later). The kit covers the F1 and F2 variants which were almost identical apart from some lengthwise fairings along the lower fuselage aft of the missiles and some internal cockpit details. They had the original rounded tip fin, short belly tank and did not have the outboard wing leading edge extensions. A square-topped fin is also provided because the F3 is available as a separate boxing. I assume that Sword will be producing the long-belly tank versions (F2A, F3 and F6) later, then with their trainers, (T4 and T5) they will have covered every variant.
Construction starts with the nose cone and a reminder to add some nose-weight. How nice to be reminded so early on as I usually forget in the rush to get the fuselage closed up! They don’t say how much but get as much in as you can but I managed to get about 3.5g in (it was more than enough). I am fortunate, living in Portugal, as we can still get lead fishing weights here. If in doubt, you can leave off the jetpipes until final assembly in case any additional weights need to be rolled in.
Next comes the resin Martin-Baker 4B ejection seat and the first surprise – no seat belts. The photo-etched sheet is so nice and these belts would have taken so little space it seems like a careless omission; everything else is there…why no belts?…not even moulded into the seat? I had to scavenge through my spares box to find some in 1/72 scale. Here’s what the seat looked like: http://www.jetartaviation.co.uk/wp-content/gallery/ejection-seats/english-electric-lightning-type-4bsb-ejection-seat.jpg. This seat had the double grab handle at the top plus a single one at the seat pan.
Incidentally, here is a link to a reasonable set of photos of Lightnings: http://www.thunder-and-lightnings.co.uk/lightning/walkaround.php.
The seat looked suitably complicated when it was done with its delicate pull handles and I added some small red decals to add that little extra. Funny how we agonize over external decals but never bother with the internal ones. The instrument panel is delightful for this scale. Unlike Eduard who provide film instruments, these are printed onto p/e then the panel with the holes for the instruments is put on top of that. I usually use Micro Kristal Klear for this as it adds little glass faces to the instruments which can be seen if the light is in the right direction. Sad, I know. Even sadder when you realize how little you can see in the final cockpit! Still, I know it’s there. And God, of course.
Incidentally, F1 cockpits were black inside; they changed to grey later and the instructions suggest that the F2 may have had a grey interior as the instrument panels provided are grey. The cockpit makes extensive use of p/e and provide a level of detail that would be good for 1/48 scale, so excellent at 1/72, but if you dislike p/e, don’t attempt this model! I’ve always felt that resin cockpits look better than p/e as they are far more three dimensional whereas p/e has to be 2D by its nature. However, this cockpit is detailed enough and small enough to look very good. The p/e parts are far more realistic than decals.
Once the cockpit is done, it’s time to clean up the fuselage sides and seal the coffin. I mentioned before that there is no intake trunking but there are two prominent ejector pin stubs that are visible from the intake so it’s best to remove these before painting the insides of the intakes silver. I painted the radome assembly at this stage and used RLM 82 which is the best match I could find for the light olive green generally used but I have also seen silver and red so check your references. Sword provide one compressor face which is just visible from the intake but this needs to be trimmed a bit to ensure that the fuselage halves fit together properly. Paint the front of the cockpit tub black so that it cannot be easily seen from the intake and you don’t notice the lack of intake trunking but I’m sure that the cottage industry will oblige.
The inserts for the cannons need to be trimmed on the inside in order to get them to fit. There are two upper cannons for the F.1 plus two ventral guns for the F.2. Although these inserts fit quite well, I used a little filler here because I intended to use Alclad II paints which are very unforgiving of any surface blemishes.
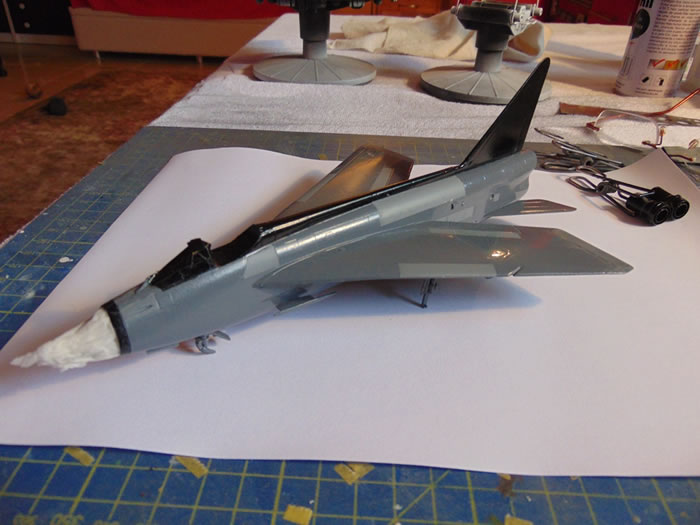
The wing halves need some internal trimming to remove a couple of intrusive ejection pins and I found that I needed to thin the tongues that insert into the fuselage to get a decent fit. When seated against the fuselage they are an excellent fit but I brushed a little Alclad grey primer/microfiller, along the seams. The separate flaps still look a bit too prominent and it would have been better to have made them part of the wing. When it came to mounting the tailplanes, I wanted to leave these until final assembly and decided to try to get brass pins in there and succeeded. I used 1mm diameter and there was no problem (PS, these are essential if you don’t want to keep losing your tailplanes when masking and painting. Do it!)
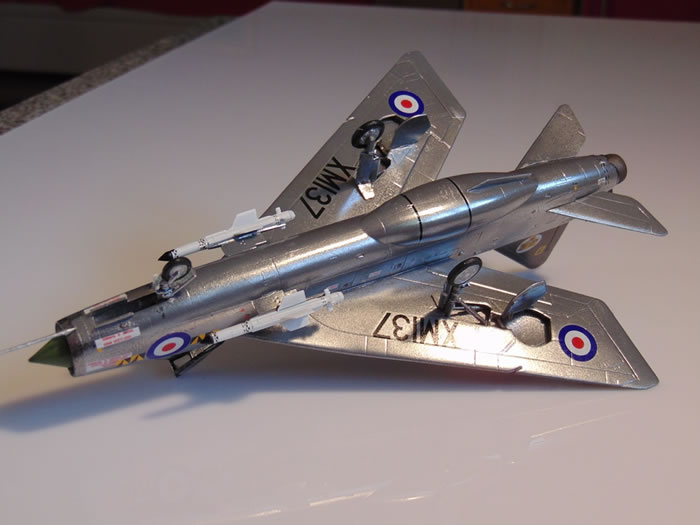
The undercarriage is detailed but goes together fine if your eyesight is good enough to see the p/e parts. I used the plastic torque links because they looked better than the p/e examples. I had decided to assemble as much of the aircraft as possible to ensure that I was gluing plastic to plastic, not to paint and, as the aircraft is essentially one colour, spraying the entire aircraft natural metal in one go is quite feasible. The only bits I left off for later were the wheels, canopy and missiles. The windscreen is a perfect fit and I put it into position before masking and spraying. The canopy itself is best posed open as closed it is not a great fit but can obviously be made to fit with a little trimming. Sword provide internal canopy details and a little rear-view mirror. Securing mine resulted in a little superglue fogging but there’s nothing I can do about that now.
Painting, Markings and Finishing Touches |
Paint was applied with my Testor Aztek A470 airbrush.
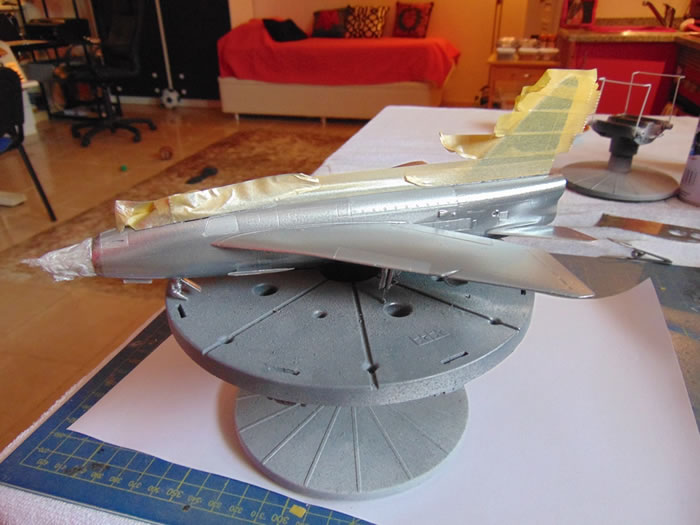
I decided to do the 74 sqn aircraft which is overall natural metal with a gloss black spine and matt black anti-dazzle panel. I looked at photos of the aircraft and there was quite a bit of variation in tone of the metal panels, including highly polished nose ring and around the jetpipes. These early aircraft were kept in great condition so I decided to try a technique that I have tried before which is to use Alclad II Chrome but to give differences in tone and shine by choice of different primer colours and sheen. First I sprayed the entire aircraft Alclad grey primer to check for imperfections. Then I sprayed gloss black over the spine, fin, nose ring and jetpipe section where it joins the fuselage. The anti-dazzle panel was sprayed satin black. When these were dry, the areas that will be black on the final aircraft were masked. Everything else will be natural metal. Then I sprayed different shades of grey, some gloss, some matt, so, I now had a model in various shades of grey with a gloss black nose.

Now it was time for the Alclad II chrome. The differences in tone and polish of the finished effect is entirely due to the underpainting. Note that Alclad highly reflective finishes cannot be masked and you are warned not to use decal softening solution. The finished result was, if anything, a little too bright so I dusted some Alclad II Aluminium to tone it down a bit, particularly on the wings. Overall, this technique works well but I am always impatient and managed to get a few finger prints on the primer that can be seen through the final coat. Damn!

The decals are by Eduard and very good. A nice touch is that all of the edge markings for the canopy are provided. The wingwalk markings need a bit of guesswork and the artwork shows a yellow tip to the fin of the 74 sqn aircraft that was not there on any photo I’ve seen. There is some evidence from a T4 that the tip was grey with the antenna in black but other photos show nothing, just all-black. The maintenance placards and warnings are comprehensive but seemed to vary from aircraft to aircraft and from time to time. The prominent warnings to keep clear of intakes (actually the Czech decal artists have given us ‘KEEP CLEAN OF INTAKES…chuckle) were everywhere initially but not used later as presumably people had got used to this ferocious beast.

I slavishly applied all of the small decals but when I later found some photos of Mk 1s it was clear that many of these markings were not used on all aircraft. In addition, this 74 sqn aircraft had prominent tiger-stripe chevrons on the nose and it is not possible to avoid overlap with the various intake warning placards and I think that these aircraft probably dispensed with them. Too late for me, though! Generally speaking, it is best to rely on photographs for correct decal placement. However, I found it quite difficult to get decent photos of F1s, especially 74 sqn aircraft with the black fins.
I’m pleased with the finished result and any defects are due to me, not the kit. It looks accurate, goes together well, is comprehensive and well detailed. Sword should be congratulated on producing a first-rate model at a bargain price and I recommend it without reservation.
Model, Images and Text
Copyright ©
2014 by Roger Hardy
Page Created 19 November, 2014
Last Updated
19 November, 2014
Back to HyperScale Main Page
|
Home
| What's New | Features | Gallery | Reviews | Reference | Resource Guides | Forum |