Trumpeter 1/48 scale
Supermarine Attacker FB.2
by Roger Hardy
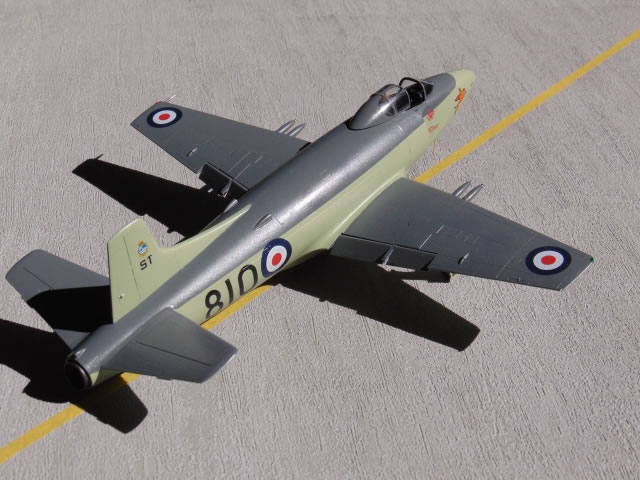 |
Supermarine Attacker FB.2 |

Airfix's 1/72 scale Spitfire Mk.22 is available online from Squadron
S
u m m a r y |
| Catalogue Number: |
Trumpeter Kit No. 02867 - Supermarine Attacker FB2 |
| Scale: |
1/48 |
| Contents and Media: |
Injection-moulded |
| Price: |
Purchased online from Hannants for £23.99 plus shipping |
| Review Type: |
Build Review |
| Advantages: |
It's an Attacker! |
| Disadvantages: |
Various shape, detail accuracy and moulding problems |
| Conclusion: |
Trumpeter must try harder. |
 History History
Supermarine were the providers of fighters to the great British Empire. The legendary Spitfire immediately springs to mind but the subsequent history of the company demonstrates how the great can fall. Frankly, in 1945, the idea that Supermarine could produce so many duff postwar aircraft would be unthinkable. They had produced the Spiteful & Seafang, the fastest piston-engined fighters in the world but were late in recognizing that the world had changed. The Attacker was a scramble to remedy the situation and used a Seafang wing married to a rotund fuselage, a Nene engine and a tailwheel undercarriage. The choice of tailwheel was to avoid modifying the Seafang wing and was known to be an anachronism right from the start. The aircraft was offered to the RAF but offered no performance improvement over the Vampire or Meteor. The Navy was interested, however.
The first navalised prototype, Type 398 TS413 flew on 17 June 1947 flown by test pilot Mike Lithgow, three years after the Meteor had made its first flight. Production orders for the FAA were placed in November 1949. The first production aircraft to take to the skies was the F.1 variant in 1950, entering service with the FAA in August 1951 with the first squadron being 800 Naval Air Squadron. The F.1's armament consisted of four 20 mm (.79 in) Hispano Mk. V cannons, with 125 rounds of ammunition per gun. It was powered by a single Rolls-Royce Nene Mk. 101 turbojet engine. In total, the RN ordered 146 Attackers.
The Attacker had a brief career with the Fleet Air Arm, not seeing any action during its time with the FAA and being taken out of first-line service in 1954. It was replaced by the Hawker Sea Hawk and thereafter Hawker became principal provider of fighters to Her Majesty. The Attacker remained in service with the Royal Naval Volunteer Reserve (RNVR) for a little while longer, being taken out of service in early 1957. The Attacker was replaced in the front line squadrons by the later and more capable Hawker Sea Hawk and de Havilland Sea Venom. Between 1952 and 1953, 36 Attackers also served in the Pakistan Air Force (PAF) until the type was completely retired in the 1960s.
As a post-script, the Attacker was developed into the Type 510 with swept wings which led directly to the Swift, which was a contender for Best Jet Fighter in competition with the Hawker Hunter. However, the Swift had many problems which the Hunter did not have and it was the Hunter that won. Supermarine’s last gasp was the mighty Scimitar twin-engined naval fighter; a massive fighter without a radar! An American observer noted “Only the British could put so much power into a jet aircraft and keep it subsonic.”
The Kit
Brett Green reviewed the earlier FB1 kit in a brief build review (as a conversion to an FB2) at http://www.hyperscale.com/2013/galleries/attacker48bg_1.htm.
The kit consists of four sprues, one clear, and a small photo-etch sheet. Decals for two RN versions (the only other option would be Pakistan) are provided as is the belly tank and modified canopy. The surface detail is restrained and looks very good. You have the option for deployed flaps and folded wings. Personally, I think that aircraft should look as if they are ready to fly but, on the ground, these aircraft would invariably have their wings folded. The only obvious accuracy problems are that the wheels are undersized (I’m also told the undercarriage bay and doors are wrong but they look OK to me) but the most obvious problem is that the tailplane sits too low on the fuselage. Looking at the kit, the trailing edge of the tailplane aligns with the centre of the jetpipe. It should be ¾ the way up the jetpipe so that makes the error 3.25mm which is significant enough to rectify. Incidentally, the earlier Classic Airframes kit is correct in this respect. I’ve seen this model made up and the incorrect tailplane location does not jump out at you as being incorrect but I thought that it would be relatively easy to rectify so did so.
Fixing the tailplane
I decided to do this with ‘minimum intrusion’, that is, to upset as little else as possible. This was done by cutting out the tailplane locating slots upwards by around 3mm, the idea being that I could retain the span and dihedral of the tail unit by adding plastic to fill the gap below the tailplane tabs so that the new slot is 3.25mm higher.
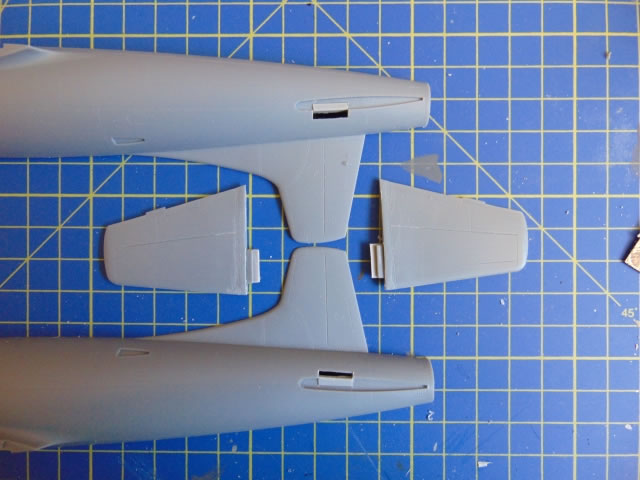
I would then have the correct tailplane position and geometry but the roots would be a mess. I planned to remedy this with the use of Milliput which is a 2-part epoxy filler that can be dampened with water and shaped by fingertips, then fettled when set. This would further strengthen the tailplane assembly.
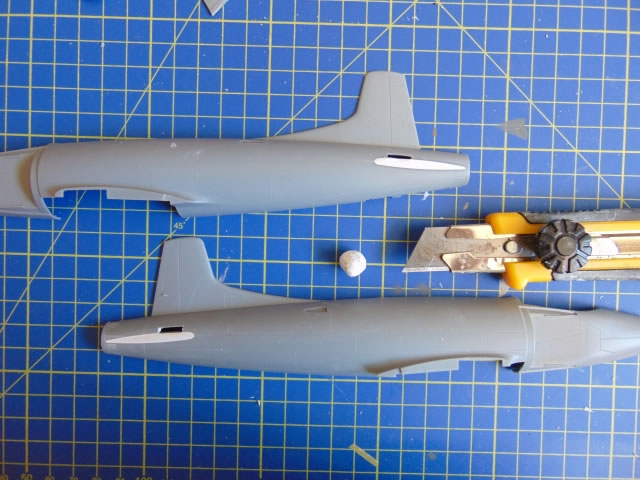
I trimmed the tailplane location slots until I had a 4mm high rectangular hole and also trimmed off the tailplane root fairings as they will be remade in the new position with Milliput. I then added scrap plastic to the fuselage and tailplane tabs to build up the new slots.
I filled in the old rebates in the fuselage for the incorrect tailplane position with Milliput as this will form the foundation for the revised tailplane fairings to the fuselage.
That’s it!
Assembly
The mould-makers have decided that the moulding tags joining each main part to the sprue are on the joining surfaces rather than on the visible external surfaces of most parts. This is nice because it means that the cleaning up is only on the joint surface and the external does not need to be treated. Construction starts with the cockpit but they keep the colours a bit of a secret. British aircraft of this vintage usually had black cockpit interiors so I use Revell Panzergrau then add depth with black and detail with dry-brushed white. For the early ejection seat, I painted the upholstery olive drab, the headrest red leather, the pull handle yellow-and-black and the top of the seat (where the parachute comes out) dark earth colour as this is usually canvas. The instrument panel is a decal which I found difficult to apply. The kit provides you with p/e harnesses but I used some generic Eduard harnesses as they were pre-painted and I’m lazy that way. Pavla do a much better seat: http://www.hannants.co.uk/product/PAVS48025 for a mere £2.25.
The turbine face at the end of the jetpipe is ludicrously far aft. In reality, the engine is amidships and the turbine would be invisible, at the end of a very long dark hole.
The fuselage assembled easily and I was assured of a general impeccable fit but when I came to marry up the wing, it seemed clear that the dihedral was inadequate. This is difficult to correct but I pulled and bent the lower wing before attaching the upper wing parts. The upper wing roots needed sanding in order to allow the right dihedral and I glued the whole thing up and applied superglue to the joint between the upper wing root and fuselage, then taped it all at the correct angle and left it to dry overnight. So much for impeccable fit. Ho hum. What started as a simple build is starting to become more of a mission of me versus the Trumpeter gremlins. The underside will need a fair bit or work to get everything smooth although most of the filling is just skimming.
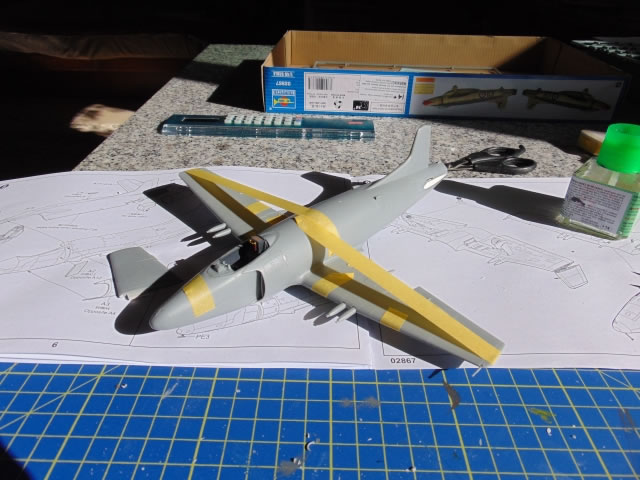
I took the opportunity to attach the tailplanes and set them with superglue then added the new Milliput fairings which started as thin sausages, set in place, then smoothed with a wet finger. That’s the nice thing about Milliput; you can shape it while it’s wet and minimize the work needed to get the final correct shape. If you get it right, you can create the perfect shape, then it’s only a matter of some light sanding and wet-and-dry.
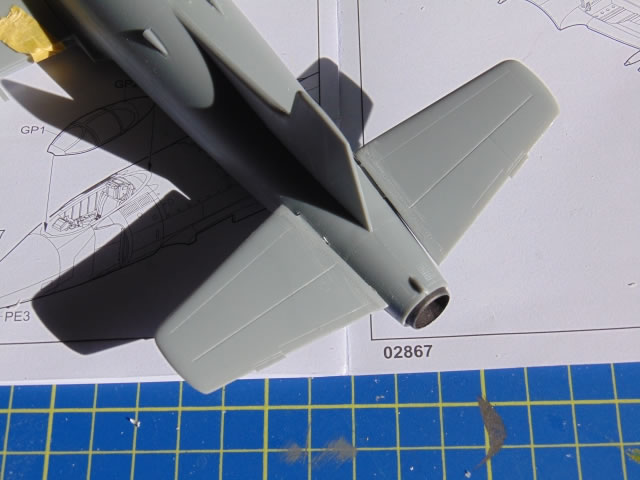
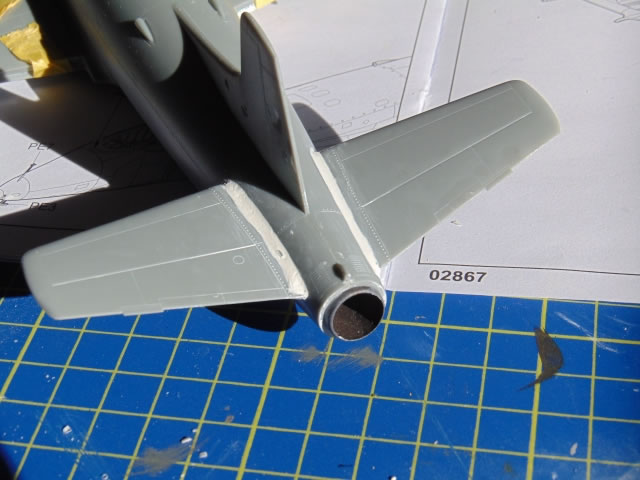
This is when I noticed that the shape of the nose is wrong. It’s fine in side and top elevation but is too pinched when looked at from any oblique angle, both top and bottom. Just ahead of the intakes the nose cross-section is a rounded square and it should morph into an ellipse as it goes forward. Trumpeter have morphed into the ellipse too early. This lack of attention is similar to their Vampire and is disappointing; there are zillions of photographs and even a surviving of the Attacker at the Fleet Air Arm Museum, Yeovilton, UK, so they should have done their homework better. I rectified this with more Milliput.
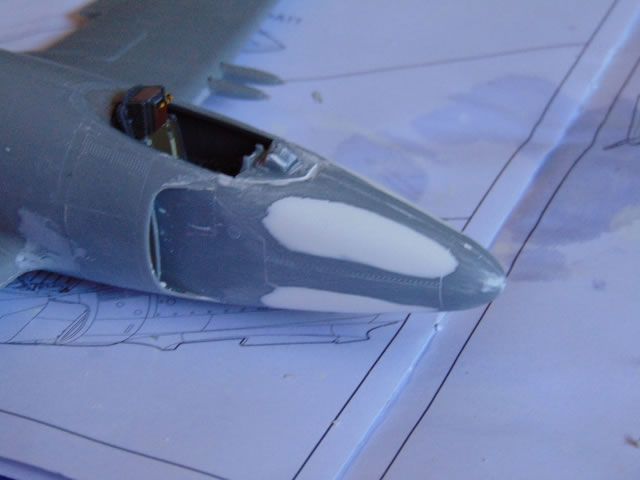
I think that Trumpeter should remember who their customers are; we are not kids who will accept anything, we are adults who have been making kits since childhood and are reluctant to accept below-standard kits. I’d rather spend more and get perfection.
One more thing: there should be four shell case ejection chutes under each wing just ahead of the canon bulges. I decided to add them as decals rather than digging them out at this late stage.
When I’d finished filling and sanding I had the impression that I was building a Classic Airframes kit; the main fuselage joints were OK but the filler and joint between wings/fuselage/lower intakes needed a bit of work. Fortunately most of the under-fuselage joint is covered by the belly tank. Of course, much of the fine surface detail of the nose was destroyed; I re-scribed the basic but not the rest as I had started losing the will to live. However, once I’d primed it to check the joints, I saw that it all looked OK. I added the flaps and belly tank and it was ready for spraying.
Painting, Markings and Finishing Touches |
I used Tamiya XF-54 Dark Sea Grey (actually, it should be Extra Dark Sea Grey) and XF-21 Sky (= RAF Sky Type S) sprayed with my Testor Aztek airbrush.
Then came the undercarriage. I had planned to put on some larger wheels but you can’t unless you’re prepared to alter the undercarriage length to the axle as the fit of the leg parts around the wheel is too tight. In the end, I opted to keep the wheels as supplied because to do anything else would be too much work and did not justify the effort. Actually, I looked at a lot of photos on the internet and the FB1 at Yeovilton actually has small wheels; smaller than on actual aircraft in service, I think. I wonder whether this aircraft (refurbished) is original and maybe Trumpeter copied that wheel diameter, so maybe they did their best and got it wrong.
I painted the undercarriage bays and legs silver but I suspect they may have been Sky. The FB1 at Yeovilton has Sky legs but interior green wheel wells but this has been completely repainted so may not be authentic, I don’t know.
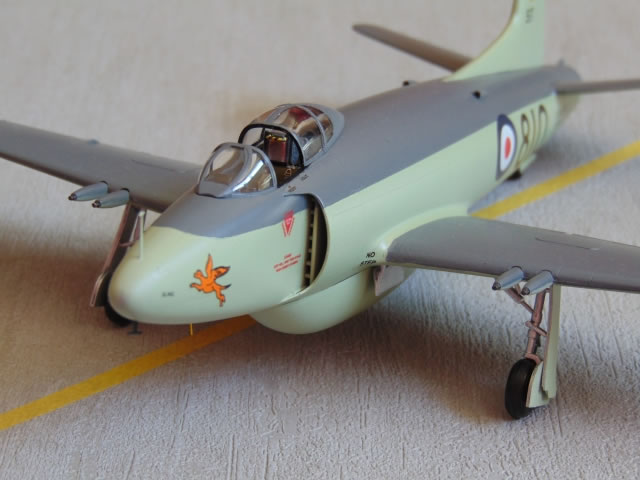
I used Tamiya semi-gloss rattle-can varnish overall as a base for the decals and because the photos I’ve seen show a satin sheen, not matt. The decals are thin and very easy to mess up. You need to make sure that everything is very wet then transfer the decal direct from sheet to model with minimum messing around once it’s on the aircraft. To do anything else risks the decals folding on themselves, then they are difficult to unfold. Having said that, they are so thin that they conform perfectly to the panel detail without the use of decal softening solution. The stencil decals look a little large and are few in number; I suspect they are a token gesture.
Overall, and contrary to what I’d expected, I’m actually quite pleased with the finished result. I think that the upper surface grey is a bit too pale and maybe XF-24 Dark grey might have been a better choice.
Brett Green’s review shows that the model made straight-from-the box actually doesn’t look bad, but, for me, this is another disappointing kit from Trumpeter. Wrong tail position, wrong nose shape, inadequate dihedral, wheels too small, no shell chutes…the list goes on. I wish companies like Trumpeter would just engage their brains before issuing models like this and their rather poor Vampire. It shows lack of attention to detail that is so easy to get right (it’s as easy to get it right as to get it wrong) and that shows a lack of interest in their customers.
However, if you want a 1/48 Attacker, this is currently the only game in town, if you cannot get the older Classic Airframes kit. It’s not that bad but it could have been a lot better.
Must try harder.
Model, Images and Text
Copyright ©
2014 by Roger Hardy
Page Created 26 August, 2014
Last Updated
27 August, 2014
Back to HyperScale Main Page
|
Home
| What's New | Features | Gallery | Reviews | Reference | Resource Guides | Forum |