Classic Airframes' 1/48 scale
CR.42CN “Caccia Notturna”
by Andrew Garcia
 |
CR.42CN “Caccia Notturna” |

Tamiya's 1/48 scale Mosquito B.Mk.IV is available online from Squadron
 Summary Summary
Catalogue Number: CR.42CN “Caccia Notturna” Classic Airframes, Kit No. 497
Scale: 1/48
Contents and Media: 36 parts in gray styrene, 40 parts in cream colored resin, 2 clear injection molded lenses and 1 clear injection molded windshield. Instructions, decal sheet and painting guide with markings for 5 aircraft. This is a 2005 product release.
Price: MSRP USD $40.00 when released, now OOP but still available from some hobby retailers.
Review Type: Build
Advantages: Good shape; engraved panel lines; nicely detailed; plenty of marking options; good quality plastic; four sets of markings supplied.
Disadvantages: Some fit challenges and missed details.
Recommendation: Recommended for value and etched & resin components.
In the Box
Classic Airframes (“CA”) released a series of CR.42 Falco kits, starting in 1995 with # 402, followed a few years later with an improved tooling for kits #474, 475, 496, 497, 498, and 499 spanning all the possible FIAT CR.42 variants including a two seat trainer and seaplane. The Classic Airframes CR.42 kits are still available from many hobby shops, eBay and some internet retailers as well. This release, # 497, came out around 2005.
The Classic Airframes CR.42 was well received when it was released and several in-box reviews appeared giving it positive marks. Steven “Modeldad” Eisenman did an excellent new kit review in March of 2005. The main differences in the Classic Airframe CR.42 kit releases are in the landing gear, bomb racks/shackles, extended exhausts, decals and carburetor intake parts. The second generation of Classic Airframes CR.42’s all share the same basic plastic components except for the two-seater and floatplane versions that have their unique changes provided in plastic. For the most part CA chose to provide the variations through additions of resin components and decal changes.
I found the Classic Airframes CR.42 series to be a welcome release. CA fed my vision of a happy future building all the kits I was interested in building but never released by the mainstream manufacturers. I purchased them as they were released setting the kits aside for a future date when time and interest would prevail to permit me the opportunity to build them. That time is now! In the interim Italeri has issued a series of CR.42’s that provide an alternative to the limited run CA CR.42 kits.
The literal translation of “Caccia Notturna” from Italian to English is “Night Hunting”. I am sharing with you my recent build experience with the Classic Airframes CR.42CN -“Caccia Notturna” version, the designation used for the CR.42 variant used for night fighting duties by the Regia Aeronautica during WWII. We use the term “Night Fighter” in English for a similar mission designation. The FIAT CR.42 Falco was always of interest due to the unusual use of this biplane fighter during a conflict in which high speed, monoplane designs prevailed. It was widely used by Italy during that conflict and was essentially the last of the fighting biplanes. I am an aircraft colors and markings fan as well and this dictates my choice in building. When CA came out with their series of CR.42 fighters, I was delighted to find Jules Bringuier’s products provided endless satisfaction filling in the gaps that no one else seemed to address in the plastic aircraft 1/48th scale modeling universe. I am eternally grateful to Jules for this and purchased every release in support of his vision. I am now building this stash of Classic Airframes releases and experiencing the joy of victory and the agony of defeats that may come from building limited issue injection moulded kits.
My purpose in this build is not to showcase a perfect model but to encourage you to build and enjoy kits that might present a building challenge that result in a completed model with some errors or deficiencies. I learned quite a bit about the CR.42 by putting some effort into building a series, so far, of four Classic Airframes CR.42 aircraft. I recently completed the CA CR.42 as a late prototype, a CR.42 as the J11 Swedish version and two CR.42’s as “CN” night fighters. The builds were challenging and errors were committed but I continued the builds through to completion. The experience has encouraged me to continue building more CA CR.42’s since I now know where to be extra careful in the builds. For great Classic Airframes Cr.42 build advice and constructive help I suggest you refer to the build review titled "Classic Airframes new 1/48 scale Fiat CR.42 Falco” by John Valo found on Hyperscale at: http://hsfeatures.com/features04/fiatcr42jv_1.htm
History
I found the FIAT CR.42CN to be a fascinating subject. Aside from a few grainy black & white reference book photographs and one color photo found on the worldwide web there’s not much documented history for the “CN” version. About the time of the “CN” kit release, in 2005, an interesting article appeared in Volume 17 of the International Air Power Review, pages 158 to 173 that provided a few tidbits of details on this aircraft. The “CN” specifics were sparse but sufficient to stoke my interest in a future build. I then continued to buy other CR.42 references.
The basic CR.42 airframe was used for some night fighting duties. While other night-fighter units re-equipped with the modified and dedicated CR.42CN models, the 377th Squadriglia continued nocturnal operations using black painted standard CR.42 versions from its base in Palermo, Italy. Lacking a radio and any specialized night fighting equipment the standard fit CR.42 had limited success when first impressed into night fighting duties in June 1940. There were a few “CN” victories such as one by Capitano Giorgio Graffer, C.O. of the 365th Squadriglia who downed an RAF Whitley bomber over Turin on August 13-14, 1940 and Tenente Luigi Torchio downing an RAF Wellington bomber on February 21-22, 1943. More detailed information on the group assignments can be found in the Mushroom Models Publications # 8104 FIAT CR.42 Falco book on pages 44-46.
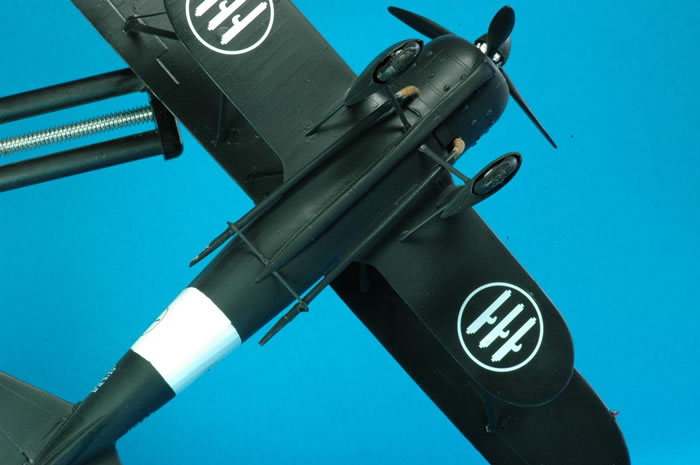
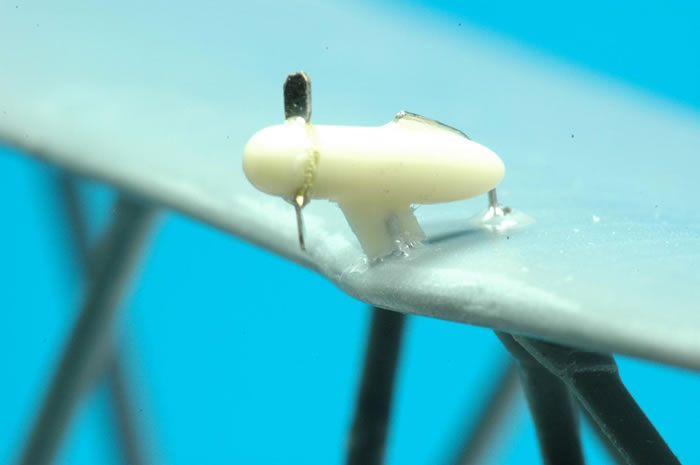
Due to the lack of success of the standard CR.42 Falco in night engagements, for which it was not designed, the development of a dedicated night fighter version designated as the CR.42CN Caccia Notturna was completed. The CR.42CN was equipped with exhaust flame dampers, a radio, illuminated instruments, and a pair of small under-wing searchlights powered by a small prop driven electrical generator mounted on the top of the upper wing. The dedicated “CN” aircraft were manufactured in the 13th production batch, matricula militare number M.M. 7459 to 7658 built during March through September 1941, for a total of approximately 200 units.
The first night fighter formations were assigned to 356th Squadriglia in 1940, operating in the Naples area from Capodichino ( or Ciampino ?) airfield. The CR.42CN entered service with the 171st Squadriglia in October 1941. Other units re-equipped with this variant in Greece, Sicily and southern Italy. In the late Spring of 1942, the 59th and 60th Gruppo would become principal operators of the CR.42CN.They were initially based at Treviso, Italy and retreated along with the declining fortunes of the Italian military right up to the Italian Armistice. The other significant operator of the CR.42CN, the 377th Squadriglia operated the CR.42CN from September 1942 to February 1943 on night fighting and anti-submarine duties. The 300th Squadriglia, 167th gruppo autonomo based at Ciampino airfield defended Rome and Naples during 1942.
From a modeling perspective this means you will find some CR.42 night-fighters in the usual Regia Aeronautica CR.42 overall sand color with green and red-brown mottling as well as most in the overall black paint schemes.
The specific color schemes for CR.42CN’s that I found were:
-
Standard Italian CR.42 Camouflage consisting of overall Giallo Mimetico 3 (Sand) FS33434 with a mottling of Verde Mimetico 3 (Green) FS 34102 and Marone Mimetico 2 (Red Brown) FS 30078 with a Grigio Mimetico (light blue-grey) FS36293 undersurface with a black-grey undersurface for the top wing (photo found in Squadron In Action #1172 CR.32/42, page32 .
-
Overall all surfaces black-grey with the under-wing searchlight pods in light blue grey.
Initially I wanted to build an aircraft with the “full Monty” of Italian CR.42 night fighter accessories which include the small upper wing electrical generator, fully extended exhausts with fishtail tips and under-wing searchlights. I could not find this creature in reference photos or decal selections, although I am certain one exists, with all three components (the third being the extended fishtail pipes with the generator and lights) in any of the reference pictures or decal options available. But, I did find a few very interesting versions which I built. I did find there were three exhausts used by the “CN”, starting with the standard fit short exhaust and two other variants for night-fighters, one a mid length damper exhaust and the full length damper exhaust terminating with a fish-tail end-piece.
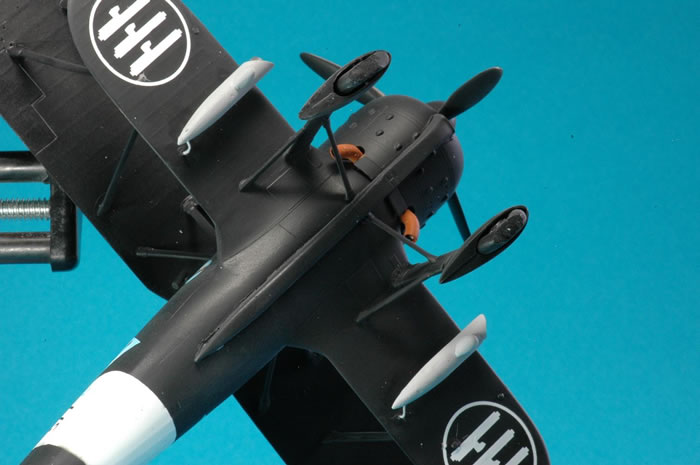
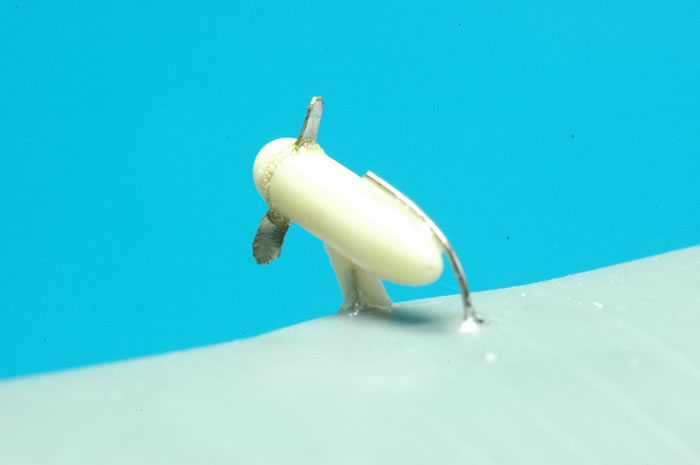
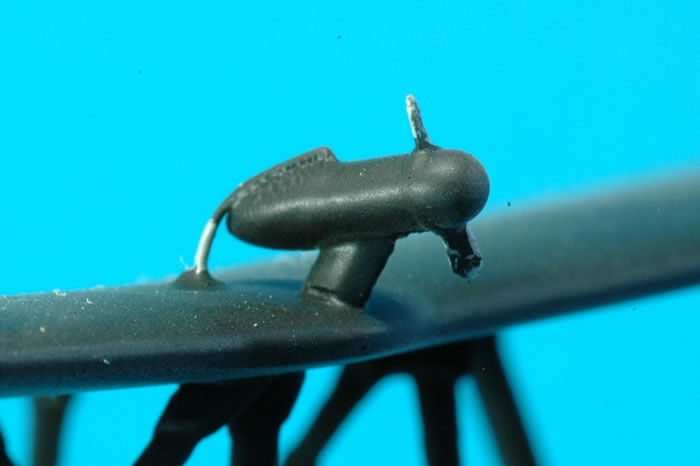
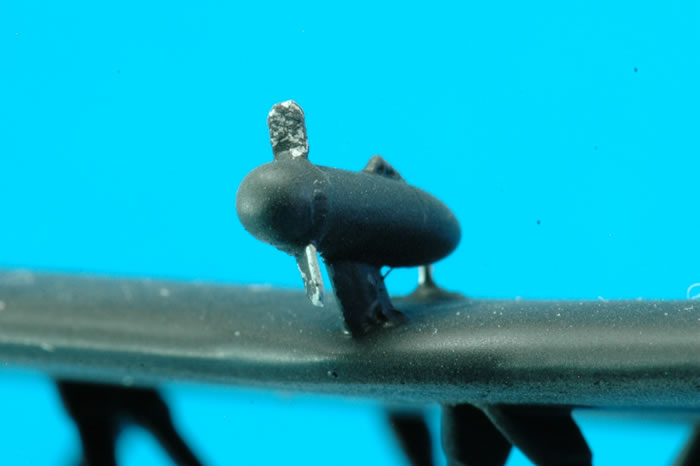
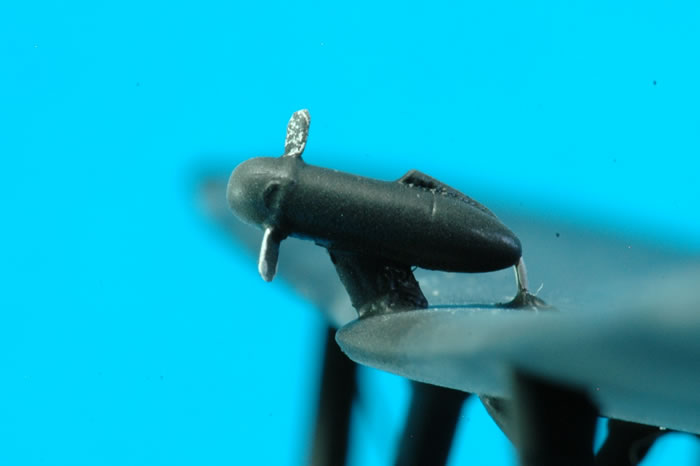
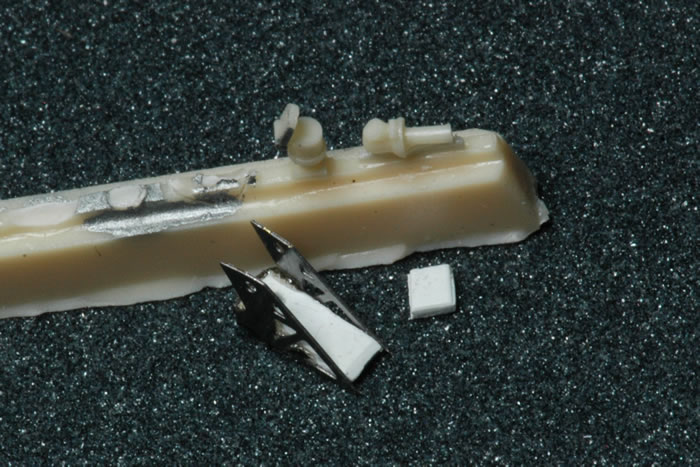
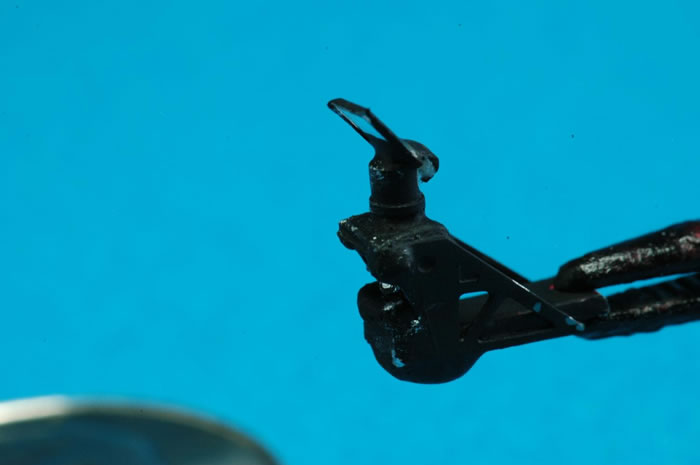
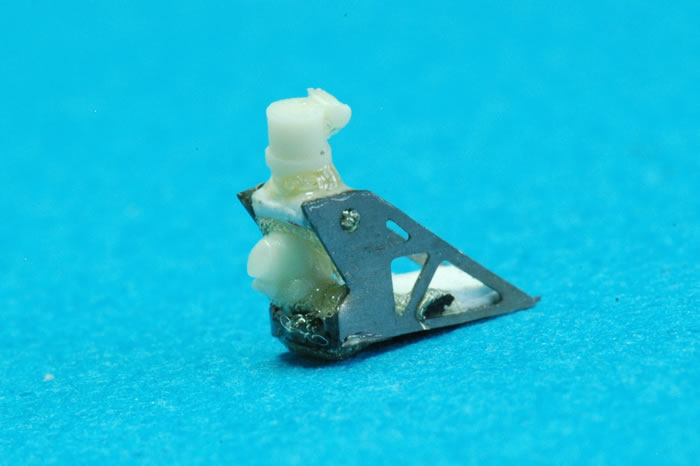
The CA #497 CR.42CN kit comes with the additional resin parts for the Night Fighter packed in a separate bag. These parts include the two different lengths of extended exhausts; one of which has a fishtail end part. The new parts also include the under-wing search lights. There are clear resin lens inserts for the under-wing search lights. Classic Airframes also included a generator placed above the center of the top wing used to power the search lights. The propeller blade for the generator is a delicate piece of resin that must be removed from the molding block with great care. I chose to cut a piece of metal from the etched parts fret and shaped it into a replacement generator prop. I was anticipating the potential delicate nature of the resin and its loss at the wrong time ruining my joy.
As Steven Eisenman noted in his Hyperscale “FirstLook” kit review: “The resin packaging was not without a problem. In my sample, one of the shorter extended exhausts was broken, and the broken piece was not even in the bag.” Me too – I had the same exact problem but found this out years later! In one of my “CN” kits, I had the same defect which leads me to think the resin caster was removing the resin parts too soon from their moulds and this resulted in a distorted extended pipe and missing fish tail on one of the resin pouring blocks. The second unit I purchased some time later had this defect remedied so I was able to use this option for one of my builds.
Steven went on to state: “There is a supplemental instruction sheet for the new parts. However, the long extended exhaust is shown as a single piece with the special tip. The resin exhaust is actually molded in two parts; the exhaust pipe and the tip are separate. Also, the instruction may not be correct in the makeup of the “longest” exhaust. The instructions show that for the long exhaust, resin parts 15 and 16 are joined. Looking at the parts, I believe that only part 16, and the tip are needed. With part 15, it would appear to be far too long. As was the case with the previous CR 42 releases, the instructions, in step 11, continue to show the inner cabine struts incorrectly installed upside down! Parts B17 and B5 should be installed as a “V”, with the open end up. “
Steven’s comments and observations are always right-on target. He notices things others would usually miss and his documentation and sharing through pictures and comments posted in Hyperscale’s forum greatly appreciated and worthwhile (Thank You Steve!). I noticed one additional error in the CA # 497 kit instructions. Resin Part number “R14” is used twice in the instruction sheet for two different parts. It is used for both the resin headrest (in Step 8) and for the venturi tube (using part #R15 in Step 12 standard CR.42 kit instruction booklet and as part #R14 in Step 12 of the addendum sheet).
Step 6 shows a resin cockpit component R7 as a support stand for the San Giorgio Type B gunsight (part R8). R7 is in fact the magnetic compass and very nicely rendered on the resin pouring block sitting next to the gunsight R8. Once R7 and R8 are removed you will have to use some scratch building to match up the etched metal gunsight support brace PE20 with the actual two resin pieces, R7 and R8. You should replace the resin inclined “glass” which sits atop the gunsight with some transparent material.
All the styrene plastic parts are molded in a soft grey plastic with the required engraved detailing. The resin interior looks complete and well detailed in the box with resin and etched color metal parts for the seat, instrument panel, rudder pedals, control stick and side panels. Each kit part has nice detailing and the resin parts are finely cast and accurate in size and shape. The cockpit turns into a nice model by itself. There are no plastic cockpit parts with Classic Airframes relying on resin and etched components to create a masterful little model of the cockpit.
All the details are there including levers, oxygen bottle & pneumatic gas and fire extinguisher bottles, gunsight, magnetic compass and complex restraint system parts in color etch. The seat and cockpit interior should have round tubular rails but are represented by flat etched parts. It makes for a complex assembly. For the most part they are difficult to see once the cockpit is closed up and installed into the fuselage. The kit cockpit is designed for an intermediate or advanced modeler with its mixed media details. The second release by CA of an improved CR.42 kit greatly benefited from adding some Eduard color etched details into the package compared to the initial Classic Airframes CR.42 Kit # 402, released in 1995.
Steven Eisenman, in his March 2005 Kit “FirstLook” listed the markings options and come additional cautionary notes which I include here because they still ring true and are terrific insights:
“The five following marking options are supplied:
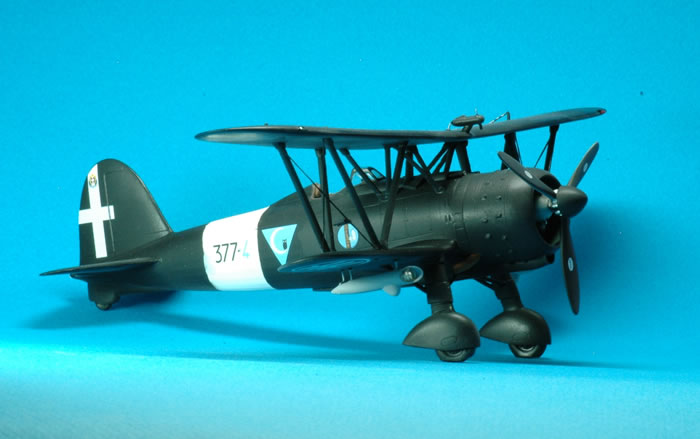
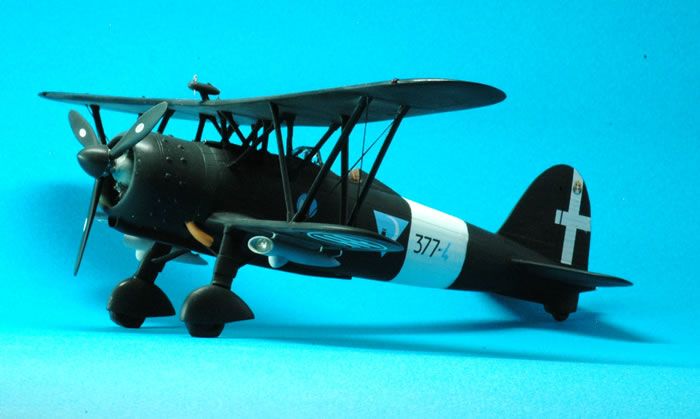
Nucleo Autonono Caccia Notturna, Gela, Sicily, circa 1942. Coded 377-4, this is an all black aircraft with white fuselage band, and the insignia of an owl sitting on the crescent moon on a blue triangle. I believe the description of the unit may be incorrect. This aircraft was part of 377 Squadriglia C.T in September, 1942 and was located at Sciacca, Sicily. This aircraft was (may have been?) equipped with the experimental search lights. It is interesting to note that, at the time, the night fighters did not even have artificial horizons!
377 Squadriglia, Palermo-Boccadifalco, Circa 1942. Another all black aircraft of 377 Squadriglia, with simply the number 6 on a white fuselage band. This aircraft also carries the Squadron insignia of an owl on a crescent moon. But this time, there is no blue triangle background.
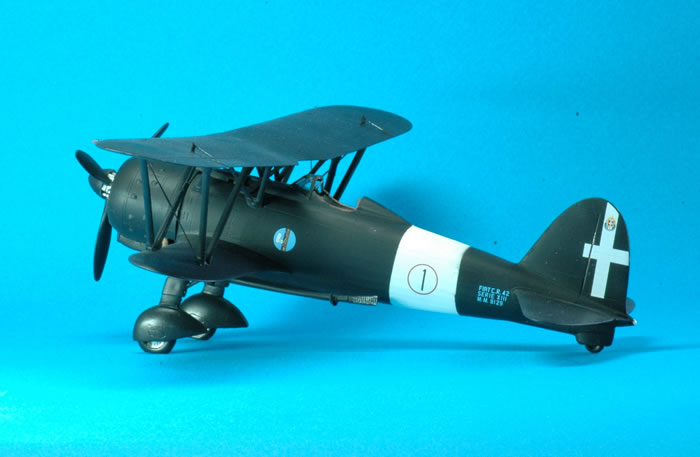
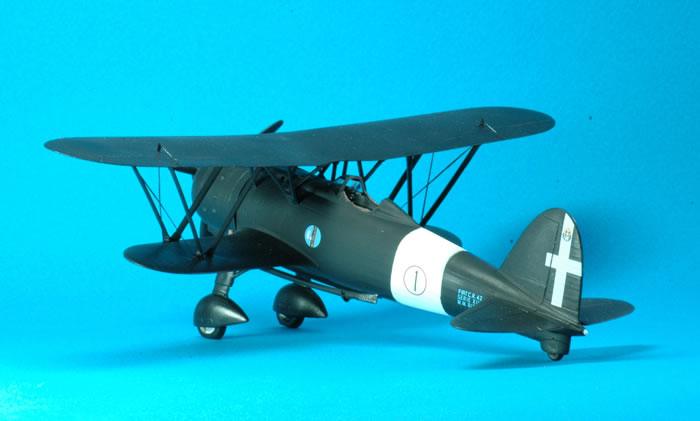
Nucleo Autonomo Caccia Notturna, Gela, Sicily, circa 1942. All black with a white fuselage band and the numeral 1 on the band. This aircraft has the longest exhaust.
377 Squadriglia, Palermo-Boccadifalco, circa 1942. What else but black! I do not believe the unit description for this aircraft is correct. I believe that this aircraft was with 234 Squadriglia, 60 Gruppo B.T. It was located at Treviso, Italy. Approximately January-February, 1941, 234 Sq. became a night fighting unit to protect industries from nighttime RAF raids.
300 Squadriglia, 167 Gruppo Autonomo Caccia Notturna, Rome- Ciampino, circa 1943. For those that want a bit of color, then this is the one for you. The aircraft is in a base color of Giallo 4, with a mottle of Verde 3 and Marrone 2 Mimetico. The underside is Grigio. However, the underside of the top wing, the top-half of the cowling and the inter-plane and cabine struts are black-gray. The aircraft carries a white fuselage band and definitely has the experimental under-wing search lights. 300 Squadriglia was involved in the night defense of Rome.
Some additional notes I wanted to add on the markings options are:
-
CR.42CN #1 - Nucleo Autonomo Caccia Notturna, Gela, Sicily, circa 1942. Coded 377-4, this is an all black aircraft with white fuselage band, and the insignia of an owl sitting on the crescent moon on a blue triangle. This aircraft appears in a color profile in International Air Power Review, November 2005, Vol. 17, page 171 but it shows a red background for the triangle. I believe the blue is the correct choice. It also appears as selection # 2, on Skymodels decals 48-036.
-
CR.42CN #2 - 377 Squadriglia, Palermo-Boccadifalco, circa 1942 coded in red with the number 6 on a white fuselage band is found in a clear photograph in Fiat CR 42, Ali D’Italia #1, La Bancarella Aeronautica, 1995 on page 28 and shows the mid-length exhaust pipe version. This aircraft also carries the Squadron insignia of an owl on a crescent moon without any triangle background. Some aircraft have a painted-in background and others had a lined triangle without background coloration. This example had no triangle when photographed. It appears as selection # 1, on Skymodels decals 48-037.
-
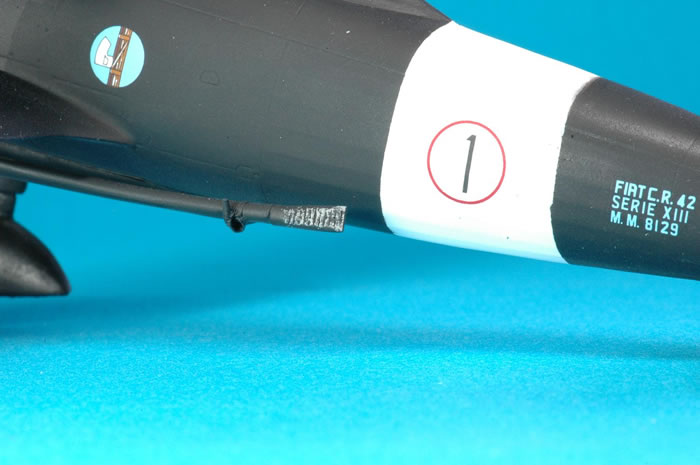
CR.42CN #3 - Nucleo Autonomo Caccia Notturna, Gela, Sicily, circa 1942. All black with a white fuselage band and the numeral 1 in a red circle on the band. This aircraft has the long fishtail exhaust. It also appears as selection # 4, on Skymodels decals 48-036.
-
CR.42CN #4 - 377 Squadriglia, Palermo-Boccadifalco, circa 1942. Coded Light Blue 234-3.
-
CR.42CN #5 - 300 Squadriglia, 167 Gruppo Autonomo Caccia Notturna, Rome- Ciampino, circa 1943 Coded Black 300 - Red 7. This version may represent the early conversion of a CR.42 for the night-time role due to its use of the standard Regia Aeronautica day-fighter colors. The aircraft is in a base color of Giallo 4, with a mottle of Verde 3 and Marrone 2 Mimetico. The underside is Grigio. What makes this example especially interesting is the underside of the top wing, the top-half of the cowling and the inter-plane and cabine struts are black-gray. The aircraft carries a white fuselage band and definitely has the experimental under-wing search lights and wing generator with the standard short exhaust as evidenced in a photograph found on the bottom of page 28, in Fiat CR 42, Ali D’Italia #1, La Bancarella Aeronautica, 1995. 300 Squadriglia, stationed at Rome-Ciampino airfield was involved in the night defense of Rome.
-
The CA CR.42CN is a limited run model requiring you to work every piece of plastic in the kit by dry fitting, including metal pins with many of the plastic join or mating surfaces, filling every gap with putty and then after sanding it a great deal use some Mr. Surfacer and sand it again to come up with something decent. Don’t forget to re-scribe some panels and add a few missing panels. I suggest you create a list of missing items to add them to your kit for improved accuracy to the injection moulded parts.
The items I found missing were a number of important items such as the wing root oil cooler front intake inlet and outlets at the rear, wing formation lights, and spar mounted pitot tubes. To keep my initial builds simple I only fixed the wing edge formation lights and worked to improve the appearance and usability of the cockpit gunsight and wing mounted generator and under-wing lights.
I build two versions in this build. I built CR.42CN decal option #1 - Nucleo Autonomo Caccia Notturna, Gela, Sicily, circa 1942. Coded 377-4, this is an all black aircraft with white fuselage band, and the insignia of an owl sitting on the crescent moon on a blue triangle. This aircraft appears in a color profile in International Air Power Review, November 2005, Vol. 17, page 171 but it shows a red background for the triangle. I believe the blue is the correct choice. It also appears as selection # 2, on Skymodels decals 48-036. The second model is CR.42CN #3 - Nucleo Autonomo Caccia Notturna, Gela, Sicily, circa 1942. All black with a white fuselage band and the numeral 1 in a red circle on the band. This aircraft has the long fishtail exhaust but no generator and no under-wing search lights. It also appears as selection # 4, on Skymodels decals 48-036.
The changes to the generator and wing lights were for appearance improvements and not because they were lacking in the kit. I felt the generator prop could be easily broken because it is a very thin, brittle resin component. Replacing the generator prop with a piece of etched metal saved me on the few unintended occasions of impact which it sustained. I simply cut a small piece of etched metal form the fret, shaped it with a Tamiya diamond etched metal prep file and on it went. I believe you can find some replacement etched metal for the wing spar pitot tube on an aftermarket set for the Italeri CR.42 on the Eduard Zoom FE332 or 49332, part # 25 on the color etched fret. It is not on the Classic Airframes kit etched metal fret.
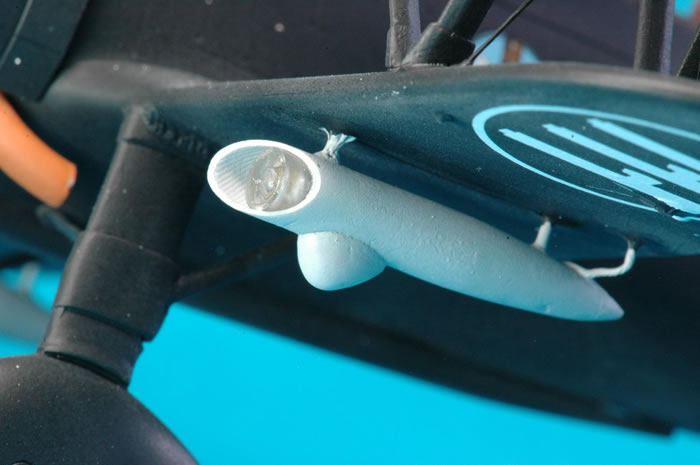
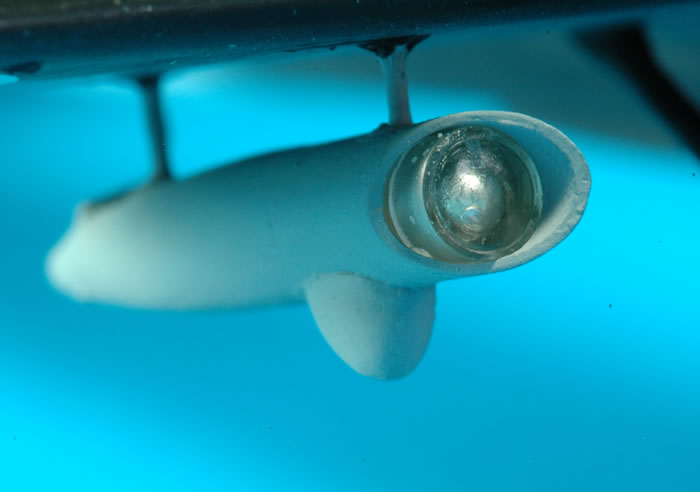
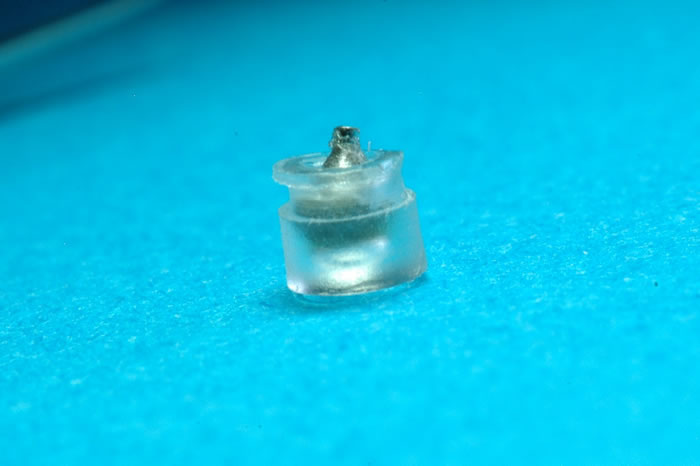
The under-wing lights I wanted to enhance by augmenting the appearance of the internal light. To do this I used the head of a clothing pin, similar to the types that are used to package men’s dress shirts which usually have a small pearl tip. I used a drill bit to hollow out a rear portion of the clear resin lens, used a drop of white glue to secure it and inserted the lens with pearl light bulb into the tip of the external light assembly under the wing. I also added a wire at the rear representing the electrical wire coming from the topside generator (there is a small hole for this on the rear of the generator and searchlight resin parts). I also replaced the resin parts R19/R20 which are the connection tubes between the searchlight assembly and the lower wing using thin guitar wire. They were too brittle and the final inserted part far too small to offer any durability to the join. They are well secured with the metal pins. I wanted to use the rest of the wire from the pearl tipped clothing pin but it was too thick.
The exhausts were easy to incorporate and my focus was on trying to get a used exhaust look.
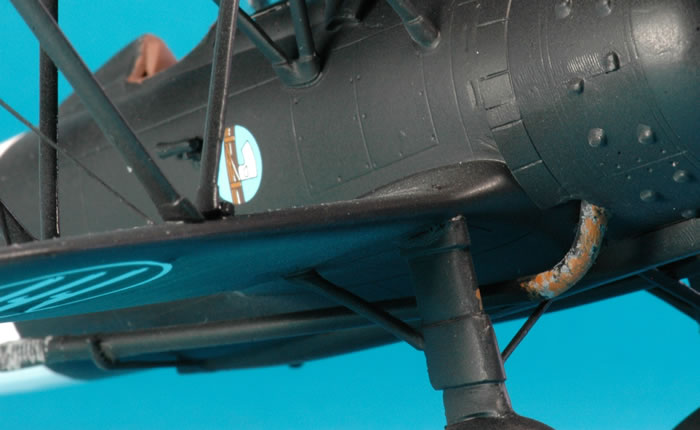
Based on the photos I have seen the long exhausts were initially painted black and after use the portion closest to the engine turned a light grey followed by some intermittent oxidation. I painted the pipes overall black using Tamiya acrylics then dry weathering with some light grey followed by some splotches of rust using Testors and Pactra enamels.
So, no need to send me any messages about my build errors, I am painfully aware of the ones I committed but I am just as pleased to get the build finished so I can do a better job next time. Since I have seen very few pictures of completed CA CR.42CN’s and think that you will have a lot of fun with this unique subject I am going out on a limb to share a less than contest ready model(s) in the hope of encouraging you to do it right, share it with us on Hyperscale and maybe avoid some build issues by following John Valo’s build advice.
Model, Images and Text
Copyright ©
2013 by Andrew Garcia
Page Created 28 October, 2013
Last Updated
29 October, 2013
Back to HyperScale Main Page
|
 Home
| What's New | Features | Gallery | Reviews | Reference | Resource Guides | Forum |
Home
| What's New | Features | Gallery | Reviews | Reference | Resource Guides | Forum |