De Havilland Vampire
FB.30 and FB.31 in RAAF Service
Czech Master Resin, 1/72 scale
S u m m a r y : |
Catalogue Number: |
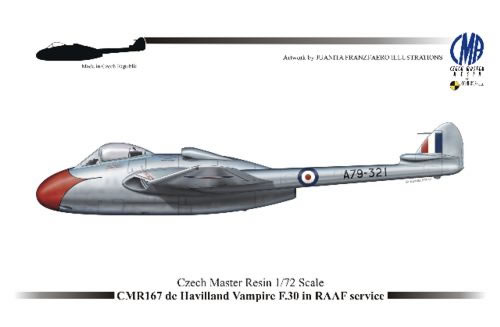
CMR 167 De Havilland Vampire F.30
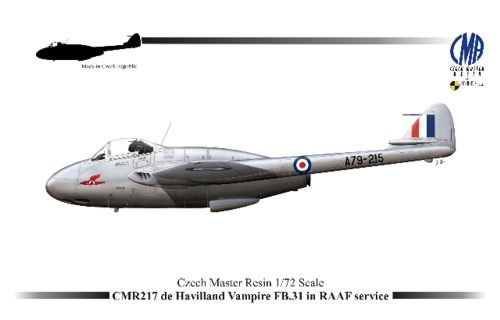
CMR 217 De Havilland Vampire FB.31 |
Scale: |
1/72 |
Contents & Media |
F.30: 53 green resin airframe parts, 5 black resin undercarriage parts, 1 pre-coloured PE Fret of 33 parts, 2 vac-form canopies, 1 pre-cut canopy mask, 1 nose marking mask and decal sheet covering 5 options.
FB.31: 90 green resin airframe & weapons parts, 5 black resin undercarriage parts, 1 pre-coloured PE Fret of 33 parts, 2 plain PE frets of 18 & 57 parts, 2 vac-form canopies, 1 pre-cut canopy mask and decal sheet covering 5 options. |
Price: |
Available from these on-line stockists: |
Catalogue Number |
Hannants |
West Coast Hobbys |
Aviation Megastore |
CMR 167 (F.30) |
£ 31.08 |
Can$ 47.00 |
€ 36.09 |
CMR 215 (FB.31) |
£33.33 |
Can$47.00 |
€ 38.61 |
Click here for more CMR stockists and here for currency conversion. |
Review Type: |
First Look. |
Advantages: |
Accurate, thoroughly researched, highly detailed, produced to very high standards, good blend of different media, pre-cut paint masks, plus a good payload selection for the FB.31. These are both just an extremely complete packages in every way. |
Disadvantages: |
None apparent. |
Conclusions: |
These kits are the first 1/72-scale releases of the RAAF’s Vampire F.30 and FB.31. They both reflect thorough research combined with excellent production quality, and should build into superb models without presenting too many challenges. I highly recommend both kits. |
Reviewed
by Mark Davies

HyperScale is proudly supported by Squadron.com
The Vampire was Britain’s second production jet fighter and first flew in September 1943 although its service introduction was a little too late to see action in WW2. The Vampire used the Goblin engine that was quite powerful for its time, which enabled it to be a single-engine fighter when most designs required two engines. Even so, the Vampire was still underpowered like all early jets. Consequently fitting the much more powerful Rolls Royce Nene appeared to offer obvious benefits when it became available in 1945.
Calculations indicated that the Nene would significantly improve the Vampire’s rate of climb and its performance in general. However, the engine would need throttling back at altitudes over 15,000 feet because it would otherwise power the Vampire past its critical Mach number of 0.76. The Nene was around 60% more powerful than the Goblin, yet only 300 lbs heavier. The extra weight shifted the Vampire’s centre of gravity rearwards, requiring nose ballast to compensate, but of greater significance was the Nene’s need for more air than the Goblin. This factor would have the greatest impact on the development of Nene-powered Vampires.
The Nene’s centrifugal compressor differed from the Goblin’s in that it had a double rather than single-sided impeller. Although less efficient than a single-sided compressor, it enabled the engine to ingest significantly more air and therefore develop more power compared to similarly sized engine with a single impeller. The Vampire’s wing-root intakes could not deliver sufficient air to the Nene’s rear impeller because they were designed for the lower air demand of the Goblin. The Nene consequently failed to provide the performance boost anticipated when first installed in the Vampire, and various modifications to the wing-root intake mouths failed to make any worthwhile difference.
It seemed that only a complete redesign of the intake, and in turn the structure of the in-board wing area, would solve the problem. One airframe was fitted with the intake design developed by Saunders-Roe for the Nene-powered Hawker Sea Hawk. This proved most successful but also necessitated major structural to the wing. Despite the success of the modified intakes, the Nene-powered Vampire F.2 and F.4 adopted a much simpler if less elegant fix developed by Rolls Royce. This consisted of two dorsal scoops, referred to as elephant ears, to supplement the standard intakes of the Goblin-powered Vampire. The Nene-powered F.2 prototype went on to display the enhanced performance anticipated (especially below 15,000 feet) despite the added to drag of its elephant ears.
One problem that emerged with the F.2 however was a nose-down pitching induced at the aircraft’s critical Mach number, and problems with dive recovery due to elevator ineffectiveness. Despite these weaknesses, the RAF ordered sixty F.2.s in February 1945 and then reduced the order to forty aircraft. Then the order changed again to two F.2’s and thirty-eight F.4’s. The RAF finally cancelled the F.4 order altogether in September 1945, leaving only two F.2’s. The French also cancelled an order for licence-built F.4’s which were to be designated F.51’s. Although British attempts to produce Nene powered Vampires had ended the Aussies were prepared to pick up where they left off.
In June 1946, the Australian Air Board confirmed the RAAF’s selection of Vampires to replace its CAC Mustangs and that De Havilland Australia would build them. De Havilland had suggested that the Goblin was the best engine choice with its more efficient single-sided impeller (of course it was also a De Havilland product whereas the Nene was not), but the RAAF chose Nene-power for its Vampires. These were designated F.30’s and were based on the Vampire F.2 complete with elephant ears. The Australians placed an order for a hundred F.30’s in September 1946. Meanwhile the RAAF obtained from the British an F.1 in May 1947, an F.2 in August 1948 and an FB.5 in May 1949 in order to gain some jet experience.
The first Australian built F.30 flew in June 1949 and delivery to the RAAF began in September of the same year. Fifty-seven F.30’s had been delivered by July 1952, whilst the remaining aircraft in the original order were changed to completed as FB.31’s which had clipped and strengthened wings for their fighter-bomber role (it was essentially a Nene-engined FB.5).
The RAAF soon found that their Vampires suffered the same problems as the British F.2 due to the effects of the elephant ear intakes at around the aircraft’s critical Mach number, along with elevator problems during dive recovery. The Australian remedy was to shift the elephant ears to under the fuselage, which provided nose-up pitching moment at aircraft’s critical Mach number rather than a nose-down one. The trade off was an increased risk of the engine ingesting foreign objects because of the scoops’ proximity to the ground on the low-slung Vampire.
Twenty-four of the original F.30’s underwent modification retrospectively to FB.31 standard during 1956. It was to be been twenty-eight F.30’s for conversion to FB.31’s, but four crashed prior to conversion, leaving only twenty-nine F.30’s in service once the process was completed. The FB.31’s were also fitted with ejection seats at this time, a change the pilots must surely have appreciated, as well as being equipped for target towing. Some of the surviving F.30’s were also equipped with ejection seats, but specific detail regarding how many is hard to come by.
The CAC Avon-powered Sabre replaced the Vampire in the fighter role from the mid-1950’s, and single-seat Vampires were retired from Australian service by 1960. Meanwhile the two-seat Vampire trainers (powered by Goblin engines) continued in both RAAF and RAN service until 1970 and 1971 respectively.
De Havilland Australia and the RAAF considered an FB.32 variant using enlarged wing-root intakes, removing the need for ancillary air intake scoops altogether (Other changes included air conditioning, re-arranged fuel tanks and detail changes to the airframe). Two aircraft received modified intakes, but the Australians abandoned the project in April 1953. Thus, the French became the only producer of Nene-powered Vampires with wing intakes capable of feeding the engine adequately. They had to modify the wing considerably and called their licence-built product the SE.535 Mistral rather than Vampire.
Previous 1/72 Vampire FB.30 and FB.31 Kits
I am unaware of any previous F.30 & FB.31 kits in 1/72 scale (although Classic Airframes offered an FB.31 in 1/48-scale). High Planes has made an FB.31conversion. It consists of rather crude styrene ventral intakes and nose gyro fairing, plus decals for “Noddy's red Vampire”, and includes an instruction to shorten and enlarge the exhaust nozzle. This very simple conversion was somewhat surprisingly included as a bonus in amongst the sprues of their F4U-5N Corsair kit - Go figure.
Overview
The kits reviewed here are typical of CMR’s products released over the last few years. They are multi-media offerings with a highly detailed resin airframe, clear vac-form canopies, complimented by Eduard plain and pre-coloured PE parts, plus pre-cut paint masks. A very sturdy top-opening box contains all of the above media, water-slide decals and several sheets of A4-sized instructions and images.
The instructions acknowledge the assistance of RAAF Vampire experts from various countries and the major published references used in the kits’ development. CMRs global network of experts and enthusiasts is a major strength that underpins much of their quest for accuracy and high levels of detail.
Contents
The instructions for both kits contain a parts map and diagrammatic assembly stages as you would expect, but what is immediately apparent is just how crisp and well drawn the graphics are. I rate the constructional diagrams some of the best I have seen, mainstream kit brands included, and in fact Tamiya is the only company that I can think of that would rival them.
Written instructions are in English, and generally confine themselves to colour call-outs and simple clarifying statements where diagrams alone will not suffice. Where appropriate notes indentify features specific to the colour schemes offered with the kits. The colour scheme guides are five pages of monochrome shaded diagrams, and there is a one-page stencil placement guide. Colour call-outs use generic colour names for interior detail and standard British military colour names cross-referenced to FS-595 numbers for the exterior. Three and six more pages provide various walk-around details in-service photo images of the F.30 and FB.31 respectively.
The kit parts come packed in CMR’s usual heat-sealed plastic pouches that separate the various resin parts broadly by size and fragility. PE parts, paint masks and canopies are further sealed and protected, as are the decals. An all-encompassing bag then encloses the entire kit parts and paperwork, so there is little chance of anything going missing until the kit is unpacked. However, I do advise care when opening the pouches containing resin, just in case some small parts have broken off their casting blocks or been damaged.
All of the resin parts are green except the undercarriage legs, which are a stronger black resin, as is common to most weight bearing parts in CMR kits. This black resin sometimes has a little flash that needs cleaning away. Easily removed casting blocks have thin attachment points, leaving only minimal cleanup afterwards. Detail levels are superb, with some incredibly fine and faultless casting. The regular and colour PE frets are produced to Eduard’s usual high standards, as is the paint mask. The kit includes two vac-form canopies, meaning you get to practice cutting out or have an insurance copy, depending on how you look at it. The canopies are very clear and well formed.
The Airframe
I know that it is obvious, but it is worth checking the various parts options that go with the markings options provided, as sometimes, there are a few features specific to one scheme or another
The F.30 has only the conventional bucket seat, whereas the FB.31 has this or an ejection seat as a choice. CMR provides the two different cockpit floors and rear bulkhead styles for each type of seat with the FB.31. The cockpits are very small but nonetheless are replete with detail. A combination of resin and pre-coloured PE forms most of the detail, with a smattering of plain PE as well. Pre-coloured PE works very well in 1/72-scale in my opinion, providing levels of detail that only a few modelers could achieve with painting. Two small clear gun-sight reflector glasses need to be scratch-built. Some of the cockpit PE will need folding into small components, which will no doubt be a bit fiddly for some. However, a stunning looking cockpit will repay the effort made when finished.
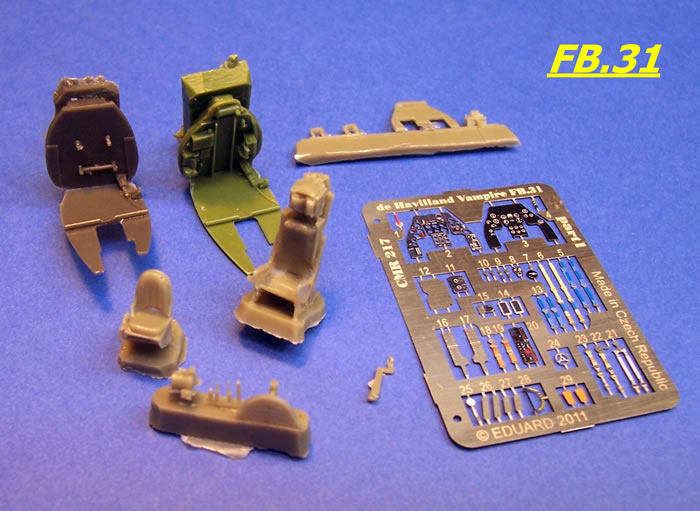
Despite my earlier praise of the instructions, I did note that painting notes specific to the bucket seat repeated on the page dealing with the ejection seat. This is a minor matter because most will realize that the MB-2 seat should be black rather than Bakelite red-brown.
The fuselage halves are ready for joining once fitted out with the cockpit, nose wheel-well and exhaust ducting. Do not forget to add some nose ballast at this stage; the instructions mention the need but not how much. I would suggest cramming all the lead shot that there is room for in the nose given the small space available, and perhaps consider a bit behind the rear bulkhead too.
The FB.31’s payloads aside, it is fair to say that most of the constructional work lies with the wings for both kits. This is because the separate flaps, airbrakes, intakes and undercarriage account for quite a few parts and will need some care with detail painting, stencil decaling and assembly.
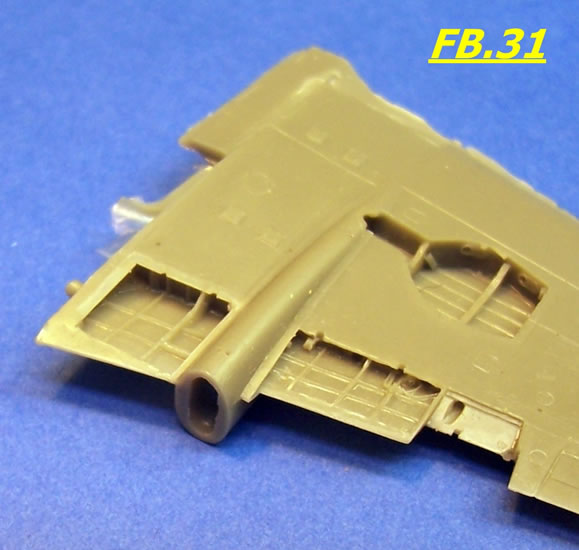
The wing tip shapes differ between the kits but the fitting out of the two wings is essentially the same. The air-intakes are separate items with PE braces to fit in their mouths before joining to the wings. The inlet ducting is convincing, and ends in a hollow enclosed within the fuselage, which if painted mat black should provide a convincing degree of shadow within their depths. The wings incorporate highly detailed wheel and flap bays, both with authentic and delicate undercuts. The wheel door interiors are also most convincing. The black undercarriage legs and green resin wheels dressed with PE discs will look good as well, and PE scissor-links will add to the overall scale refinement in this area. Closed or deployed airbrakes are also an option.
Two lugs on the wing-roots and their corresponding holes in the fuselage, as well as the intake ducting that nestles into openings in the fuselage, help to guide the wing to fuselage fit. Some regard twin boom aircraft as a bit of challenge to build correctly aligned. However, CMR’s combination of tab and slot, plus crisply cast faces where the booms join the wings should ease this aspect as far as is practicable; and of course the square fit of the tail-plane also aids alignment.
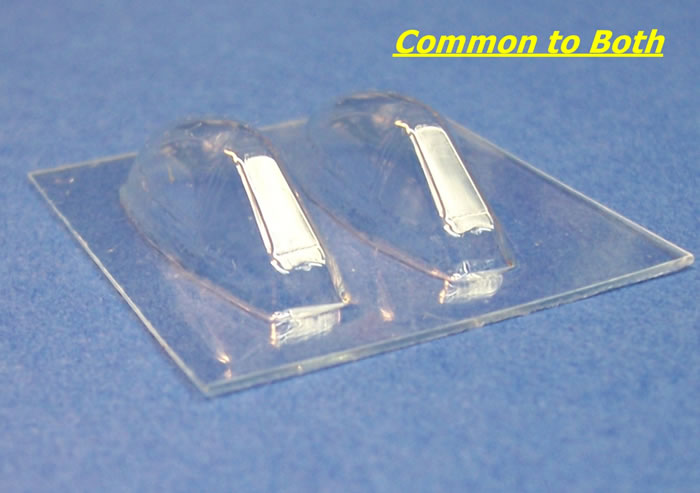
Most builders may well leave a number of small components until the end of construction (the instructions also advise to do this). These include tail-fin pitot, elevator mass balances, two tiny gun barrel tips to fit into the rearmost pair of cannon troughs, and various small antennae that need to be scratch-built. The FB.31 also features some PE FOD guards for the ventral intakes and an optional bomb slip for a target towing cable. Each kit has two very nice vac-form canopies along with Eduard pre-cut masks for these, which is a nice feature of CMR’s kits, making painting just that little bit easier. The F.30 kit also has a pre-cut mask for the two red-nosed markings options.
Payloads
The F.30 has the single option of fitting drop-tanks, as F.30’s had no provision for carrying external stores, whereas under-wing stores account for much of the FB.31 kit’s parts count. Payloads for the FB.31 kit include:
-
100-Gallon Drop-tanks,
-
Mk.8 Rocket Projector Rails,
-
60-lb S.A.P./H.E. Shell, No.1, Mk.1 Rocket Projectiles,
-
60-lb Concrete Practice Shell, Rocket Projectiles,
-
25-lb Shot, Practice (Concrete) Rocket Projectiles,
-
1,000-lb HEMC Bombs,
-
500-lb HEMC Bombs, and
-
250-lb HEMC Bombs.
The rockets have separate PE fins, and there is a PE jig to assist with rocket fin alignment. Another tricky PE challenge is the stirrups that suspend the rocket projectiles beneath their rails and each other, but once folded these will add considerable scale finesse. The rocket fins and stirrups account for much of the plain PE fret parts count.
Colours & Markings
RAAF Vampire colour options are a bit like Henry Ford’s Model T, except in this case you can have any colour you like as long as its overall aluminium. Fortunately, the Vampire looks quite smart in this colour (in my opinion at least). Two of the F.30 options feature a red nose extending into a short cheat-line, for which the kit supplies a pre-cut Eduard mask to aid painting, along with notes on its use. One of the FB.31 schemes represents a Red Devils aerobatic team machine and this borders on being decorative. The base colour is of course aluminium, but it also features a black nose, black upper and lower engine panels and two black tail-boom stripes, all topped off with red wingtips and horizontal stabilizer.
The painting and markings guides provide colour call-outs using the colour name and equivalent FS-595 number in the case of the aluminium, but not for the red of the Red Devils example mentioned above. However, it seems reasonable to match the red for the flying surfaces to the decals for the Red Devil motif either side of the nose.
Each scheme is catered for by a full A-4 page of monochrome four-view colour plans, with additional view of the inside fin surfaces, whilst a similar one-page guide covers stencil placement. The decals look to be very good quality.
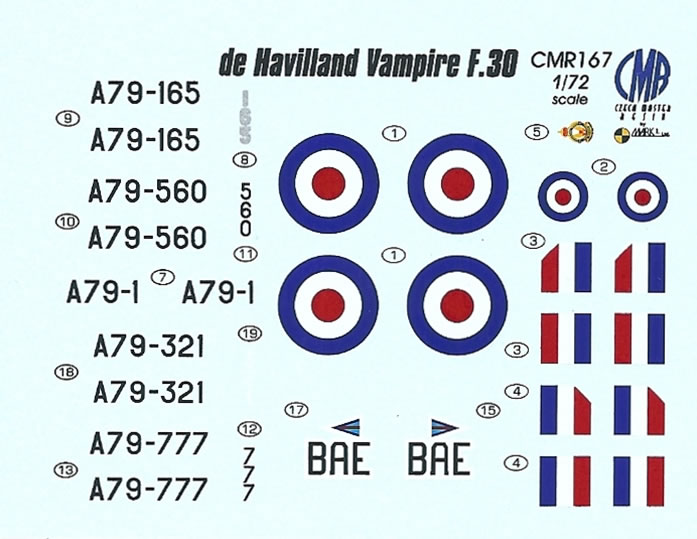
The markings options provided are:
Vampire F.30:
-
A79-1: No.2 O.T.U., RAAF, Williamtown, N.S.W., 1952 (1st De Havilland Australia-built Vampire)
-
A79-165: No.21 Squadron, RAAF, Laverton, Victoria, 1951-53
-
A79-32: No.21 Squadron, RAAF
-
A79-560: RAAF (Squadron, date & place unknown)
-
A79-777: No.2 O.T.U., RAAF, Williamtown, N.S.W., 1952
Vampire FB.31:
-
A79-215: No.21 Squadron, RAAF, 1957
-
A79-111: Red Devils Aerobatic Team, No.2 O.T.U., RAAF, Williamtown, NSW, circa 1958
-
A79-915: No.21 Squadron, RAAF, Laverton, Victoria, September 1959
-
A79-550: '50', RAAF (Squadron, date & place unknown)
-
A79-422: No.21 Squadron, RAAF, Laverton, Victoria, 1961
Accuracy
Both kits look to be very good in terms of accuracy when compared to walk-arounds and in-service images. I have not made a comparison to plans, as I have no assurances regarding the accuracy of those to which I have access. I do have confidence in the thoroughness CMR put into their projects (and the fact that they have devoted an enormous effort to kitting the Vampire family), so I will be surprised if there are any glaring errors.
CMR obviously undertakes considerable research using wide-ranging network of people. Their expertise helps ensure highly detailed and accurate kits result. These are the first 1/72-scale kits of the RAAF’s Vampire F.30 and FB.31 to the best of my knowledge. I am sure many Aussie modelers will be very pleased to have such good kits of these subjects, as well as Vampire builders everywhere who want a grunty Nene-powered Vampire model that isn’t a Mistral.
Both of these kits are fine examples of just how good resin multimedia kits can be. The detail and casting are excellent, as is the packaging, instructional graphics and additional information. These things combined should all add to the enjoyment of building these kits and hopefully the finished results.
It should come as no surprise that I highly recommend both of these kits.
Thanks to CMR by Mark 1 Ltd for the review samples.

Review Text and Blue Background Images Copyright © 2012 by Mark Davies
Page Created 23 April, 2012
Last updated
16 May, 2012
Back to HyperScale Main Page
Back to Reviews Page
|
 Home
| What's New |
Features |
Gallery |
Reviews |
Reference |
Forum |
Search
Home
| What's New |
Features |
Gallery |
Reviews |
Reference |
Forum |
Search_fs.jpg)
_fs.jpg)
_fs.jpg)
_fs.jpg)
_fs.jpg)
_fs.jpg)
_fs.jpg)
_fs.jpg)
_fs.jpg)
_fs.jpg)
_fs.jpg)
_fs.jpg)
_fs.jpg)
_fs.jpg)
_fs.jpg)
_fs.jpg)
_fs.jpg)
_fs.jpg)
_fs.jpg)
_fs.jpg)
_fs.jpg)
_fs.jpg)
_fs.jpg)