Bristol Sycamore
HC.14/HR.14/Mk.51/Mk.52
Czech Master Resin, 1/72 scale
S u m m a r y : |
Catalogue No: |
CMR 146 Bristol Sycamore HC.14/HR.14/Mk.51/Mk.52 |
Scale: |
1/72 |
Contents & Media |
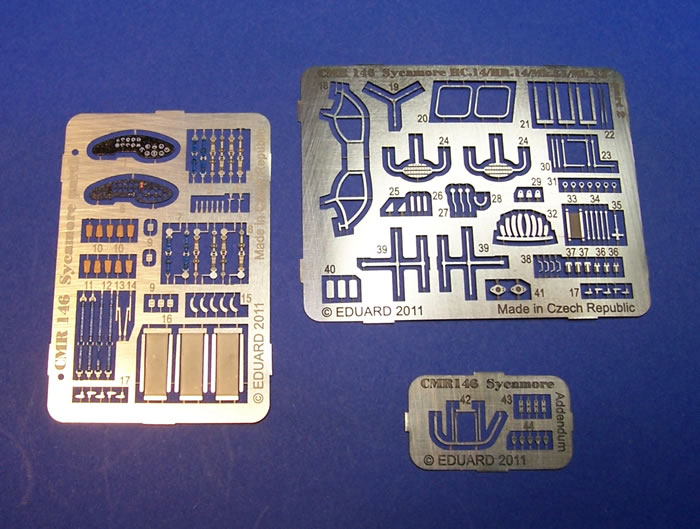
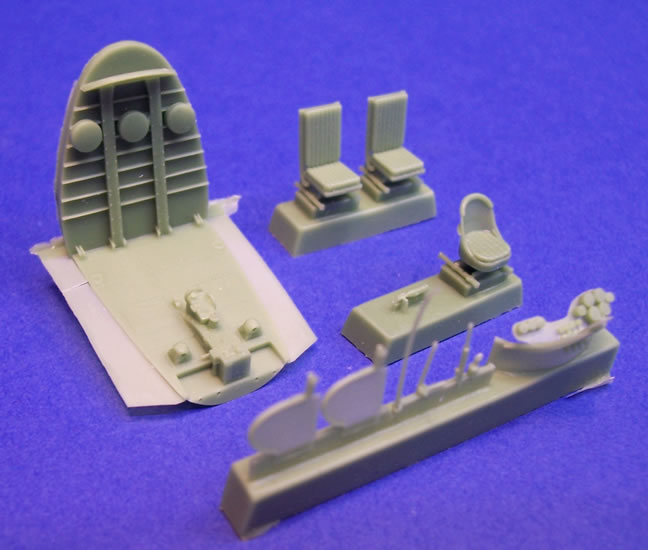
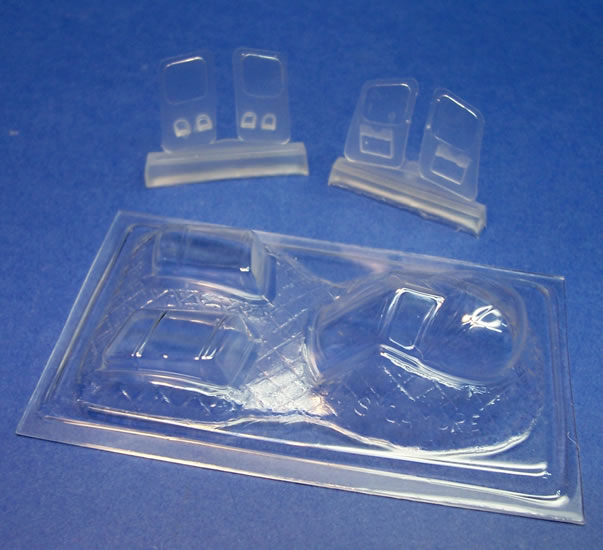
27 green, 5 black & 4 clear resin parts, 1 pre-coloured PE Fret of 53 parts, 2 plain PE frets totaling 71 parts, 2 sets of 3 vac-form canopy parts, 1 pre-cut canopy paint mask and decal sheet covering 5 options. |
Price: |
Available online from these on-line stockists: |
Hannants |
Red Roo Models |
West Coast Hobbys |
Aviation Megastore |
£ 31.00 |
Aus$ 45.00 |
Can$ 47.00 |
€ 36.09 |
Click here for currency conversion and here for more CMR stockists. |
Review Type: |
First Look. |
Advantages: |
Looks very accurate, thoroughly researched, highly detailed, produced to very high standards, superb instructions, good blend of different media, has a canopy & wheel mask. It is just an extremely complete package in every way. |
Disadvantages: |
None apparent. |
Conclusion: |
This is a fine example of just how good resin multimedia kits can be. The quality of packaging, instructional graphics and additional information is excellent. It is for now the definitive Bristol Sycamore kit and highly recommended. |
Reviewed
by Mark Davies

HyperScale is proudly supported by Squadron.com
An Austrian helicopter pioneer named Raoul Hafner had moved to Britain in 1933. He headed the rotorcraft team at the Airborne Forces Experimental Establishment (AFEE) during WW2. In 1944, the Bristol Aeroplane Company formed a helicopter department within its aircraft division. Hafner and other members of his AFEE team joined Bristol and formed the nucleus of the company’s new helicopter design team. Bristol also acquired the patent, assets and manufacturing rights to Hafner’s pre-war design called the A.R.III Gyroplane. This was similar to a Cierva autogyro, but replaced its crude tilting rotor hub with a much more sensitive cyclic pitch control. Bristol tasked Hafner and his team with developing a four-seat helicopter suitable for military and civilian use.
By June 1944, a design study commenced using the 500-hp Bristol Aquila engine. However, the tools and jigs to manufacture this engine had been disposed of earlier in the war, making its revival impractical. Several other makes of engine were considered, and the Pratt and Whitney Wasp Junior of 450-hp was selected to power the first two prototypes because of its proven reliability and ready availability.
The new helicopter design was designated Type 171 and first flew in July 1947 and considerable development work followed on from this. The 171 demonstrated its potential for casualty evacuation to the RN, Army and RAF medical services in January 1949. In April of the same year, it received the first Certificate of Airworthiness issued to a British helicopter and flew to the Paris Salon for exhibition the next month.
Completion of the prototype 171 Mk.2 with a 550-hp Alvis Leonides engine followed in the summer of 1948, but prolonged testing delayed its first flight until September 1949. The rotor disintegrated during its second brief flight although nobody was injured. A redesigned and strengthened rotor enabled the 171 Mk.2 to fly successfully shortly after.
Experience with the two prototypes led to the 171 Mk.3. It had a shorter nose for better downwards vision, a slightly wider fuselage enabling a three people to sit in the rear cabin, and transferred the accessory drive from the engine to the rotor gearbox ensuring that essential systems received power in the event of auto rotation.
Production of sufficient components for the manufacture of 25 Mk.3 airframes followed; although at first only 15 were assembled. All initially had civil registrations allotted, but only two retained these as the Ministry of Supply reserved the balance for development and experimental work at Filton, Farnborough and Boscombe Down. A modified machine became the prototype for an RAF ambulance version known as the Sycamore HC.l0. This went to Malaya for operational trials in 1949 although its formal acceptance did not occur until August 1951. The Army communications variant called Sycamore H.C.11 followed next. It first flew in August 1950 with acceptance occurring in May 1951. The RAAF bought one for use at Woomera rocket range, whilst two others went to Khartum and Canada for tropical and winterisation trials respectively. The RAF’s Coastal Command accounted for the last three of the first 15 airframes, their version being the Sycamore HR.12.
Both the Mk. 3 and HC.11 had two sliding doors, whereas the HC.10 had hinged front doors and two extra doorways fitted with plastic blisters to enclose a stretcher carried transversely. One HR.12 had a forward sliding door on the port side, whilst a canvas door with zip-fasteners covered the starboard doorway located aft under the winch. The Mk.3a introduced a lengthened undercarriage for shipboard operations and an extended fuselage aft of the engine to increase baggage space for civil operators. This extension also happened to reduce drag.
The second production batch consumed the remaining ten sets of components. This included four HR.12’s, one of which carried sonar with a crew of two, whilst the other three had the tall landing gear for use by the RAN and were designated HR.50’s. RAF Fighter Command took two Sycamore HR.13’s with winches and tall landing gear for air-sea rescue evaluation. British European Airways bought two civil Mk.3a’s. The last two in this batch were a company demonstrator, eventually completed as a Mk.4 with enlarged baggage locker and tall undercarriage, and the first Sycamore HR.14. Both the Mk.4 and H.R.14 had the pilot's position was changed from left to right side to conform to American practice. The RAF adopted the HR.14 for all of its helicopter roles.
The RAF’s use of the Sycamore was wide-ranging covering many parts of the world during the period when the sun finally set on what remained of Britain’s empire. Some saw service in the brief Suez Crisis whilst others were lost in the Malayan Emergency (now Malaysia) operating in difficult jungle conditions. They also saw operational use in hot spots like Borneo, Cyprus Kenya and Aden. They gave good service, but for how long I cannot say, as I have yet to find clear information as to when they were withdrawn from RAF service (Please contact me if you can help clarify this point). On a more peaceful note, a Sycamore became the first helicopter used for an air-to-surface television transmission in August 1955.
The Sycamore enjoyed a degree of export success. Belgium ordered three and West Germany took fifty Mk.52’s. Australia bought seven HC.51’s for the RAN in addition to the three HR.50’s mentioned earlier, plus a single Mk.4 to join the Mk.3 already in use with the RAAF at Woomera. Australian National Airways operated one of only two more civil Mk.4s produced, the other becoming a demonstrator aircraft in Canada and Mexico. Sycamore production ended in 1959 totalling 178.
Previous 1/72 Sycamore Kits
I am aware of three previous 1/72 Sycamore kits. Maintrack released theirs in 1988. It was a rather basic resin kit requiring a number of details to be scratch-built. Vami have issued what I understand is a copy of Maintrack’s kit, and it is still available, as is a vac-form kit by Whirlybird in various versions. There is also an old kit by Lincoln, also re-issued by Glencoe and sometimes labeled as 1/72-scale, it is in fact 1/65-scale. Some may regard this as compatible within a 1/72-scale collection, but I do not. It is oversize in linear terms by approximately 11% and a whopping 35% volumetrically, which in my view is most definitely incompatible. The extent of the size difference is most apparent from the image below showing the new CMR kit and Lincoln fuselages side by side.

Overview
The kit reviewed here is typical of CMR’s products released over the last few years. It is a multi-media offering with highly detailed resin airframe, clear vac-form canopies, uses clear resin for smaller windows, and has Eduard plain and pre-coloured PE parts plus pre-cut paint masks. A very sturdy top-opening box contains all of the above media, plus two sheets of water-slide decals and several sheets of A4-sized instructions and images.
Contents
The instructions contain a parts map and diagrammatic assembly stages as you would expect, but what is immediately apparent is just how crisp and well drawn the graphics are. I rate the constructional diagrams some of the best I have seen, mainstream kit brands included, and in fact Tamiya is the only company that I can think of that would rival them.
Written instructions are in English, and generally confine themselves to colour call-outs and simple clarifying statements where diagrams alone will not suffice. Where appropriate notes indentify features specific to the colour schemes offered with the kits. The colour scheme guides are five pages of monochrome shaded diagrams. Colour call-outs use colour names cross-referencing to FS-595 numbers as well as the BSC381C and RAL color systems where applicable. Eight more pages provide various detail and in-service photographic images of the aircraft.
The kit parts come packed in CMR’s usual heat-sealed plastic pouches that separate the various resin parts broadly by size and fragility. PE parts, paint masks and canopies are further sealed and protected, as are the decals. An all-encompassing bag then encloses the entire kit’s parts and paperwork, so there is little chance of anything going missing until the kit is unpacked. I do advise care when opening the pouches containing resin however, just in case some small parts have broken off their casting blocks or been damaged.
CMR now uses green resin for airframe parts as it reveals fine detail better than their previous cream-coloured resin. A minimal amount of cleanup is required to deal with the thin casting blocks attachment points and some wafer thin flash present the window frames. Detail levels are superb, with some incredibly fine and faultless casting. Stronger black resin forms the undercarriage as is common to most weight bearing parts in CMR kits. The regular and colour PE frets are produced by Eduard to their usual high standards, as is the paint mask. The kit includes two vac-form canopies, meaning you get to practice cutting it out or have an insurance copy depending on how you look at it. The canopies are very clear and well formed.
Airframe
It is worth checking the various parts options that go with the markings options provided because there are a few features specific to one scheme or another. For example, a fairing for the winch’s bottom boom requires removal from the fuselage side in the case of the HMS Ocean Joint Helicopter Unit version. This is not something that you would wish to do after fitting the undercarriage!
The kit supplies two styles of resin co-pilot’s seats to cater for the colour scheme selected. Coloured PE harnesses garnish the seats and should look most convincing. The three rear seats were a foldable canvas sling-type design with lap belts. The kit provides these using a combination of coloured PE parts. They sit surrounded by resin cockpit detail and various small coloured PE items.
This includes a very convincing multi-piece coloured PE instrument panel that attaches to the resin instrument coaming, the backing-piece to which has barrel-like instrument casings. The entire instrument panel should look most convincing. There is even a tiny decal representing a placard on the forward floor are visible through the nose transparency.
The fuselage halves are ready for joining once fitted out with the cockpit interior, leaving the challenge of various vac-form transparencies to deal with next. This medium caters for the combined windscreen and nose bubble and the side-door blisters used with stretcher carrying versions. Whilst very well formed these will still need care to cut, trim and gradually progress from testing to final fit. Not all version use the blisters making construction a bit simpler build if you choose one of the non-stretcher carrying schemes. CMR has cast the four side doors in clear resin, which keeps things simple because there are no separate clear windows to cut from acetate. These will benefit from a light polish and coat of future to enhance their clarity. There is the option of open or closed doors, although only the front doors apply to the versions with side blisters.
To assume that most of the constructional work is over once the doors and windscreen installation is complete would be a mistake. Whilst not many green resin parts remain there is still quite a bit of assembly left. This includes the black resin undercarriage, numerous small PE details including the air intake ahead of the rotor gearbox, windscreen wipers, and various handles. Some versions will also need the resin and PE winch plus rope ladder attachment frame that is also made of PE. The winch accounts for the only scratch building required, needing a 2-mm length of stretched sprue between the winch head and bob-weight.
The main rotor assembly appears to be quite straightforward with some PE and resin parts to enhance the detail of the rotor head, and some decal stenciling for the blades. I do not have experience of building resin rotorcraft, but I think the resin blades are sufficiently light to avoid having the blades droop at their thinnest point where they attach to the rotor hub. Some however may choose to replace the resin attachment points with metal wire, which should be easy to do. The one-piece tail rotor is very simple by comparison needing only the addition of its PE pitch change mechanism.
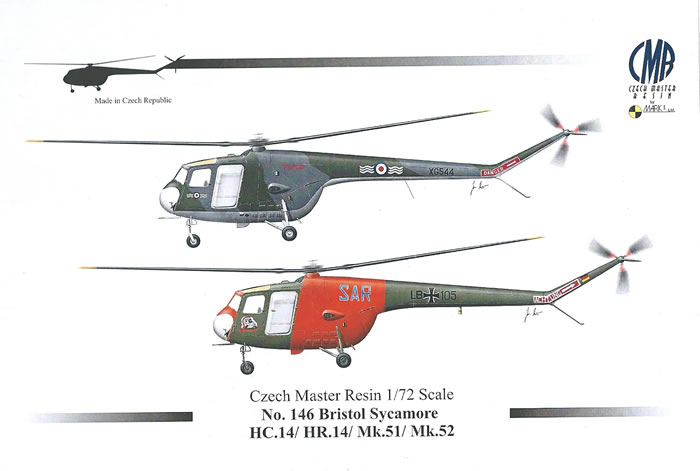
Colours & Markings
CMR has chosen a nice selection of schemes offering a good variety of colour schemes.
-
Sycamore HC.14 - XG548: 6 Joint Helicopter Unit, HMS Ocean, Suez Crisis, October 1956
-
Sycamore HR.14 - XJ916: No.275 Squadron, RAF Thornaby, summer 1957
-
Sycamore HR.14 - XG544: No.118 Squadron, RAF Aldergrove, Northern Ireland, 1962
-
Sycamore Mk.51 - XN448 / 852: No.723 Squadron, HMAS Melbourne, Royal Australian Navy (RAN), 1964/65
-
Sycamore Mk.52 - LB+105: 2. Luftrettungs und Verbindungsstaffel, (2nd SAR Unit), Luftwaffe, West Germany, 1962.
The decals look to be of very good quality.
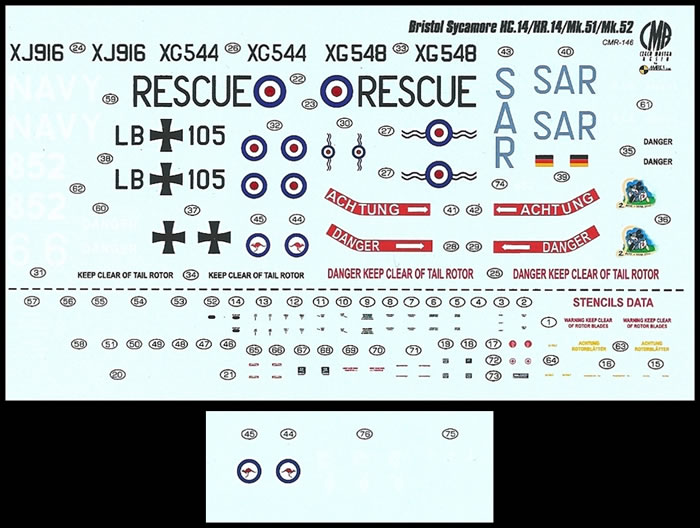
Registration is sharp, and my prior experience using CMR’s decals would suggest that they have good colour density as well. A small errata sheet supplies replacements for the slightly misplaced kangaroos on the RAN national insignia on the main sheet, as well as some additional stenciling.
This latest CMR release is a fine example of just how good resin multimedia kits can be. The kit’s detail and casting are excellent, as is the packaging, instructional graphics and additional information, all of which should add to the enjoyment of the kit and hopefully the finished results.
This kit is essentially quite simple with a modest resin parts count. It will need some care and fit checking where the vac-form clear parts are concerned. Some may choose to reinforce the main rotor blades although I think this is unnecessary. It needs patience and care with the numerous PE details, but these all serve to contribute to what should be a stunning model. The colour scheme choices offer a good variety of finishes to choose.
This is for now, and I suspect a considerable time to come, the definitive Bristol Sycamore kit. I highly recommend it.
Thanks to CMR by Mark 1 Ltd for the review samples.

Review Text and Blue Background Images Copyright © 2012 by Mark Davies
Page Created 26 April, 2012
Last updated
26 April, 2012
Back to HyperScale Main Page
Back to Reviews Page
|
 Home
| What's New |
Features |
Gallery |
Reviews |
Reference |
Forum |
Search
Home
| What's New |
Features |
Gallery |
Reviews |
Reference |
Forum |
Search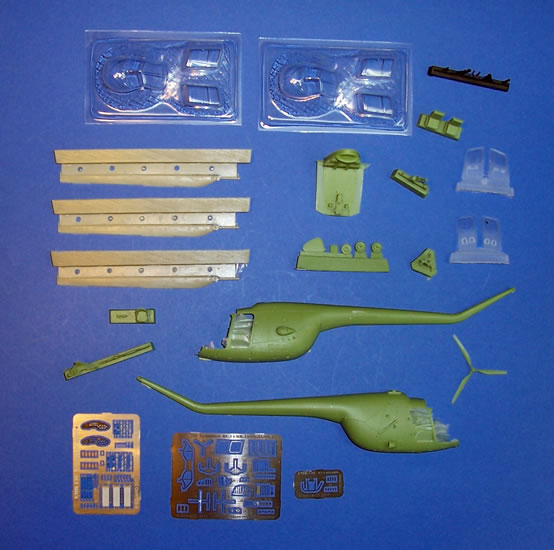
_fs.jpg)
_fs.jpg)
_fs.jpg)
_fs.jpg)
_fs.jpg)
_fs.jpg)
_fs.jpg)