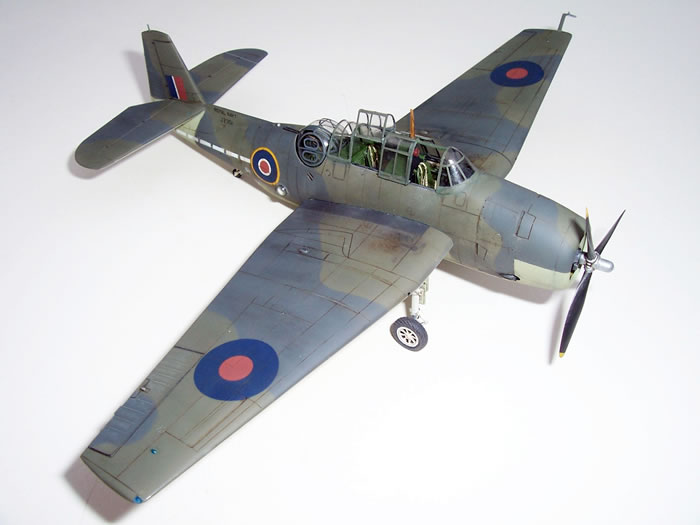
Hasegawa's 1/72 scale
Grumman Tarpon II
by Mark Davies
|
|
Grumman Tarpon II |

Airfix's 1/48 scale Spitfire Mk,Ia is available online from Squadron.com
The TBF/TBM Avenger needs little introduction, and is surely one of Grumman’s classic designs. After an inauspicious baptism of fire with the USN it went on to serve with several air arms in WW2 and numerous more post-war, including with its former enemy Japan. During its lengthy service it fulfilled all manner of roles from torpedo and level bomber, shallow dive-bomber, radar early warning, anti-submarine, all-weather strike, COD (Carrier On-board Delivery), reconnaissance, fire-bombing, and in my country at least they were used for aerial fertilizer spreading (we Kiwi’s call it top-dressing). The Avenger soldiered on in military service until mid-1960 with the RCN when it was replaced by the Grumman Tracker.
Probably no other service so appreciated American designed carrier-borne aircraft as did the Royal Navy in WW2, if for no other reason than they were generally far better than any of the British aircraft available! Certainly this was the case with an Avenger versus Barracuda for example.
Initially British Avengers were called Tarpon I (TBF-1) or Tarpon II (TBM-1/TBM1-C), although in the case of later variants the US name of Avenger was retained. Tarpons were modified to suit the RN’s different crew and other compatibility requirements. These included retention of the second crew position behind the pilot, fitting of British radios, gun and bomb-sights, seat harnesses, bulbous observation windows (with drift sights I think) in rear fuselage sides, folding antenna mast (to cope with lower British hangar decks) and no doubt other features as well. This work was carried out in the USA by a detachment from the Blackburn company in the UK.
Tarpon Colours
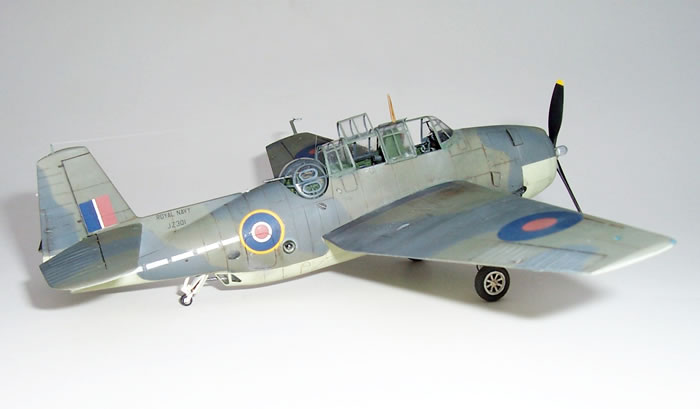
The Avenger was manufactured by a number of companies and this has a bearing on the paint colours used. Grumman-built aircraft (Tarpon I’s) had Bronze Green cockpit interiors, grey cowling interiors, and Dupont paints that matched British Slate Grey, Dark Sea Grey & Sky. Eastern-built aircraft (Tarpon II and Avenger III) had Interior Green cockpit interiors, Zinc-Chromate cowling interiors, and used another paint system, possibly ANA. Ignoring overall Sea Blue Avenger III’s, it seems that Tarpon II’s were painted in colours that were very similar to their British equivalents, but possibly greyer in tone. I have also read that in fact the colours used were Olive Drab FS 34130 for Slate Grey (FS 34096), Sea Gray FS 36173 for Dark Sea Grey (FS 36118), and Sky FS 34504 for the British Sky (FS 36373). This information is largely based notes I made of past Hyperscale `Plane Talking’ posts by Paul Fontenroy & Bruce Archer. This said I can’t find them now. I decided to run with the correct Tarpon II interior colours described above and just use Xrtra Colour’s interpretations Slate Grey, Dark Sea Grey and Sky. My plan was for a weathered and faded beast, so I was not too hung up on small tonal differences with the external finish.
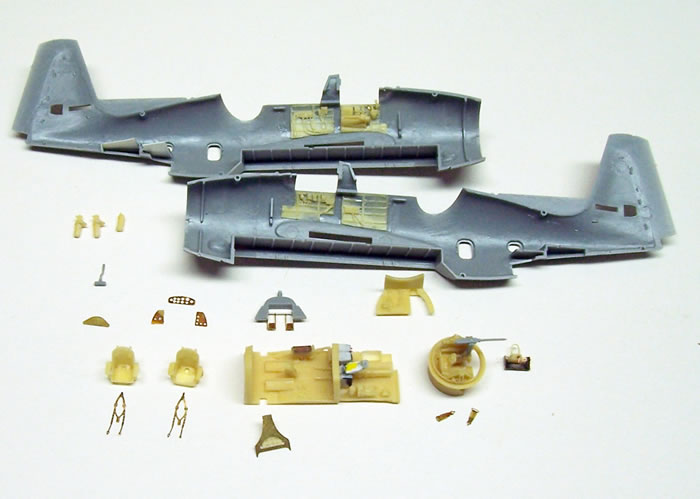
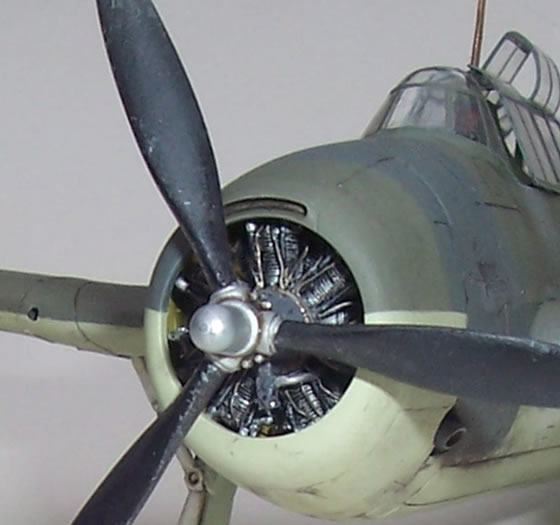
The build was prompted by the fact a group of my mates were building Avengers. I had the Hasegawa Tarpon II kit for about 12 years or so, and also a second-hand but unused Aires cockpit set for a TBF-1 (so two seats provided). The kit engine was Okay, but certainly had room for improvement. Quickboost came to the rescue with a good-value and simple one-piece resin engine needing only scratch-built push-rods and ignition harness.
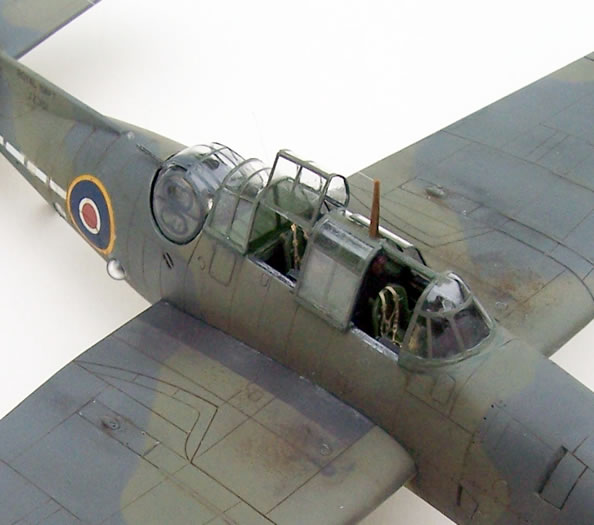
The Avenger/Tarpon had an interesting canopy and with a resin interior modeling it open seemed a good idea. Surprisingly I could find no vac-from canopy for the Hasegawa kit. I had some very nice Falcon canopies for the old Airfix kit and some quite reasonable Pavla canopies, although the kit they are intended for wasn’t stated. A quick check showed the Pavla items weren’t within a bull’s roar of fitting the Hasegawa kit In fact I almost think they might the dreadful offering from Aoshima that purports to be 1/72-scale but is smaller). So Falcon for Airfix it had to be. The turret was a perfect fit, and the observer’s canopy was close enough. However, the windscreen and pilot’s sliding panels were too big and the wrong shape in the case of the windscreen where it fits the fuselage. But I figured I could make these pieces fit, so I had a plan.
I didn’t have any aftermarket decals, but the kit came with Aeromaster decals which were probably better than Hasegawa decals from 12 or years ago, but also potentially stiff as a board and totally resistant to decal solvent if my prior experience of this brand was anything to go by.
I mentioned I had a plan, but failed to point out that I barely had a clue as to the layout of the observer’s cockpit in the Tarpon. It seems that I’m not alone, as despite requests and searches definitive proof of the layout was not forthcoming. I had a walk-around of a warbird Tarpon, but it I suspected that the observer’s cockpit seemed optimised more for joy-rides than authenticity. I figured I’d run with a largely TBF-1 layout, off-set seat and speculative radar scope (which I now feel is too large). The USN had the radar scope “downstairs” in their Avengers, but I felt sure that in the FAA that the Observer would man the radar rather than the TAG (Telegraphist Air Gunner).
So typically I started with the cockpit. The Aires parts were a good fit although I did away with the rear decking before the turret. This, like the kit part, had a curved edge to surround the turret and was smooth on its upper side. Instead I scratch-built some decking with an angled structure around the turret with ribs on its upper surface based on observation of photos. PE British harnesses were added. They may not be the right style, but they are clearly not US-style ones which is what I wanted avoid.
The Aires resin turret was a solid “bucket” for the gunner to sit in, so I ground away all the un-required resin so that just the seat was suspended as it should be and a see-through effect to the ventral gun would theoretically be possible. A quick note on ventral guns, some but not all Tarpon II’s had their gun replaced with an F.24 camera, but I like guns so I replaced the kit blob with a Browning .30 from the spares box. To finish the turret I made a small gun control handle, and oxygen hose and some gun solenoid wiring to dress things up a bit, and in this case kept the US-style lap-belts.
Before I could close the fuselage halves I needed to finish the engine. I’ve found two handy ways to do push-rods on 1/72-scale radials. One is to drill through the top of the rocker housing and insert the rods down to the crankcase, glue and trim off at the rocker. In this case it was easier to drill the crankcase, allowing a slightly over-length rod to be inserted and moved up to the rocker for final fixing. Then it was time for some lead wire to make the ignition harness, some paint and a few licks of washes. I used Mr. Colour Aluminum lacquer for the cylinders, and Gunze Engine Gray and black for the gear housing and pushrods respectively. For engines I quite like to make a wash using acrylic paints and Future. It flows nicely and leaves and shiny oily look.
So almost time for the fuselage to be closed, just the fuselage windows and the Tarpon’s bulged observation ports needed to go in. The bulged windows are supplied mounted on an oval surround that conforms to the normal Avenger-pattern side windows. As is so often the case, the clear parts didn’t fit perfectly, leaving some filling to be done to hide the kit’s Avenger-optimised origins. Once this was done I closed up the fuselage and lined the tail-wheel bay with 5-thou platicard to hide a join line. I found that the cowling ring was a less than perfect match to the fuselage, and that filler and some filing was needed in this area. Then I dry-fitted the wings and tail, requested permission to make aeroplane noises, and glide-bombed my modeling bench. This is an essential phase of any model-plane build as it provides motivation to push on with annoyingly fiddly jobs like scratch-building clear wingtip lights.
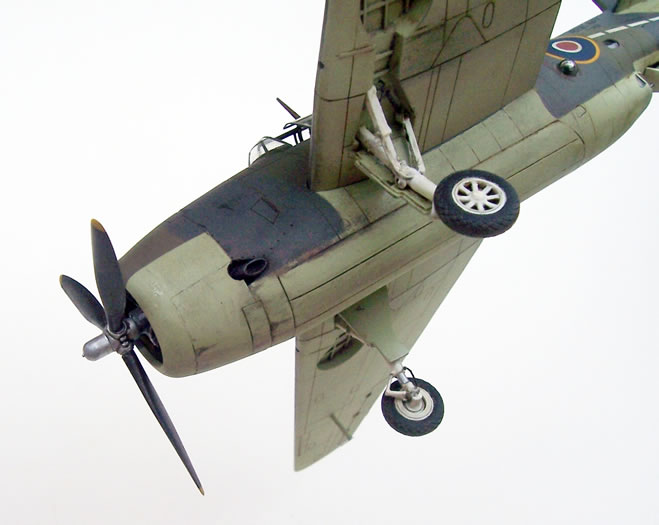
With wing-halves joined and the wing-tip lights installed I decided to turn my attention to plumbing the wheel wells. Avenger walk-arounds indicated the need for two U-shaped hydraulic lines in the wheel well, plus brake-lines and various electrical cables to undercarriage solenoids. I knew that the wheel wells would be the same as the underside colour (Sky or its Eastern equivalent), but was less sure about the undercarriage legs and wheel colour. Initially I opted for Sky, maybe because everything would be easier to plumb if the legs were fixed to the wings. So this is what I did. But I was uncomfortable about this decision, so I made a request for information on “Plane Talking” which turned up a helpful reply from someone who actually got to handle an old Tarpon U/C leg, and he recalled it was white. After much searching I found a colour photo of a Tarpon wearing Slate Grey, Dark Sea Grey and Sky with distinctly white legs and wheels – So I then had to brush pint the legs which by this stage were fully plumbed and painted Sky. I also added tie-down rings to the undercarriage legs and what I assumed to be catapult hooks that fix to the main legs and protrude through holes in the main U/C doors.
One nice thing about this kit is the ability to paint it without the wings on until the very end. So I returned to the fuselage and fitted the tail-planes. I then realised that the kit had a solid panel above the ventral gun rather than some more open framing. So I did a bit of hacking, improved overall accuracy and wasted about an hour as nothing can be seen.
Painting, Markings and Finishing Touches |
Time then for paint, and I’ll confess here and now that I’m not a pre-shader. My intellectual reason (in other words excuse) for this position is that weathering is a post rather than pre-paint application process, and pre-shaded models, whilst looking quite sexy, often seem too uniform to be realistic to me. My practical reason (the truth) is that I like a good gloss finish from my Xtracolour and so I need good coverage (I’m the same with whatever paint I’m using), and this tends to eliminate any pre-shading.
As I mentioned, I chose to stick with British paint shades even though this model represented and Eastern-built airframe. I used blue-tac sausages for most masking, and Tamiya tape where hard lines were appropriate. The ventral gunner’s windows were masked with adhesive metal foil, the bulged windows with tape and PVA glue, and the oval windows with punched tape. My vac-from canopies were to be framed with painted decal strips, so no masking worries there.
Once the paint was dry I could decal. As I had expected, the Aeromaster decals supplied with the kit were stiff as a board. I had planned to use the kit option with Pacific theatre blue and white roundels inside US-style bars, I soon found it was impossible to make a roundel and bars decal conform to the rear fuselage because they were so inflexible (including trying to float them into place on a puddle of Future). So I made a quick decision to run with the other kit decals using conventional British roundels. Being from the same sheet these were of course just as stiff, but being smaller I could manage to get them into place. Once dry I found that they would not react to Microsol. I considered diluting some Acetic Acid Glacial (quite acidic and flammable) with water to make my own killer-brew of decal solvent, as I have softened Aeromaster decals this way before. However if the brew is too strong it dissolves the decal ink and sometimes even the decal! On this occasion I opted to just run my little fingernail through the decals where the panel lines were. This done I brushed on a coat of Future as weathering-prep.
For weathering I did basic blacky-brown oil-paint sludge wash on the glossy surface using artist’s turpentine. I don’t try to achieve a totally uniform fill of the panel lines as rarely do real planes seem to be uniform in their staining. I did a few oily black stains around the cowl and trailing on the underside. Then I hit everything with matt household polyurethane varnish because I like doing my final weathering on a matt surface because stains key to it far better than they do to a gloss finish.
In some places I like to run a soft graphite pencil into panel lines, and I also grind graphite to mix with artist’s turps to make stains. I find you can build up the density and wash the mix around. I like it for fuel stains and so on. I also used some more oil-paint washes, Gunze Acrylic “Oil” mixed with Future to thin. I also like to dry-brush light grey in places to highlight and also represent wear on the wing walkways. I sponged on some brown and black oil paint around the wing roots and the fuel fillers to simulate that mixture of dirt and gasoline that gets trodden in to these areas by deck-crew. Ground chalk pastel in colours slightly lighter than the camouflage colours was dusted onto the applicable surface areas to simulate fading and general wear. Some dirt was applied around the gun service hatches, but not the ammo hatches as these could be serviced from the deck using a special ladder when the wings were folded, meaning crew did not need to crawl around in this area. My prop was painted so that the rear of the blades faded from black to metal (I got this idea from a mate, Andy Hosking, who does this with his props). I also did some chipping of the blades, faded the paint with pastel and made sure I had some irregular hydraulic leaks running down the blades. The aerial mast was painted using an oil paint brown over acrylic sand-colour to simulate wood.
Vac-Form Canopies
The canopies were a bit of a challenge. My first attempt at the turret was difficult because I cut out the gun slot just like the kit part. This was tricky because the acetate is very thin as you approach the top of the turret dome, and is inclined to collapse beneath the pressure of even a new scalpel blade (essential for vac-form canopies). I then realised from photos that there was a sliding strip within the slot, and all that was needed was a hole for the gun - Doh! Fortunately I had as second set of the required falcon canopies to hand.
Cutting the observer’s door out just needed care. I do a lot of my straight cutting of canopies using a Stanley knife blade and a hammer. I line the blade up on the canopy, which in turn is placed on a cutting mat, and give it one fairly hard swift hit. The result is a usually nice precise cut. Otherwise I cut using repeated gentle scores of a brand new scalpel blade, occasionally I will use nail-cutters or good quality side-cutters, and more rarely scissors. I use files, nail-boards and wet & dry paper for final adjustments with frequent checking.
For the pilot’s sliding panels I used my Stanley blade and hammer to lop about 1.2mm off its width by cutting inside the outer frames on both sides. I also removed the top centre section as this would be replaced with a scratch-built rail. The windscreen was frankly a pain to make fit, so different must the Airfix kit be from Hasegawa’s. It took two attempts and is less than perfect. I considered chopping off the Hasegawa windscreen, but it would have looked to thick. The other tricky bit was cutting some clear styrene to make the clear panel that sits behind the observer sealing off the open area of the canopy. Again less than perfection was the result.
I Futured the canopies as this provided a better surface for decal strip to adhere to and to protect from super-glue fumes. Then I set about cutting strips of painted decal film and applying it. The turret was a bit of challenge with its round panes; but a circle cutter son too care of this. For some reason Falcon’s turret does not have the two small gun-service panels on the gun’s side of the turret (I have seen early Avengers with just one hatch, and the prototype with none). The best way to have done this would be to print the required shape onto decal paper, but I didn’t have any suitable for my ink-jet. So instead I got a scribing template and cut the tiny shapes from decal film with a scalpel. Not perfect but good enough for me. The curved frames on the windscreen were done using a circle-cutter again. I lock in dried decal strip with Future, if the framing gets too shiny I brush on matt varnish, but remember canopies were kept clean and polished so more sheen on the framing is okay in my view.
Sometimes I get great results with decal strips framing on vac-form canopies, but this wasn’t one of them. Never mind, I wanted to move on and had had enough. The canopies were fixed in place with superglue and I just remembered to pop in a Quickboost gun-sight before fixing the windscreen. I won’t bore you with how many goes it took to get the pilot’s sliding panels to stay in place…..
With the canopies in place all that was left do was to add the antenna mast and stretched-sprue wire. Not that it matters, but I finished the model on December 31st, giving me a sense of a clean modeling-start for 2012 (if I ignore 30+ unfinished projects!).
Hasegawa’s Avenger/Tarpon kit remains clearly the best in 1/72-scale, which is not surprising given the age of its Airfix, Frog and Academy rivals (Academy may not be as old as the first two, but it’s much like and engraved detail version of Frog’s Tarpon). I don’t feel I should dignify Aoshima’s effort by including it in the same sentence as the other three.
If I’d left well alone, stuck with Hasegawa’s canopies and maybe just added sets-belts to the kit interior I think I would have ended up with a technically better (read: more IPMS-competitive result). But it may have been less interesting to glance at. With me it’s a straightforward case of the more things I do the more there are things to go wrong. Given that I start to get fed up with things and want to begin another build I’m disinclined to strip all of the canopy framing off, or whatever, and start again. If it’s good enough for a country job as we would say when I lived rurally, it’s good enough for me.
I enjoyed this project most of the time, but the detail and scratch-building parts took way too long. I completely dragged me away from my Martin Marlin build when I thought it would be but a brief distraction. This said I think I shall get another Hasegawa Avenger and build it basically out of the box in an Atlantic scheme like my mate Dimitri the Hairy Greek did, as his looks really smart
Moreover he could have built three or four in the time I took to finish mine. Maybe there’s a benefit in doing a build like this once in awhile just to make you realise that often all you notice behind the display cabinet glass is a nice paint job!
Images and Text Copyright ©
2012 by Mark Davies
Page Created 30 January, 2012
Last Updated
31 January, 2012
Back to
HyperScale Main Page

|
 Home
| What's New |
Features |
Gallery |
Reviews |
Reference |
Forum |
Search
Home
| What's New |
Features |
Gallery |
Reviews |
Reference |
Forum |
Search
_fs.jpg)
_fs.jpg)
_fs.jpg)
_fs.jpg)
_fs.jpg)
_fs.jpg)