Eduard's 1/48 scale
Messerschmitt Bf 109 E-1
by Fernando Rolandelli
|
|
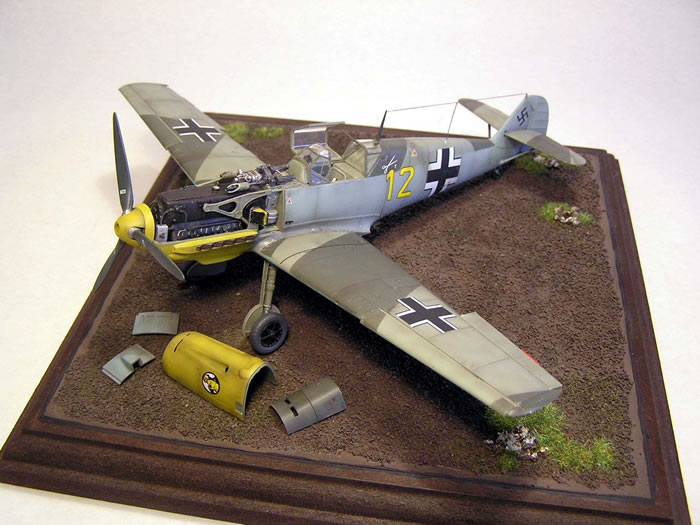
Messerschmitt Bf 109 E-1 “Yellow 12”3./JG27
flown by Fw. Ernst Arnold, August 30th, 1940 |

Eduard's 1/48 Messerschmitt Bf 109 E-1 is available online from Squadron.com
Background
Writing a history on the 109 would be like trying to reinvent the wheel. Suffice to say that the E-1 was an interim model with incorporated the Daimler Benz DB601 fuel-injection engine which was the hallmark of the early series of the 109, and the twin radiators which remained with the series to the end. They were typical early war light fighters, with light armament (four MG17 7.92mm) and no armour, but many were reworked into E-3 standard. Many were also converted or built straight into E-1/B fighter bombers. Many were built by Bayerische Flugzeuwerke, by AGO, by Focke Wulf and Arado.
The Kit
The latest “uber-kit” by Eduard, the 109E family was highly talked about, accumulating much praise and some nitpicks as well. I had long toyed with the idea of building an E-1/B, even getting a SAMI conversion, so I bought a couple of “Overtrees” issues, directly from Eduard. The rationale behind the “overtrees” concept is that you could use them to build the spare variants in a ProfiPack boxing, therefore, they lack instructions and decals, lowering the costs (in the end, there was no saving at all, the cost of the posting to Argentina more than compensating the low price). The kit looks wonderful while still on the sprues, though it oozes complexity. I decided to try an “open engine” build, though I was not really a fan of that mode previously, and certainly did not become one afterwards.
First things first - I attacked the cockpit. It is fairly complete, but I added some details: the regulator for the oxygen equipment, the throttle lever, lights lamps and levers. The assembly is very flimsy, not a good omen.
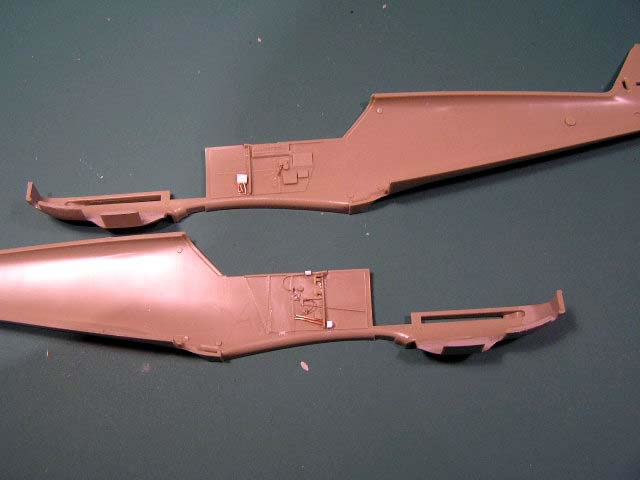
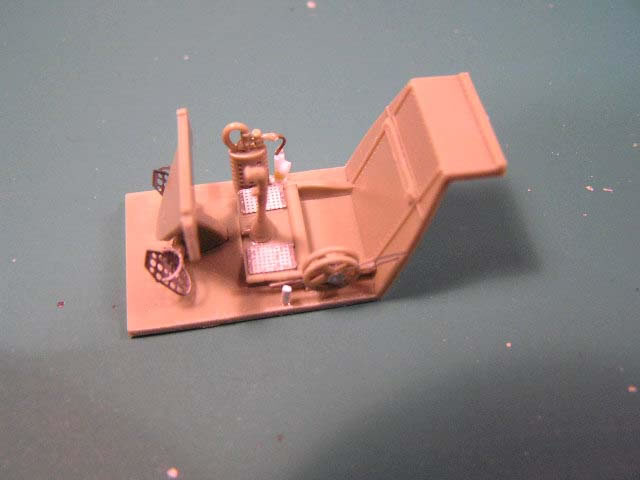
After that, I went for the oil cooler, a very nice and accurate assembly. Then, I started the engine assembly. This is designed as a “carriage” starting in the cockpit, to which the gun shelf, the accessories bay, the engine bearers and the engine itself, including the exhausts, are added. This looks very well all alone, but inserting it in the fuselage was a chore. The engine itself also looks good, but begs for a bit of detailing. I shunned from the obvious (erasing the molded spark wiring and replacing it with real wire) but added some connectors and pipes to the front and some prominent wiring running along the right engine bearer. The accessory compartment, between the back of the engine and the ammo boxes, is a veritable maze of wiring; I made a “blob” with some wire and glued it into place to provide a busy look. The fuel injector unit rides a bit too low, interfering with the machine guns (its horns should ride well clear of them); I mounted it on a slice of plastic to raise it a bit. The gun reinforcing rings I thinned from the inside; they fit over the barrel, but one goes over the muzzle, which is wider. It is difficult to correctly place then, given the stagger in the machine guns; dry fit first.
Then, I tackled closing the fuselage. The exhausts are supposed to slide into the slit openings, but they are raked backwards and wouldn’t go laterally, but with a “forward-then-backwards” movement that detached it from the bearers. After some pondering, I decided to detach the engine, and glue the cockpit and cooler assemblies. Then, I slide the engine in place. It worked, the assembly was strong and the bearers fell into position (well, almost). Of course, all the fragile wiring detailing detached itself in the process, but the fuselage was closed. No wonder the instructions in the later E-4 boxing suggest adding the exhausts from the outside once the engine is in place (mine would be add the engine to the fuselage halves and then detail). Windscreen fits well, but rides tight on the instrument’s panel’s coaming; I had to sand a bit to fit.
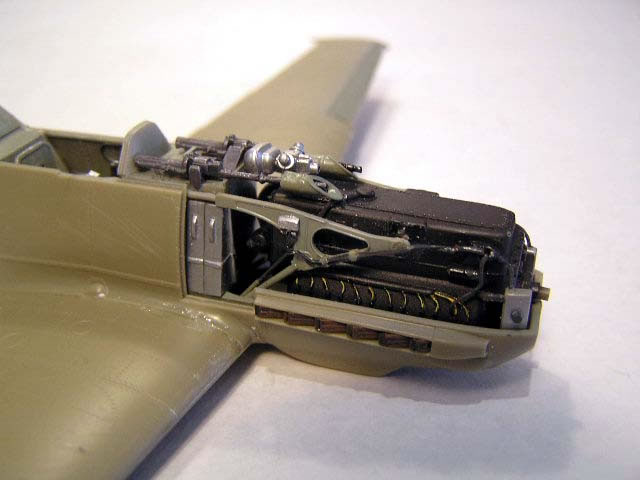
Wings were not difficult. The gun opening are a bit small (E-1s’ were conspicuously big) but I was contented with placing some gun tube muzzles in the inside. The radiators gave some problem and resulted in a bit untidy assembly. The tips did not match perfectly, but nothing serious there. When flowing the customary wash over the panel lines I noticed some panel marked on the leading edges next to the muzzle holes; they shouldn’t be there, they are access panels for the cannon muzzles in the E-3/-4/-7s. Take action before painting, erasing them with some filler; I failed to notice them in time.
After that, everything went smoothly. The notorious “ Messer’s join line” along top and bottom of the fuselage and the excellent wing to fuselage join ensured an almost putty-free assembly. Just watch the dihedral and the join between the rear oil cooler ramp and the lower wing, which should be perfectly level. The undercarriage legs have no positive fit (manufacturers will never learn) and there is no indication of the correct attitude in the instructions; I juggled with them and some drawings and pictures until satisfied (in the E-4 instructions, there is a front and side diagram)
After the painting stage, adding all the bits was also something of a chore, but here the flying surfaces did behave correctly and were glued without incident.
Well, finding decals for a confirmed E-1 is no easy game (for an E-1/B is outright impossible). I manage to detect two in a big SkyModels sheet, and two other in a Superscale one (the third is an E-3… only it lacks the cannons!) A Spanish one in a Aeromaster (“6-126”) sheet is also an E-3 (but you could make a “6-129”…). The two examples I got were “Yellow 13” from 6. (J)/Traggergruppe 186, (actually, the same included in the Profi boxing, only the number is in Yellow –Brown that early in the war is highly doubtful- and the “witch” emblem is rather less colorful) and “Yellow 12”, from 3./JG 27, shot down over Kent and force landed in good shape at Westwood Court on 30th August, 1940, its pilot taken prisoner. I went for this one, a handsome machine with high fuselage demarcation and Yellow nose, also showing the early use of the “Afrika” emblem. In my references it is depicted in 70/71/65, but from the pictures there is high contrast in the upper colours, so I decided for a 71/02/65, which is perfectly possible in the given timeframe (the crash report says “standard camouflage, Yellow nose”). A dark area in the nose is sometimes interpreted as dark paint, but others think it’s a shadow (I concur). Paints were Xtracolour, topped with acrylic clear coats.
I only used the “12”s and the “Afrika” shields from the SkyModels sheet, being a bit uneasy about them, but they behaved well. Stencil came from a Techmod sheet, and generic insignia from an Aeromaster one. Regarding this, the supposedly too wide wing slats came back with a vengeance, as no correct sized cross would fit (I tried Aeromaster’s, Ministry’s, Tamiya’s and SkyModel’s). In the end I used some Superscale small (incorrect, IMHO)-sized ones. Significatively enough, the ones in the E-4 Profi boxing also are.
Not exactly a relaxed build, this kit is a bit exacting because of its very quality. Tolerances are small, and subassemblies should be well built, otherwise, errors will mount up and things will not fit. The general look of the finished model is quite satisfying, rendering the old Hasegawa’s as “carved in stone” (though I still like Tamiya’s)
References
-
Classic Publications Jagdwaffe “Battle of Britain Phase 2”.
-
Aerodetail “Bf 109E”
-
Squadron Signal Publications “Bf 109E Walkaround”
-
SAM Publications “Combat Colours n°1”.
Model and Text Copyright ©
2012 by Fernando Rolandelli
Page Created 24 October, 2012
Last Updated
24 October, 2012
Back to
HyperScale Main Page

|
Home
| What's New |
Features |
Gallery |
Reviews |
Reference |
Forum |
Search