MPM's 1/48 scale
Heinkel He 177 A-5
by Dennis D. Rossko
|
|
Heinkel He 177 A-5 |

MPM's 1/48 scale Heinkel He 177 is available online from Squadron.com
I want to say right at the start that this is definitely not a kit for the beginner. It does build up into a (large) beautiful model if proper care is taken during construction. It is also the only injection-molded offering to date of this plane in 1/48 scale that I know of. Unfortunately, this is a limited-run kit so there are a few problems, as should be expected.
Brett Green did an in-the-box review of this kit so I will not go into that but will rather focus on the build itself, which took me slightly over a year.
One thing that should be mentioned though is that there are two versions of this kit- the regular, all plastic version (Brett’s review) and the “High-Tech” kit which includes masks, resin and photo-etch parts. My kit is the “High-Tech” version, which I purchased for about US$110 on Ebay. I recommend getting the High-Tech version if you plan to build this kit. There are also several resin and photo-etch aftermarket add-ons, some of which I used in my kit.
The Aircraft
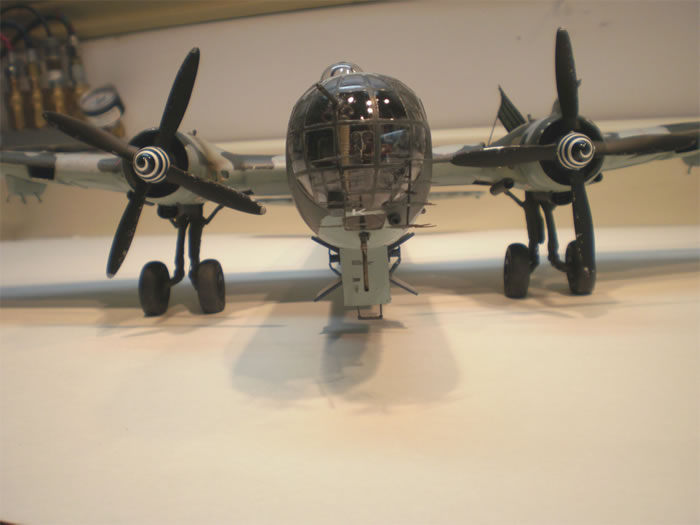
When designed in 1936-37 the He-177 was the most advanced heavy bomber in the world. It was host to numerous innovations such as coupled engines (4 engines driving 2 propellers), surface evaporative engine cooling (no drag inducing external radiators), remote controlled turrets, fully pressurized crew compartments and a unique 4 leg landing gear arrangement. The original aircraft was faster than most fighters of the day, quite maneuverable and could fly above most fighters maximum altitudes. Unfortunately, these innovations as well as a German RLM requirement that the 30,000 lb bomber be able to dive bomb (?!?) caused many problems which required numerous modifications.
The original DB 604 coupled engines had a tendency to catch fire in flight at the slightest provocation and many aircraft were lost to engine fires. By the time the A-5 came out in 1942 most of the issues had been resolved by changing to the DB 610 engines, adding radiators and designing larger engine cowls but by then it was too late for Germany. Some were used as maritime patrol aircraft in France, others against Russia and in the “little Blitz” (Operation Steinbock) against England but it was “too little, too late”. By 1944 all available fuel was needed for fighters to defend the Reich and most He-177 sat on airfields to be destroyed by strafing allied aircraft. None survive today. The He-177 was also the only heavy bomber built by Germany in quantity in World War II.
Cockpit and Fuselage
The resin cockpit is a vast improvement over the injection-molded pieces, which are included. The resin parts go together well but the instructions bear close watching, as there are a lot of parts and the assembly can be complex. I also purchased the Eduard “Big Ed” set for this model but I used the MPM photo-etch for the instruments as the Eduard set are the wrong color (from 1942 the cockpit of bombers should be RLM 66 gray and not RLM 02 as the Eduard set has – the Eduard set would be right for an –A3 but not the –A5). Be careful of the overhead instrument panel. Mine ended up a little too far forward and the unpainted back can be seen through the top window panel. You will also have to grind away some resin and some plastic to fit the cockpit into the fuselage halves.
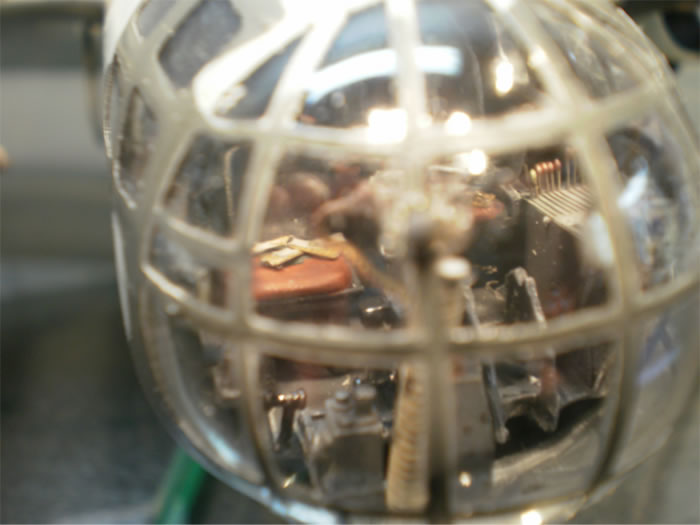
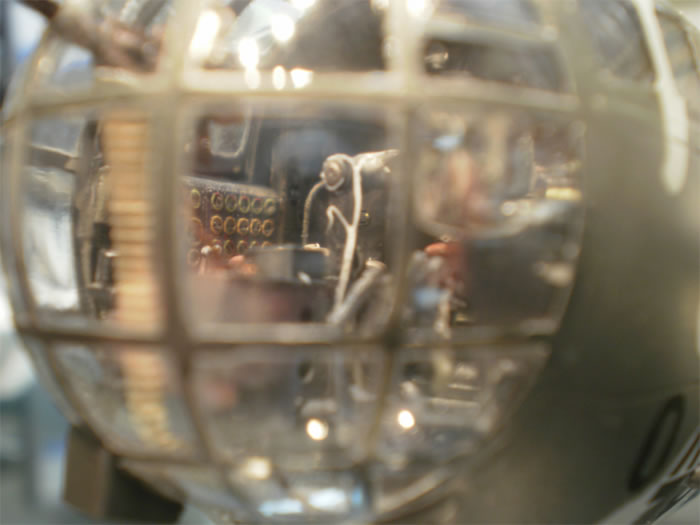
The fuselage went together well after placing some guide tabs along the inside of the fuselage halves as there are no alignment pins anywhere in this kit. The clear turrets are drop-in so they can be left off until after painting. The dorsal cannon turret uses a Revi reflector gunsight which did not fit under the clear dome until I moved it inside a bit further than the instructions show. The tail gunner position is also a separate ‘pod’ and can be left off until painting. There are two versions of rudder in the kit. Make sure to put the right one on as the A-1/A-3 version will not clear the A-5 tail gunner canopy without cutting off the bottom edge of the rudder. Also, be careful of the tail wheel. I had to adjust the mounting position as the position shown in the instructions place it too far out of the fuselage, raising the tail too much. There is a lot of plastic around the inside edges of the horizontal stabilizer halves that have to be ground down to allow the halves to seal around the join. When I mounted the stabilizers I saw that the rear fuselage has a slight warp that puts the tail out of alignment. I had to compensate and fill the ensuing gaps with filler. I was hoping this wasn’t a sign of things to come but alas, I was wrong… so wrong!
Wings and Undercarriage
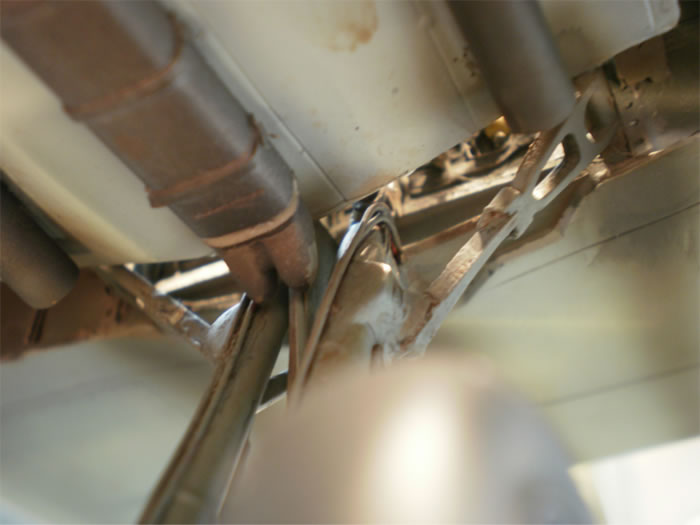
The wings are the real problem with this kit and absorbed a lot of time. The plastic around the inside edges had to be ground down, same as the tail, but there was a lot more of it. I ended up using a Dremel because there was just too much to do by hand. Be sure to test fit the wing halves often during this process and while installing the gear bays as I had to grind out quite a bit. Another major flaw is that the wings are of unequal length! The top half is slightly shorter than the bottom half. All I could do was to align them at the wing tip and fill the wing root. I ended up using .010 Evergreen stock as a shim, cut to fit and filled with lots of superglue, then sanded down.
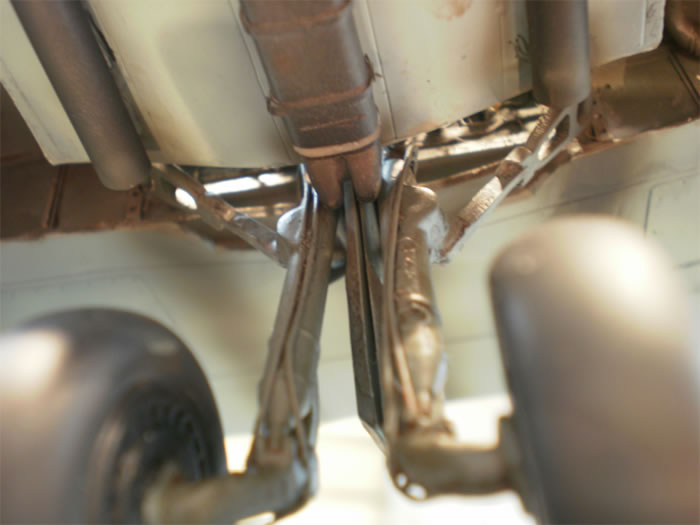
Needless to say, all this problem at the wing root did not lend itself well to proper wing alignment and this is especially important in this kit because of the landing gear. With four wheels on four separate struts everything has to be aligned or you end up with one (or more) wheels not touching the ground! I ended up sawing off one wing or the other three times until I managed to get the wing on straight and all of the wheels on the ground! The kit comes with small tabs that are supposed to fit into square holes in the wing root. Not only did the holes not allow the wing to line up properly, they are also too small for the square pegs on the wings to fit into them. I ground off the pegs on the wings altogether and just epoxied the wings to the roots flush. I understand that there is a wing spar aftermarket for this kit and I recommend it or something like it as this bird is heavy! My wing roots cracked a few times before I managed to get them to stay put. The spars would also probably help a lot with alignment. The ailerons, stabilizers and rudder are all separate parts, allowing you to position them as you see fit.
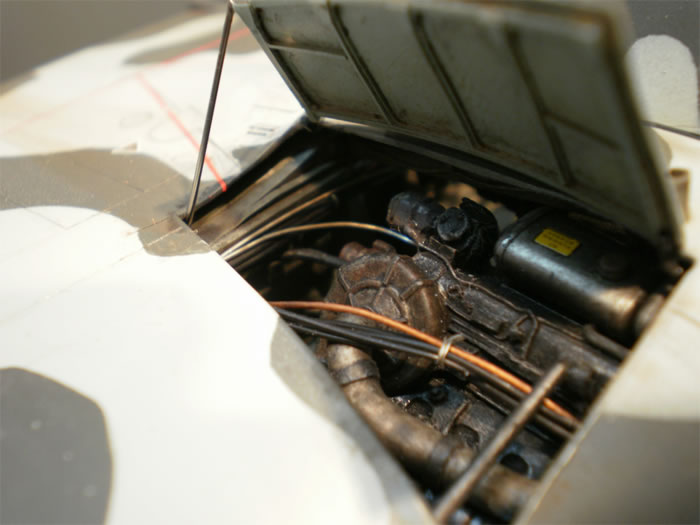
As I said before I used the CMK resin engine bay and landing gear bays on my kit. The engine bay is simply fantastic with lots of detail and it includes several duplicate parts that the gear bays have so don’t panic - you will see extra parts. You will have to cut out the engine access hatches and thin the wing inside to get everything in there but the CMK set comes with really nice access hatches so you will not need the cut out pieces. The only disappointment I had was that my resin wheel covers were too small to fit over the openings. The CMK instructions show displaying the wheel covers open but this is not correct on the real aircraft as they closed again after allowing the gear to lower. The brackets that the gears attach to are a bit finicky so be careful that everything is properly aligned and all the parts are installed properly or you will have issues with getting the wheels on the ground as I said above. The CMK wheel well set comes with flattened resin tires, which are a nice add for this kit.
Miscellaneous
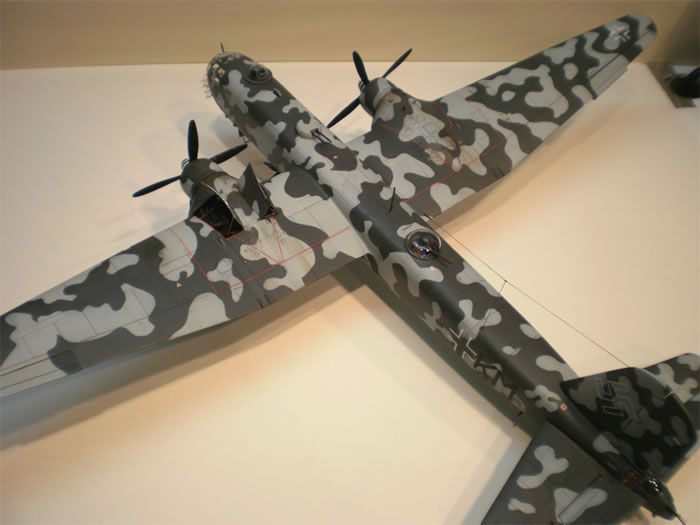
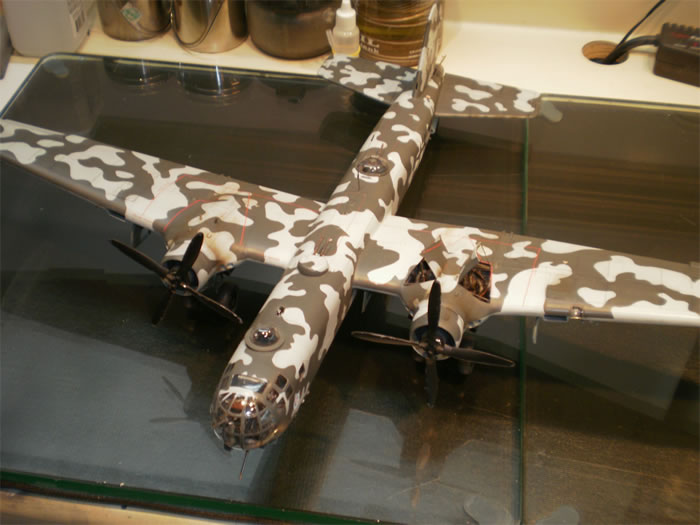
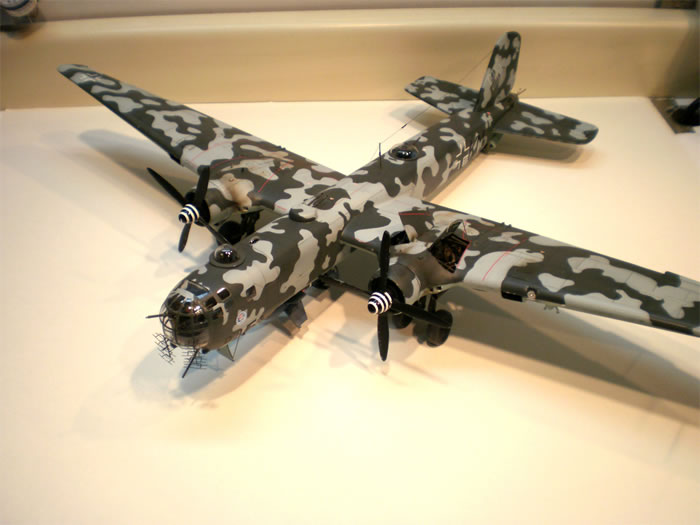
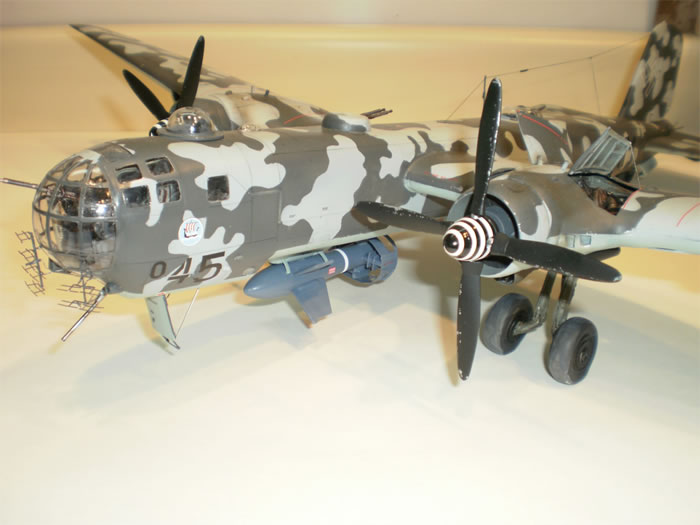
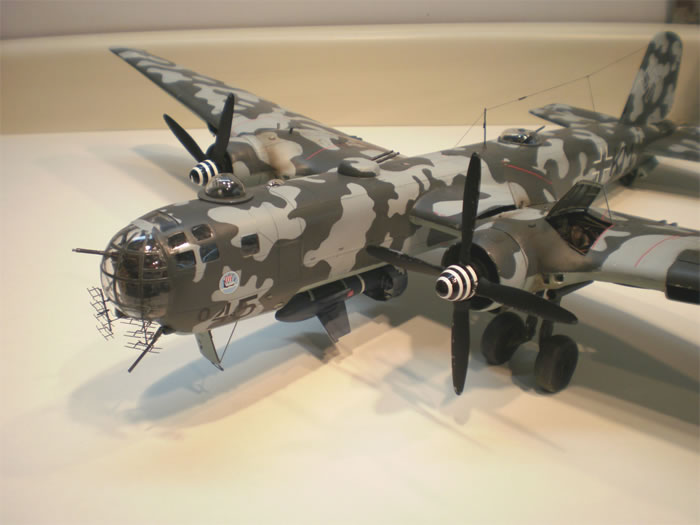
The decals are quite thin and care is needed not to tear them during application. They do lie down well though and only needed a small amount of Solv-a-set to snuggle in nicely. There are markings for three units. I used the maritime markings from KG-50 because I wanted that camouflage scheme, being unique from most Luftwaffe patterns.
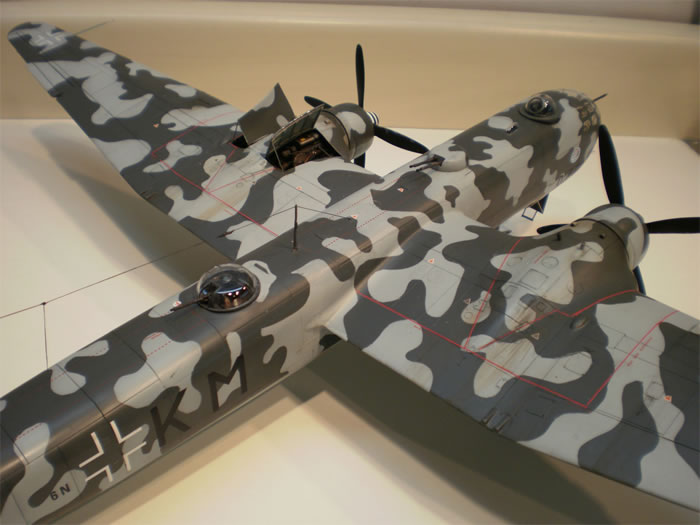
There is also included in the kit the Condor missile set #1 (Hs-293 guided bombs) but I opted for the Kramer X-1 “Fritz-X” remote control glide bomb (Condor set #2, which is not included) for my kit as the He-177 was modified for their use against maritime vessels. The bomb is actually a kit in itself, with a rather complex PE tail. I also installed the radar antennas included with the Big Ed set. Be careful if you install these antennas, they are small, fragile and very hard to deal with – lots of patience and interaction with the ‘carpet monster’ required here! The wife actually got tired of listening to all the expletives and closed the door to my modeling room a few times. Why can she not understand that I was having fun?
One of my antennas was destroyed returning from EagleQuest XX so the photos only show two of the three normally equipped. My He-177 did win a bronze medal though.
There are some big hurdles to overcome but for those who decide to tackle it will be rewarded with a great model.
Be patient, test fit often and be sure to look things over closely during assembly and things will come out all right. I can easily say that this is the most difficult kit I have built to date, due in part to complexity and part to the ‘limited-run’ issues but I am glad I did it.
Now I just need to find a place to put it…
Model and Text Copyright ©
2011 by Dennis D. Rossko
Page Created 10 August, 2011
Last Updated
10 August, 2011
Back to
HyperScale Main Page

|
 Home
| What's New |
Features |
Gallery |
Reviews |
Reference |
Forum |
Search
Home
| What's New |
Features |
Gallery |
Reviews |
Reference |
Forum |
Search