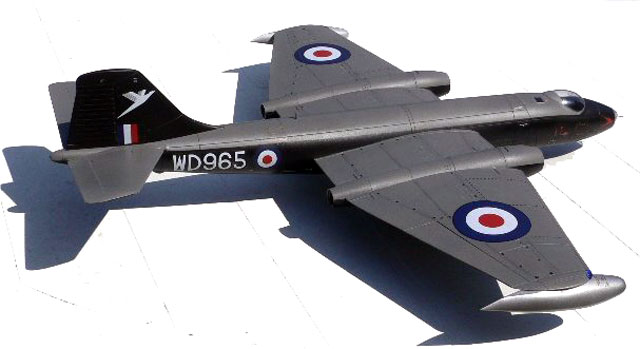
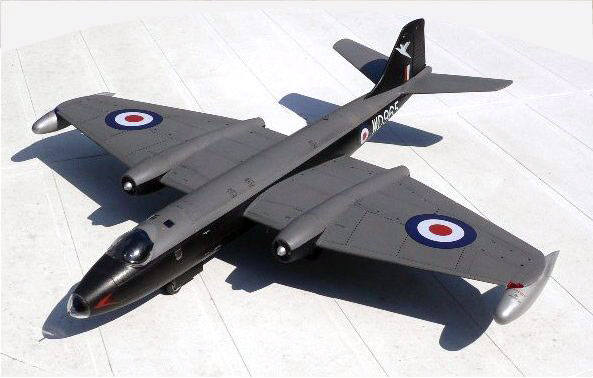
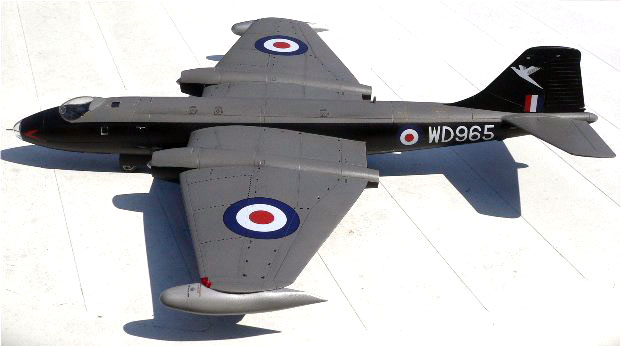
Airfix 1/48 scale
English Electric
Canberra B Mk 2
by Roger Hardy
|
English Electric Canberra B Mk 2 |

Airfix's 1/48 scale Canberra B.2 is available online from Squadron
What can you say about the English Electric Canberra? It was designed by a company that had never designed an aircraft before (if you ignore the Kingston flying boat and the tiny Wren in the 1920s) and went on to become the world’s most successful medium bomber. It was so good that it required almost no changes from prototype to production and it was such a fine design that even Uncle Sam decided that he couldn’t do better and built it under licence as the Martin B-57. Yet, when it first flew in 1950 the people who were at the roll-out were deeply disappointed; the aircraft was far too conventional – remember that the revolutionary B-47 had flown three years earlier. New jet aircraft should look like rocket ships; the Canberra looked rather too normal in appearance.
However, the Canberra was a jet Mosquito; internal bomb bay and the most aerodynamically clean airframe that could housed the bomb-load, crew and the two engines. It was otherwise absolutely conventional, minimising development risks. The designers went straight for the axial flow RR Avon turbojets, avoiding the bulk of the centrifugal engines then in common use in the UK. It was a jet and jets are most efficient at altitude but the UK industry had little experience of pressurised aircraft and the Canberra had a curious bubble canopy that stayed with it until the B(I)8 and PR 9 variants. Mr Martin got rid of it quite early on. I remember flying in a T Mk 4 back in the 1970s and they had managed to shoe-horn two ejection seats into that space. It was like being sealed into a submarine.
The aircraft remained in service for 57 years; quite an achievement for a first attempt at designing an aircraft!
The Canberra is not a small aircraft so a 1/48 scale kit is not going to be small either. The kit is from the new born-again Airfix and is moulded in a soft grey plastic. The panel lines are all engraved, rather too deeply for my taste and, for you rivet-counters, I note that a number of prominent panel lines are not there at all. The control surfaces are all separate as are the bomb-bay doors. I won’t bother going through a full in-box review because it’s been done by others before me.
The assembly is straight-forward as this is essentially a very simple aircraft. The only assembly problem that I had was in locating the cockpit assembly as the precise location is not at all clear. It’s only when you try to locate the nose undercarriage bay in the right place that you realise where the correct location should be, so fix that to the cockpit assembly and you won’t have any problems.

There are three ejection seats and console details for the rear two crew members. None of it can be seen, however, and it’s hardly even worth painting them. The front seat is very visible in the finished model and so is the pilot’s instrument panel so it’s worth making a bit of an effort here.
A word of warning: this aircraft is the ultimate tail-sitter. The instructions advise you to add 100 grams to the rear of the cockpit assembly; yes, 100 grams! This is a lot of weight and, believe me, it needs every gram! Mine only sits on its nose-wheel because of the flats on the tyres (which Airfix thoughtfully provide). The kit provides a tail prop if you get it wrong, but I don’t think it looks very good.
My only other criticism is that the flying control surfaces and flaps are all separate. God knows why Airfix’s toolmakers decided to do this because if you look at any photograph of any modern aircraft on the flight line you will see that all flying controls are neutral and the flaps are up. Fixing the control surfaces in these correct neutral positions is easy but the fit of each is not that great and I had to resort to much scraping to get the surfaces to match. The flaps need filling and re-scribing. Why, oh why did Airfix do this? Give me one-piece wings and tailplanes every time. I had the same problems with the bomb bay doors. Other reviewers have criticised the engraved detail on the rudder (which is incorrect) but I didn’t bother to fill these as I was painting it black and they are not noticeable against a dark colour. The only other minor gripe is that the noseleg assembly is a bit wobbly on the finished model.
I selected the medium-sea grey and black scheme that the aircraft sported when it first entered service with the RAF. They didn’t keep this scheme for long so I didn’t bother with too much weathering (can’t stand the junkyard look that is so fashionable these days). What little I did was using girl’s eye make-up pastels and they took just fine.

I used the finest paints ever created by God, Gunze Sangyo acrylics, and a satin varnish made by mixing Tamiya matt and gloss varnishes. The decals took to the surface just fine and there was minimal silvering.
So, overall, am I happy with the result? The answer is an unequivocal yes. I am not a rivet-counter and don’t trust three-view drawings, preferring to judge the look of a model ‘by eye’ and this one looks absolutely right. The whole look of the aircraft, the way it sits on the ground, slightly nose-down, the whole package.

Would I recommend it? Yes, of course, but you need a big space to display it. Oh, and don’t forget that nose weight...
Model, Images and Text Copyright ©
2011 by Roger Hardy
Page Created 30 September, 2011
Last Updated
30 September, 2011
Back to
HyperScale Main Page

|
Home
| What's New | Features | Gallery | Reviews | Reference | Resource Guides | Forum |