|
Lockheed C-5B Galaxy
Anigrand, 1/72 scale
S
u m m a r y |
| Description and Catalogue Number: |
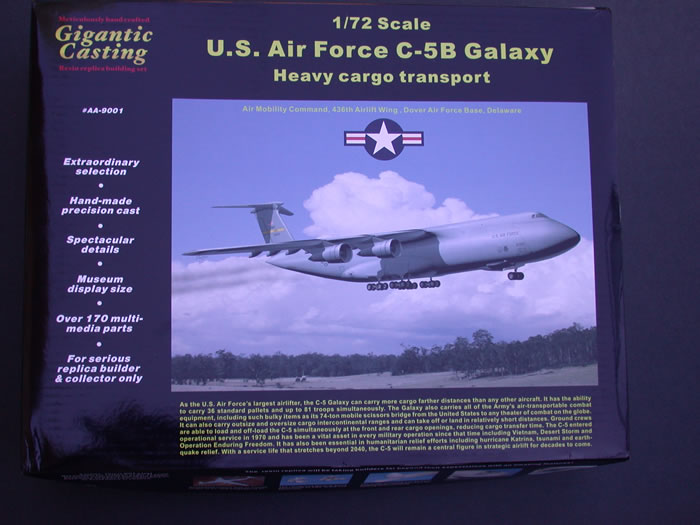
Anigrand “Gigantic Casting” Kit No. AA-9001 - Lockheed C-5B Galaxy |
| Scale: |
1/72 |
| Contents and Media: |
Epoxy glass/injected plastic and grey green colored resin. |
| Price: |
$380 (includes shipping within continental U.S). Prices and shipping direct from Anigrand will differ! |
| Review Type: |
FirstLook |
| Advantages: |
High quality casting; fine engraved detail; minimal flash; stout packaging. |
| Disadvantages: |
Rudimentary cockpit; very expensive |
| Conclusion: |
With this ambitious release Anigrand has taken a huge step forward in resin casting quality and is finally running with the “big dogs”. |
Reviewed by "Bondo" Phil Brandt
This curmudgeon was first privileged to climb aboard a C-5 operational test article at Edwards circa 1968. We were already flying a very large MAC bird, the C-133A, and had watched the C-141 go operational at our “home drome”, Dover AFB, but both airframes seemed like little brothers in comparison. Six years later, I had the pleasure of accepting a “Space-A”, upper deck C-5 ride direct from Thailand to Travis AFB, where I would get to spend a month with my wife and family. Instead we enjoyed a short hop to Okinawa, where we active duty GIs were unceremoniously bumped off the airplane in favor of waiting civilians, and told it was up to us to arrange our own air travel to the Left Coast; hello American Express Card, Japan Air 747 and an unplanned $600!
The C-5As had initial serious teething troubles and accompanying political storms, but slowly did all the called-for fixes to became the backbone of America’s military heavylift. Modified C-5B still carry the military freight worldwide, and it appears they will continue to do so for at least the next few decades.
The only 1/72 C-5 kit previous to this was, I believe, the ID vac kit, actually built a few years ago by the intrepid Finescale Modeler editor and all-round good guy Paul Boyer. Nichimo, of course, did a nice injected 1/144 version at least forty years ago.

Easily Anigrand’s most ambitious offering to date, this all-resin C-5B airframe–the box top says “C-5B"; the box ends say “C-5A”-- has got to be among the top five largest “plastic” display kits extant; its all-resin 41"X37" footprint is only surpassed IMO by the 1/72 epoxy glass/injected plastic Amodel Spruce Goose, and the gigantic 1/72 Antonov transports, also made by Amodel. Note that I included for size reference my thirty-six year-old Frog Wyvern (built in the Northern Thai jungle) and a $20 bill--you’re gonna need nineteen of these Andrew Jacksons if you want a beeg C-5!.

Oh, BTW, don’t throw away the flimsy cover of the corrugated box - my box had serious interior wall gouges from the large resin components being too closely packed – because the sides of the cover are the only place you’re going to find color reference and decal placement information (see “INSTRUCTIONS” below).
Molding

Those of us modelers experienced with previous Anigrand offerings are hardened to the often myriad pinholes and bubbles (voids) that we know are going to be there; it just seems to come with the territory, and we bear that burden because of the wonderfully eclectic releases by the Hong Kong firm. Well, all this longtime resin kit devotee can say is, it’s a new day at Anigrand, casting-wise! I have endeavored to closely inspect all of the large components, and most of the smaller ones, and I have yet to find any flaws: no bubbles, no pinholes, no extraneous dingleberries hanging off components (that have to be Dremeled) and no warpage! Casting spigots that have to be trimmed are strictly minimal.
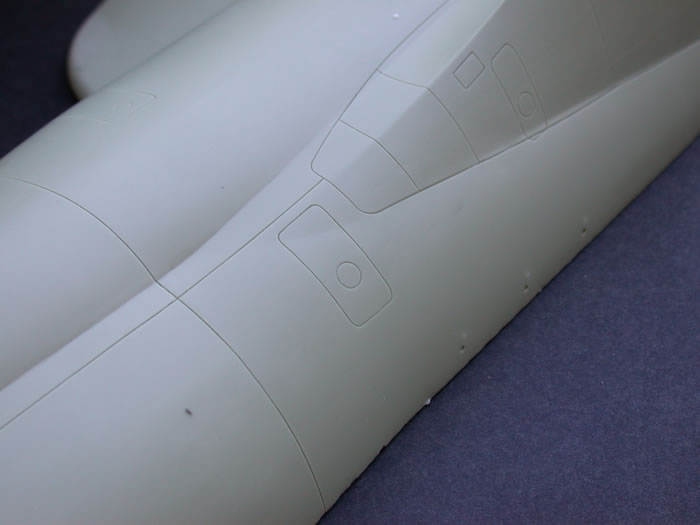
The castings, now greenish grey as opposed to the usual cream-colored resin, are exceptionally smooth surfaced, almost semigloss, with sharply executed, bold panel engraving (which I deem OK for a model this size).
General Kit Engineering
The fuselage is in four main pieces. Each fore and aft half has rabetted edges to give strength to the epoxied–I’d never use CA on such large components–joints. Each fore and aft fuselage half is further held together by the lage maingear pod fairings with hefty tabs that fit into fuselage slots.
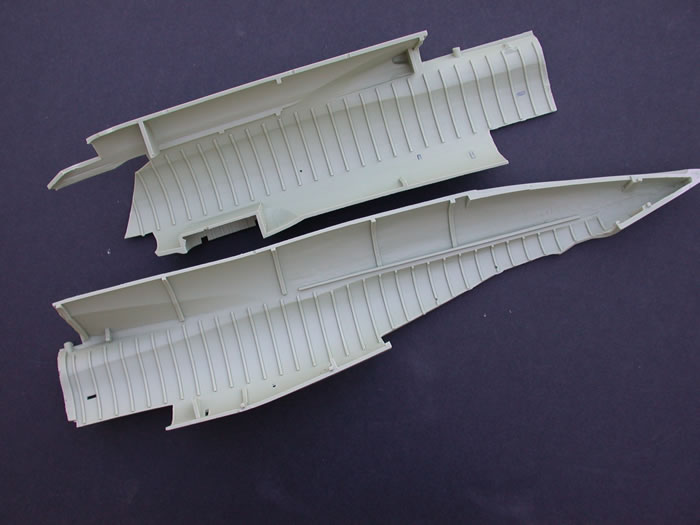
(Criticism) The fore and aft halves of one side of the fuselage have square ends of the interior fuselage “ribs” protruding slightly (say 1/8") proud of the glue (center) line. This apparently is to facilitate the strength of the join by “sistering” (locating right beside) with the flush ribs of the opposing half. Nice concept; bad execution; unfortunately, if one aligns the engraved panel lines and openings in the right and left fuselage halves, some of the protruding ribs butt directly into the opposing rib, so it’ll be Dremel time here, but not a big deal. Additionally there is also some interference with a couple of opposing wing ribs; same solution.
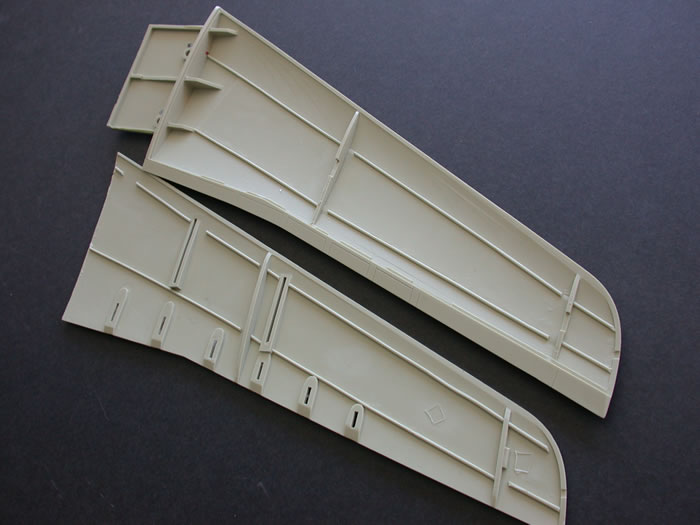
Each wing is in two pieces, top and bottom, with cast-in slots for large flap hinges and engine pods. Spanwise strengthening ribs (to minimize drooping over time) are cast-in to upper and lower wing sections. Each wing half has a large resin “tongue” with mounting holes that correspond with large diameter pegs in the fuselage. The separate large over-wing fairing has mounting holes that further match more pegs in the wing-half tongues.
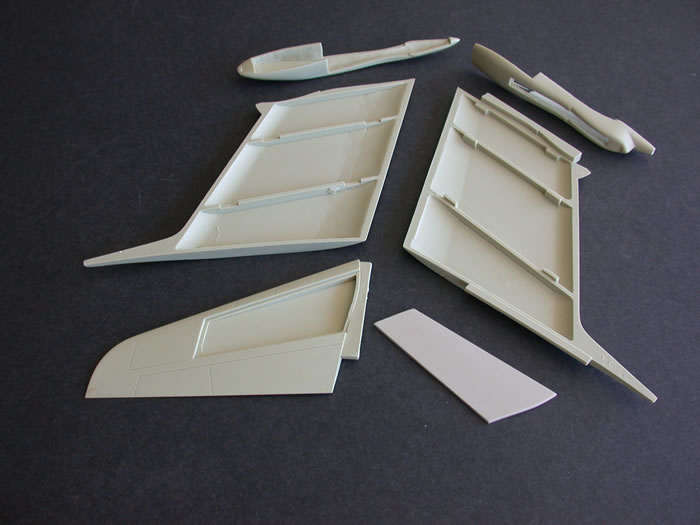
The large vertical fin is in two halves which key into the empennage spine. The horizontal stabilizers are each two-piece and, in turn, key into the separate large cast fairing on top of the vertical fin.
Cargo Deck
Long mounting strips for floor and ceiling are cast-in to each fuselage half. Cargo deck floors and ceiling are large, thick components and lend a fair amount of strength to the fuselage (epoxy is again, strongly suggested by this modeler!). The aircraft may be configured with massive nose cone and tail cargo doors open and ramps deployed, but, other than the aforementioned ribbing on the fuselage sides–the real deal has much of the ribbing smoothly covered with insulation and fabric--and some structural detail on the floor and ceiling, there’s no other “busy-ness” inside. The only way I’d consider doing a loading configuration would be if one could “jam” a large, say 1/72 truck, tank, rocket, or airplane into each opening, so that the viewer cannot easily see that there’s no other detail inside.
(Criticism) There are no obvious locating/mounting pads for the gigantic nose cone/front cargo door in the closed position (although said pads do exist for the aft cargo door). The modeler will have to add pads CA’ed to the inside of the large forward fuselage opening. There is also no pivoting mount facility for the modeler who wishes to have the forward door open; just a simple triangular brace to place between the lower edge of the raised forward door and the airframe just forward of the cockpit. I guess you’re supposed to tack glue the aft “ears” of the forward nosecone to the fuselage sides!
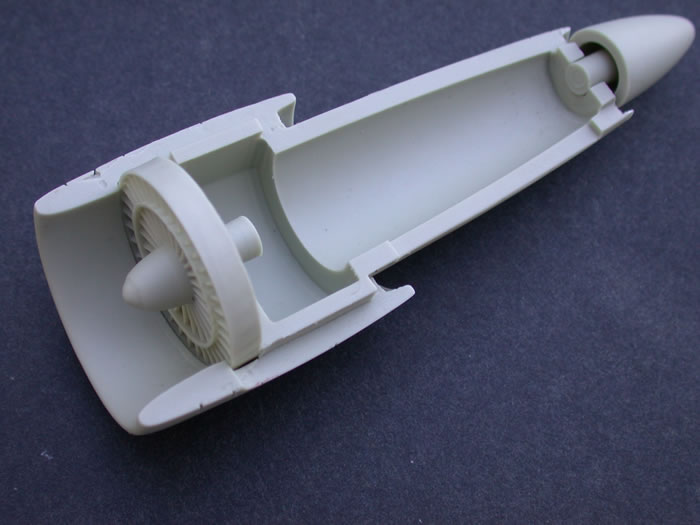
Engines
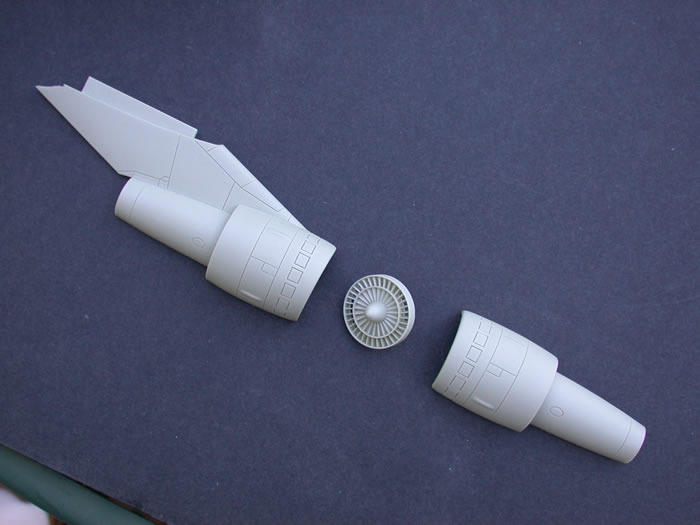
A total of only four components complete each engine/pod which, in turn, keys into precast slots in each wing bottom. Although the first fan stage is cast separately, aft fan stage blades are cast into the fan bypass exits. Surface casting is, again, very well done, with no flaws evident.
(Criticism) I do wish Anigrand had opted to create the front one-inch-worth of intake trunk leading back to the first fan stage as a single circular resin component (as has Collect-Aire in their decent B-66/A3 kits), instead of two complete nacelle halves which the modeler has to align, sand and putty (to hide the obvious seam) before painting the intake trunk (and then you have to mask the pre-painted and pre-installed) fan. Same, same for the exhaust area (although the one-piece exhaust cone hides most of any seam that might result).
Landing Gear
Multimedia. That is, the main struts are turned aluminum, the retraction screws are threaded brass and the gear support frame and wheels (six per assembly, four assemblies) are resin.
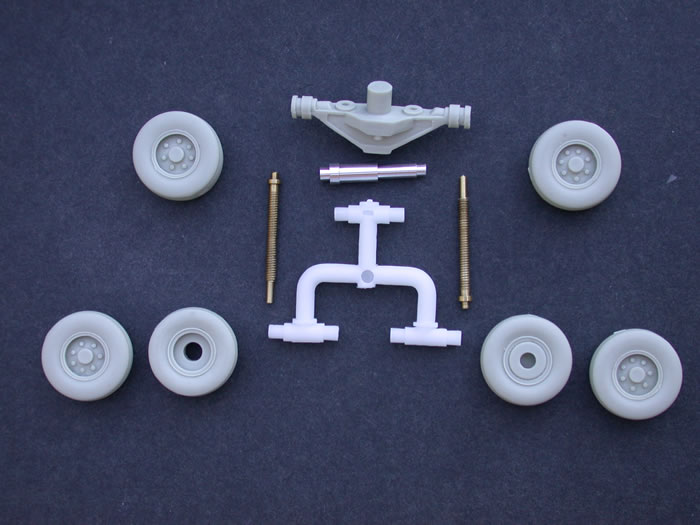
The six-wheel axles are done in white resin. All castings are, again, very clean. Hinges for the large main gear doors are separate resin; somewhat delicate (but cleanly cast) .
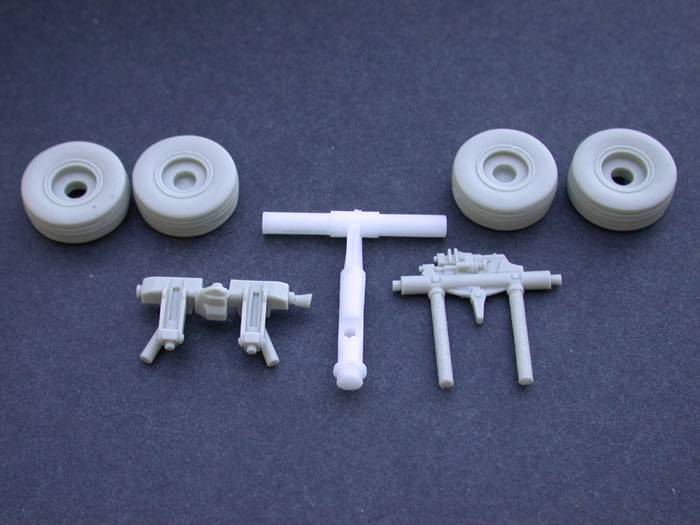
The nose gear is all resin, albeit in three pieces, with four resin wheels (different hubs from mains).
Cockpit
Very rudimentary: an instrument panel/coaming and six seats (no belts). This probably works in view of the small amount of window area. I may even tint the windows with some translucent “smoke” lacquer to further hide things. Of course, if the builder does the kit in the loading configuration the cockpit will be hidden from view by the raised nosecone/cargo door.
Clear Parts
The large canopy is cast resin; clear and, although roughly 3/64" thick, certainly acceptable, especially in this scale.
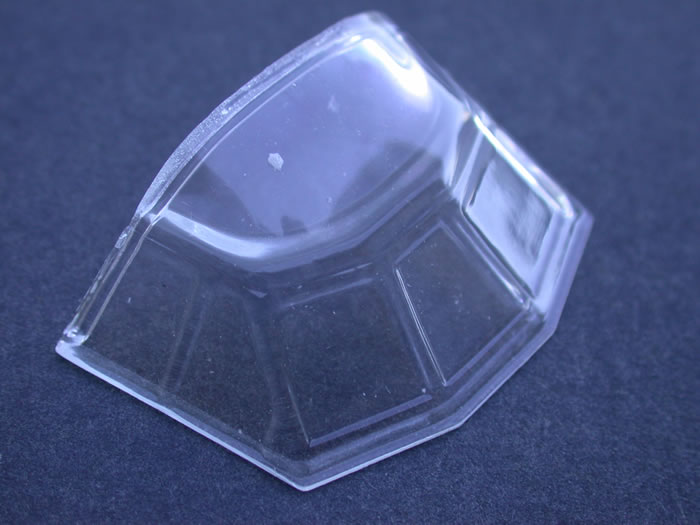
Small wingtip lights, etc., are included, also in clear resin.
Decals
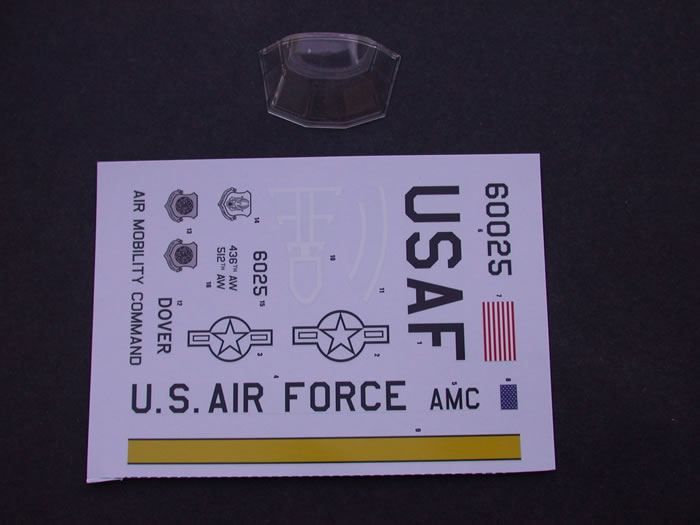
A single sheet depicting a 436th wing (Dover) bird: black insignia/lettering to accompany the dark gray overall paint scheme.
Instructions
The typical Anigrand single B&W sheet, double-sided, with small photos (really small, hard to see in the case of the landing gear assemblies) is all the builder gets for a four-hundred dollar kit! Plus, there is not even a heading on the instruction sheet saying that same is for the C-5. Luckily, just before I relocated the kit components to a larger container and threw the original box away, I noticed that the color pix on the sides of the box cover are the color and decal placement guide! I strongly recommend that the builder have on hand the excellent reference provided by Squadron In Action Series Number 201 “C-5 Galaxy”.
With this ambitious release Anigrand has taken a huge step forward in resin casting quality and is finally running with the “big dogs”. Now, If they can just start working on the little details and (especially) instructions, such as the Ukrainians are doing with their “Amonster” line.
Text and Images Copyright © 2010 by Phil Brandt
Page Created 30 December, 2010
Last updated
30 December, 2010
Back to HyperScale Main Page |
 Home
| What's New |
Features |
Gallery |
Reviews |
Reference |
Forum |
Home
| What's New |
Features |
Gallery |
Reviews |
Reference |
Forum |