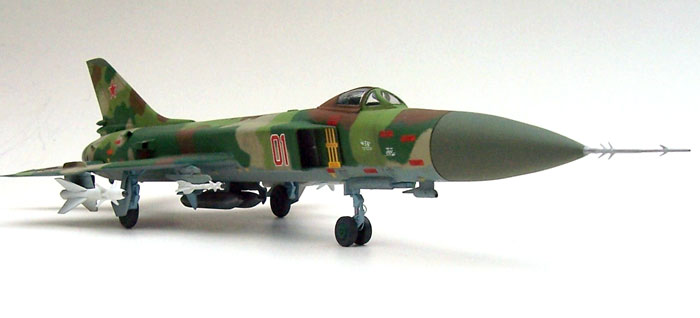
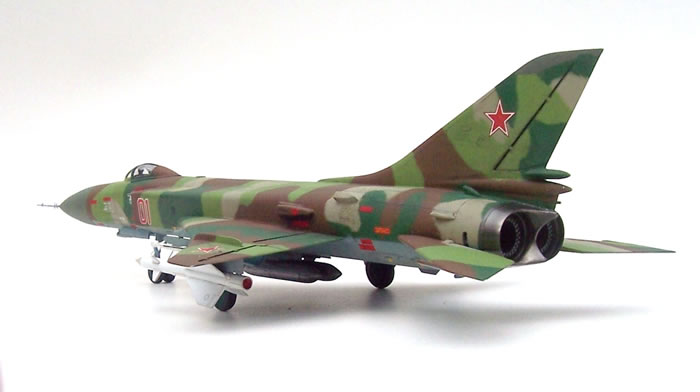
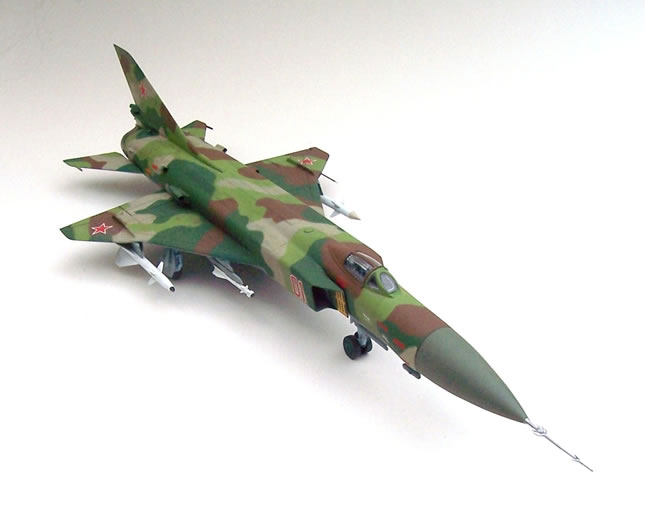
Trumpeter's 1/72 scale
Sukhoi Su-15TM (Flagon F)
by Mark Davies
|
Sukhoi Su-15TM (Flagon F) |

Trumpeter's 1/72 scale Su-15UM is available online from Squadron
Background
In the late 1950’s Sukhoi began work on an interceptor to replace their previous Su-9 and Su-11 designs. The replacement was to be heavily dependent on ground control for interception. This operational aspect was to culminate in an automated data-link interception system enabling a completely “hands off” intercept mission. A variety of airframe and engine configurations were explored until a design known as the T-58 became the prototype Su-15 in 1962.
The Su-15 was assigned the NATO reporting name for Flagon-A and entered service in 1967, replacing not just the Su-9 and Su-11, but the Yak-28 as well. The Su-15UT was an unarmed trainer version and dubbed Flagon-C by NATO.
The Flagon went through a variety of improvements and changes, perhaps the most distinct being the extension of the Flagon-A’s delta wing tips to the cranked delta form associated with Flagon-D onwards. The Su-15T (Flagon-E) had a Taifun radar, but only 10 were built as various problems were encountered with it. The next model was the Su-15TM, or Flagon-F (for a while it was referred to as the Su-21 by NATO). This had an improved Taifun-M radar and new nosecone shape. It also introduced provision for two R-60 close range missiles and two under-fuselage UPK 23-250 twin-barrel cannon pods. The trainer equivalent of the Su-15TM was the Su-15UM, or Flagon-G. Unlike the earlier Flagon-C the G was combat capable.

The last Su-15 rolled off the assembly lines in 1979. Russia’s Flagons were retired in 1993 and the Ukraine’s in 1996. None were exported to Eastern bloc countries, although some are thought to have been deployed to Egypt and flown by Russian pilots in 1972.
Flagons damaged or destroyed three civilian aircraft during their time in service, killing 274 civilians in all:
- Korean Air Flight 902 was attacked over Murmansk in 1978. The airliner survived the missile hit, but two passengers were killed, and the damaged plane subsequently made a forced landing on a frozen lake.
- In 1981 a Su-15 deliberately rammed a Canadair CL-44, killing three people who were delivering arms from Israel to Iran, after it strayed into Soviet airspace. The Su-15 rammed the target because it was close to the Soviet/Iranian border, and would have crossed it in the time the interceptor needed to open the distance for a missile engagement. The Soviet pilot ejected and survived.
- In 1983 came the most infamous incident with the destruction of Korean Air Flight 007, when a Boeing 747 was shot down along with all 269 passengers and crew.
An Interlude and a slight digression….
The Flagon has always appealed to me, in fact I think that it looks like it flew straight out of Thunderbirds (I mean the 1960’s TV show, as in “FAB Virgil” and marionettes that struggle to walk convincingly, not the USAF’s display team).
It’s a good looking plane, that somehow still manages to have the sinister look that cold-war prejudice demanded. As an aside, I feel that most WW2 German planes have the same slightly sinister characteristic to their lines as well. But this could be a biproduct of being English-born in the 1960’s and reading too many war comics. Or maybe it’s just a case of irrational bias where the “opposition’s” planes look a bit evil.

Although in a different way, the Su-15 has a similar brutish all-or-nothing look as the BAC Lightning does. It’s an appearance that takes what could be individually ugly features and combines them into a whole that appears really stunning.
Please excuse this interlude that is unrelated to the plane’s mission, history or design intent. I just thought I would share my motivation for this project. Besides any hands-down-the-trousers-moments over appearance, the name Flagon here in New Zealand refers to a refillable half-gallon jar of draught beer, so it must be a winner!
1/72 Flagons
I’m aware of several other 1/72 Flagon kits:
- Pioneer’s is probably the oldest, and I do recall that the one I once owned was very basic. I read a 1990 build review of this kit by Ken Duffey (alias Flankerman) that was not too critical. The main errors Ken mentioned related to perpendicular rather than canted intakes, and misdirection over the fitting of missile pylons. But I feel that 20 years on most would now view this kit at least as being overly simple.
- There was a Russian vac-form Su-15, but that’s all I know.
- Another Russian company called VES offered an injected kit of the Flagon-F, and this was re-boxed by Gran. I have read a review that showed it to be limited run in nature and a bit crude, although an acceptable model could result.
- More recently A-Model released an Su-15TM, and it seems likely from the reviews I’ve seen that this is the most accurate of the Flagon kits. However it has some fit issues plus indifferent and at times vague instructions. It is generally typical of this brand’s earlier efforts.
Regardless of the forgoing, I decided that Trumpeter’s more readily available and easier to build kit of the Su-15TM would do for me.
The Kit
The kit is clearly and improvement over the old PM offering and the other kits in terms of finesse at least. It has generally good detail and delicate recessed panel lines with a few rivets and fasteners, although these are nothing like Trumpeters RA-5 Vigilante thank goodness. Like some of my other Trumpeter kits, I felt this one could have done with a bit more “meat” to some parts; the fuselage halves in particular seem a bit thin where they join. Decals for a camouflaged and natural metal machine were provided. I must apologise for not being more specific in my description, but the start and finish of this build were more than a year apart.
I was aware of a number of faults and areas for improvement from reading various reviews and modelling forums. The most important aspect requiring correction was the nosecone. A Quickboost replacement took care of this issue, along with a replacement pitot form the same company (the kit pitot’s accuracy and finesse suffer from the limits of injection moulding). I also replaced the tail-fin with a Pavla item. This addressed a missing rearward facing radar that sits above the braking parachute housing on later Flagons.
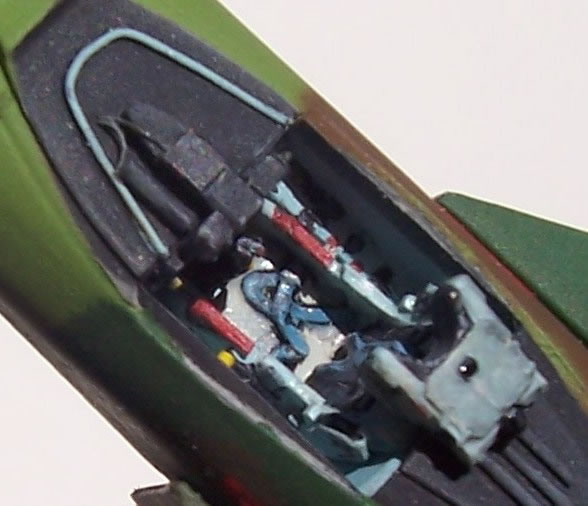
The kit cockpit is fairly basic as supplied, and I seem to recall that the instrument panel was smooth and blank as if intended to receive a decal with dials etc. Suffice to say that there was no decal supplied. I chose to make a plastic card panel with drilled instrument dials using my references as a guide. I also made a throttle and added some windscreen demisting pipes. I replaced the kit’s rather squashed and odd-looking KS-3 ejector seat with a more detailed and generally better looking Pavla resin Item. However this needed to surgery to make it fit. I think this was due to a combination of the thickness of the canopy and the shallowness of the cockpit tub rather than the height of the seat being wrong. As it happens not a great deal of the cockpit interior can be seen anyway.

The airframe build was very straightforward on the whole. Trumpeter has tooled the kit for the two-seat Flagon-G, and consequently there is a rather long piece of cockpit decking to be inserted once the two fuselage halves are joined. The fit is adequate, but not perfect. The seams along this cockpit decking area and the fuselage join line have numerous panels that cut across the join. It’s a good idea to scribe these a little deeper before sanding the join, as the delicate detail can disappear all too easily. Also it is here that some internal reinforcement could help, as the slightly thin and flexible fuselage halves mentioned earlier could crack apart if gripped too tightly during sanding. I also took the opportunity to refine and thin the openings to the various air scoops that are affixed to the aft of the fuselage.
The wings are an easy and trouble-free fit. I have read that Trumpeter have not captured the outboard kink correctly where the cranked delta’s tips intersect with the outboard weapon pylon (the A-Model kit apparently does get this right). I looked at various photos of the real plane, and this area is one with some very subtle shapes. I’m not convinced Trumpeter have captured this as correctly as they might, but I decided that it would be more awkward to fix than I was prepared to contemplate.
Engine intakes have sufficient depth to be convincing enough, and the exhaust nozzles likewise are okay, but purists might wish for more a little detail in this area. The surround to the exhaust nozzles and the intake mouths were the only areas other than the cockpit decking insert that I really had to use much in the way of filler, although the quantities needed were modest in both cases
The undercarriage and wheel wells are about on par for a 1/72 jet in terms of detail levels and all fitted fine. However, I did find that the A-frame-like retraction strut for the nose-wheel was absent from the kit after comparing to photos and detail sketches. I made a simple representation of this from plastic card and rod. One mistake I made, especially for a laden aircraft, is to not compress the main undercarriage legs a little more. As a result my model does not sit quite as nose up as it should. I may correct this at a later date.
My Flagon sat around awaiting paint for about a year. I’m not sure why, but other projects got in the way, and for some odd reason masking off the wheel wells was a task I didn’t fancy. In the end I decided to paint the triple-coloured camouflage scheme suggested in the kit instructions. I have looked at some photos of camouflaged Su-15’s and they tend to have much more dark brown than Trumpeter suggests, but then they were not the aircraft portrayed in the instructions. Right or wrong, I followed the instructions pretty much as I liked the scheme. This may offend some people’s sense of correctness and modelling respectability; but after a year or so I just wanted this model to capture the essence of a Flagon and get it off my work- bench.
My first shot at painting used Blue-Tac masking with Xtra Colour and Humbrol gloss paint mixes. I wasn’t happy with the masking, so the model got rubbed down a bit and was re-sprayed freehand using the same paints. The Trumpeter decals were excellent to use, being commendably thin but strong, and I had no silvering issues that I can recall. The model got a bit of Future mixed with acrylic paint as a wash. I found I could wick some of this mix into a panel line, and then give the area a quick wipe with a cotton-bud or even my finger to get rid of any excess. A bit of chalk pastel here and there toned done the decals and suggested a bit of dirt in places. Some Alclad II and assorted metalisers took care of the hot burny end. However I noticed that Trumpeter’s styrene seemed more sensitive to the lacquer’s solvent qualities than I have found with some other brands of kit plastic.

There are four missiles provided: Two R-60 Dogfight missiles, and one each of the much heavier and longer-ranged R-98MR and R-98MT, with radar and thermal homing respectively. There is a choice of two drop tanks or a pair of UPK-23-250 twin-barrel cannon pods. It might be assumed that two twin-barrel podded cannon in conjunction with rather a heavy load of air-to-air missiles is an unlikely weapons mix for an interceptor. However I read that after the Soviet Union had experienced air-space penetrations by low-flying Cessnas it was decided to carry cannon as well as missiles better suited to downing large bombers and airliners.
My last job was to assemble Quickboost’s pitot. This is a resin shaft with some very tiny PE blades. Quickboost provide a four-piece PE jig that needs to be assembled, into which the resin pitot is to be inserted. The jig included cut-outs to guide where each of the many small blades should go, and these are supposed to be held in place within the jig by small pieces of adhesive vinyl (like the material early after-market canopy masks were made of). Presumably the idea is that the resin shaft is guided into this sort of basket framework holding all the blades, and then super-glue is applied. All I can say is that it’s incredibly fiddley and didn’t work for me. I glued my blades on by eye. Not perfect but good enough for my model cabinet.
The kit can be commended for its fine surface detail, general build-ability and good decals. I for one I am grateful that Trumpeter released this kit, which nose shape aside, is generally a good overall and a big improvement on what went before in terms of detail and ease of build, if not always accuracy.
However, the resin corrections and still less than perfect shape in places make the A-Model proposition look pretty good if you’re prepared to put the work in. The A-Model price is certainly attractive, and I must confess that I’m tempted to get one.
So there you have it – a slightly rough and ready model by me that still has some accuracy issues, and is finished in a possibly dubious colour scheme. But for all that it’s still the deadliest and most awesome looking machine in my display cabinet. Although maybe not for long, as I’ve almost finished my Trumpeter BAC Lighting F-6.
But that’s another story….
Image and Text Copyright ©
2010 by Mark Davies
Page Created 15 July, 2010
Last Updated
15 July, 2010
Back to HyperScale Main Page

|
Home
| What's New | Features | Gallery | Reviews | Reference | Resource Guides | Forum |