Trumpeter's 1/32 scale
P-47D Thunderbolt
by
Mario Riccioni

|
Republic P-47D Thunderbolt |

Trumpeter's 1/32 scale P-47D is available online from Squadron.com
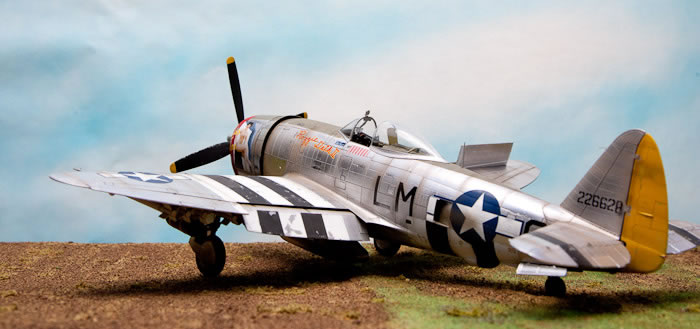
I have always wanted to do an aircraft in a bare metal finish ever since I learned of the availability of appropriate materials through this website. I can think of no better subject to display this finish on than the famed P-47. It is an aircraft that I’ve found intriguing because of it’s ability to dog fight the lighter and more agile Luftwaffe single seaters.
This, as I’ve learned is due first, to the turbo-charged engine, giving the aircraft extraordinary performance at altitude. It’s weight allowed the ability to dictate the terms of a combat action by being able to break away if the going got tough.
The stats display this clearly; only 0.5% of P-47’s produced were lost in combat. As one veteran pilot put it in a documentary I saw, ‘If you wanted to send a photo home to your sweetheart, you took it sitting in a P51. If you wanted to survive combat, you flew a P-47.’
I saw the model images on Trumpeter’s site, and that it boasts some 270 parts, convinced me that this was the one to buy.
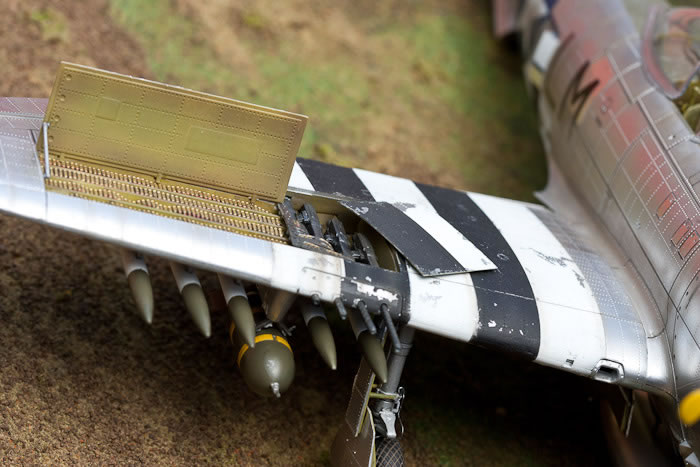
Whilst I found the detail to be extremely impressive along with a huge variety of ordinance options, I found it a most difficult build. The instructions were clear and easy enough to follow, but it left me at times thinking, ‘hang on, how do you put this piece in when you have to put that one in first?’ The color for some components was not specified, therefore requiring research.
Over 100 parts are devoted entirely to the engine, and that became my first point of anguish. You’re given the choice of 2 different caps to go on the cylinder heads, one smaller than the other; each option though, alters the diameter of the engine, but the hoop shaped engine braces that attach to these caps remain the same size. No matter how hard I tried, I couldn’t get the engine bracing to fit properly. I’ll never know if the other caps would have worked better but an image on the side of the box clearly shows that who ever built the display model had the same trouble as I did. Misery loves company! I added the plug leads using fine electrical wire that was already red; no painting! I cut a tiny piece of the shielding of that wire to simulate the plug ends.
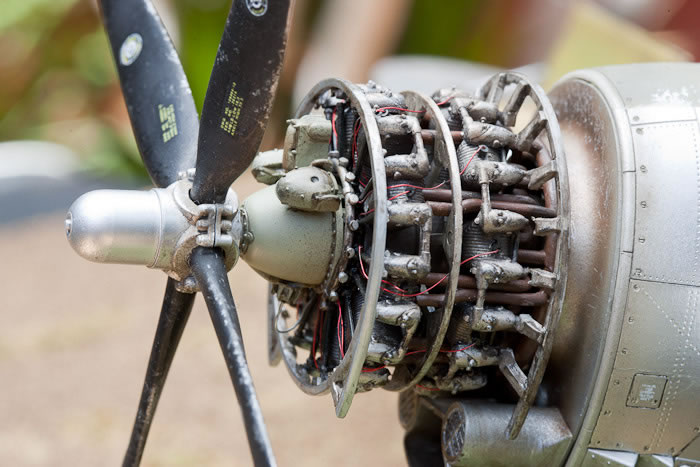
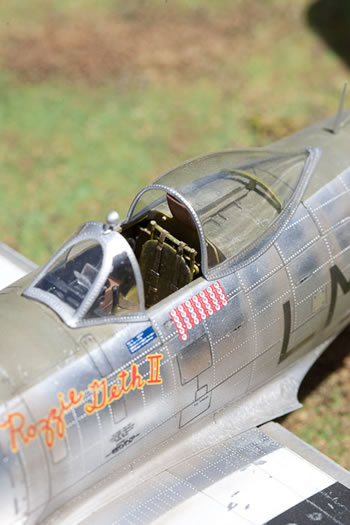
The cowl comes transparent so one can see the engine; a tempting option, but I like to see the final product looking the way it should so I painted it. Even this cowling would not fit properly, demanding many modifications. In the end I got it good, but not perfect. Nearly all the internals come with the kit and go almost from the front to rear.
An exciting prospect for imaginative diorama scenarios where one could display a maintenance scene.
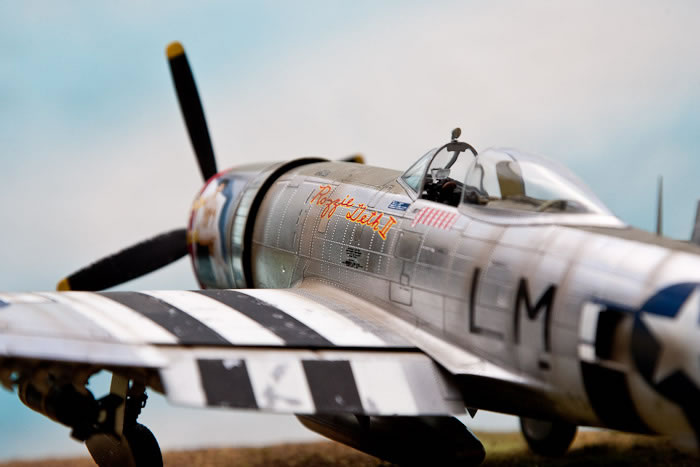
 I did the invasion stripes first, that is after I painted regular silver underneath those stripes, then went to work on paint chipping using scotch tape. After that I masked them up before applying the main coloring. The metal finish was achieved using Model Masters aluminum paint and bare metal foil. The paint is unpredictable. Sometimes I’d get a beautiful finish and other times it would look coarse and horrible without reason. The surface preparation didn’t seem to have anything to do with it. On earlier tests I tried it on both well prepared and totally unprepared surfaces and it made no difference; sometimes it was good and other times it was bad. On the kit itself I had to paint and strip some surfaces several times before I got what I wanted or at least close enough to it. I then polished the surface with a cloth used for silverware; and it magically transforms into a metal finish. I did the invasion stripes first, that is after I painted regular silver underneath those stripes, then went to work on paint chipping using scotch tape. After that I masked them up before applying the main coloring. The metal finish was achieved using Model Masters aluminum paint and bare metal foil. The paint is unpredictable. Sometimes I’d get a beautiful finish and other times it would look coarse and horrible without reason. The surface preparation didn’t seem to have anything to do with it. On earlier tests I tried it on both well prepared and totally unprepared surfaces and it made no difference; sometimes it was good and other times it was bad. On the kit itself I had to paint and strip some surfaces several times before I got what I wanted or at least close enough to it. I then polished the surface with a cloth used for silverware; and it magically transforms into a metal finish.
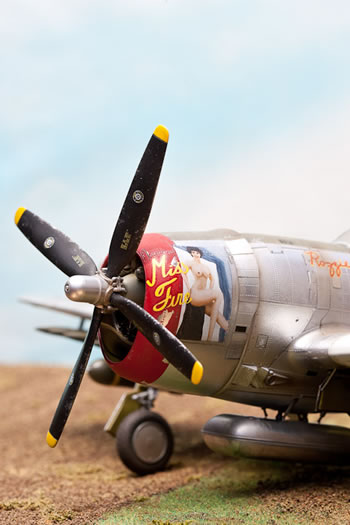
Bare metal foil on the other hand, is a delightful product, so easy to use in fact that I regret not using more of it. I put it on the undercarriage, the belly of the fuselage, some of the removable panels and various other small panels to achieve a slightly different hue throughout the aircraft. At first I was going to set it up as a long range escort, but I thought it would look more interesting as an attack plane and Trumpeter provide a generous selection of under wing stores.
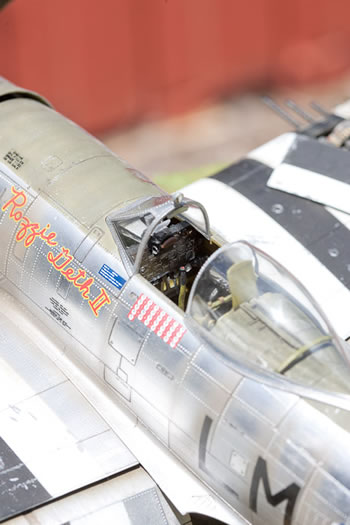
I found 2 problems with the decals. First the instructions are not accurate about their placement. At times it told me to use decals that I did not have and in the end I found an excess that looked to be a part of the version I was doing but couldn’t find a place for them. Could this have something to do with the several different P-47 kits made available by the company and they got a little confused? The second problem is that Mr. Mark Softer does not work on them, no matter how much of it I used and in some instances neutralized the adhesion properties of some decals.
While it might not sound like it, I thoroughly enjoyed building this one, the challenges that it presented and I’d buy another Trumpeter kit despite my criticisms; Their good points do outweigh the bad. Having said this, like the rest of the world I’ve bought and started on the latest Tamiya 1/32 scale Spitfire Mk 9; this is a different prospect, with such great engineering, thought and innovations put into it, they’ve definitely set the standard for things to come in the world of plastic scale modeling.
Model, Images and
Text Copyright © 2010 by Mario Riccioni
Page Created 4 March, 2010
Last Updated
5 March, 2010
Back to HyperScale
Main Page

|
 Home
| What's New |
Features |
Gallery |
Reviews |
Reference |
Forum |
Search
Home
| What's New |
Features |
Gallery |
Reviews |
Reference |
Forum |
Search