|
Revell-Monogram's 1/48 scale
Douglas C-47A Skytrain
by Jon Bryon
|
Douglas C-47A Skytrain |

Revell's 1/48 scale C-47A Skytrain is available online from Squadron.com
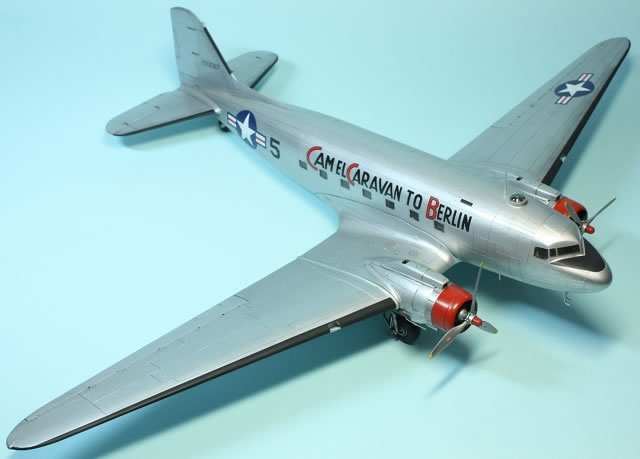
This is Revell's 1998 boxing of the 1/48 Revell C-47A Skytrain in Berlin Airlift markings. No kit has thus far taken me this long to complete; 17 months of slow construction, with a two month hiatus while it was shipped (by sea) from the UK to China.
The primary cause of this slow progress was that, as is my habit, I rescribed the kit. I don't like rescribing, and I'm not particularly good at it, but engraved panel lines are very much a trait of my modelling style. The components were all sanded down and the lines reinstated with an Olfa P-cutter or needle in a pin vise (depending on where the lines were) and a variety of Hasegawa rescribing templates. I made several slips, some of which were corrected, and some not (as you will be able to see in the pictures). In the end I was satisfied, but if I had more patience I could have made a better job of it. Thankfully the kit is moulded in silver plastic, which makes rescribing easier as when the raised lines are removed they leave a darker outline in the plastic.
Once the rescribing was done, I made a start on the interior. This is quite nicely detailed, but in reality, once the model is done, nothing is visible through the small, thick windows. Next time I wouldn't bother painting the interior at all. The fuselage was then closed up around the bulkheads, the wing assembled, and the model packed and sent to China.
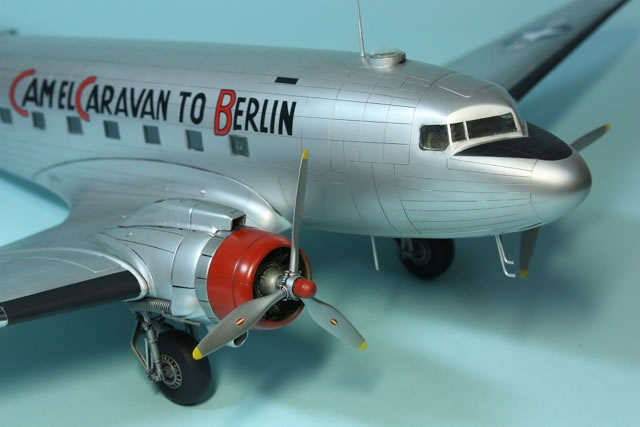
I was impressed that these parts made it intact inside a large packing box. Once I was reunited with them serious work could start on filling the seams and progressing with assembly. The fit of the fuselage is poor, particularly around the nose, with gaps of 1mm or so. Plenty of superglue and Tamiya epoxy filler were used to get a smooth joint and the panel lines reinstated. The windows had already been installed from the inside and fitted okay, but I wanted them smoother. I filled around them with superglue and spent many an evening sanding, polishing, filling, sanding, polishing, etc. The same process was repeated ad nauseam for the cockpit windows until I got fed up and decided to live with the remaining imperfections. One major omission in the modelling world is a clear filler. I don't know if such a thing is possible, but thick superglue can get pretty close.
The fit of the wings to the fuselage was very disappointing, with gaps of 2-3mm all round. For these I used various combinations of plastic card, superglue and epoxy filler, finished off with Mr Surfacer. Eventually I achieved an adequate result, but it still doesn't stand up to very close scrutiny. It was with a great deal of trepidation that I rescribed the lines in this area. Unfortunately, some surface detail was lost that I considered too much hassle to replace; there should be two more 'blobs' on each wing (vents?) in between the fuel filling points. The fit of the tailplanes was fine, requiring just a smear of filler.
This kit really was too big for my work table. It's only as long as a 1/48 Buccaneer, but the wingspan is pretty huge. Whilst being handled the seam along the top of the fuselage popped open and had to be reglued and refilled. Tiresome. I've decided kits can be too big.

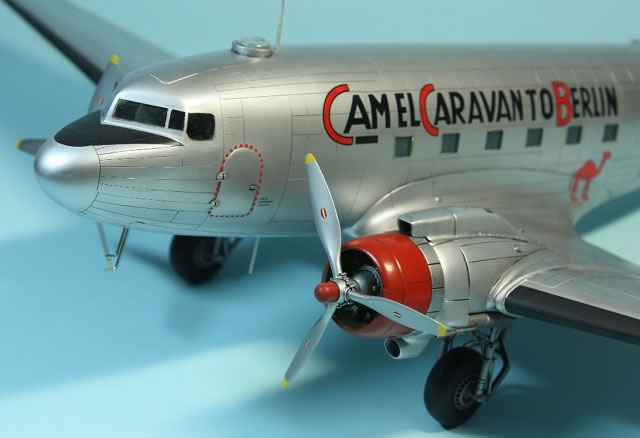
It was at this point I began to pay attention to the details. Thanks to Derek Pennington, I had a photo of the plane I was building to work from, although in black and white. This showed some omissions from the kit and provided some guidance on the optional parts (no guidance being provided in the instructions themselves). I replaced the front tubing under the nose (pitot tubes? antenna mast?) with brass tubing bent to shape; Revell moulded it integral to the fuselage where, of course, it did not last long before being accidentally snapped off. Revell suggest another antenna mast (?) should be attached further back on the fuselage underside; I couldn't be sure but I thought I could see this on the photo, so I made one from brass tube and attached it. Under the rear fuselage should be (at least) two T-shaped structures, which I also made from brass tube and wire (since they're not provided in the kit). An antenna mast was also necessary behind the astrodome, so I used one from my spares box. There's a bunch of other optional stuff provided in the kit that, following the photo, I deemed unnecessary.
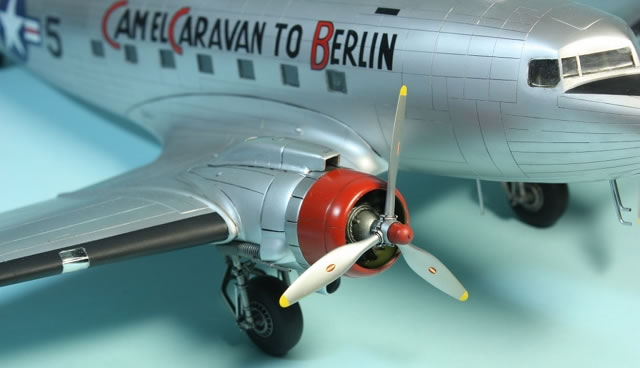
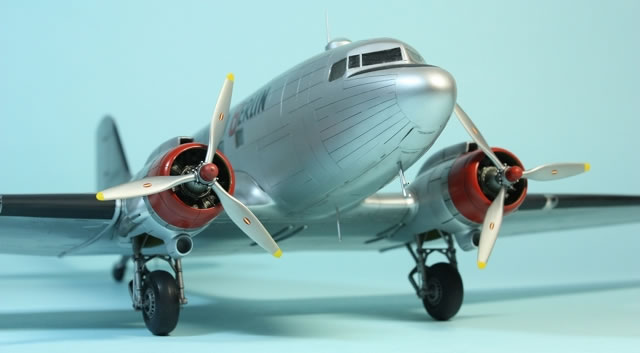
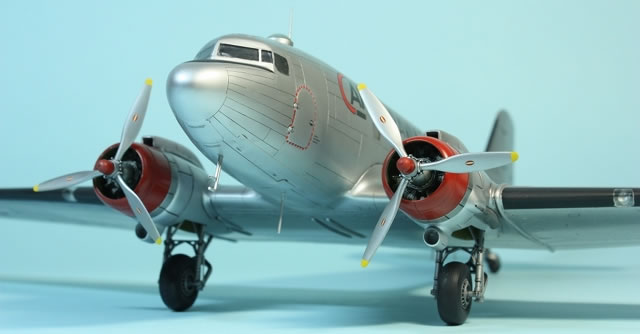
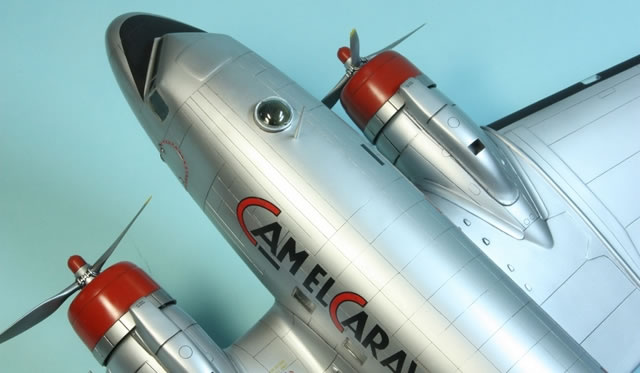
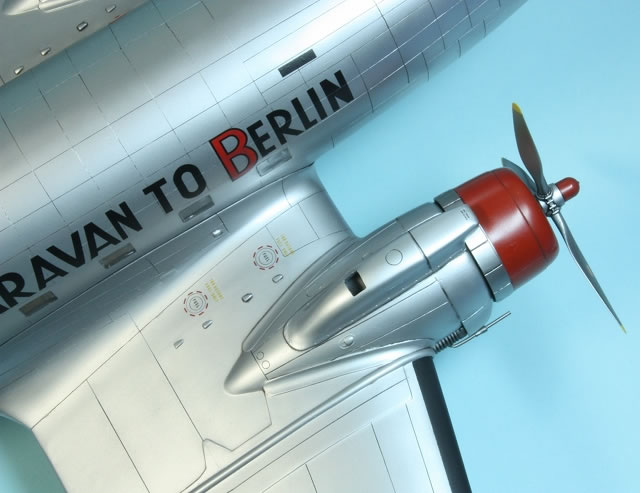
The kit details are adequate. The landing gear is nice, although as I was taking photos the tailwheel strut snapped in half. I need to fix that; I'd recommend reinforcing it with metal. The engines and props are fine and painted up without any trouble. The light covers don't fit too well into the wings, so out came the superglue and a lot more sanding/polishing again. Photos show that the engine exhausts should have some kind of tubular structure protruding forwards alongside the cowling. I fabricated rough approximations of these using brass tubing.
Paint
 At this stage I had a complete airframe making a lot of rattling noises, as one of the pilot seats had come adrift. It doesn't matter; the windows are too small to tell, and it's very dark in the cockpit. I used Gunze Mr Surfacer 1000 to prime the model, being disappointed (as usual) at the amount of lint that appeared in the paint. I wish I could use a spray booth, but that's not possible in the foreseeable future. I spent some time polishing the primer out, but the paint is still rather rough around the wing root area. I think lint in the paint is the most visible weakness of my models at the moment. At this stage I had a complete airframe making a lot of rattling noises, as one of the pilot seats had come adrift. It doesn't matter; the windows are too small to tell, and it's very dark in the cockpit. I used Gunze Mr Surfacer 1000 to prime the model, being disappointed (as usual) at the amount of lint that appeared in the paint. I wish I could use a spray booth, but that's not possible in the foreseeable future. I spent some time polishing the primer out, but the paint is still rather rough around the wing root area. I think lint in the paint is the most visible weakness of my models at the moment.
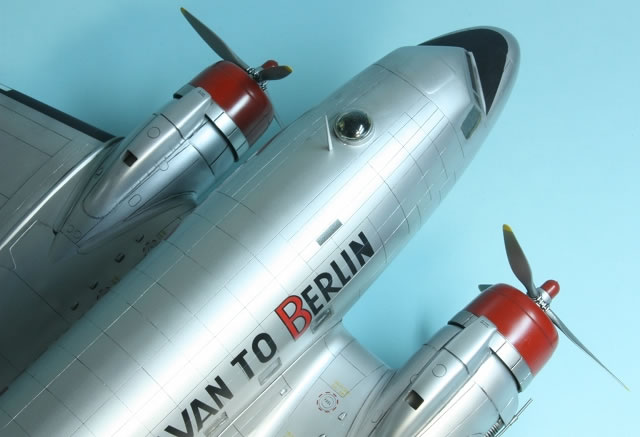
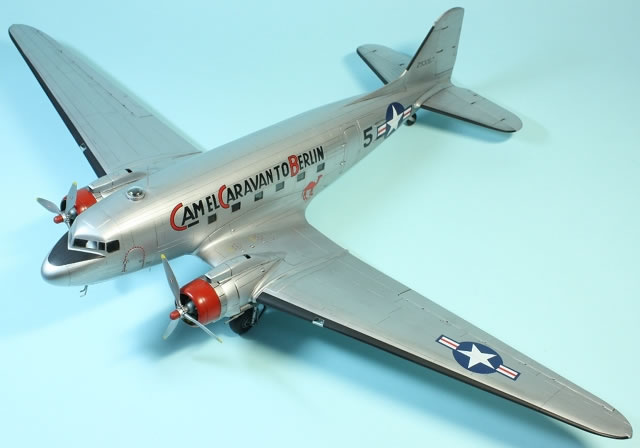
I wanted a little differentiation between the flying surfaces and the rest of the airframe, so once I'd painted the de-icing boots and anti-glare panel, the former were painted in Alclad II White Aluminium, then masked and everything else sprayed with Gunze Mr Color Silver (no.8). The cowlings and prop bosses were painted in Mr Color Insignia Red (no.327). I was pretty sure from the photo that the props were silver, so I painted them in Alcad II Dark Aluminium, just to look a little different. This was all topped off with Johnson's Klear.
Markings
The wash was applied next, with my favourite mix of black oil paint and Zippo lighter fluid. Applying the wash is my favourite part of modelling; I wipe it off using a dry cotton cloth and find that it often gives a 'filter' effect to the finish, which I rather like.
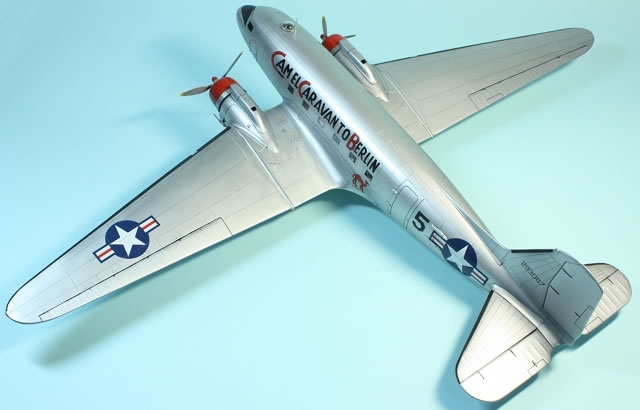
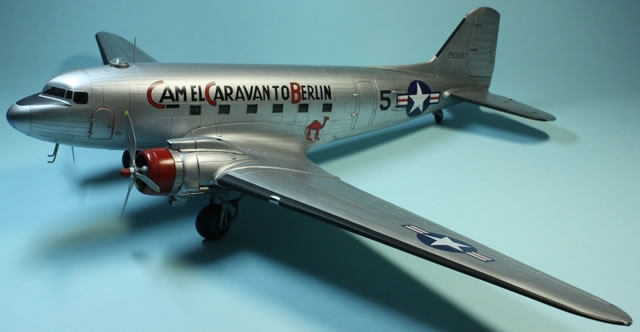
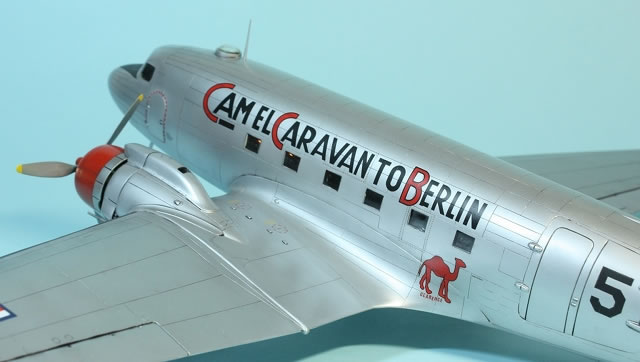
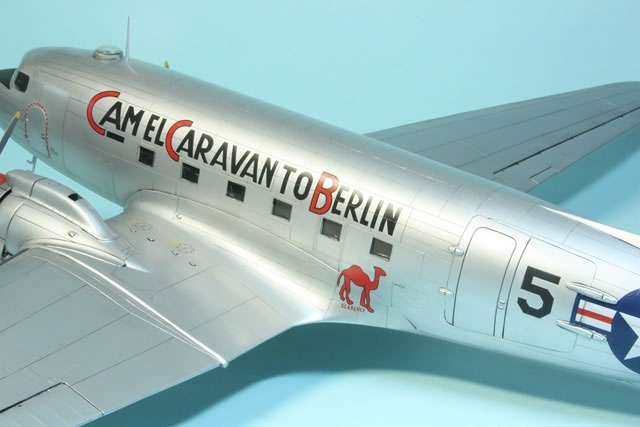
Decals were up next. Reference to the photo showed that the lettering along the fuselage was too big and too uniform; it should look like it was daubed on with a paintbrush. Nothing I could do about that (or, rather, nothing I wanted to do about that), but that's why the lettering looks too close on the port side. Conversely, Clarence the Camel is too small. The number '5' on the rear fuselage should, I think, be black, not red. I filled in the red interior with scraps of black decal. Lots of stencilling is provided; I think some of it is wrong (rudder stencils near the outer wings?) and the diagram definitely has some mistakes. Not much stencilling was visible on the photo, but I like it, so applied it anyway. The red-dashed surrounds on the port side appear to be dimensionally suspect. The national insignia on the fuselage is too large. I am not convinced the starboard side had the 'Camel Caravan to Berlin' lettering, but if anyone knows, let me know!
The decals themselves were great in that there was very little excess carrier film, which is very useful on a silver plane, but not so great in that they were quite stiff and unresponsive to Mr Mark Setter/Softer and Daco Products Strong Setting solution. Microscale Micro Sol did have some effect.
Now I was on the home straight. I used Pollyscale Satin varnish to even out the decals and Vallejo Matt Varnish on the de-icing boots, anti-glare panel and tyres. The antennae (or whatever they are) were all attached and the astrodome set in place (a very nice fit). The cowlings and engines were added along with the props, and with the masking removed, she was finished.
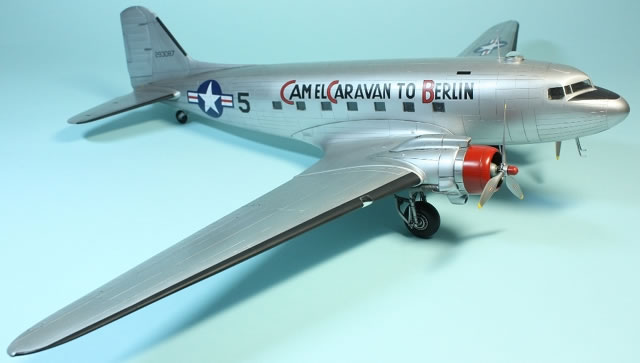
In summary, this is an aging but fairly nice kit. But for me the size and raised panel lines mean I won't be building another one (however tempting an AC-47A might be). Now I have to fix the tailwheel and find somewhere to put it; probably in a box under the bed. Nevertheless, I'm very glad to have finished this and, despite a few rescribing glitches, a rough paint finish, and some ropey transparencies, I'm pretty pleased with the final result.
Models, Description and Images Copyright © 2010 by Jon Bryon
Page Created 10 March, 2010
Last Updated
10 March, 2010
Back to HyperScale
Main Page

|
 Home
| What's New |
Features |
Gallery |
Reviews |
Reference |
Forum |
Search
Home
| What's New |
Features |
Gallery |
Reviews |
Reference |
Forum |
Search