B-58 Engine Upgrades
Lone Star Models, 1/48 scale
Reviewed by David W. Aungst

HyperScale is proudly supported by Squadron.com
This is one of two Lone Star Models update sets I picked up to use in my big Monogram B-58A Hustler kit.
This set was released a couple years ago. I had held off picking up this set until I was ready to actually build the B-58 model. When Mike West at Lone Star Models released a full cockpit set for the bomber, I knew it was time to build it. So, I picked up this engine nacelle update in addition to the cockpit set. Click here to see my review of the B-58 cockpit set.
The Update Set Described
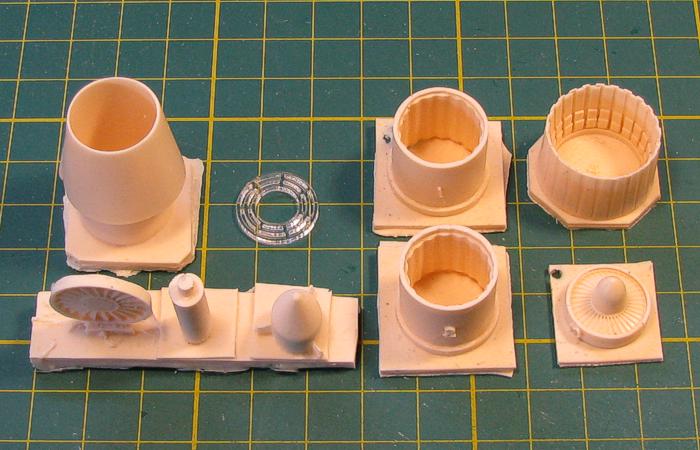
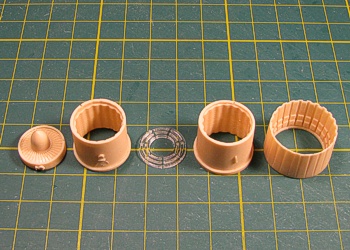
My set came packaged in a plain white box. Inside the box were five zip-lock bags and a folded instruction sheet. Four of those bags held nearly identical resin parts for each of the four engine nacelles. The fifth bag held four laser-cut plexiglass flame holders for inside the engine afterburners. The instructions are one side of an 8.5x11 inch page.
I will start with the instructions. They are simple exploded view drawings of the resin pieces, showing how they are assembled. There is also some text describing special considerations and details, like how to handle the laser-cut plexiglass flame holders. The instructions make no special mention of anything in the set that is specific to either the inboard or outboard engine nacelles, which for the most part is true.
The four bags of resin parts contain nearly identical resin components. The exception is the seamless intake pieces. There are two different designs of this piece. On the inboard engines, the nacelle pylon extends far enough forward to have a portion of the pylon on the engine intake piece. On the outboard engines, this is not the case. The seamless intakes do have this detail and you need to watch which piece you use on which nacelle.
My specific set had three inboard intakes and only one outboard intake. This is not a problem because the small portion of the nacelle pylon on the intake can be sanded away to make it work on the outboard nacelle.
The Seamless Intakes
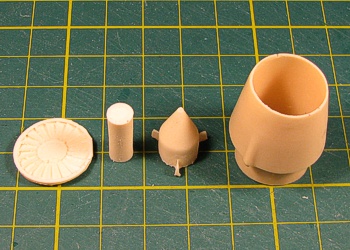
The intakes break down into four pieces -- the seamless intake, the intake spike, a spacer rod, and an engine face. The intake spike has splitters molded to it. My set had bubbles in almost all the splitters that will create issues using the spikes. Since these appear to be copies of the Monogram kit spikes with their backing plates sanded away, I think I will just sand the backing plates off the kit pieces in them instead of the resin pieces. The engine faces are also a bit crude, but considering the view of them you will get at the back of the intake, behind the intake spike, they will work just fine.
Intake Pieces |

Intake Assembled |
My only issue with the pieces is that the seamless intake pieces are skewed, just slightly. I assembled the kit nacelles, first. Then, I cut one of them to receive the seamless intake. I cut a uniform line 1/16th of an inch in front of the forward-most panel line. When I dropped the seamless intake into the opening, the intake lip was not aligned at 90 degrees to the center line of the nacelle. See below.
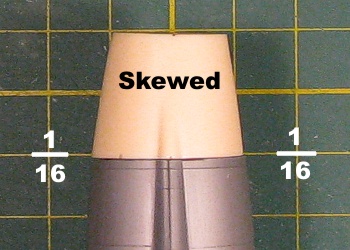
Intake Skew |
Intake Skew Fixed |
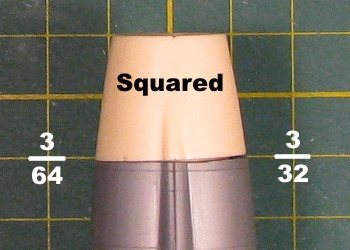
After looking closely at the fit, I found the resin seamless intake pieces are not quite true. The fix is easy. When looking down from the top of the nacelle, you need to cut a diagonal line that is 3/64th of an inch in front of the panel line on the left side and 3/32nd of an inch in front of the panel line on the right side. Doing this, the seamless intake drops in and fits true.
One point to watch on the set is the amount of the intake spike that sticks out of the front of the intake. Without tinkering with the pieces at all, the fit is as seen below. As can be seen in the reference image, the spike is just a tad too far forward. This is easily fixed by taking a little bit off the spacer piece that fits between the spike and the engine face. All the intakes will need to be carefully measured and adjusted individually to get the intake spikes fitting with the right amount of extension in front of the intake lip for each nacelle.
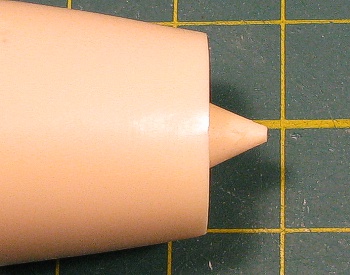
Intake Spike Detail |
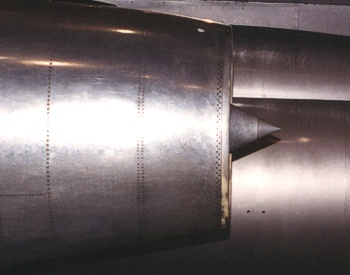
Intake Spike Reference |
Some missing details that are found inside the intakes are three auxilary intakes spaced around the sides of the main intake. The update set pieces have smooth interiors with no hint of these auxilary intakes. I am undecided if I want to try to represent these auxilary intakes using decals or just ignore them. They are far enough inside the intakes to be not too easy to see. I will have to decide quickly, before I start painting on the intakes.

Intake Interior |
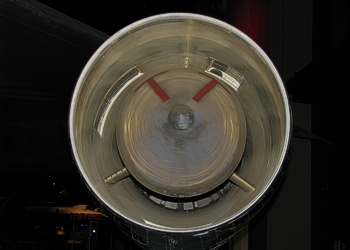
Intake Interior Reference |
The Replacement Engine Exhausts
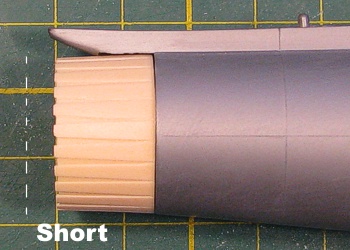
The engine exhausts are also made up of four resin pieces -- the engine exhaust cone, the rear half of the afterburner tube, the forward half of the afterburner tube, and the engine turbine. Add to this the laser-cut plexiglass flame holder, and each engine exhaust is made up a five total pieces. Detailing of the afterburner is nice and the flame holder looks really nice when sandwiched into the afterburner tube. The exhaust cone is a resin copy of the Monogram kit exhaust cone and has the correct number of peddles (24). There is added details on the inside of the exhaust cone to improve it over the kit piece.
Exhaust Pieces |

Afterburner Assembled |
The good news is that the exhaust cone fits the Monogram engine nacelles without any modifications. Realize, the Monogram kit nacelles are 4.5 scale inches too wide at the engine exhaust. They are spot-on for the diameter of the intake and are almost exactly the right length, but the diameter of the exhaust end is oversized. Since the resin set piece is an enhanced copy of the kit engine exhaust, it fits the oversize nacelle with no issue. Monogram also got the right number of eyelid petals on the exhausts, so Mike's parts also have the right number of petals.
The bad news is the resin exhaust cones are copies of the Monogram kit exhausts. Monogram molded their exhausts with the eyelids too short / the cone not deep enough. The exhaust should be nearly as deep as it is around (appoximately), but the Monogram pieces are much fatter around than they are deep. Considering the amount the exhausts are truely visible under the wings on the finished model, this flaw is not that noticable without specifically looking for it.
Afterburner Cone Length |
Exhaust Fit on Nacelle |
|

Afterburner Cone Reference |
Inner Exhaust Reference |
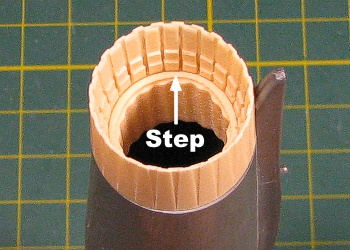
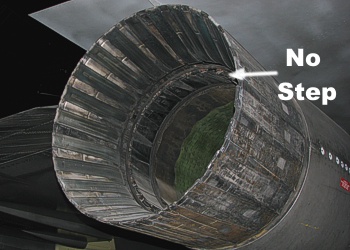
My only other complaint with the engine exhausts is the fit of the afterburner to the exhaust cones. The afterburner tubes appear to be modified copies of pieces taken from an F-4 Phantom or F-104 Starfighter set. As such, their diameter is significantly smaller than that of the exhaust cone. When joined together, there is a noticeable step from the inside of the exhaust cone to the inside of the afterburner. There is no step on the real J79 engine. I think that painted up nicely, this will not be a big deal, but it is there.
Overall, I like this set. I believe it will make a big difference in the look of the engine nacelles on the big bomber kit.
Text and Images Copyright © 2009 by David W Aungst
Page Created 7 December, 2009
Last updated
7 December, 2009
Back to HyperScale
Main Page
Back to Reviews Page
|
 Home
| What's New |
Features |
Gallery |
Reviews |
Reference |
Forum |
Home
| What's New |
Features |
Gallery |
Reviews |
Reference |
Forum |