Eduard's 1/48 scale
Yakovlev Yak-3
by Patrick Grué
|
|
Yakovlev Yak-3 |

Eduard's 1/48 scale Yak-3 Weekend Edition is available online from Squadron for less than $18.00!
Summary
Kit: YAK-3, EDUARD 1/48 Profipack
Kit # 8028
Price: around 20 Euros (from second hand market)
Decals: original from box
Reviewer: Patrick Grué
Notes: miscellaneous additional scratch parts added
Background
Undoubtedly the Yak-3 was one of the most popular Russian propeller fighters during WWII. Its success was not a legend among the pilots who had the chance to fly it. As said test pilot Piotr Stefanovski about the Yak-3 “This is not an aircraft, this is the dream of all fighters”. Its success was in fact due to a long outcome of the previous versions Yak-1, Yak-7 and Yak-9. The Yak-3 should normally be ready before the -7 but the innumerable improvements required by the Russian Aviation Authorities – mainly in terms of weight and performances – delayed its production until June 1944.
Its main features were the plywood wings and stabilizers which gave this aircraft its legendary maneuverability. The Klimov VK-105PF engine was powerful enough - with only 1,300 HP - to propel this light fighter at a top speed of 650 km/h (IAS) at 6,000 m. Its 2,550 kg gross weight gave him a real advantage in combat against its main German adversary, the sturdy FW-190 A8. This later, despite its wonderful BMW engine and formidable armament was almost twice heavier than the small soviet fighter. As a consequence the maneuverability of the Yak was better than the FW-190, assuming similar skills both the German and Russian pilots. However the advantage of a wooden construction was also a disadvantage. The quality and reliability of glued-on plywood sheets was not as good as expected: during the high rate of turn in combat phase the G force was such important that some wood parts of the wings broke or unstuck which was often a lethal issue for the pilot. To this end, some of the German pilots knew this flaw and the most daring pilots took along the Yak-3 in never-ending dogfights. However instructions were given to German units enrolled in the Eastern front to flee or break up combat when encountering the “Teufel Yak-3”. Its production stopped in May 1945 after 4,848 Yak-3 were built with VK-105 engine. Some post-war aircraft were produced with most powerful engines such as VK-107 and VK-108 which could propel the Yak at a top speed of 745 km/h!
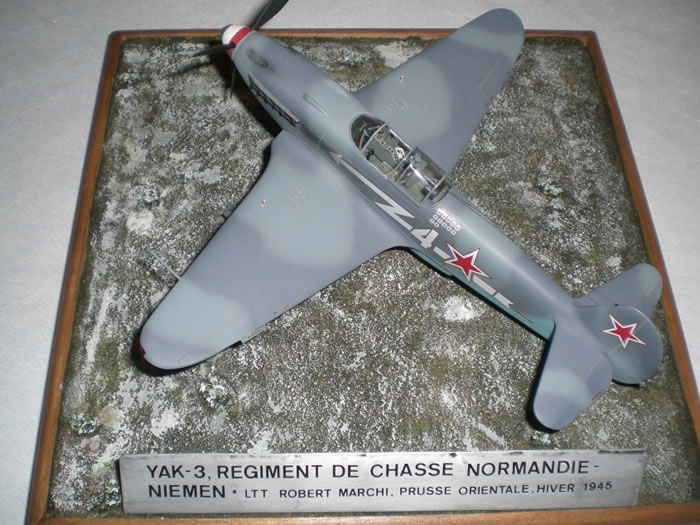
The French version selected by Eduard is in fact the Yak-3 “white 4” displayed in the National Air & Space Museum at Paris- Le Bourget (see original photo) which was flown by flight lieutenant Robert Marchi. As a French modeler I decided to show this fighter in this version. This aircraft flew in one of our most illustrious Fighter Group involved during WWII: the “Groupe de Chasse Normandie-Niemen”. Under Soviet commandment this FG gained 273 air kills thru 5,240 missions on the Eastern front until the end of the war. As a counter part, 42 pilots lost their live in action among the 96 pilots enrolled. Some pilots were awarded “Hero of the Soviet Union” and many other glorious Russian medals and awards. When war was over, Staline himself offered the 40 Yak-3s to their pilots as a gift for contribution to the Patriotic War!
Nowadays this fabulous fighter is coming back among the airshows worldwide. Some pilots and collectors rebuilt their Yak-3s from original structural parts available in museums. They fit their aircraft with an American V-1710 Allison engine instead of the Russian Klimov engine which is no more airworthy since a long time. Some of them have the original wooden wings; others are built all-aluminum. I saw one of these warbirds at the Duxford airshow (UK) in July 2008 and I can confirm that its maneuverability is not overrated.
Eduard's 1/48 scale Yak-3
Particular attention should be taken by modelers if they try to check the dimensions of this model kit (which represents the Yak-3 fitted with VK-105 engine) with the ones of a full scale flying replica. The flying replicas fitted with Allison engines are similar to the original post-war Yak-3 fitted with Klimov VK-107 engine with some minor differences such as the air intake in front of the windshield. When compared to the early versions (VK-105), the cockpit is shifted 0.40 m rearward because of the weight & balance recalculation for the new engine installation. Furthermore these flying replicas have sometimes the wings of the Yak-11 which are 97% similar to those of the Yak-3.
When opening the box this kit seems an easy model to build despite the very small photo-etched parts it includes. There are 51 parts in plastic including the two canopies (open or closed position) protected by bubble wrap, and 54 parts for the PE sheet. Option is given for two flattened wheels in resin. As usually in Eduard productions there is a film sheet for the instrument panel and a pre-cut sheet for the canopy masks. The decal sheet is nice and gives four marking options. The instruction sheet is clear but a tricky step may be avoided before gluing the cockpit consoles (see construction). Some photos in color of a flying replica are printed on a specific sheet for additional details about wheel well and air intake if needed. As only drawback I could say that the panel lines are a bit large but this is not important as this aircraft does not have many of these. The thickness of the wing trailing edge must also be reduced. However the main dimensions are accurate if compared with my paper sources.
I started as usually with the cockpit at steps #1, 3 and 4. The real problem is the numerous throttles and cocks in PE to glue onto the consoles. You need patience and skill here. The seat belts are nicely drilled and give a realistic impression when painted. Exhaust pipes must be drilled to be more realistic.
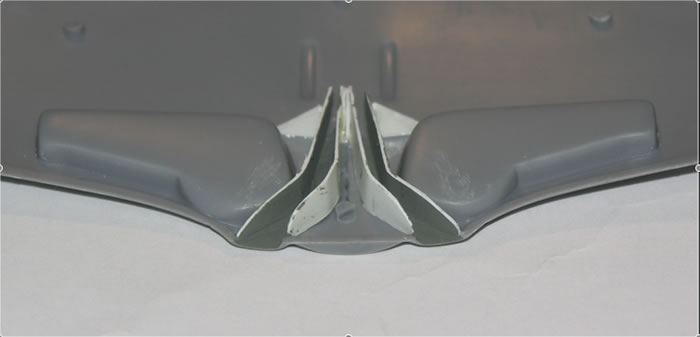
I modified the air intakes at step #2 by adding interior details such as air ducts in sheet styrene
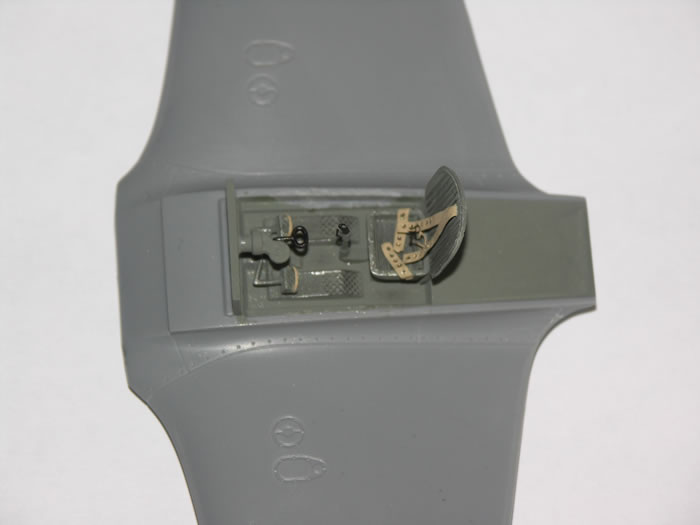
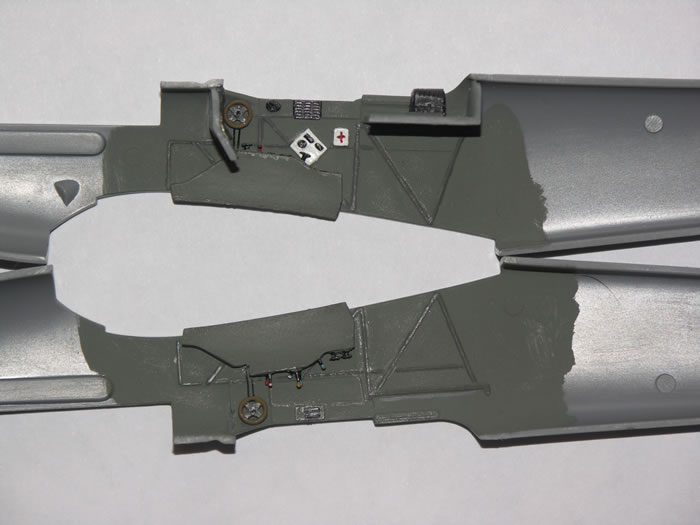
The step #5 suggests gluing LH and RH consoles on the cockpit floor which is molded with the wing upper part. I advise not doing that this way because the consoles could not fit correctly when the fuselage halves will be glued on the wings; a gap is possible within the fuselage halve and the console. To my mind the best way is to glue consoles directly onto the fuselage halves in step #6 (see photo “Yak3-fuselage halves”).
Cockpit interior – as well as wheel wells - was painted in grey-green using Humbrol 31 enamel with a final dry-brush of silver powder to give a metallic aspect. The seat belts and rudder pedal belts are painted in beige
The instrument panel needs a sheet styrene glued onto the rear side to reinforce it, and a white paper sheet within the film and the PE panel to lighten indicators and needles. In order to have the best fit between this panel and the fuselage, I preferred gluing it onto a fuselage halve instead of gluing it onto the consoles as indicated in step #6
Then steps #7, 9 and 10 (wings, fuselage, stabilizers, propeller and canopy) come easily straight forward. I chose to fit the elevators in down position; the cut out of these parts is easy. I reworked the aileron and rudder tabs using metallic parts from the PE sheet to be more realistic. I glued the engine cover onto the fuselage assembly in steps #7 instead of step #1 after including sting needles for the two 12.7 mm machine guns.
Step #8 – the last one for my construction - is dedicated to the landing gear. You need also patience and skill here because the brace struts of the legs and doors are made in PE and they are fragile though
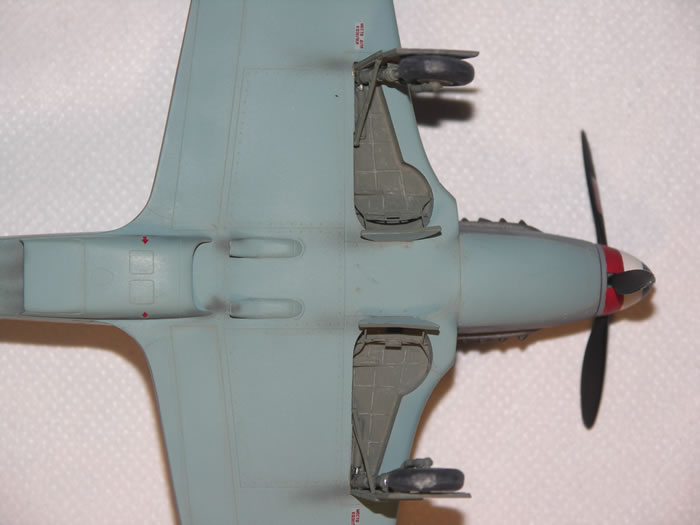
I chose to display the two air exhausts underneath the fuselage in open position as it is usually the case when the aircraft is on ground. They are molded in closed position. If doing this way, you need to build two little scoops in aluminum sheet.
As usually I added some parts not included in this kit such as the brake wires for the L/G legs, the two L/G position indicators (red/ white pins) on the wings and the antenna wire.
I started to paint the lower surfaces in Russian “light blue” with my airbrush using enamels. To do this I mixed 10 parts of Humbrol 65 light blue with 3 parts of Humbrol 89 middle blue to reinforce the Russian “light blue”.
 The upper surfaces were sprayed using Testor enamels. I started to spray the upper surfaces with T-1721 medium grey, and then I mixed one part of T-1721 with one part of T-1723 gunship grey for the camouflage schemes. The result gives two shades of grey which match with the NASM original model. The upper surfaces were sprayed using Testor enamels. I started to spray the upper surfaces with T-1721 medium grey, and then I mixed one part of T-1721 with one part of T-1723 gunship grey for the camouflage schemes. The result gives two shades of grey which match with the NASM original model.
The decals are easy to apply but are a bit gloss. It is not a problem if over sprayed with a matt varnish. However there is a small mistake with the two white arrows on the fuselage sides. They must be lowered as regard of the red star.
As usual, I weathered my model with smoke and oil marks using a mixture of black/ brown acrylic paints airbrushed. The panel lines were weathered using a mixture of light grey and water, and the wheel wells were dry brushed with a lighter shade of grey-green.
The model is displayed on a typical winter diorama which shows this aircraft when moving thru Northern Germany near the Baltic Sea in January/ February 1945. The frost was made using white acrylic paint.
This Eduard kit is worth the effort to be built if you want to have this famous Russian fighter in your display shelf. The value for money is terrific. At this time, this is the most accurate Yak-3 available in the market unless Tamiya and/ or Hasegawa decide to launch their own Yak-3…
References:
- Yak-3, Eduard 1/48 Profipack, Scott Van Aken review, Feb. 2007
- Encyclopédie de l’Aviation, Ed. Atlas/ Pilot press Ltd, #176
- Musée National de l’Air et de l’Espace, Aéroport du Bourget
- The “Normandie-Niemen” official Web site
Images and Text Copyright ©
2009 by Patrick Grué
Page Created 14 December, 2009
Last Updated
14 December, 2009
Back to
HyperScale Main Page

|
Home
| What's New | Features | Gallery | Reviews | Reference | Resource Guides | Forum |