Realistic Model Painting
It’s Not Like Painting a House
by Rafe Morrissey

HyperScale is proudly supported by Squadron
A fellow member from my model club asked me to write an article summarizing a painting demonstration I gave earlier in the year. What follows are some observations on painting models. The method described is a synthesis of techniques that I have gleaned from photos and articles of some truly great modelers including Floyd Werner, Jr., Brett Green, Chris Wauchop, Andrew Dextras and Ian Robertson. I claim no authorship over the following techniques, but my hope is that by describing my own journey to awareness of how to approach realistic model finishes, it will help others more easily grasp the path to a more satisfying paint job.
Before I begin, I would humbly offer the following observation: “Painting a model is not like painting a house.” I say humbly, because as obvious as it sounds, I have only been able to put this reality into practice in my last few builds – after some 34 years of trying. Part of the problem is that from an early age, we are trained to approach the process of coloring in a very rigid and uniform way.
| Realistic Model Painting Techniques |
The first art tool most kids use is the crayon which is designed to apply areas of uniform color. All we are encouraged to do is keep within the lines. A bit later, we are introduced to comic books and the Sunday funny pages which reinforce a very limited depiction of reality with bold solid blocks of color. Over time, our brains lose the ability to see what is really in front of our eyes and begin to substitute symbols for recognition rather than expending the effort to reflect the nuances of whatever object we are looking at.
Unless we have an opportunity to take an art class, this process of seeing in symbols becomes ingrained and unconscious. Ask the average adult to draw a person and they most likely will produce a stick figure. Add to it that when we paint a house we reinforce the notion that “painting” equates to applying large areas of uniform color. So when we approach the task of painting a model, our natural instinct is to paint it the specified color such as OD Green, and then we are perplexed when it doesn’t look “real.” The reality is that close observation of wartime photographs reveals that the elements and hard use impart a variety of different colors and textures to painted surfaces. So, the trick is to somehow simulate what is actually there as opposed to what our eye is trained to let us see.
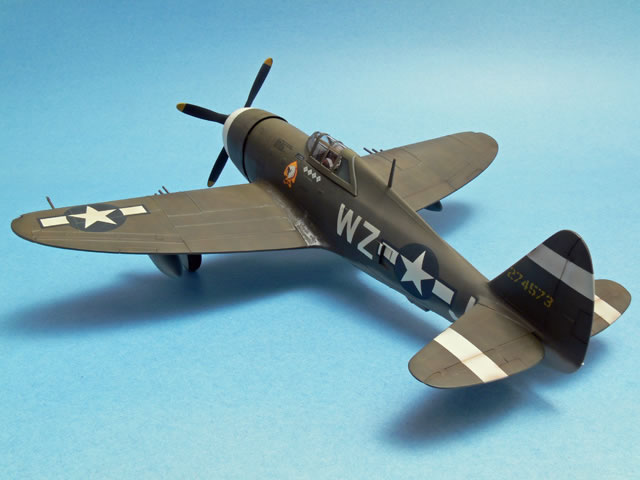
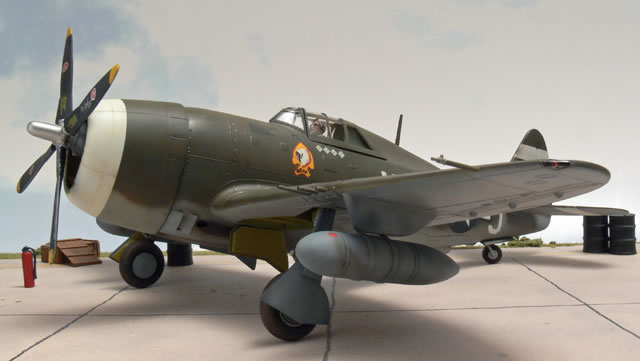
The following techniques provide an overview of how to achieve a more realistic finish. With practice and careful study, you can utilize them to great effect to improve the look of your models. I have intentionally chosen for this demonstration the old Hawk/Testors 1/48 P-47D. I hope to show that with quality construction and careful painting, even the most basic kit can be turned into a very pleasing replica. The main thing I want to emphasize before we begin, is that this is a multi-layer process rather than the “2 coats and you’re done” approach used in house painting. There is a depth to realistic finishes that can only be achieved by building up layer upon layer of paint and weathering effects.
Step 1: Create a Canvas
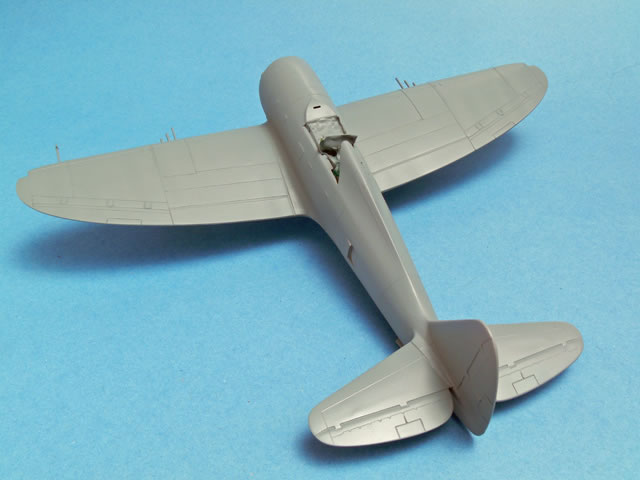
One of the most important steps in achieving a realistic finish is to start with a good basic coat of primer. Of course, this is after you have taken care of filling and sanding all of your seams and replacing lost panel lines. A good coat of primer will reveal any remaining flaws from your earlier work. Once these have been fixed, re-prime the repaired areas so you have a uniform surface to paint on. [Primed.jpg] Another benefit of priming is that it creates a surface with a bit of “tooth” to it. Most airbrushes were originally designed to apply ink to paper. Under a microscope, paper has a texture to it that prevents the paint from running when it is applied. A good coat of primer simulates this texture and will help you get good results in the subsequent steps.
For this step, I recommend using a good quality single action airbrush. Single action airbrushes are designed to lay down large areas of coverage and I find it easier to perform this task than with a double action brush which is really more of a detailing tool.
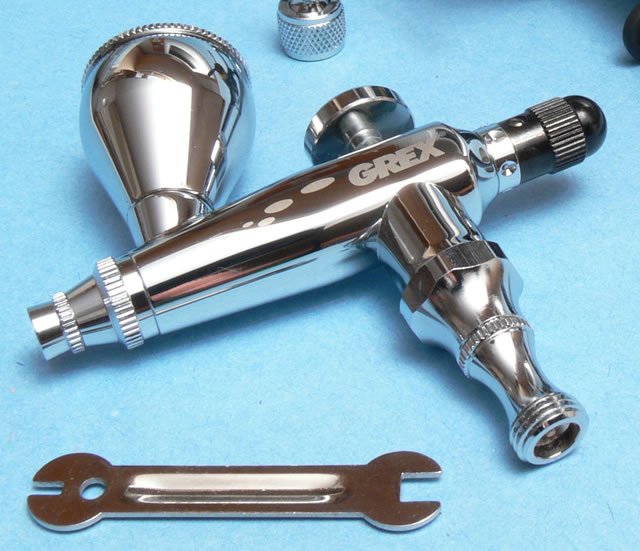
The Grex XA is a great single-action airbrush and is ideal for this task.
Step 2: Set a Tone
The next step in the process is to paint the entire model flat black. The purpose of this is to ultimately provide a sense of depth to your finish. Many modelers advocate pre-shading panel lines. While that technique can sometimes provide pleasing results, I have concluded that post shading is a better technique for panel lines. We’ll touch on that shortly.
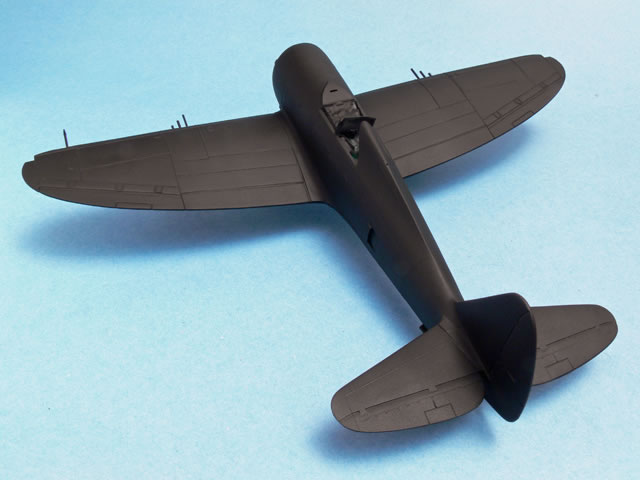
For now, use the single action airbrush to lay down a nice even layer of flat black paint. In this example, I used Tamiya acrylic paint.
Step 3: Diffusion Painting
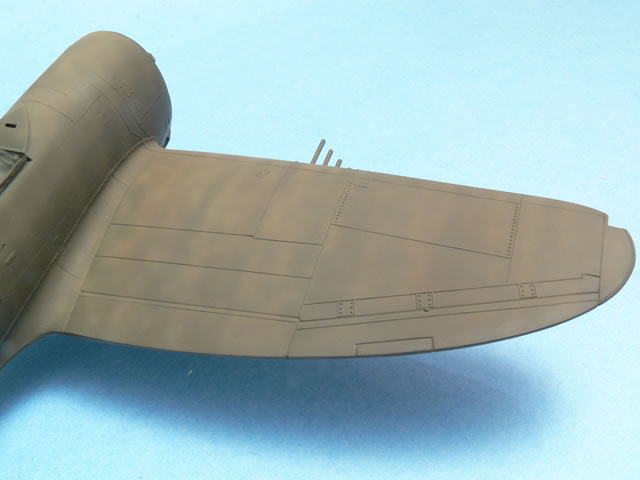
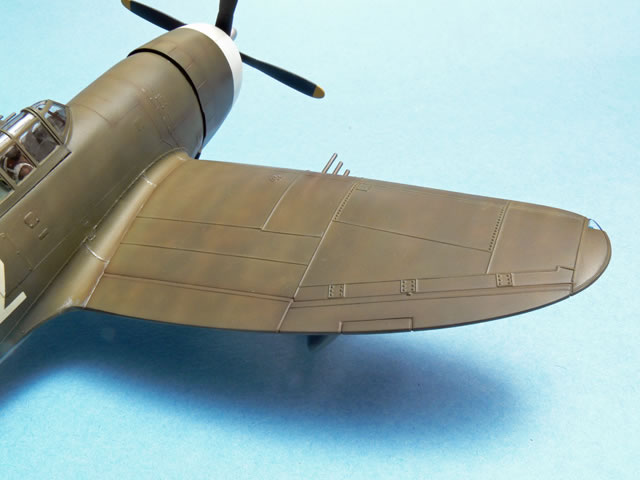
Some time ago I came across a beautiful P-47 on the Web by Andrew Dextras. In his accompanying text, he mentioned a painting process he called “dual diffusion.” It has taken me a while to figure out what he meant. I have concluded that it describes the method of applying the final color shades. Rather than approaching it as though you were painting the real subject in which case you would want to apply and even and fully opaque layer of paint, for purposes of painting the model, we want to lay down a “diffuse” semi- transparent layer of paint. In addition, the method of application is different. Rather than using broad overlapping strokes, the best method is to use a tight small pattern randomly applied leaving slight gaps in the coverage where the black base coat shows through a bit. The best way I have heard it described is to think of painting a German WWII squiggle camouflage but keeping it much tighter so the gaps are much smaller and subdued. To even things out, you can go back over the area with a wide overspray of the base color.
The next step is to add a second diffuse layer (hence “dual diffusion”) of the base color lightened with white. In the case of the OD green for the P-47, I also added a little yellow. This replicated the bleaching effect of the sun. This layer is applied the same as the first with no regard to panel lines. Some modelers suggest focusing on the center of panel lines, but this often creates the effect of a patchwork quilt. I do tend to focus on areas most exposed to the sun, however, such as the tops of the wings and tail planes and the upper portion of the fuselage.
I also apply thin streaks of the lightened color in the direction of the airflow over the wings (i.e. front to back). Sometimes, I go the entire width of the wing and others only part of the way. I also paint streaks from the top to the bottom on the fuselage sides to suggest the effect of rain running down. Finally, if the aircraft being modeled had fabric control surfaces, at this stage I will mask them with Post-it notes and lighten them. The P-47 had metal control surface so it wasn’t necessary in this particular case. I then reload the airbrush with some of the base color and apply streaks in the same areas to create a more random and uneven effect.
Depending on how starkly you have applied these techniques, you can mute the effects by applying a thin mist of the base color. Keep in mind, however, that the subsequent clear and flat coats will tone down all of these effects considerably, so don’t be too timid. You can always go back at the end of the build and smooth things out if necessary. It is a little difficult to capture each of these stages with a camera, however, this shot shows what the cumulative effect should look like.
A good quality double action airbrush such as the Grex XN is the optimal tool for these tasks. You can really take advantage of the control and precision these instruments provide at this stage.
Step 4: Post Shading
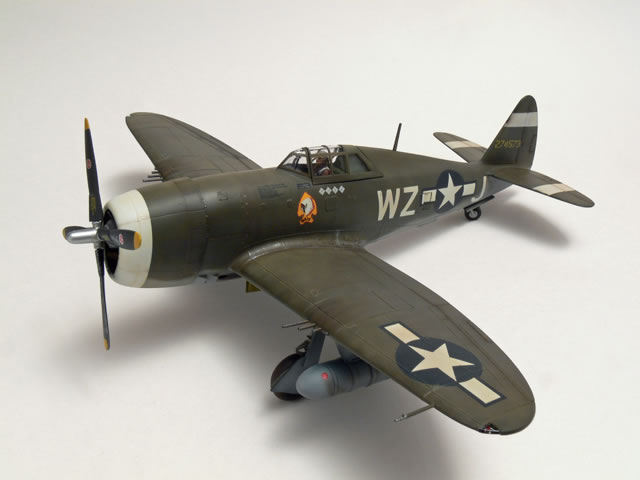
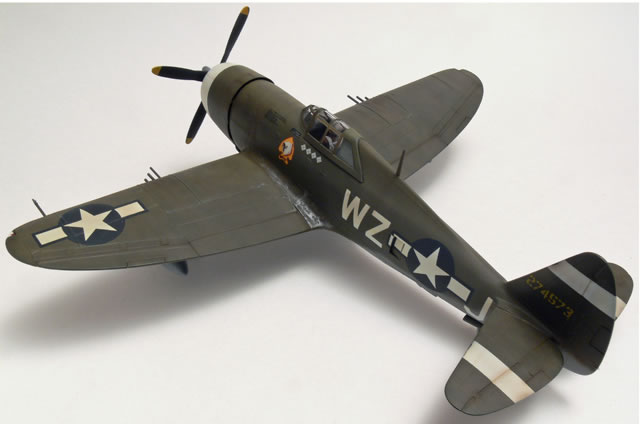
You will recall that earlier in the article, I indicated that I refrain from pre-shading panel lines in favor of post shading them. Now is the time to perform this task. I use a very thin mixture of Tamiya XF-64 Red Brown and XF-2 Flat Black. Only two drops of each color are required. I then add a large quantity of Tamiya thinner to produce a very thin translucent mix. Using a double action airbrush, I apply an extremely thin line over the panel lines and control surfaces I wish to accentuate. I focus heavily on the panel lines around the engine area and wing gun access doors. The paint should take several passes to leave a visible line. This helps to keep from overdoing it. Some practice on scrap plastic is definitely recommended. I also apply this mix in natural shadow areas such as the intersection of the wing and fuselage and around prominent raised details. I also applied a little bit of this color along the trailing edges of the white bands.
Finally, I add some random streaks and squiggles of this mix across the surface of the wings and along the demarcations between camouflage colors to soften them.
Step 5: Other Effects
The steps outlined above are all that are necessary for providing a realistic looking finish with an airbrush. There are a number of other techniques that are necessary to complete the effect. In the case of the P-47, a filter of Yellow Ochre oil paint was applied over the whole model after decaling over a clear gloss coat to simulate dust. This also toned down the white in the decals, although in retrospect, a more tan color might have been a better choice. After an overall flat coat, I use a Berol silver Prismacolor pencil to apply areas of chipped natural metal along the wing roots and on the wing access panels. I went over these areas with a bit of the base color to add “reverse chips” to the wing roots to better represent the random manner in which paint is worn from these areas.
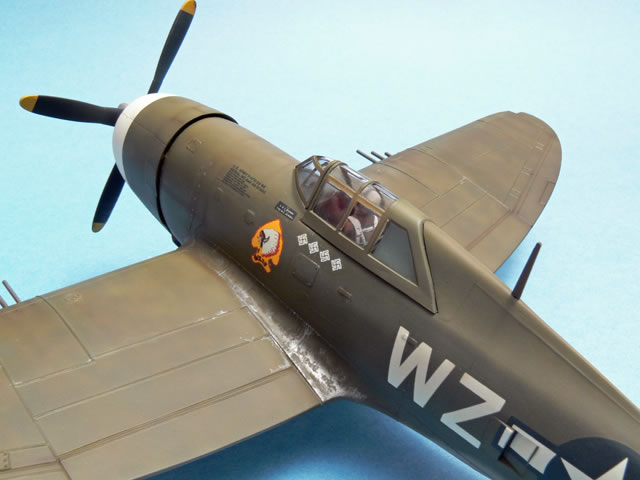
Exhaust stains and oil leaks were simulated with a combination of airbrush using the black-brown mix and oil paints and a fine paint brush.
As you can see, a convincing paint finish requires a number of steps in proper sequence.
It’s kind of like a fine French pastry with many layers. With the investment of a little time, judicious use of these techniques and careful study of reference photographs to really see what is there, however, you can take the realism of your models to a whole new level.
With care and a little practice, I think you will find the results well worth your time.
Happy Modeling!
Model,
Text Copyright © 2008 by Rafe Morrissey
Page Created 12 February, 2009
Last Updated
12 February, 2009
Back to HyperScale
Main Page |
 Home
| What's New |
Features |
Gallery |
Reviews |
Reference |
Forum |
Search
Home
| What's New |
Features |
Gallery |
Reviews |
Reference |
Forum |
Search