|
Tamiya's 1/48 scale
Focke-Wulf Fw 190 A-8/R2
by Ron Petrosky

|
Focke-Wulf Fw 190 A-8/R2 |

Tamiya's 1/48 scale Fw 190 A-8/R2 is available online from Squadron.com
The Tamiya Fw 190 A-8/R2 Item 61095 and Eduard Item 49348
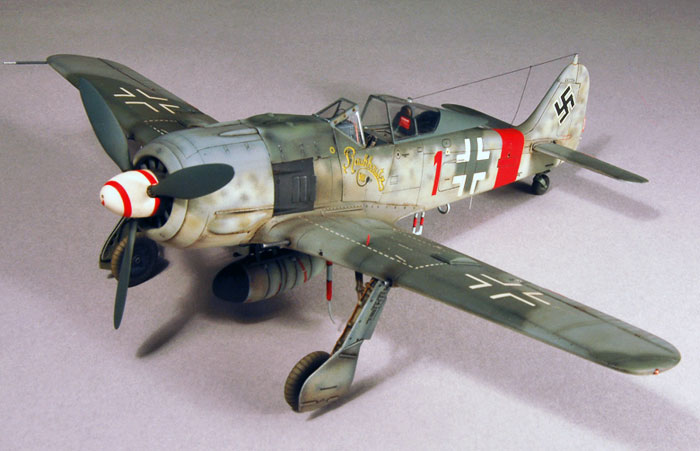
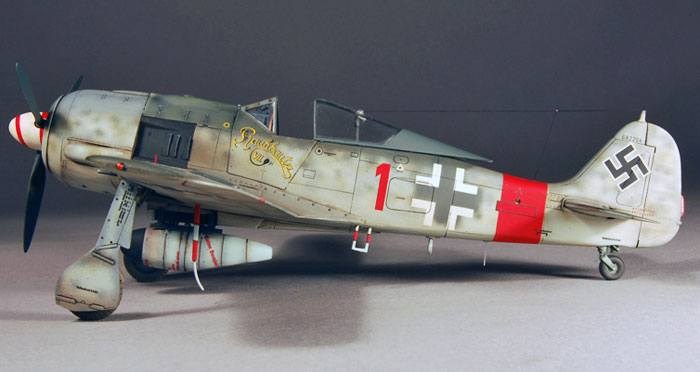
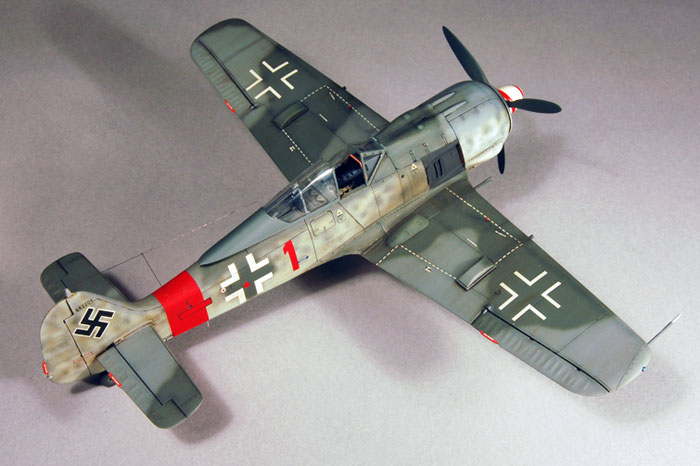
I have wanted to build a replica of Leutnant Klaus Bretschneider’s Focke-Wulf Fw 190 A-8/R2 of JG 300 for some time. For me there is something aesthetically pleasing about the contrast of the grey-violet and grey-green of the RLM upper camouflage against the vivid red of JG 300’s Reich defense fuselage band and Bretschneider’s “Rauhbautz VII” personal markings. Enter the Tamiya Fw 190 A-8R2 in my favorite scale (1/48), which included the markings for Bretschneider’s fighter and the add-on cockpit armor plate for the fuselage sides.

Also enter the Eduard color photo-etched set for this kit and I realized it was time for the build. Having recently completed two Eduard Fw 190 kits I thought the Tamiya build would be a relaxing, easy project where I could concentrate on practicing and hopefully improving my painting and weathering skills.
Well, it would have been had I just stuck to the Tamiya kit!
Others have written about the Tamiya kit so I’ll just concentrate on my build notes.
First, I wasn’t sure about the stick-on armor included in the kit. My concern was not that it wouldn’t work at first but how long the adhesive would last before the panels would start separating from the plastic. I also worried about how they might hold up to my weathering technique, which includes applying oil paint to the panel lines and wiping this away with a rag, moistened with thinners.
The Eduard photo-etched set for the Tamiya kit included the armor panels in etched brass with better relief but I wondered how they would conform to the contours of the fuselage. I rolled the backside of the panels with the smooth end of a large drill bit on a hard rubber mat and gently curved the panels. I then offered the panel up to the Tamiya fuselage and with but a little pressure the fit was almost perfect! A bit of Zap-a-gap on the edge of a curved X-acto blade applied to the edge of the panel against the plastic and done! Just make sure the drill bit you use to roll the panels doesn’t have any chuck burrs on it. The first one I used had one and the Eduard brass panels are so thin the burr left a dimple in one of the panels that I had to sand and burnish out.
The Eduard set also includes a replacement instrument hood underneath the windshield. Using this part requires that you cut away the Tamiya hood sections. If I were to do this project again I would not use this replacement part and just use the Tamiya fuse sides as is. Except for some minor seam work that you save by using the Eduard part I don’t see the benefit of the Eduard part for all the work. There are some really nice etched and acetate gun sight parts in the Eduard set that will work just as well on the Tamiya hood. The Eduard color cockpit parts are fantastic! They just take some time and patience to assemble. The whole tub and all the interior parts except the Tamiya seat and stick are etched parts that need to be folded, assembled (some painted) and installed.

If you are going to use the Eduard etched tail wheel detail parts (nice!) make sure you install the tail wheel before you glue the fuse sides together. It is impossible to install the tail wheel with the details afterwards. The protrusion of the clear pulley assembly underneath the Tamiya rear canopy section interferes with the Eduard etched headrest support structure. I scratched the canopy slightly trying to trim this clear protrusion down. Tilt the headrest forward more? Lastly, you may need to trim or sand down the etched ribs added to the main gear bays as on my set the unmodified ribs were a bit high and interfered with the wings joining without a gap in the rear of the gear bay.
I opened up the outboard 30mm shell ejection ports. I also used a spare set of Eduard wheels as I’ve read that the Tamiya tires are undersized. I think the Eduard wheels look a bit thin though.
 I used some of my dwindling stock of Aeromaster enamels to finish the build (Squadron bring them back, please!). I used some of my dwindling stock of Aeromaster enamels to finish the build (Squadron bring them back, please!).
All the panel lines were pre-shaded with acrylic black from Testor.
Diluted burnt umber and black oil paint was applied to all panel lines and wiped with a cotton rag slightly soaked with mineral spirits in the direction of the airflow.
A silver Prismacolor pencil, Pastels and some dry brushing finished up the weathering.
BTW, The Kabuki tape masks for the canopy included in the Tamiya kit work perfectly.
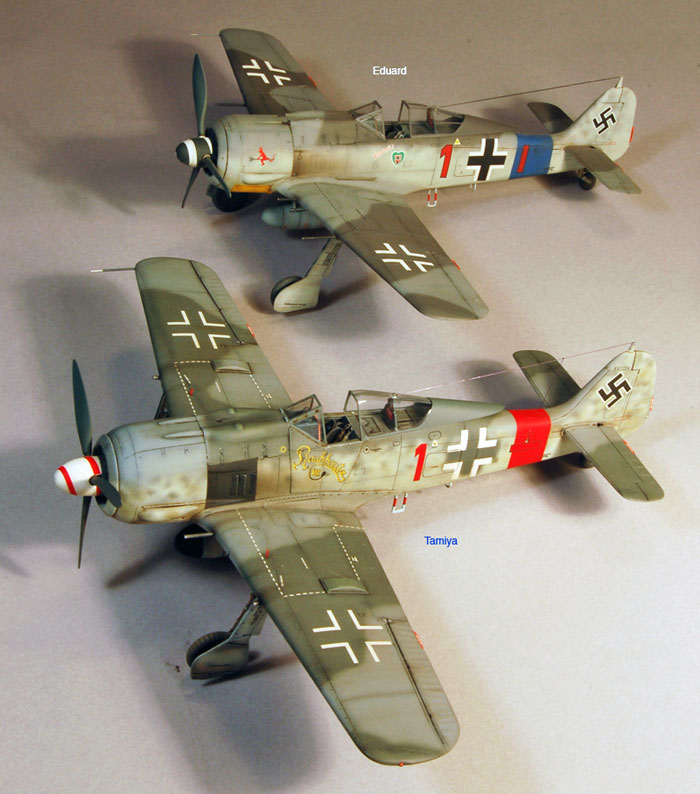
Final thoughts and opinions…Comparisons with the Eduard Fw 190 kits are inevitable for me. Both kits have their pluses and minuses.

-
The Eduard gear bays are deeper and better detailed.
-
Eduard has all that interior detail under the cowl that I close up anyway. You can see the engine behind the fan if you look reeeeealy hard!
-
The Tamiya kit is a much easier build.
-
Although I like the rivet detail on the Eduard kit, Tamiya’s engraving is more consistent in depth, which is better for my weathering technique.
-
The cowling profiles are slightly different as are the height of the landing gear between the two kits. I do not know which is more prototypical nor do I care (The Eduard kit is more accurate in both respects – Editor). Both look very much like the hundreds of photos of 190s that I have looked at and are thousands of light years ahead of the Aurora 190s I built as a youngster in modeling’s Devonian era (Monogram’s was light years ahead of Aurora’s!). Thank you rivet counters! Keep on ‘em!
-
The Eduard kit with all the etched parts is much less expensive (@ 36$ US) than Tamiya kit with the additional purchase of the Eduard etched set (@ 53$ US).
-
The Morane antenna hanging down from under the wing on the Tamiya kit has the profile of a 3 x 4” piece of lumber! No replacement on the Eduard etched set.
-
The cooling fan is farther forward in the cowl on the Eduard kit compared to the Tamiya kit (I’ve built two Eduard kits, the last A5 to the letter of the instructions!) and both fans turned out too far forward. Maybe it’s just me though.
-
No choice in canopies types with the Tamiya kit, A9/A-8, open or closed like the Eduard canopies.
I am sure that I have left out more differences. “Ya pays ya money and ya takes ya chances!” Frankly, I like the way the Tamiya kit turned out but I think I did a better job on the weathering than my Eduard A-8. Now where’s that Hasegawa 1/48th ‘190… My name is Ron and I’m addicted to Fw 190s…
Model,
Text Copyright © 2009 by Ron Petrosky
Page Created 26 February, 2009
Last Updated 26 January, 2009
Back to HyperScale
Main Page |
Home
| What's New |
Features |
Gallery |
Reviews |
Reference |
Forum |
Search