Hasegawa + Academy 1/48 scale
Lancer Two
A Racing F4U-4 Corsair
by Rodney J. Williams
|
|
HC-102 Heli Baby |

HyperScale is proudly supported by Squadron
The real F4U- 4 Corsair was built by Chance Vought. One data source states that this F4U-4 was built in 1945, while another source says that it was built in 1949. More conflicting data: One statement says that it was placed in storage until 1955, but another record says it was in the Korean Conflict, (1951-1953). I found no BU number published for it. Hey…..who cares!
Eugene (GENE) Akers of San Diego, CA/USA and his crew chief Mac Mendoza bought this surplus fighter, (circa: 1966). Gene and Mac worked on the plane and got it ready to race in the 1967 Reno, Nevada National Air Races. It is said that Akers was a “fire control pilot,” and that this would be his first race.
During those years it is said that, “ Mac Mendoza trained astronauts in every current fighter plane in the Air Force inventory.”
I have a book entitled “GENTLEMEN, YOU HAVE A RACE,” by JOHN TEGLER. The book deals with the “History of the Reno National Championship Air Races,” 1964- 1983. On page 99 within Chapter Five, titled “Reno the Hard Way – Reno 1967,” we find data concerning this Corsair.
I quote the following: “Tenth in qualification was Gene Akers in one of the first two Corsairs to show up for racing at Reno in this new era.” This machine which was almost sans paint was an F4U-4.”
On page 101 of the same book, it shows a ¾ left rear black and white photo of Gene’s Corsair. It appears that the aircraft was all “bare metal,” with a dark color painted on the cowling and on the “fin/rudder” combo. A large number “22” was applied
to the “fin/ruder.” There is a smaller registration number of “N6667” painted on the aft fuselage section.
After I scanned in this book photo I enlarged it and see that the name on the fuselage is called “Cal–Nat.” It appears that the small letters above Cal-Nat are “Presented By” and/or “Prepared By.” I see a word just under the cockpit, which looks like “EXPERIMENTAL.” I noted that the instrument panel appears to be painted a white color. I did not find any description for the color scheme on this racing Corsair in John’s book.
A years or so ago, a fellow modeler sent me several color photos of this Corsair with the new “Lancer Two” paint job, including one color “bare metal” configuration.
The color photo of the bare metal Corsair was taken from the right rear angle. It appears that the fin/rudder combo and the cowling were painted a very dark blue and/or black. The call letters & numbers 22 and N6667 are of a “red” color. The color photo shows that “Cal-Nat” is painted on that side too, which looks like a black color. You will also note that there is a “Champion” spark plug logo under the cockpit. It appears that this logo is next to a word, which may be the same “EXPERIMENTAL” word that is painted on the left side of the aircraft. Again, they look black in color.
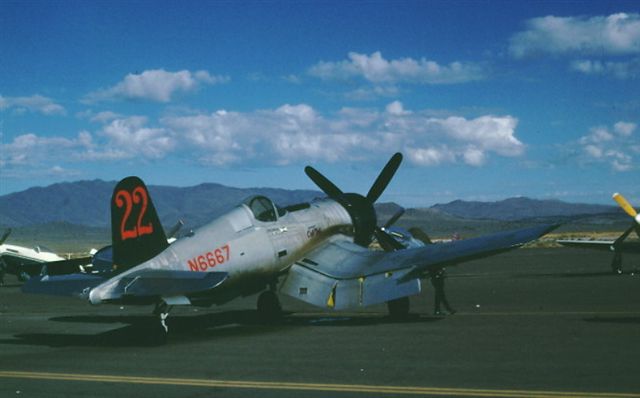
The first “Unlimited Class” 1967 race was held on Saturday September 21, 1967, which was called “Consolation” and it had an interesting bunch of airplanes in the race. There were two Bearcats, two Mustangs, one Sea fury and Gene Akers Corsair.
A guy by the name of Bob Hover was in the “Pace Aircraft” and was lining up the 6 racers and the famous words were then born by Bob: “GENTLEMEN, YOU HAVE A RACE.”
Out of the six pilots entered only one of them, Walt Ohlrich was a veteran, (race pilot?).
A guy by the name of Tom Taylor flew the Sea Fury and won the race, while Gene placed fourth in his Corsair.
In the same book Chapter Six, “A Pivotal Year - Reno 1968” states the following for the event which was held on Sunday, September 20th and ended on Tuesday, September 22. 1968.
On page 117 it says that Gene got to the races to late to qualify but was allowed to enter his Corsair to fill out the “12 Plane Field.” Gene’s F4U-4 carried the name of “LANCER TWO” and an attractive green and gold paint scheme. On page 119 it states that Gene was the sixth starter but he dropped out before the start of the first lap when he could not get his gear to retract. There was no photo of Gene’s Corsair published in the book with its’ new “Lancer Two” paint job.
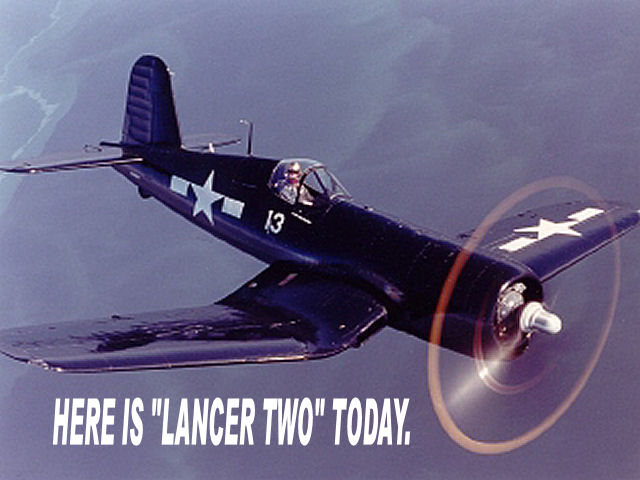
After the Reno fiasco, this F4U-4 Corsair was flown around as a “show plane” until 1974 then laid dormant until 1982, when it was donated to the “EAA Museum” which is located in Oshkosh, WI - USA.
The museum staff worked on the plane for 12 years and unveiled it in May, 1994. It’s on permanent display in the “AirVenture Museum’s Eagle Hanger.”
Sad to say, but the Museum staff painted the aircraft in the standard Navy Gloss Sea Blue color. (Attached is a color photo of the fighter flying ). It’s present markings are “Identified” as the aircraft that Marine Corps Captain Kenneth Walsh flew during WW-II. Walsh scored a total of 21 “kills” flying Corsairs in the Pacific Theater Operations.
I could not locate the Corsair in their “Eagle Hanger,” via their web site. I sent an email and have not received a reply during a two week interlude.
I surfed some model web sites and wound up buying two different 1/48 scale kits.
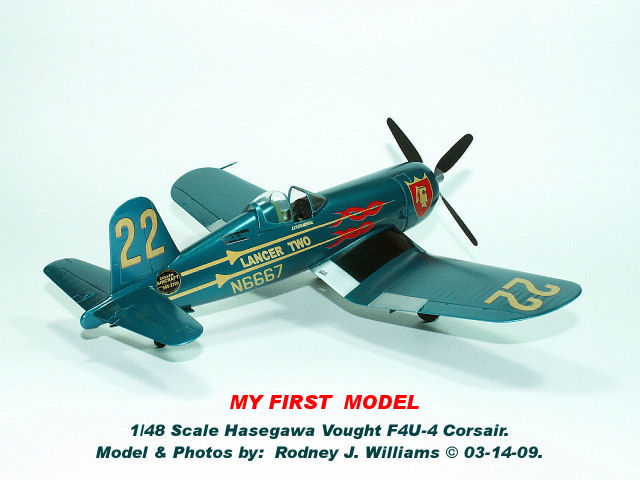
My first model kit was a Vought F4U-4 Corsair made by Hasegawa.
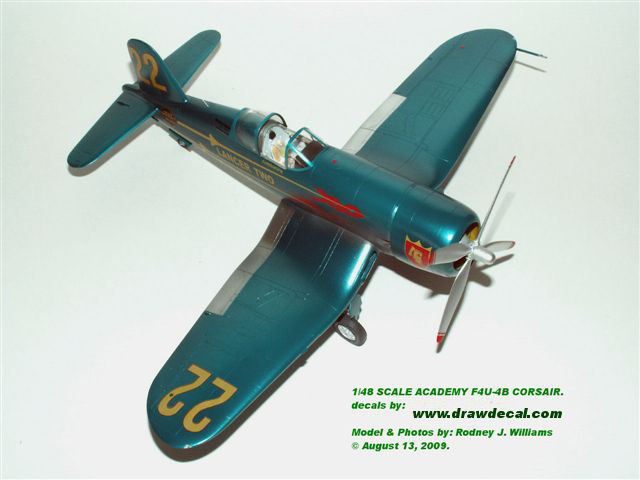
My second kit was classified as a Vought F4U-4B Corsair made by Academy.
I built my first kit in 2008 right “out-of-the-box” and sanded off all of the raised panel lines, which were not re-scribed in.
I ask Greg who owns Draw Decal’s what color does he thing I should paint my model?
(Use “Model Masters Acryl TEAL #4664” was his reply).
The ½ bottle (s) of Teal paint was real thick so I mixed each one with about 2 ounces of my ordinary “Denatured Alcohol,” (DA as I call it). My other acrylic paints were by Tamiya. The finished kit looks a bit funny with no panel lines.
In early 2009, Greg, the owner of Draw Decal’s sent me a couple of new photos of “LANCER TWO.” I was off and running on my second kit.
One photo of Greg’s showed a ¾ front view of Lancer Two from the left front of the aircraft. To me it appears that the rear cockpit bulkhead was painted white. As mentioned earlier, I noticed that the instrument panel was painted a white looking color in my black and white photo so I painted my entire cockpit white, including the instrument panel.
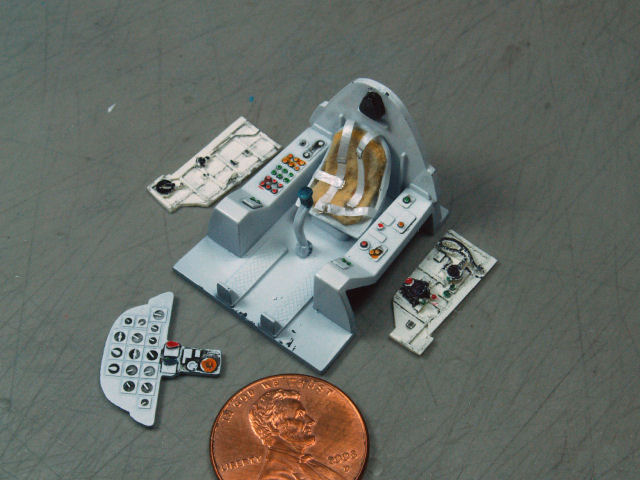
I notice that the clear gun camera glass ports do not have the usual square shape. I “wondered” if these glass covers were changed and the area was made into new landing lights. I made a rectangle clear part for my second model.
The 3 piece wing sections was glued together and sanded. I added clear stock to my gun camera/landing lights and wing tip lights. The wing tip lights were pre-drilled with a 0.13” diameter drill. The holes were filled with Tamiya clear red and clear green. The finished clear parts look more realistic, rather than just painted like I did on my first model.
I glued in the cockpit then glued the two halves together using super thin super glue.
I did a bit of seam sanding on the fuselage then attached the finished engine and cowling. It was time to attach the one piece wing section, including the tail plane. I doubled check the wing/tail plane alignment then finished my super gluing application.
Naturally, I re-scribed in some panel lines that were lost during the sanding process.
My paint application turned out perfect on both of my models and left a nice high gloss finish. After the paint dried for a couple of weeks, I added the decals on top of the gloss paint without applying a coat of Future Floor Wax first.
A few days later, I clear coated the decals with some thinned-down Future Floor Wax, (FFW). I thin the “FFW” with nothing more than my “DA.” It’s been working for me like this since 1984.
Please study my photos which will tell you how I attached my fuselage decals and in what sequence.
“THIS IS A REAL IMPORTANT STEP IN APPLYING THE DECALS.”
I followed the directions for applying these new “DIGITAL SILK” decals on my first model. However the large cowling decal did not lay down very good on the front curved section of the cowling, thus I had to make a couple of small cuts on the front edge of both decals and by using some more Microscale “Set and Sol” mix the decals laid down really nice.
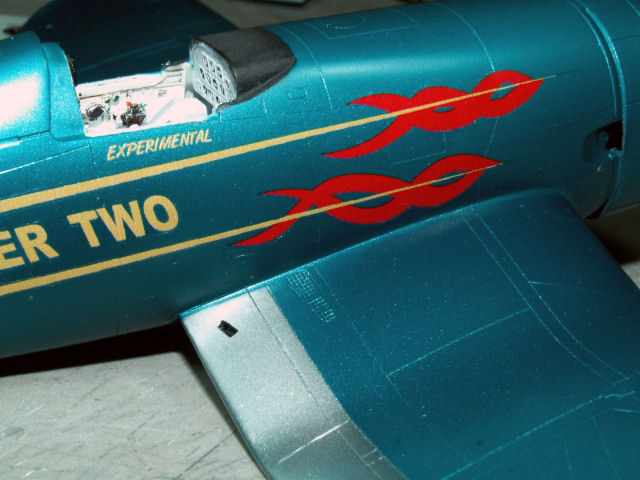
I did the same thing to my second model and had the same results with the larger cowling decal. I took it off and applied a smaller decal that Greg made for me.
FLASH UPDATE”: Greg has informed me that he plans on making the red decals of “22 and N6667” for Gene’s 1967 version of the racing F4U-4 Corsair. Now !!! All I have to do is remove the decals and sand the “teal” color paint a bit on my first Corsair model and repaint it and apply the new decals.
If desired you can access this site and read some more about said Corsair displayed at the “Airventure Museum.”
Here is a bunch of photos that will tell my story. You will note that my prop on my first model is painted different from the one on the second model. Also “note” the black color on top of the wings on my first model, including the bare metal flaps then compare it with my second model.
These different color renditions are due to the photos that I had when I built the first model, then obtaining more photos of the real aircraft before I painted my second model.
Last but not least please look at the double color photo of Lancer Two. The right rectangle photo has something special in it. Just forward of the big cowling decal/logo you will see a small round circle. This is a Pratt & Whitney “PW” logo.
Greg was kind enough to send me four of them for my two models. I assume he has included two of them on his new decal sheet for the model.
You can purchase the LANCER TWO decals at the following web site www.drawdecal.com.
In closing out this photojournalism story I can now add this fancy looking model to my “Air Racing” model collection.
Happy Corsairing!
Rodney
Images and Text Copyright ©
2009 by Rodney Williams
Page Created 7 December, 2009
Last Updated
7 December, 2009
Back to
HyperScale Main Page

|
Home
| What's New | Features | Gallery | Reviews | Reference | Resource Guides | Forum |