Kitbashed 1/48 scale
Messerschmitt Bf 109 G-12/R3
by
Werner Scheibling
|
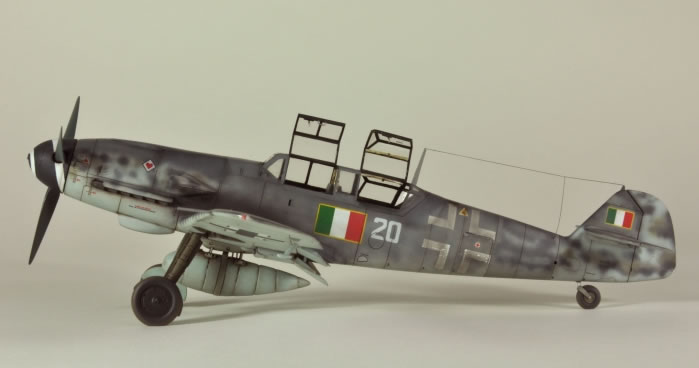
Messerschmitt Bf 109 G-12G-12/R3
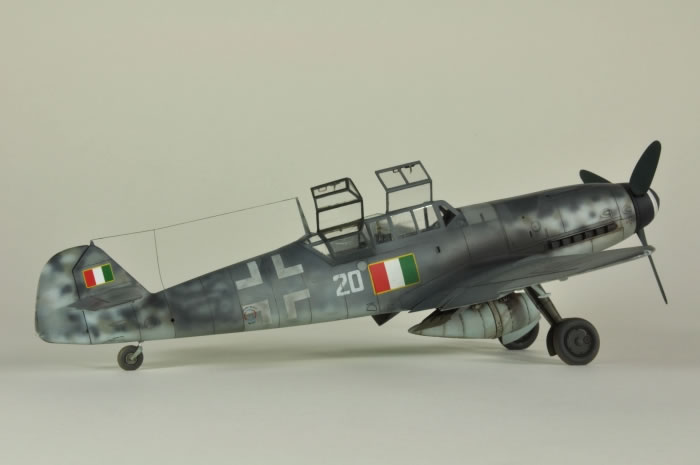
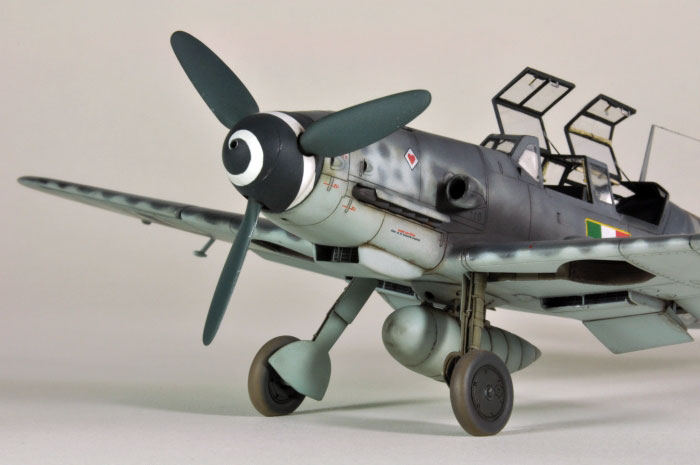
('Zweisitziges Schulflugzeug')3a squadriglia 2° Gruppo Caccia, Aeronautica Nazionale Repubblicana Aviano / Northern Italy, December 1944 |

Hasegawa's 1/48 scale Messerschmitt Bf 109 G-6 is available online from Squadron.com
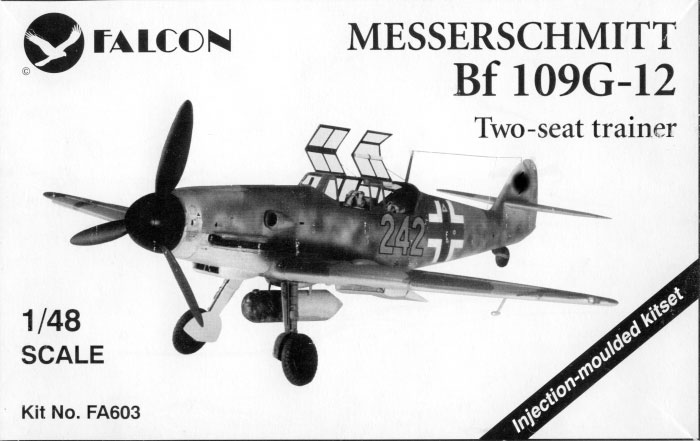
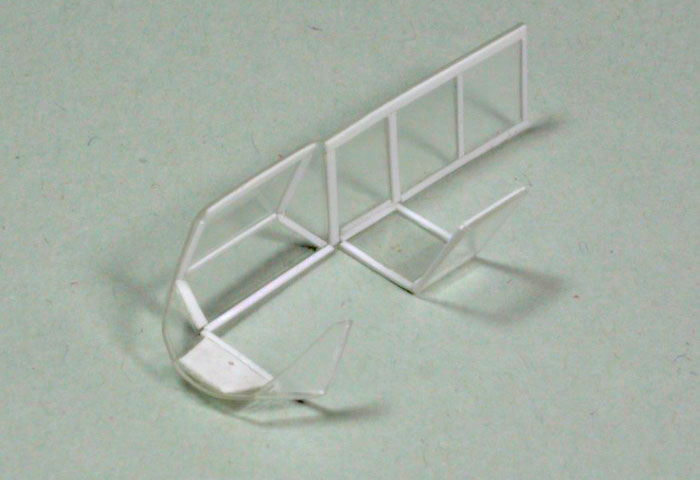
Falcon's short-run injection moulded kit of the Messerschmitt Bf 109 G-12 two-seat trainer in 1/48 scale dates back to the late 1990s. From time to time it still pops up on eBay, so there's still a chance to grab one, if you should feel like it.
But be warned, you'll feel like you've travelled back in time, back to the beginning of short run injection moulding with all its shortcomings.
The kit comes with a little bag of (very soft) white metal detail parts, two vac-form canopies and decals. Unfortunately, in the last ten years we plastic scale modellers have been spoilt to such an extent that hardly anyone would seriously contemplate building this kit straight from the box - and exhibit the final product next to his collection of Tamiya or Hasegawa models. Maybe this is why Falcon now offers just a conversion set with vac-form fuselage halves, but still including that same 'crystal-clear' canopy, which even found its way into the luxurious contemporary Kiwi resin conversion kit.
Anyway, I planned this project around the short-run Falcon kit; my sample of which had spent many unloved years on the shelves of not just one model shop.
Closer examination of the box contents revealed that the only parts I would use would be the two fuselage sections around the rear cockpit, the canopy and - small but important - the housing for the instructor's flying instruments. Everything else, including the decals, was only fit for the dustbin, I'm sorry to say.
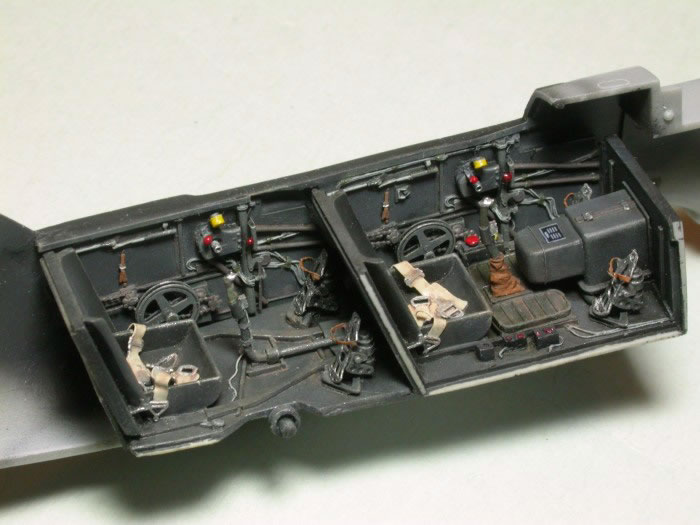
The fuselage conversion
When I write about the basic construction process, I'll restrict the article to the fuselage conversion. The rest of the construction was more or less identical with the process I described in my last 109 article, not coincidentally a G-4/R6 in Regia Aeronautica markings (http://hsfeatures.com/features04/bf109g4r6ws_1.htm).
Before I actually got the saw out, I very thoroughly planned the whole fuselage work with all the sequential steps involved. This time proved well invested, as I could have easily ended up with two ruined kits (the proverbial 'measure twice...' will not suffice here).
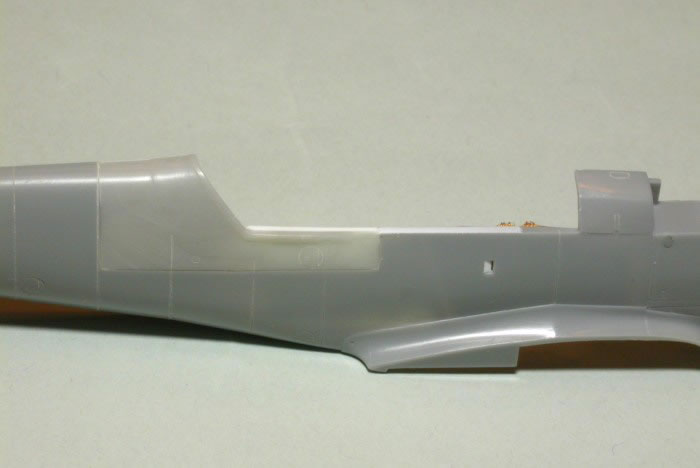
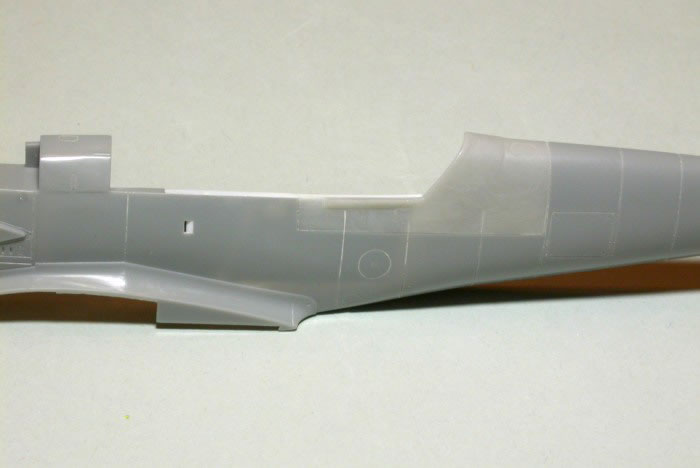
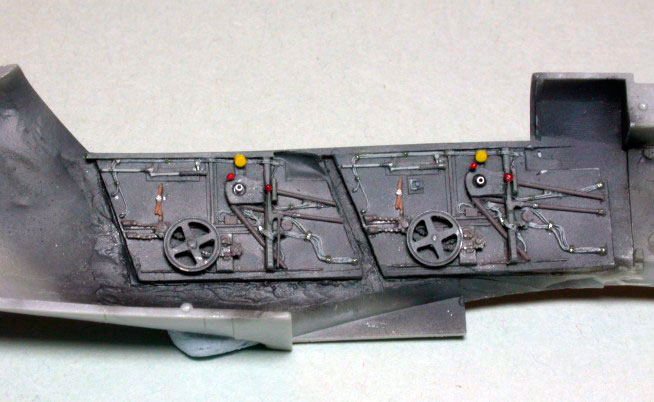
As the Falcon fuselage meets the cross-section of Hasegawa's 109 G kit well enough, I attempted a transplant. First I marked the fuselage sections around the instructor's cockpit as small as possible, the cut at the rear, towards the tail, along a panel line. I cut the parts with a hacksaw and did the final adjustments with a fine-grain sanding-stick and lots of patience.
After the plastic cement around the transplanted fuselage sections had thoroughly dried, I thinned down the inner fuselage walls with a rotating tool. To make the new fuselage halves strong enough for repeat handling, the whole inner sections around the glue seams were generously covered with two-part epoxy. All outer gaps and seams were filled in with super glue several times, then sanded, and finally, polished. Re-engraving the panel lines finished this basic conversion work.
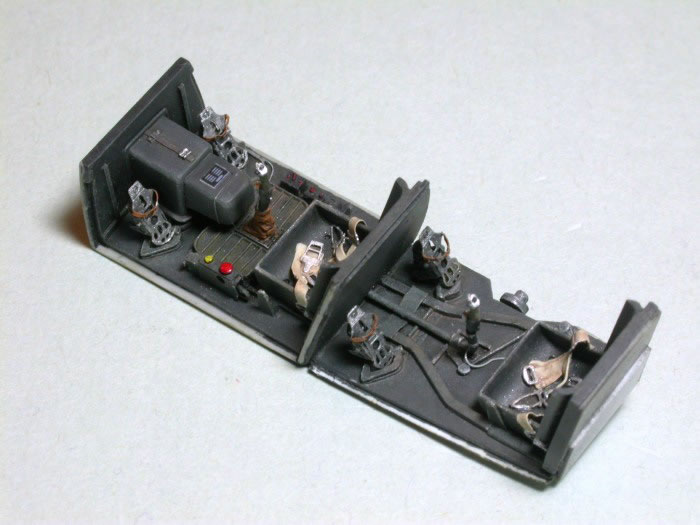
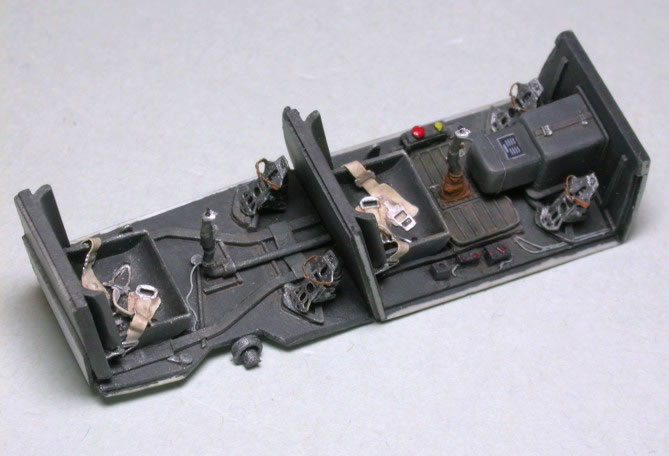
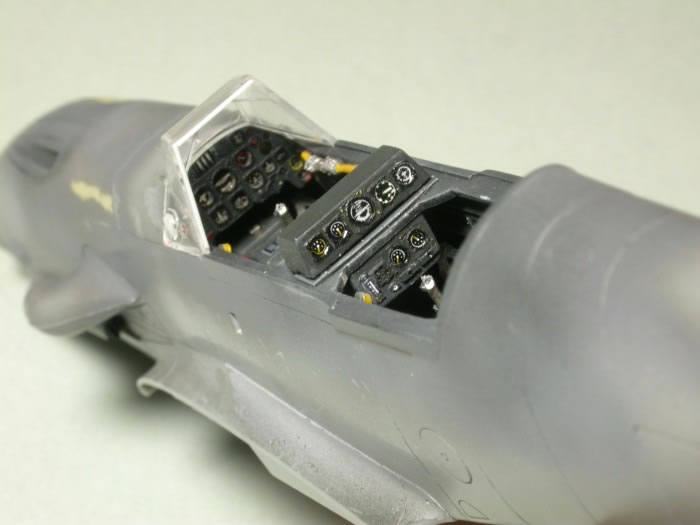
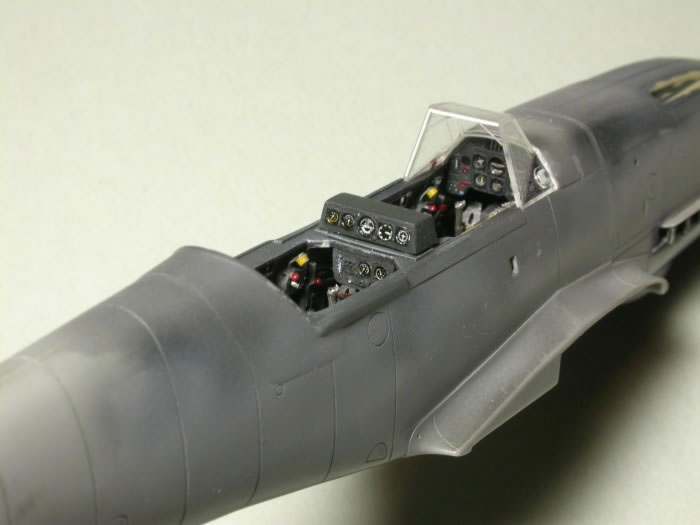
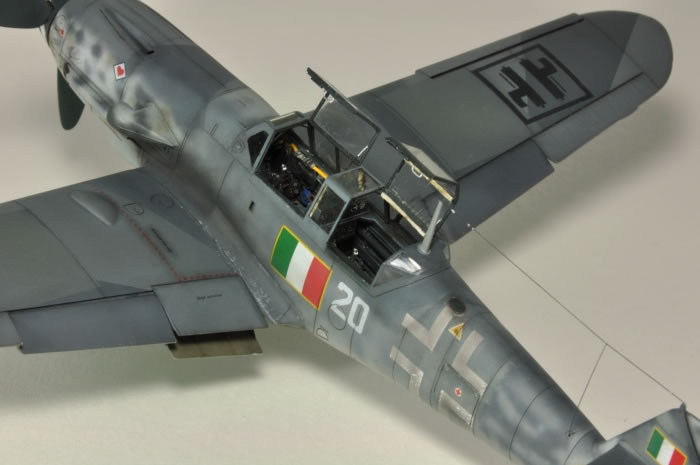
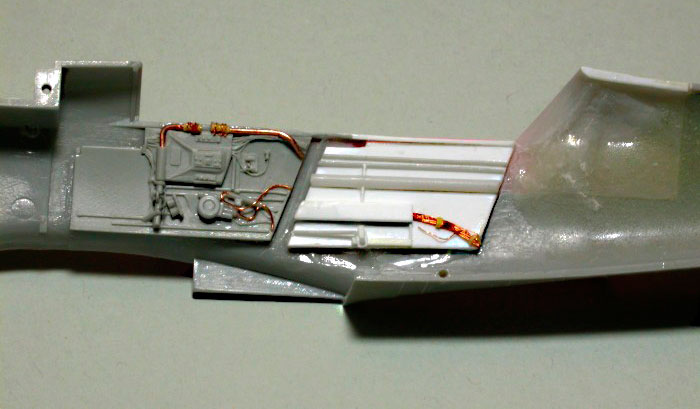
Front cockpit
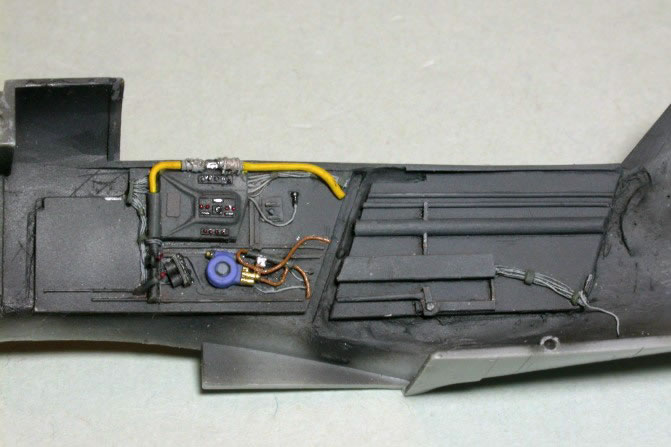
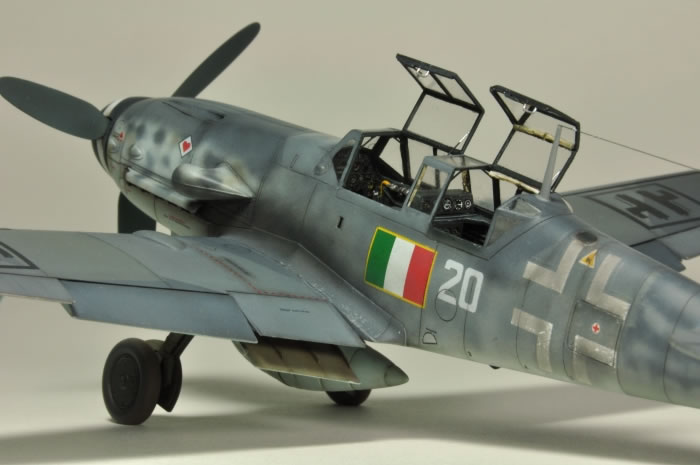
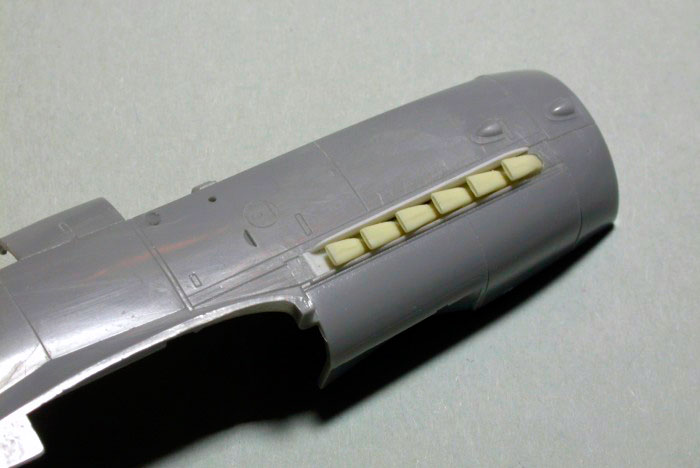
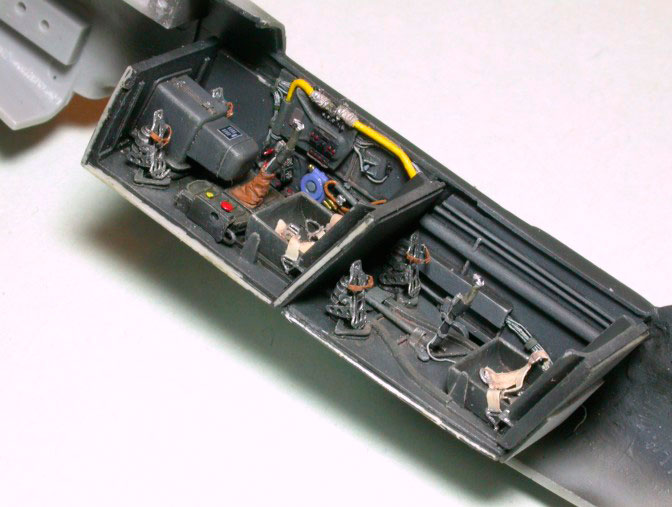
Weeks later; there's not too much to say about the front cockpit. It is Aires' resin and PE set (new master), which assembles easily apart from one odd peculiarity: the upper horizontal part of the conspicuous fuel line is completely missing and there is no mention of this in the instructions. Aires apparently expects their customers to know their subject intimately and complete the product with some serious scratch building (as the fuel line includes a transparent section, held at both ends with metal clamps). And while I'm frowning: The PE rudder pedals are also wrong. Once you've bent the heel rest into a curved shape, you'll find out that it doesn't fit the foot plate, because the designer got the geometry wrong.
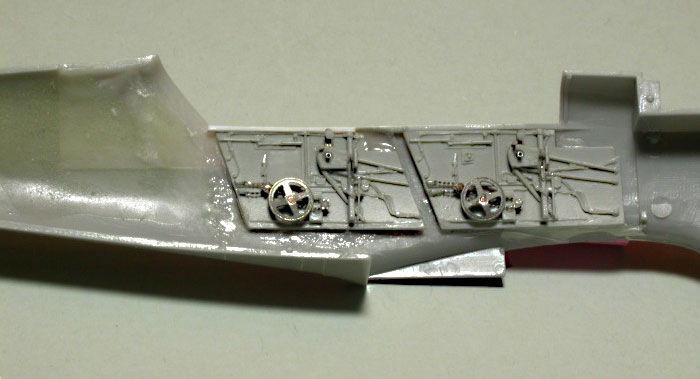
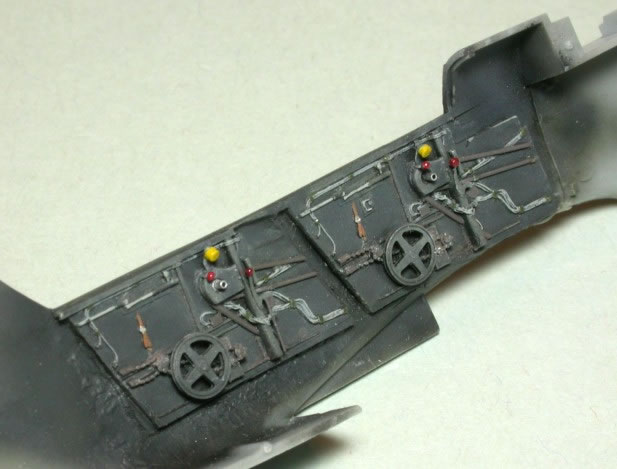
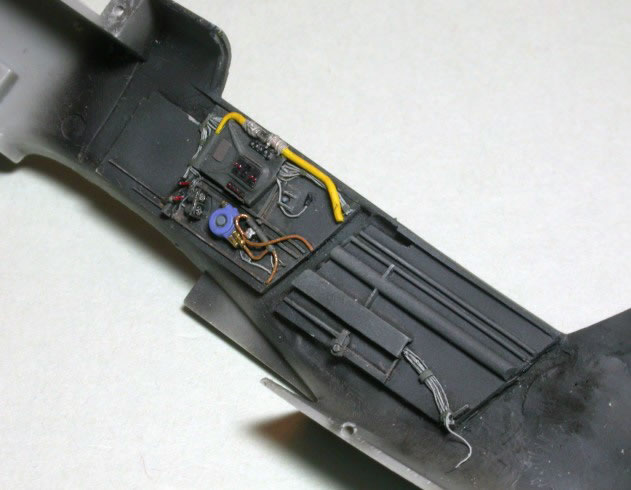
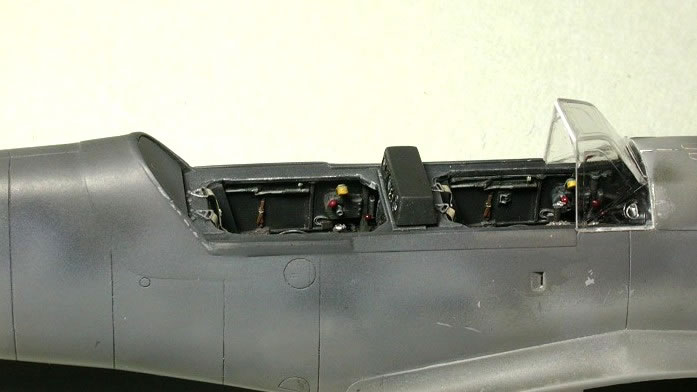
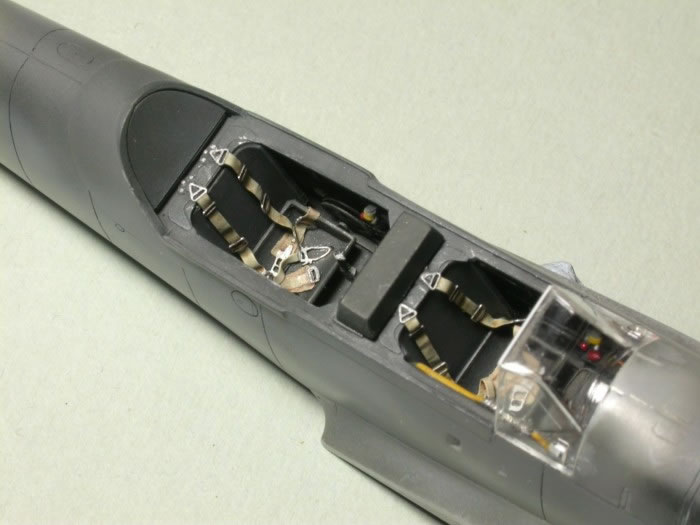
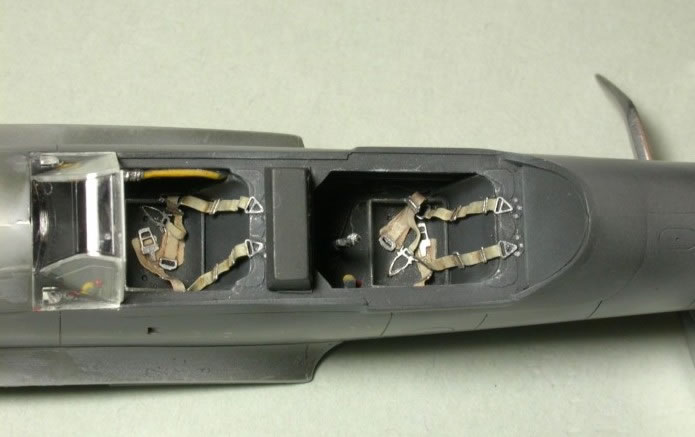
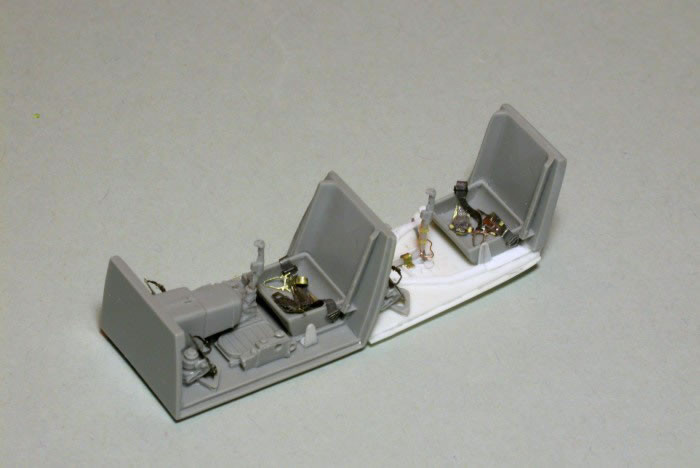
Instructor's cockpit
The instructor's cockpit was built mainly from scratch.
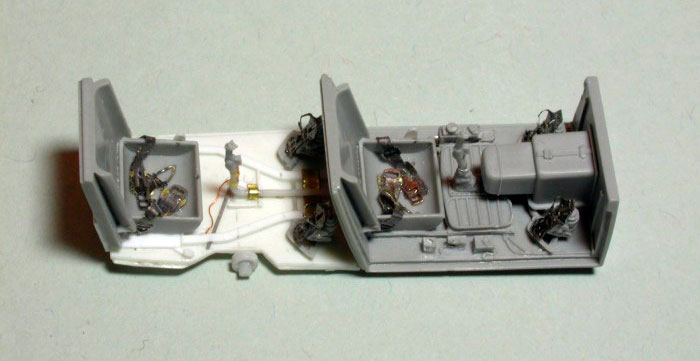
There is one well known photo of a G-12 cockpit that served as my main reference. It shows the starboard side wall, control column and cockpit floor without the seat. The only other piece of reference material I had came from the G-12 instruction manual (a facsimile print), which shows a very good sketch of the instructor's instrument panel (actually two panels, upper and lower part). Another simple sketch shows the layout of the interconnected chain transmission of the tail plane incidence adjustment wheels.
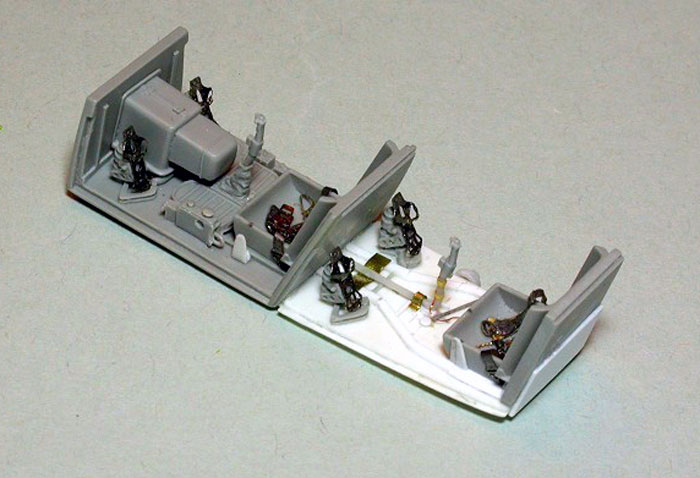
So far I have been unable to find any pictures that show the port cockpit side wall. This made it easier to cheat a little bit and just use a second Aires resin panel on the port fuselage.
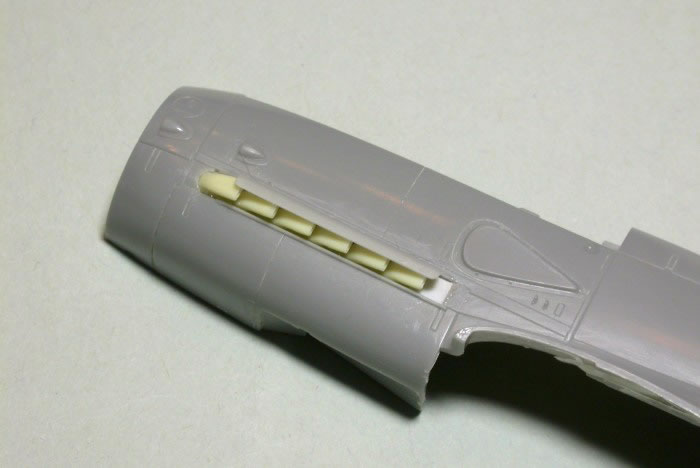
For the instructor's instrument panels I used the Falcon part (upper panel) and a scratch built part (lower panel). Both panels were completed with single PE gauges that I cut from the second Aires PE instrument panel. The instrument dials were punched out from various decal sheets.
I'll let my photos do the rest of the talking; they'll hopefully tell you everything else you'd like to know.
Canopy
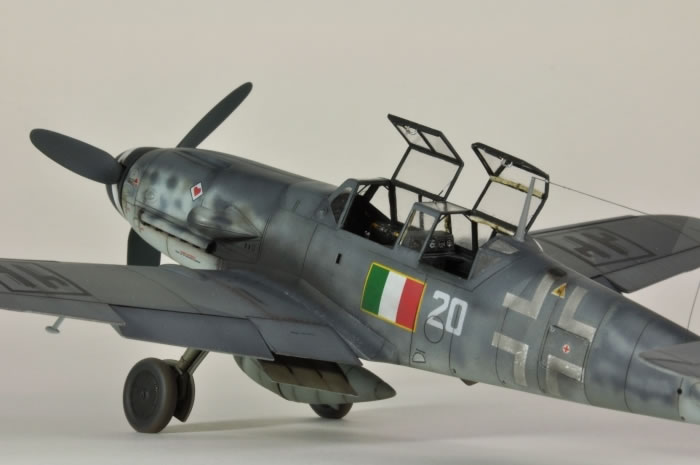
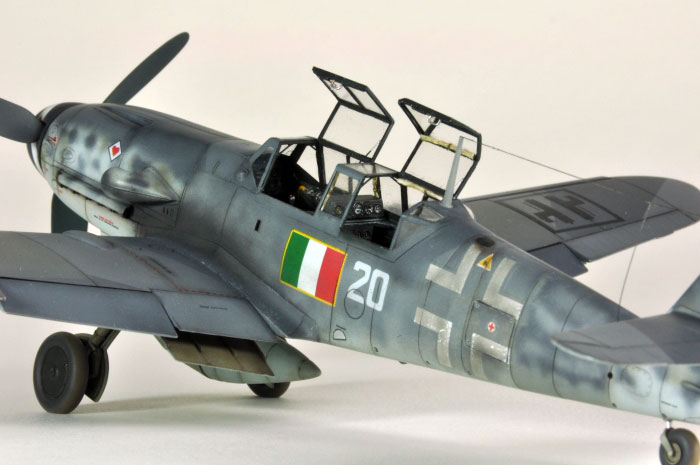
When the whole airframe was finally assembled, it was time to deal with the vac-form canopy. Luckily I managed to cut it from its carrier and remove the two opening sections without one slip of the knife. Still, it helped a lot to know that Falcon provides a second canopy, just in case...
As I had already spent roughly four months on the construction so far, I decided to carry on at the slow pace and replicate the sturdy canopy framing that would be very visible with both entrance hatches open. The very thin vac form would just look too flimsy and under scale.
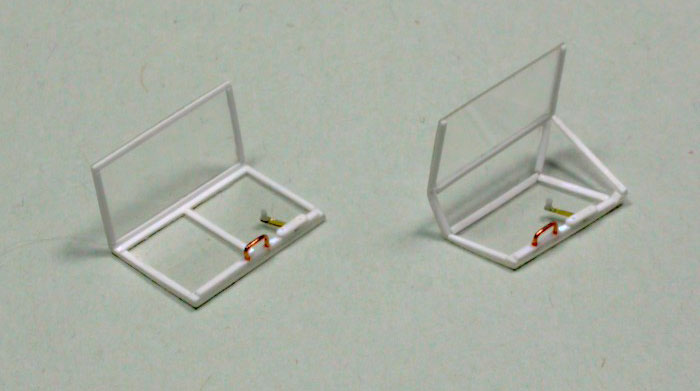
After some experimenting I found out that you can glue styrene strips to clear acetate with fluid plastic cement containing Dichloromethane. There's a product sold in specialised UK model shops called EMA Plastic Weld and it works very well. It works even better if you first soften both parts to be joined with Plastic Weld and then use UHU Allplast as the final bonding medium (a rather viscous cement out of a tube sold in Germany for gluing all sorts of different plastics). Needless to say you should use these products only in a very well ventilated area if you want to live to a ripe old age.
So there I went, measuring, cutting and gluing strip after strip of very thin styrene profile onto Falcons crystal clear canopy. After painting (by hand and brush) the final result looks very convincing and truly worth every hour I spent.
Maybe a word or two how about I attached the Falcon vac-formed canopy:
When you dip clear plastic parts in Johnson's Future (or: Klear) acrylic floor polish, the parts will not fog up when you use cyanoacrylate ('Super-glue') for attachment. I even used CA lavishly to fill in any gaps and sanded the seams smooth with fine sandpaper (600 - 2000 grit). The clear sections can be easily protected with Tamiya masking tape, which resists fine grit sanding mediums unexpectedly well. The result is... well check the photos!
The finishing touch is a set of rolled up blinds around the instructor's canopy, which I made from the thinnest available cigarette paper.
All paint work was done with Vallejo 'Model Air' acrylics (their interpretations of RLM 74/75/76/02 and 66), applied with Iwata airbrushes: An Eclipse HP-BS (0,35mm nozzle) for general work and a Hi-Line HP-BH (0,2mm nozzle) for the finest detail work.
Panel lines were accentuated with pastel dust - burnt umber on all upper areas, medium grey / burnt umber mix on all lower surfaces. Only panel lines where fluids would seep through were treated very sparingly with a mix of reddish-brown artists oils, diluted with Daler-Rowney low-odour thinners.
Italian Kits' limited edition decals are Alps printed on continuous carrier film. The printing 'ink' is very sensitive and rubs off immediately, if you touch it with metal tweezers. In hindsight I'd say that I should have rather covered the whole sheet with clear liquid decal film before I started decaling.
On the flip side the carrier film is as thin as you would want it to be and disappears completely after the application of Micro Sol and a final coat of clear flat varnish.
Unfortunately the Italian flags on my sample were completely out of register and therefore unusable. I sourced the flags from various Sky Models decal sheets, even though the size and shape of the yellow fringe might not pass the strict eye of Messrs. D'Amico and Valentini. But as some say, this is as good as it gets; at least in my case.
Some historical / technical remarks about 'White 20':
D'Amico / Valentini published some very rare photos of 'White 20' in their expansively researched book 'Camouflage and Markings of the Aeronautica Nazionale Repubblicana'. Two of these pictures show 'White 20' after its arrival at Villafranca, still in the full markings of its former German JG 77 owner. The photos are not very crisp because they are actually stills taken from a contemporary propaganda ciné film.
What these photos clearly show, though, are:
These features indicate that 'White 20' was converted from a late G-4 airframe and not from a G-6 as some other publication claims.
Two more photos survived the course of time. These show 'White 20' at a later stage in its short-lived ANR career, this time taken at Aviano. Italian flags have by now been added to the fuselage and the vertical tail.
I've drawn an additional, personal conclusion from this photo: Quite obviously the white fuselage Balkenkreuze have been strongly toned down by its new owners, whereas the number 20 and the white section of the Italian flag stand out very brightly. When these two photos were taken, 'White 20'also carried the obligatory 300l drop tank.
And finally, to round off this feature article, here come some more facts about the Messerschmitt G-12 that you might find interesting:
-
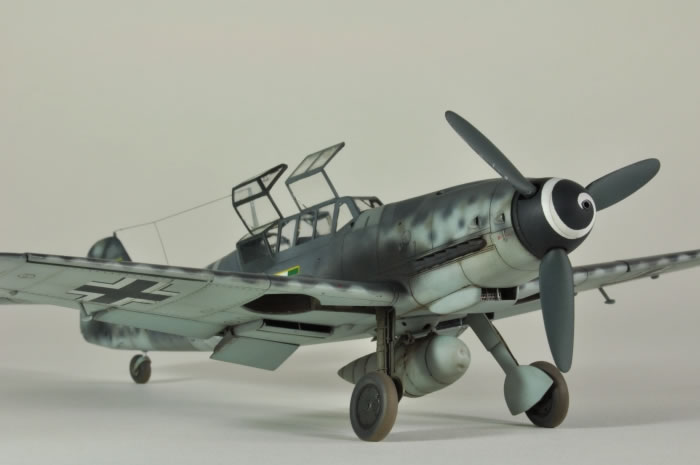
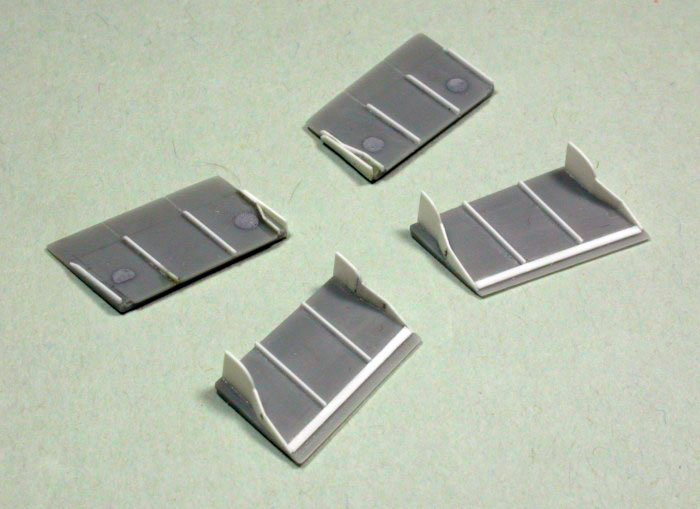
The G-12 had external stiffeners running along the cockpit sill to make up for the impaired stability of the cut down fuselage. The solid starboard canopy side with sturdy framing was a second means of regaining some of that lost structural stability. This led to the somewhat curious construction with two up and sideways opening hatches.
-
The blinds around the glazing of the instructor's cockpit were intended for instrument flying training. Only for this purpose would the student occupy the rear cockpit, 'curtains drawn'.
-
Flaps could only be set from the front cockpit
-
The G-12 did not carry any weapons. The operating manual clearly states: 'Armament removed'.
-
By adding a second cockpit, the size of the main fuselage fuel tank was reduced to 240 litres, allowing only 35 minutes overall flying time. This is why nearly all G-12 were operational in the /R3 configuration (ETC-rack plus jettisonable auxiliary fuel tank).
-
Most G-12 (as 'White 20') had a simplified tail wheel strut without steering mechanism
Kits, accessories and decals used
All in 1/48 scale:
- Hasegawa kit #09588 'Messerschmitt Bf 109 G-2'
- Falcon kit #FA 603, 'Messerschmitt Bf 109 G-12 two seat trainer'
(short-run injection moulded kit with white metal parts and decals)
- Italian Kits decal sheet # Ik48003, 'Me 109 G in ANR Service (Limited Edition)'
- Eduard #EX 500 'spinner spirals' (flexible masks)
- Aires resin and PE cockpit set #4271, 'Messerschmitt Bf 109 G-2' (2x)
(new master)
- Eagle Parts #EP23-48, 'Messerschmitt Bf 109 ETC Rack (F,G,K series)'
- Eagle Parts #EP21-48, 'Luftwaffe 300 l Auxiliary Fuel Drop Tank'
- Ultracast #48078, 'Messerschmitt Bf 109 F,G,K Exhausts'
- Ultracast #48166, 'Messerschmitt Bf 109 G5-G14 Wheels, 660 x 160 smooth tyres'
References
- Camouflage and Markings of the Aeronautica Nazionale Repubblicana
1943 -1945. A Photographic Analysis through Speculation and Research by Ferdinando D'Amico and Gabriele Valentini. Published by Classic Publications / Ian Allen Publishing Ltd., Hersham, Surrey, England, 2005 ISBN: 1-903223-29-6
- Aero Detail No. 5, Messerschmitt Bf 109 G, by Shigeru Nohara and Masatsugu Shiwaku, Dai Nippon Kaiga Co. Tokyo, 1992
ISBN: 4-499-20589-1
- Messerschmitt Me 109, Alle Varianten von Bf 109 F bis 109 K,
by Willy Radinger and Wolfgang Otto, Aviatic Verlag Oberhaching / Germany, 1998 ISBN: 3-925505-43-1
- Bf 109 G-12 Bedienvorschrift-Fl, L.Dv.T.2109 G-12/Fl, Ausgabe Dezember 1944 (operating instructions for the Bf 109 G-12, issue December 1944),
reprint copyright by Luftfahrt Archiv Hafner, Ludwigsburg / Germany www.luftfahrt-archiv-hafner.de
- Falcon's Messerschmitt Bf 109 Hangar (if you're looking for that one 109 photo you were always hoping to find, this is the place to check out!)
www.messerschmitt-bf109.de
Model, Images and
Text Copyright © 2009 by Werner Scheibling
Page Created 12 January, 2009
Last Updated
12 January, 2009
Back to HyperScale
Main Page |
 Home
| What's New |
Features |
Gallery |
Reviews |
Reference |
Forum |
Search
Home
| What's New |
Features |
Gallery |
Reviews |
Reference |
Forum |
Search