|
Tamiya's 1/48 scale
P-51D Mustang
by Scott Miller
|
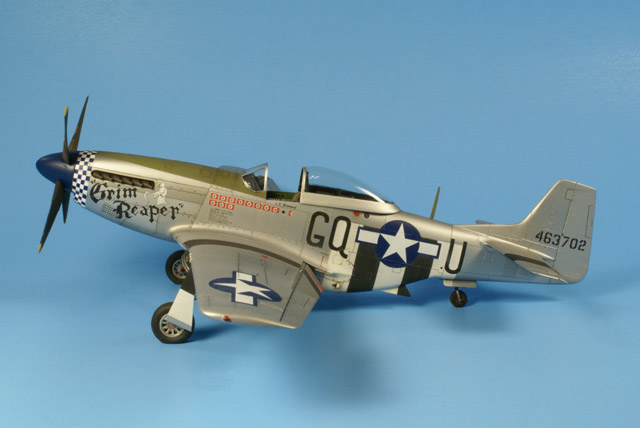
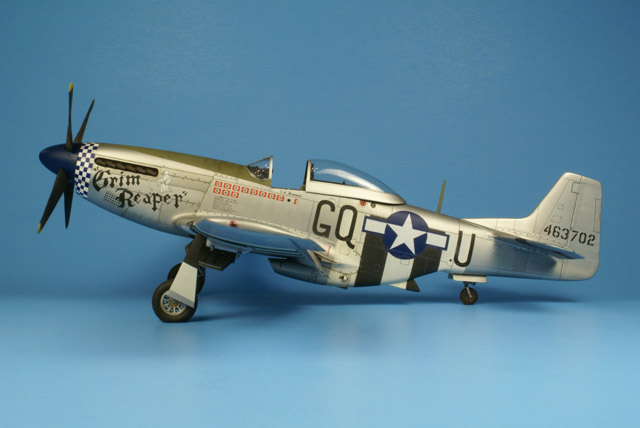
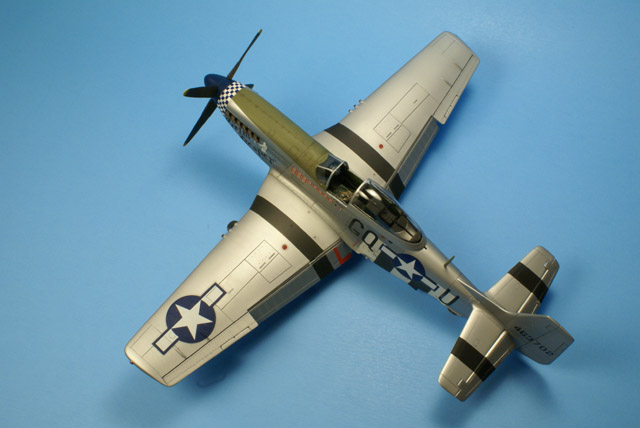
North American P-51D Mustang “Grim Reaper” |

Tamiya's 1/48 scale P-51D Mustang is available online from Squadron.com
Background
While enjoying a day of shopping at the annual Squadron Open House, I came across a set of P-51 decals that caught my eye, Superscale #48-732. I purchased the decals and after finding a picture of it in Aces and Wingmen II and doing some more research on the pilot and plane, I was hooked.
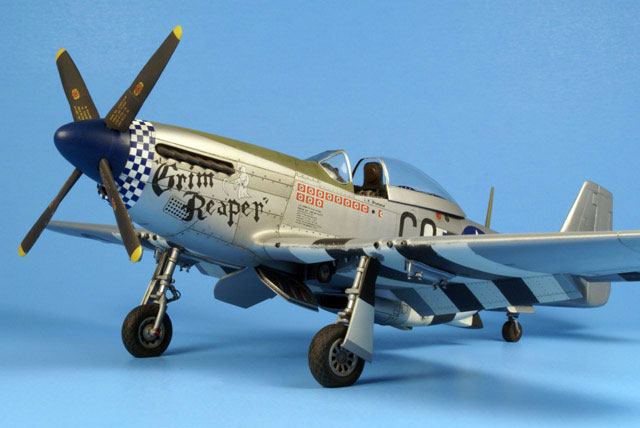
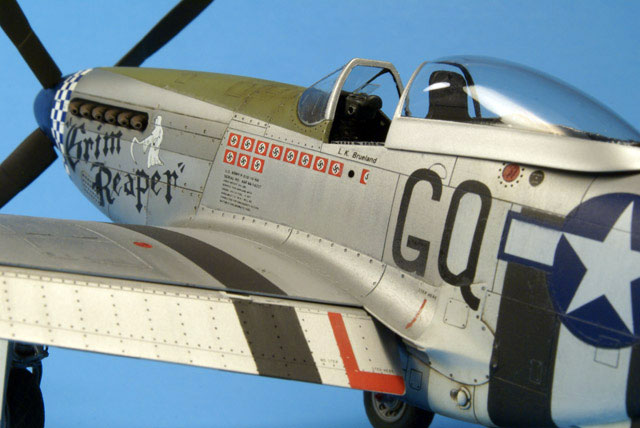
“Grim Reaper” was attached to the 354th fighter group, the “Pioneer Mustang Group”, 355th fighter squadron, and flown by Capt. Lowell K. Brueland who was officially credited with 12 ½ victories in WW II (plus another two in Korea). The decals represent Brueland’s Mustang as it appeared operating in France during mid 1944 after D-Day. As the story goes, his Mustang was also named “Speck IV” and “Wee Speck” in honor of his sister (he also flew a P-47 named “Wee Speck”).
After a mission, one week after D-Day, his plane returned so badly damaged by ground fire that an assistant crew chief, S/Sgt. William "Bill" Westgard, chose a new name for it, “Grim Reaper”, and painted it on the nose of the aircraft.
The Model
The 1/48 scale Tamiya P-51D is probably the best bubbletop kit in this scale as reported by the numerous features articles on HyperScale, although the Hasegawa kit is very nice too.
After building the Tamiya P-47, I was initially a little disappointed in the number of parts contained in the kit, but that feeling soon evaporated. The kit is finely detailed and builds up nicely, although there are a few items that can be addressed to further improve the accuracy of the kit. As others have pointed out, the engineering of the canopy, particularly the two-piece bubbletop transparency/frame presents a hassle, whether you decide to struggle with the kit supplied parts or struggle with a vacuform replacement. This is where the Hasegawa kit shines, having molded the whole thing as a single part. However, the Hasegawa kit does not allow you to drop the flaps.
The other issues are the shape of the Hamilton Standard propeller blades being too wide in chord at the cuff and slightly narrow toward the tips, and also the flaps, which are molded with a curved recess on the inboard part of the flap so that it will fit flush with the wing fillet in the retracted position. There are resin replacement parts available, but I decided it would be easy enough to correct them myself.
Some have also pointed out that the spinner cutouts for the blades are not quite right, being circular on the kit part versus more elongated on the real thing, but I didn’t feel it was noticeable enough to worry about.
And then there’s the main wheel wells…
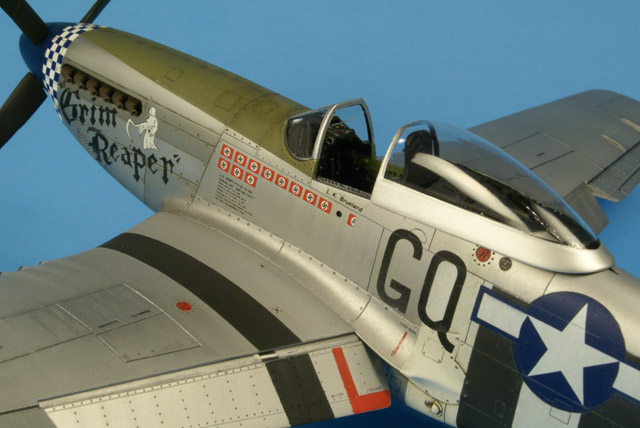
Aside from the decals, the only aftermarket item I added was an inexpensive Eduard Zoom photoetch set, # FE109. This provides some extra cockpit detail, seatbelts, and landing gear detail, although I didn’t use it all. Aside from the very useful instrument panel insert and seat belt/harness set, a set of upper cockpit side panels are provided which gave raised rivet detail on the inside and a very nice representation of the canopy rail on the outside.
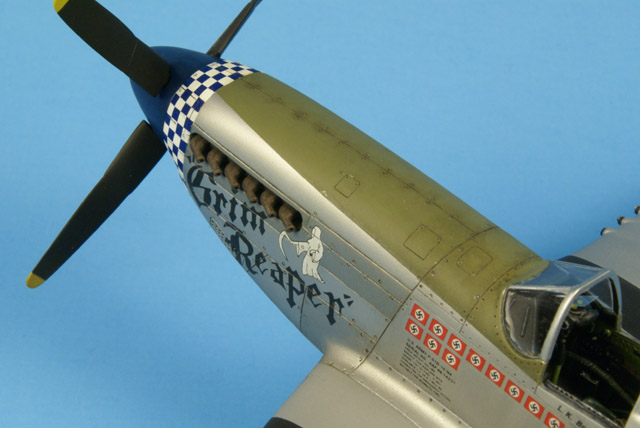
I started with the cockpit and added the photoetch bits. I scraped off the molded instrument detail and used the photoetch panel with the acetate dials and filled the recesses with Future to simulate the lens glass. I added an oxygen hose made of copper wire wrapped with fine wire, and also added brackets to the seat made of strips of sheet styrene. With the cockpit done, I turned my attention to getting the fuselage ready. On the lower part of the engine cowling on each side, I drilled out the molded representation of the perforated panels used for the carburetor air induction system. I increased the diameter of the holes to better match the real thing. Also, the little intake scoop on the port side cowling just above and forward of the wing leading edge was shaved off with a chisel blade and doctored up with some Mr. Surfacer since this was only incorporated on very late model Mustangs. On the starboard side cowling, I drilled a hole that Tamiya left out for the crankcase vent (often seen with oil streaming out of it along the fuselage after heavy maneuvering). Since this was going to be a natural metal finish, I used superglue to close up the fuselage halves, which would ensure no seam line ghosting. The top part of the engine cowling is a single molded piece, which prevents you from having to worry about messing up the centerline cowling line and dzus fastener detail.
For the wings, I filled in the panel lines except for the gun bay access panels to better represent NAA’s practice of puttying and smoothing the wings to better approach a low-drag, laminar flow airfoil. Erasing these panel lines took a couple iterations of superglue applied with the edge of a knife blade, followed by sanding, Mr. Surfacer, and more sanding. In addition, the patch of raised rivets on top and bottom of the wings were removed, as these were not found on WW II Mustangs.
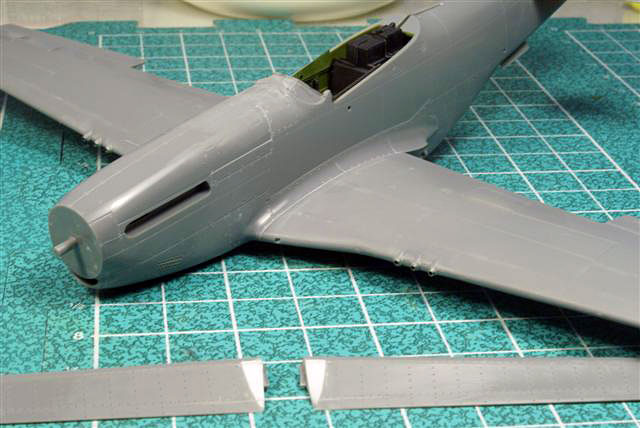
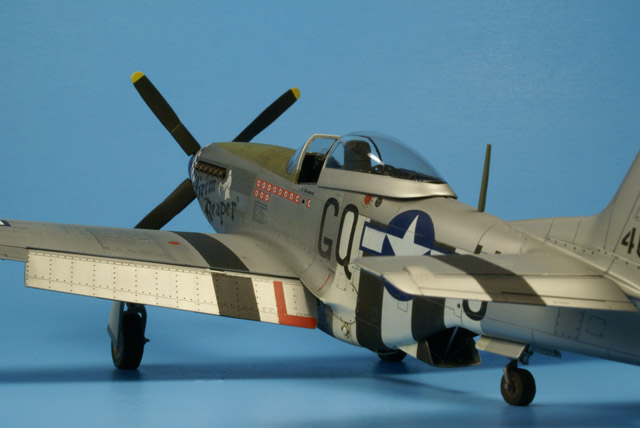
Since the main gear wells are too simplified, particularly in the way the main spar is represented, I contemplated opening up the aft wall of the bay and adding the appropriate detail, but decided it wasn’t worth the effort since it’s not really that visible. But, there are also resin options available for those inclined. After joining the wing parts together, I drilled out the molded .50 cal machine gun barrels and replaced them with telescoping pieces of stainless steel tubing to better represent the blast tube and machine gun barrel. Since I wanted the flaps down, I filled in the incorrect recessed areas on the upper surface with sheet styrene, sanded it to contour, and restored the rivet detail.
The wing/fuselage join was very good. But just to make sure, I sanded down the top of the wheel bay (part # A8) and the bottom part of the fuselage/wing fillet as recommended by others. The fit was so good, all it needed was a little application of Mr. Surfacer followed by a wipe down of 91% alcohol.
I wanted the horizontal tails to be slightly trailing edge down as they often seen when the aircraft is parked, so I cut these out so they could be repositioned.
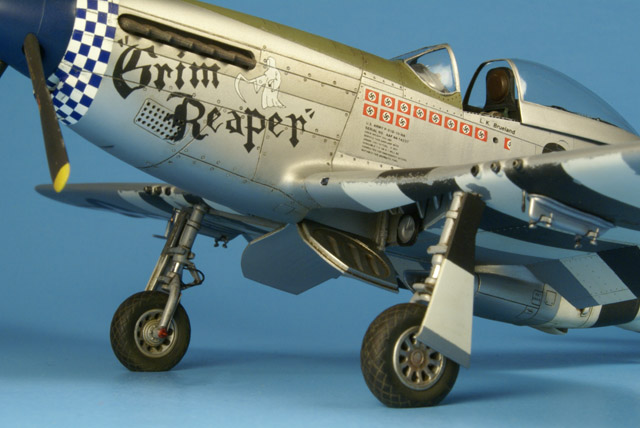
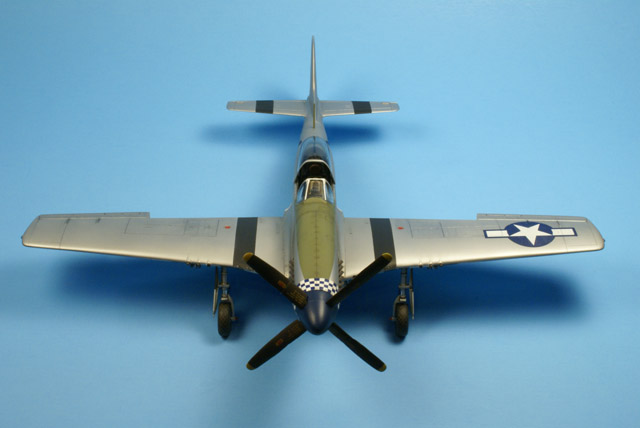
For the landing gear, I drilled three small holes in the shape of a triangle on the upper and lower torque links and carefully cut between the holes with an x-acto blade to open these up. I added small curved pieces of wire to the inside facing part of the axles to represent the tow bar attachments. Finally, copper wire was added along the strut for the hydraulic lines. I decided to use the kit wheels because I wanted to open up the spokes on the hubs. Since the kit wheels are cast in two pieces with the inside hub being molded with the tire and the outside hub a separate piece, this process was easy to do. A Dremel tool with a conical-shaped grinding bit was used to thin the inside part of the outward facing hub (part A13), then a small drill bit was used to mark the corners of the triangular spokes and an x-acto blade was used to cut between the holes to open the individual spokes. After they were all cut out, I brushed on a little Testors liquid cement in the cutout areas to help clean up any burs and smooth things out. The inside hub that’s molded to the wheel was easy to drill out since the cutouts are circular. The only downside to using the kit wheels is that the tire tread is not molded very deep, and when the mold seam is sanded off, the tread tends to really look worn. I decided to rescribe mine to restore the tread pattern using a sewing needle and pin vise, then using the liquid cement trick and some light sanding. It’s was a little tedious, but worth the effort.
For something different and to match reference photos, I wanted the inside gear doors to hang at an angle. On Merlin engined Mustangs, the doors were kept closed with engine hydraulic pressure, but would extend downward over time after the engine was shut down. I simply measured and shortened the actuator arms for the appropriate angle.
The kit provides options for both shrouded and unshrouded exhaust pipes. “Grim Reaper” did not have the shrouds and so I used the unshrouded exhausts and carefully drilled out the pipes. I didn’t want to use wing tanks on this model, so I used empty pylons and scavenged some sway braces from the Hasegawa kit (which provides several different sets depending on the ordinance carried) and added a stubbed-off fuel line near the pylon. For the radiator exit shutter, I added some internal bracing and an actuator rod.
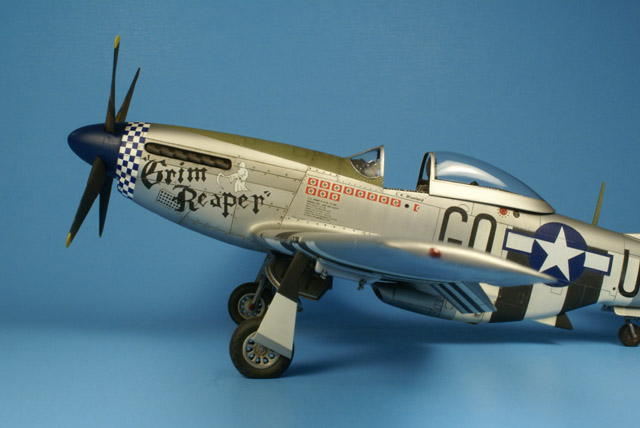
As for the prop mentioned earlier, the chord is too long at the cuffed base of the blades. I sanded these to the appropriate shape. See Ian Robertson’s article for great comparison photos: http://hsfeatures.com/features04/p51dir_3.htm. The spinner is provided in two pieces but when the parts were joined, the conical profile was not as smooth and continuous as I would have liked. I glued them together, filled the seam in, sanded, then rescribed the join line.
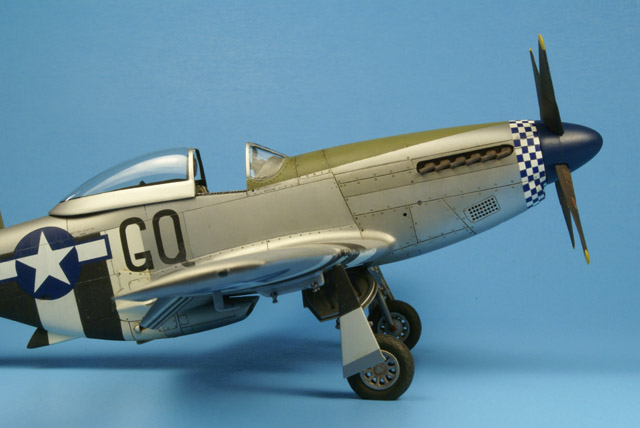
Now, how to deal with the bubbletop canopy? I had already bought some Squadron vacuform replacement canopies, but I wasn’t sure how to attach it to the model since the vacuform part alone is a little flimsy. Ultimately, I decided to use the kit provided frame. I sanded the outside of this frame down to about half it’s original thickness and used epoxy glue to attach it to the inside of the vacuform canopy. That worked pretty well, but then I had to do some additional material removal on the inside of the frame so that it would have a proper sit on the model.
Painting
 Cockpit painting was done with Model Master enamels. The Tamiya color callouts appeared to be generally very accurate. I did however paint the cockpit floor with interior black followed by some drybrushing and scuffing since the wood floors were over-coated with a non-skid surface. Cockpit painting was done with Model Master enamels. The Tamiya color callouts appeared to be generally very accurate. I did however paint the cockpit floor with interior black followed by some drybrushing and scuffing since the wood floors were over-coated with a non-skid surface.
Since the exterior finish would be natural metal, I sprayed Mr. Surfacer 1000 cut 50/50 with lacquer thinner over the entire model to highlight any imperfections and also as a primer to prepare the surface for Alclad II lacquer. Knowing the surface would have to be very smooth, I used micro-mesh polishing pads (3200 to 12000) to polish the primed surface, then sprayed the fuselage and control surfaces (except the rudder), gear doors, and under wing fuel tank access panels with a base shade of aluminum, followed by dark aluminum for the cowl panel surrounding the exhaust, and finally a mixture of aluminum and dark aluminum for several additional panels on the fuselage. The rudder was sprayed with Floquil old silver with some light gray added to give it more of a silver doped look. Since the wings were painted a silver lacquer by NAA, I painted the wings with Floquil old silver to provide a contrast to the more lustrous Alclad aluminum. The next items to paint were the invasion stripes on the fuselage and underside of the wings. I applied a frisket mask in the shape of the fuselage stars and bars insignia to ensure the stripes wouldn’t show through the decals. Tamiya tape was then applied to mask the outline for the stripes. After spraying the area MM flat white, the white portions were masked, and the black stripes were sprayed, along with the black ETO bands on the wings and horizontal tail. Next, the OD anti-glare panel was masked and sprayed with MM OD and faded OD. At this point, I started thinking about the tiny blue and white checks around the front part of the cowling and how well the decals probably wouldn’t fit. I decided to spray a white band around the nose, so that if the decal didn’t fit or there were gaps, it would be easier to just add blue decal pieces or blue touchup paint, and I’m glad I did this.
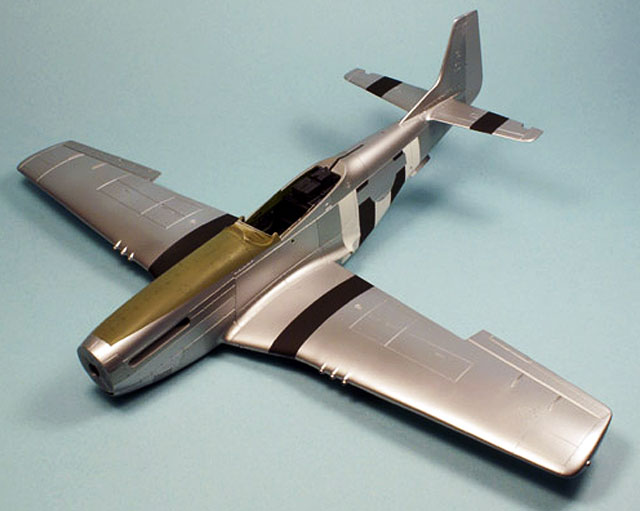
I was really impressed at how durable the Alclad was, particularly when applying Tamiya tape over the surface. In contrast, I found that the Floquil old silver was much more delicate to handling and tape which required some touchup. Next time, I’ll try something different for the wings.
The landing gear was painted with Floquil old silver mixed with some light gray, and then given an oil wash to bring out the detail. Strips of kitchen aluminum foil were added to replicate the chrome look of the oleos. The wheel hubs were spray with Alclad aluminum. The exhaust pipes were sprayed black, then dry brushed with a mixture of steel and dark brown, and later, brown and white pastels were brushed on. I sprayed the spinner MM blue angels blue as it was similar to the blue on the checker decal.
Decals and Final Weathering
Since the 354th FG was operating out of open fields in France following D-Day, I wanted to replicate a dull, oxidized aluminum finish. I also wanted to hide any decal film, so I didn’t hesitate too much to use some clear coats to achieve this. I wanted to chip up the invasion stripes and ETO band paint at the wing leading edge as seen in reference photos of this plane. This was accomplished by inserting a half dozen or so pieces of copper telephone wire in a pin vise to make a mini wire brush and then flicking the paint off the leading edge. This worked well as the paint didn’t seem to adhere very well to the Floquil old silver.
Next, the whole model was sprayed with Future, primarily to protect the paint from the upcoming oil wash. After the future was allowed to dry a couple of days, the decals were applied. I noticed that many of the stencil decals and even the data block were oversized, so those were not used. The national insignia decals had a much lighter blue than most decals, which didn’t look right, so I didn’t use these either. Fortunately, I had the Superscale #48-915 insignias and stencil sheet with the proper blue for the insignias. I used my Waldron punch and die set with the #4 punch (.089) to make fuel tank filler caps out of red decal material. They fit the caps on the fuselage and wings perfectly. The “Grim Reaper” artwork was applied and was so thin that the carrier film was virtually invisible over the Future.
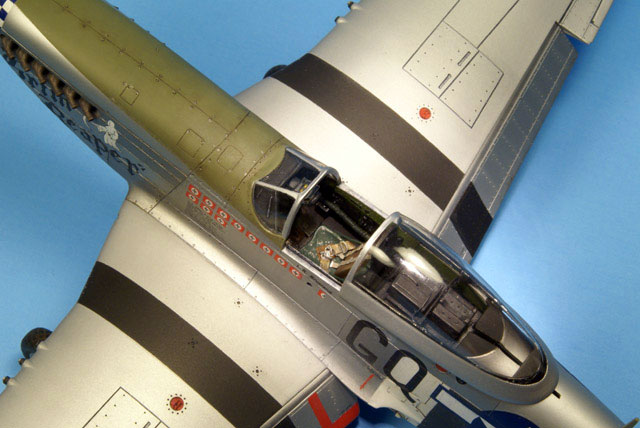
I saved the nose checker decal for last. To increase chances for success, I cut the single piece decal into about six sections and applied each piece separately starting at the top, allowing 30 minutes or so setting time before applying the next one. I also cut small slits between the checkers at the spinner edge to help them set along the curved surface. By a small miracle, the checkers on the bottom pieces lined up perfectly. I cut some blue squares from one of the insignias I didn’t use to fill in the checker pattern around the ram air inlet.
After finishing up the decals, I began applying an oil wash using Winsor & Newton artist oil paints thinned with turpenoid. All of the panel lines got an initial wash of Paynes Gray lightened with white as I didn’t want too much contrast. The control surfaces received a darker wash of Paynes Gray. Next, I applied a mixture of burnt umber and Paynes Gray to dirty up the engine cowlings, OD anti-glare panel, and areas around the fuselage near the radiator scoop and oil cooler. Finally, additional washes were applied to the fuselage and then removed with a dry cotton bud, leaving some of the oil residue as a tint and creating vertical streaks in some areas. A final clear coat was applied to the “lacquered” wings and anti-glare panel using Polly Scale flat, and a mixture of satin and flat was applied to the fuselage and other “aluminum” parts. A silver Prismacolor pencil was used to apply some light paint chipping around the propeller, anti-glare panel, and wing walk areas.
Model,
Text Copyright © 2008 by Scott Miller
Page Created 15 September, 2008
Last Updated
15 September, 2008
Back to HyperScale
Main Page |
 Home
| What's New |
Features |
Gallery |
Reviews |
Reference |
Forum |
Search
Home
| What's New |
Features |
Gallery |
Reviews |
Reference |
Forum |
Search