Trumpeter's 1/32 scale
Messerschmitt Me 262 A-1a
by
Ian Robertson

|
Messerschmitt Me 262 A-1a |

Trumpeter's 1/32 scale Messerschmitt Me 262 A-1a is available online from Squadron.com
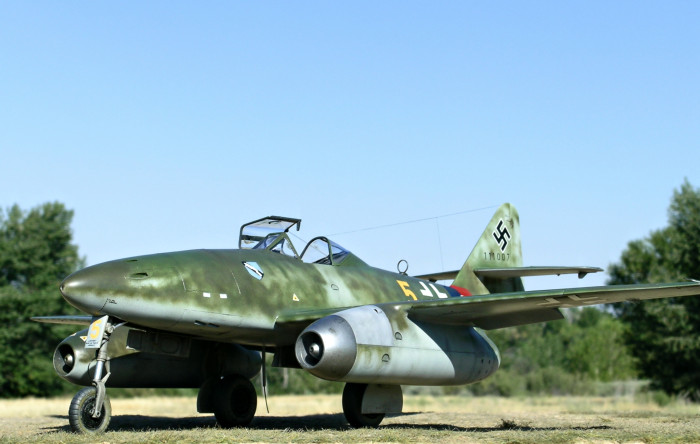
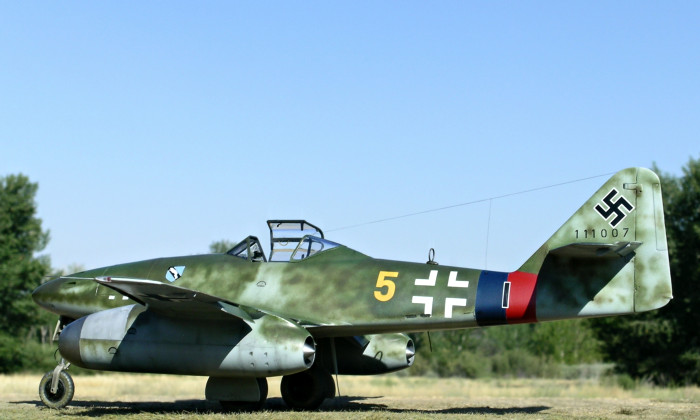
On 8 May 1945, Uffz. Anton Schöppler of 11./JG7 surrendered his Me 262 A-1a “Yellow 5” to British forces at Fassberg, Germany. The aircraft was subsequently scrapped without ever being flown by the RAF. With my model I have attempted to represent “Yellow 5” as it appeared shortly after falling into RAF hands.
Trumpeter’s 1/32 Messerschmitt Me 262 A-1a is an impressive kit and a welcome addition to the growing number of large scale offerings for aircraft modelers. The kit contains 365 parts, most of which are molded in light grey styrene and feature recessed panel lines and fine rivet detail. The kit also includes a fret of photoetch, vinyl tires (an unfortunate mainstay of Trumpeter kits in my opinion), and clear engine nacelles for those wanting to display the internal plumbing of the engines.
Trumpeter’s Me 262 distances itself from the competition by providing leading edge wing slats that can be displayed either retracted or extended (note - the slats were almost always seen extended when the aircraft was on the ground). This option for the slats is not available in the various smaller scale representations of the Me 262, nor in Hasegawa’s 1/32 Me 262 (an old-tool kit that resurfaces from time to time). Kudos to Trumpeter for not overlooking this detail.

Construction was straightforward and without any major fit problems. Thankfully the kit lacks many of the fiddly details, such as metal hinges on control surfaces, common to some of this company’s earlier releases. Don’t forget to add weight in the nose before gluing the fuselage halves together, otherwise your model will become a tail sitter.
From the outset of this project I decided I would remove the rivet details and most of the panel lines because these features on the real aircraft were puttied and sanded smooth. My filler of choice was Tamiya’s basic grey putty. The exercise of filling and sanding the exterior surfaces of the model was time consuming and mind numbing (I took a three month hiatus from the project at one point because of the tedium and lack of tangible progress). I’m not sure if I’d go to the same trouble again if I build another Trumpeter Me 262, but I’m pleased with the outcome.
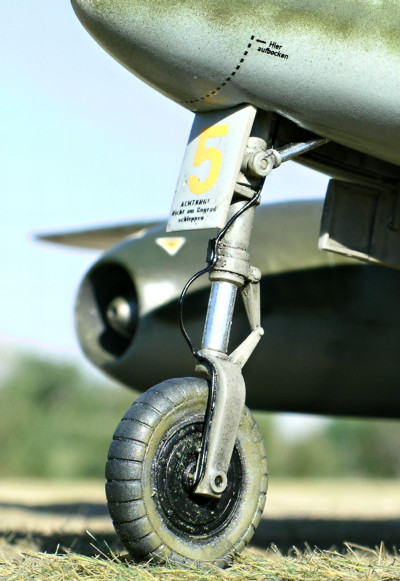
I replaced the kit’s vinyl tires with weighted resin wheels from Master Casters in the UK (set MST32005).

Apart from this upgrade and the use of aftermarket decals, no other aftermarket additions were made to the model. Custom additions to the model include the addition of brake lines, a replacement DF loop antenna, a replacement pitot tube made from syringe tubing, wiring in the wheel wells, canopy details, and an antenna wire made from stretched sprue.
Camouflage
 I primed the model with Tamiya fine grey surface primer. I then painted and masked the red/blue Reich defense bands using mixtures of Polly Scale acrylics. I primed the model with Tamiya fine grey surface primer. I then painted and masked the red/blue Reich defense bands using mixtures of Polly Scale acrylics.
Polly Scale acrylics were also used for the RLM 81/82 over RLM 76 camouflage, as well as the light grey on the port nacelle.
Alclad II duraluminum was used for the natural metal on the front of the port nacelle, and in the wheel wells.
The cockpit was painted RLM 66.
Markings
In preparation for decals I applied a clear gloss coat of Future over the model and allowed it to cure for 24 hours. The decals I used were from Eagle Editions’ EagleCals sheet #96. As always, the EagleCals decals performed flawlessly.
Most sources I’ve come across indicate that this aircraft’s werknummer was 110007. Indeed, that number looks correct from photos that show the port side of the tail. However, when I looked up W.Nr. 110007 in Dan O’Connell’s “Messerschmitt Me262: The Production Log 1941-1945” (2005, Classic Publications), no such number was listed. Instead, Schöppler’s “Yellow 5” was identified as W.Nr. 111007 built at Leipheim. Closer examination of the photos reveal that the third number in the sequence was situated on a dark patch of camouflage, perhaps making it look like a “0” when in fact it was a “1”.
I opted to go with O’Connell’s interpretation given that his entire book is dedicated to documenting work numbers of Me 262s.
Images of the completed model were taken outdoors in natural light with a Nikon Coolpix 5400 digital camera. The “blur” tool of Adobe Photoshop was used to merge the trailing edge of the base with the background. The “unsharpen mask” tool was used to restore some of the clarity and crispness lost during image compression.
Model, Images and
Text Copyright © 2008 by Ian Robertson
Page Created 16 December, 2008
Last Updated 16 December, 2008
Back to HyperScale
Main Page |
Home
| What's New |
Features |
Gallery |
Reviews |
Reference |
Forum |
Search