|
Roden's 1/48 scale JOV-1A Mohawk
"Whispering Death"
by
Hubert Ortinger
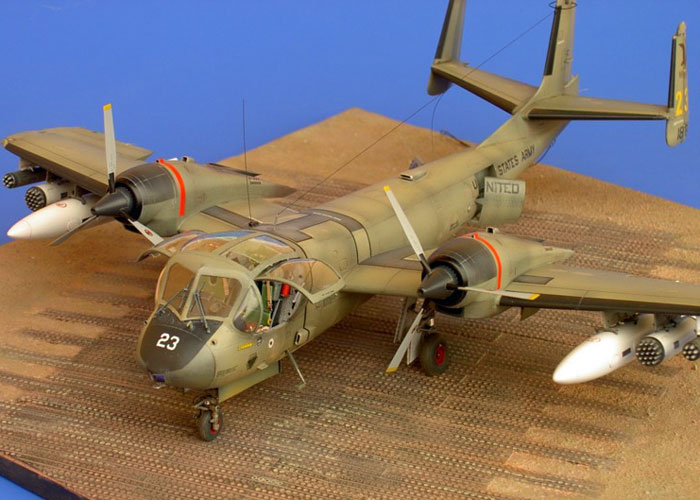
|
Grumman JOV-1A Mohawk |

available online from
Squadron.com
Background
The first Mohawks deployed to Vietnam were six armed JOV-A1s of the 23. SWAD unit (Special Warfare Aviation Detachment). They arrived at Nha Trang/Vietnam in September 1962 and had the task of supporting the armed forces of the South Vietnam Army in form of air reconnaissance.
The rules of engagement meant that the Mohawks for the time were only armed with 50 cal. machine guns, which were allowed to fire only in case of attack. In addition a Vietnam observer had to fly along with the American pilot.
This combination delivered an abundance of valuable information concerning troop movements, bases and logistics.
Meanwhile, the deployment of armed JOV As led to serious resistance in the Pentagon. The Air Force argued that the Army should be limited to the roles of troop transport, clearing-up and medical supply/evacuation, and otherwise combat helicopter should be deployed. All other deployments from the air should be the role of the Air Force.
On the other side a set up commission held the opinion to even increase the number of airplanes to 24 aircraft (and 36 UH-1 Huey´s) per division for protection.
Up to the summer of 1965 30 Mohawks were stationed in Vietnam. These formed the 73. ASC (Air Surveillance Company), and provided the 1. Cavalry Division. Until 1971 there was still formed the 131 AC who take care of the 101. Airborne and the 1st Marines.
While the debate in Washington escalated, the Mohawks worked satisfactorily in combat missions. Particularly due to its quiet turbo-prop engines they were in the position to spy the Vietcong effectively. The effectiveness of artillery fire was also trebled. Therefore a plan was directly worked out to tap the full potential of the Mohawks, whereby the restriction of weapons stood in the way.
The Army argued that the extent of the destruction with bombardment had to be increased, so the aircraft were rigged with 2,75 inch rockets in the field. Now the Mohawk changed itself already to something like a fighter-bomber. Due to its fast response time, the Mohawk was requested enthusiastically by ground troops. For the pressed soldiers, it was all the same which branch of service finally came to assistance!
Finally an agreement with the Air Force was fnalised, as the airplanes helped with the bombardment of the “Ho Chi Minh Trail” by B-52 Bombers. Also during night operation, Mohawks equipped with infrared cameras accompanied the Air Force planes and helped by navigation and target acquisition.
Without consideration for the official policy, thereby they were mostly equipped with rocket launchers and automatic cannon containers.
Thanks to its robust construction the Mohawk was equally popular with its crews and feared by the Vietcong, who posted a reward of $1000 for shooting one down. During the war the Mohawk reached a readiness of application of 95% and therefor it was one of the most important staff of the Army in Vietnam.
Roden's 1/48 scale Mohawk
Hats off to Roden for the type choice, but the kit itself should not be praised too much, because it has enough weak points which had to be ironed out!
Above all the sink marks, unfavorably placed ejector pins and those extremely rough surface are to be criticized. Nevertheless the kit offers the basic ingredients for a top model.
Eduard obviously recognised this potential and released three photoetched sets on the market, which can be used to great effect.
Wings
I began by cutting of any flaps and control surfaces. In addition I trimmed with a fresh knife the engravings several times, from the corners to the basic and then milled the material on the back more and more thinly until the parts fall out nearly automatically. On the pictures one can recognize that I copied the hinges and internal wing structure with polystyrene and lined the flaps/rudders with different profiles and putty. The retracted landing flaps are sitting in a fillet, above that the lining of the engine peak is continuing streamlined to the rear. It had to pay attention that the ailerons were provided for stability reasons with three linking in each case.
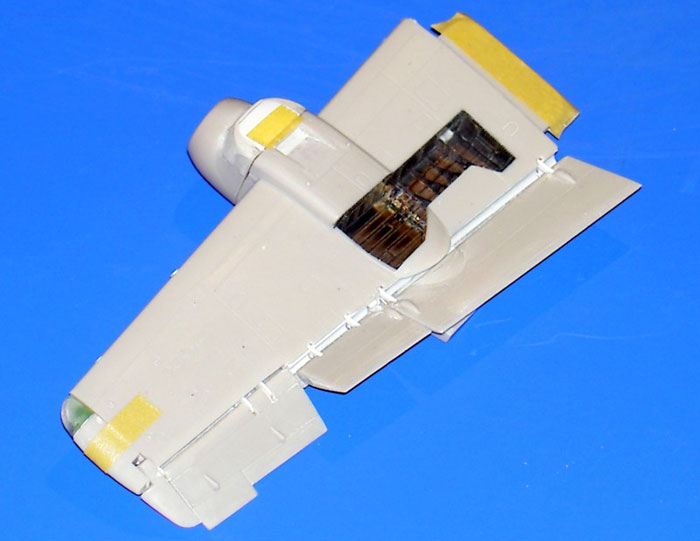
Now EDUARD comes into play with the extremely useful “Wheel well/Undercarriage set”.
This set replace mainly the complete wheel housings and provides for the internal, structured lining of the hatches. Also the nose landing gear bay lined laterally whereby unpleasant columns could be covered. The undercarriage itself is actually marvellous and experienced only an improvement in the form of drags/stowing rings and a filigree shock strut. Finding etched brake hoses less meaningfully, I replaced them by fishing line which I threaded through tiny eyes from wire and stretched Q-Tips. For frightening my wife I flattened the tires on her new iron. When warming up slow there also can be bump out the side bulges.
Next continues to go is the “Exterior set“ and the etched turbine nozzle of the turbo-prop engines. This brass part was bent around a suitable round bar and then is in the diameter more largely/more realistic than the injection moulded part which can be replaced. In addition this Set contains particular various antennas and sensors, caps for the auxiliary tanks, ascent assistance/footsteps, and parts for the rocket launchers. Besides still the interior structure of the airbrakes and/or their bays can also be detailed.
With the air intake of the oil cooler I did not want to make friends myself. The slot is too small and the lining works too approximately and narrowly. I created a new, acceptable form with Sheet and putty. In addition to the pics one can recognize the claimant expenditure led that one could see inside and/or afterwards into the engine compartment and through it, what caused me to design and fit in the oil cooler also. The correct, because rectangular servo tabs are again from EDUARD. For placing the air scoops on the engines one better consult pics from the original. With the lining of the landing light with bare metal foil and glazing it with adhesive tape I ended this section.
Cockpit
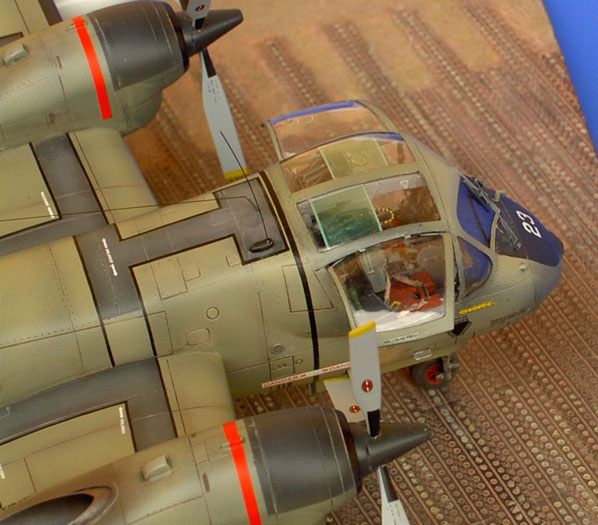
If you think the kits cockpit is anyway well equipped, then look at the EDUARD “Interior Set”!
Times apart from the mandatory coloured printed instrument panel, structured linings for floor, rear wall and sides are present. Center console and Overhead display are also revalued with in interior colour printed etched parts. Hand gears and switches as also many other small parts on the etched plates are present more than doubly.
The standard equipment fire extinguisher is still brought more near to the original with a mounting plate. The foot pedals are somewhat fussy but however look far better than made of plastics. And then the ejection seats! Why should I according to EDUARD and sand off the raised detailing at the side panels and exchange the beautifully made upholstered seats against flat etched parts! Fast looking on www.ejectionsite.com brings light in the dark.
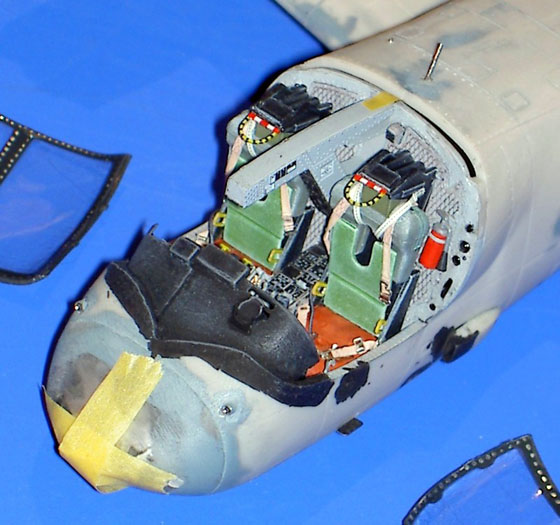
Roden´s seat is a Martin Baker Mk J5D but Grumman had originally equipped all OV-1 with MB Mk J5A. Due to EDUARD the kit seat can be backdated. Nevertheless I did not wanted to give myself content with the flat metal parts and padded up the seats face with compound. I carved the backrest from plastic card, this looks more ductile. The harness is perfectly and I also used the stripy ejection trigger. Very flat at first I after-painted the yellow/black stripes with thick colour and rounded off the edges.
On original photographs I thought I could recognize that over the pilots a sun protection is installed, which could be shifted obviously as required. Roden and EDUARD do not deal with it so I fiddled in such a way cutting from a green-toned transparent slipcover an appropriate part, which I stuck simply over the overhead display bar. For armed JOV´s do not forget to install a sight on the instrument panel. On painting the cockpit you should put large care, since the large panorama windows permit a good view. I got the correct clay/tone with Revell semigloss grey and after a unobtrusive washing I lightened the details with dry brushing in basic colour and white. To the conclusion the armatures receive still different coloured accents.
Nacelle
Inserting the cockpit unit and sticking the trunk halves makes no problem. When sanding, antennas and sensors are not considered because they were later replaced by appropriate metal parts, which do not break according to experience so easily. For the radome I picked the version equipped with infrared night-vision device and deposited the camera window with a coloured confetti. Now it´s time to inset the windshield and to assemble with the rooflight the transition to the upper side. The struts of the transparent parts and naturally also the folding doors I painted black before and imitated the rivets on the inside with a thin silver felt marker. During the front transition of the windshield to the nose it becomes an unpleasant gap, which it applies to fill up. In addition I used abrasive dust, baking powder and super adhesive. This mixture can be sanded and engraved afterwards well. For the protection of the transparent parts I masked them with Tamyia tape.
For detailing the air air brake there is a etched part, crescent-shaped and perforated for the outer reinforcement, but I did without it and provided directly all ribs with holes. The brass part for the air break bay revalues this in any case and the hydraulic cylinders had been taped with bar metal foil after painting. Same applies, besides noticed also to the drawing in mechanism on the undercarriage.
There is no problem to install the wings and the horizontal tail in the correct angle. aileron, elevator and rudders are naturally fixed angled – for what we have sawn them out!
External Stores
In any case I wanted to use the beautifully made Pylons and extremely purify Sway Braces and in such a way I decided for all wing stations with reserve tanks and two rocket launchers per side. To get away from all the same olve green drab I selected another Speak white lacquer finish for a pair mounting plates, the large Pod´s and the tanks.
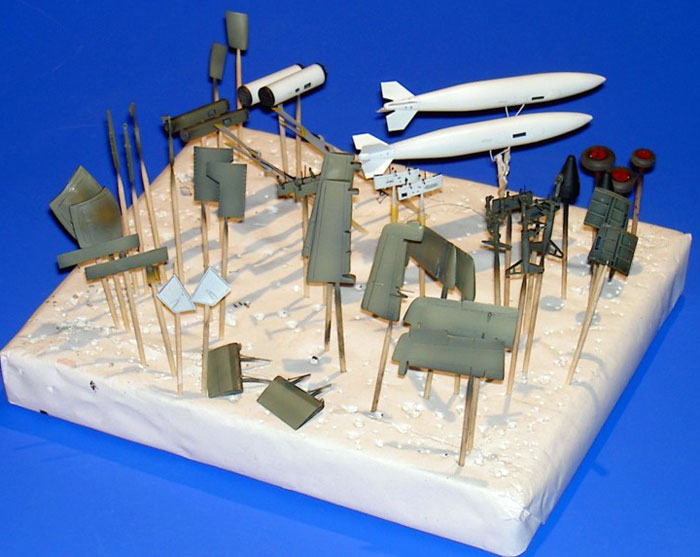
As to original photographs occupy it could happen quite times that this was exchanged among themselves. In any case it makes an interesting combination.
Painting
Before I dedicated myself to the chapter lacquer finish I would like to send on ahead that due to the rough plastic surface this had to be completely sanded and rescribed to create the base for a perfect finish.
With a good conscience I did not bother to pre-shade, since the painting would be anyway a relative dark one, which should be usually lightened partially. Only small openings like the air scoops and the insides of the surfaces where later the rudders and flaps had to be installed I brushed tank grey. The wheel wells and wheel housing covers I coloured light-grey thereby afterwards I could dry-brushed them with white.
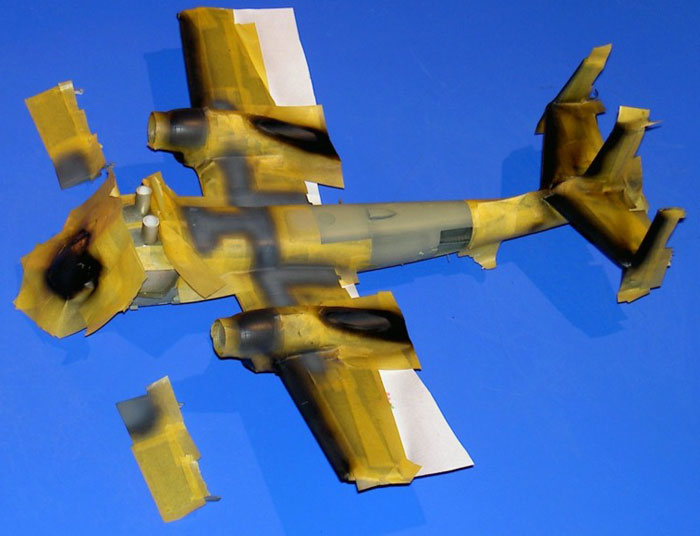
Despite the monochromacity of the airplane it was clear from the outset that it would not become easy to was me, when I began to mix different shades of green. I selected colours of the comp. “X-tra Colours”: olive Drab, olive Drab faded (faded) and Vietnam Forrest Green which I blunted with some drops Revell olive yellow, light olive and earth. I sprayed these alternate and irregularly whereby I made certain that the top side should appear more brightly because it was more faded by the sun logical-proved. Some panels I masked to fool the viewer it concerns replaced parts. I left also the radome dark and more shining because the infrared equipment was upgraded in Vietnam later. Since I did not want to install the rudders, flaps and airs brake after completed the lacquer finish I need not to made certain that these would stand out against the rest. All too „checkered“ it was not allowed of course and so I lightened the colours with skin, white and sand to adapted the different ranges partly again. After sufficient drying time I sprayed the area for the deicer edge black and the Walk Way dark grey. Within the lower, front range, where dust and dirt would be whirled up I weathered unobtrusive with a „sand/earth“ mixture.
To the entry area I added a few chips and scrapes with a silver pencil.
Decals
The Decals make a good impression, but only at first sight! I have really tried everything which had accumulated at experience in eight years model building. It did not work very well to apply the decals. Thanks god that I had selected the “Low Vis“- option!
Apart from this, I found the kit´s markings oob not very pleasant therefor I made from the emergency a virtue and choosed myself a new exemplar from the publication „Mohawk in Action“: The # 23 of the 131. Surveillance aviation company, based in Phu Bai.
I copied and enlarged the eagle on the vertical stabilizer, refined the outlines and brought out new claws and pecker. The script nameplate I designed freehand. After scanning and upgrading I transferred both to Window Words where I puzzled out the correct size in several attempts to print it out on a blank Decalsheet. Afterwards I Fixed it with commercial clear varnish. For not having the best printer I still had to mend everything with a brush. The “23“ I cut as a precaution directly from a yellow fuselage strip Decal. Before removing the tape from the transparent parts I sealed the whole surface with flat clear lacquer which I usually still add one/two drops gloss lacquer.
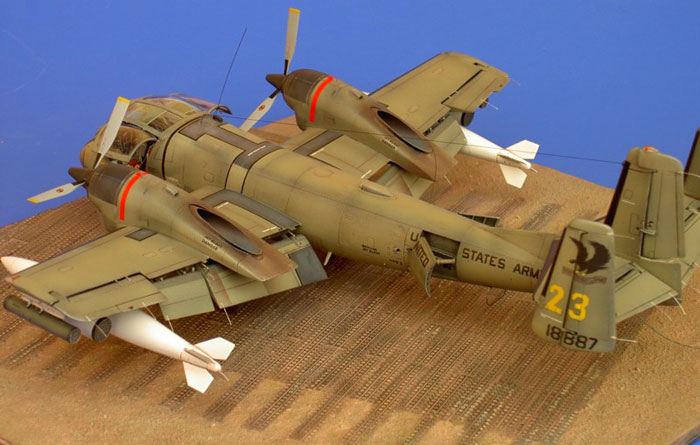
After the installation of the undercarriage and assembling all extra painted parts I prayed that the weight in the radom and besides the landing gear bay would be sufficient to hold down the nose! Roden mentioned nothing in the guidance and it´s a propper portion lead needed to balance that long tail. For a safe stand it was undercharged so I directly drilled holes into the tires to tighten it on the planned display with wire.
Base
For the presentation of my model I afforded myself a segment of runway, fastened with PSP (perforated Steel Planks). This Resin plate is already outright to use and must be only be painted. However that turns out more difficulty than believing could, since it depends on the fact that the visible soil in the holes should have the same colour as around. Whashing and dry brushing is not adequate, so finally a sophisticated detail painting was necessary to come to a satisfying result. There were used all possible nature colours from Revell (earth, kaki, stone-grey, sand, fesh, mouse-grey…) and different Oils (Umbra burnt, Vandikbrown, black, Nepal-yellow, flesh, ochre…). My intention was to merges the plane from some distance with the diorama, what probably should be the sense and purpose of a effective camouflage. Sooner or later I becomes populate.
Model, Images and
Text Copyright © 2008 by Hubert Ortinger
Page Created 10 January, 2008
Last Updated
10 January, 2008
Back to HyperScale
Main Page |
Home
| What's New |
Features |
Gallery |
Reviews |
Reference |
Forum |
Search