|
Eduard's 1/48 scale
Fokker D.VII (OAW)
by
Scott Lyle
|
Fokker D.VII (OAW) |

Eduard's 1/48 scale Fokker D.VII (OAW) is available online from Squadron.com
Perhaps the last great fighter of World War 1, the Fokker D.VII was said to make a mediocre pilot a good one, and a good pilot an ace. Fitted with a powerful Mercedes engine, the Fokker was easy to fly, featured a high rate of climb, and could be thrown into a full speed dive without any fear of structural failure. When it began arriving on the front in the spring of 1918 German pilots began to rack up kills so quickly that the Allies feared that a second Fokker Scourge had begun. Although it arrived too late in the war to truly alter its course, it was so successful that one of the terms of the Treaty of Versailles was that Germany hand over all of its remaining Fokker biplanes to the Allies.
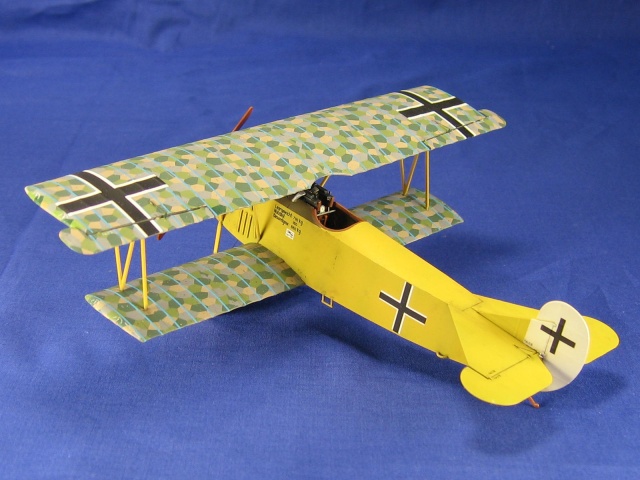
While the Fokker D.VII produced a number of new aces, some of the older hands used it to even greater success. Using Eduard’s OAW kit I decided to model Erich Lowenhardt’s yellow Fokker D.VII(F), a later version with a BMW engine. Germany’s third highest scoring ace of the war, he had 21 victories when he began flying the D.VII in May 1918 – when he was killed in combat less than three months later he had 54.
This is Eduard kit number 8131, “Fokker D.VII (OAW)”, in 1/48 scale.
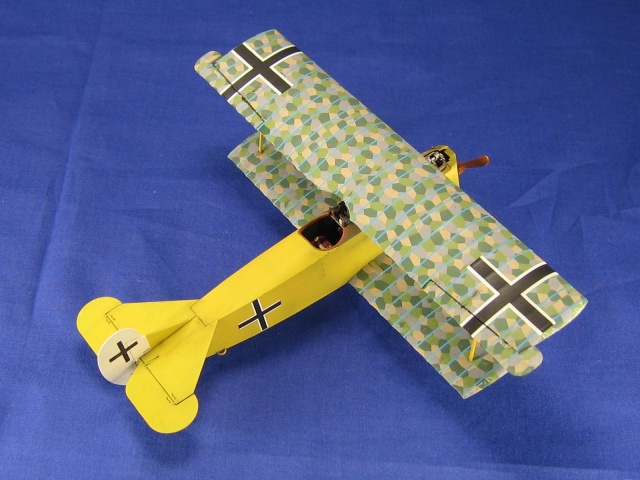
Eduard’s relatively new model includes a color PE fret, a set of masks, and a large set of decals. Included in the decals are some sheets depicting the famous four-color lozenge paint schemes seen on German fighters during the war. Eduard thoughtfully sized the lozenge schemes into the correct sizes and shapes for the wings, fuselage, and even the interior cockpit walls. The decals include two different color schemes of the lozenge pattern, one for the upper surfaces of the wings and one for the lower surfaces. Also included are two different colors of rib tape decals to be used over the lozenge decals on the wing spars, blue and purple.
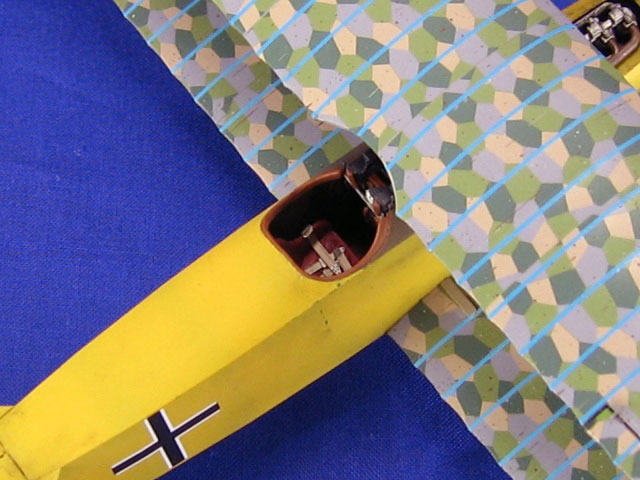
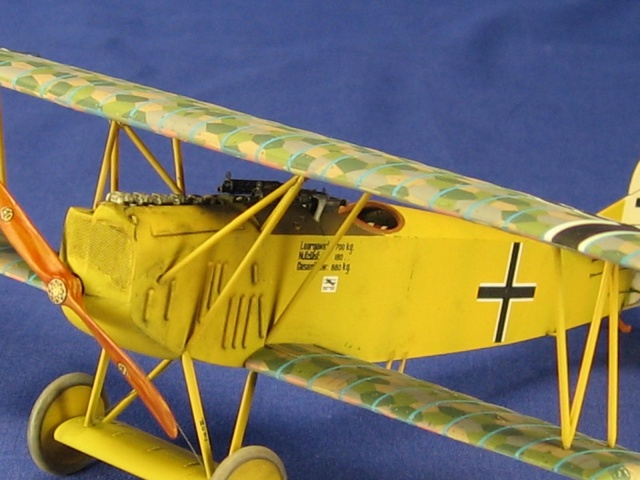
Construction began with a nicely detailed replica of the engine, which mounts to a wall in front of the cockpit. Next up was the cockpit, and Eduard includes a detailed seat, color PE seat belts, the aforementioned lozenge decals for the walls, ammunition boxes for the twin machine guns, and the usual control stick and instrument panel. I painted the floor in wood shades and the seat in a dark red color. The instruments, rudder pedals, and control stick were picked out by hand, and the lozenge decals were applied to the fuselage side walls. There is some framing molded on the side walls that the decals cover, so I picked them out by hand using Testors Neutral Gray. Everything was then given a light raw umber wash and set aside to dry. Once that was dry the fuselage halves were closed up, and I attached the lower wing, stabilizer, vertical tail, and landing gear structure. The fit of all parts was excellent, resulting in minimal seam cleanup.
The aircraft I was modeling was basically all yellow except for the lozenge patterns on the wings, an olive drab panel just in front of the cockpit, and a partially white tail. I figured the decaling would be a lot easier if I left the upper wing and its struts separate at this point, so I masked off the cockpit and the exposed part of the engine and headed for the airbrush booth.
Painting
 After a primer coat of Mr. Surfacer 1000 was sprayed on the aircraft and the upper wing, I preshaded the fuselage with some Tamiya NATO Black. Next I sprayed Testors Acrylic RLM 04 Yellow all over the fuselage and the hubs of the wheels, letting some of the pre-shading show through. It took a lot of coats to get the yellow to cover to my satisfaction, and I’ve since read online that other modelers have had similar issues with yellow. If I ever have to spray large yellow areas again in the future, I think I will use white as a primer color instead of light gray. After a primer coat of Mr. Surfacer 1000 was sprayed on the aircraft and the upper wing, I preshaded the fuselage with some Tamiya NATO Black. Next I sprayed Testors Acrylic RLM 04 Yellow all over the fuselage and the hubs of the wheels, letting some of the pre-shading show through. It took a lot of coats to get the yellow to cover to my satisfaction, and I’ve since read online that other modelers have had similar issues with yellow. If I ever have to spray large yellow areas again in the future, I think I will use white as a primer color instead of light gray.
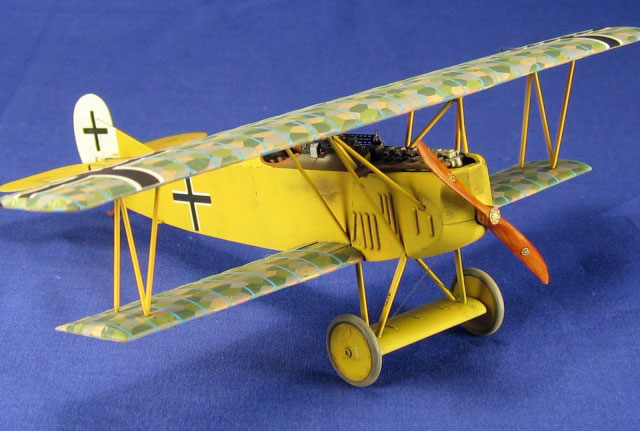
Using the color profile in the Osprey book as a reference, I masked off part of the tail and sprayed it Testors White. The small olive drab panel in front of the cockpit was masked off and sprayed Tamiya Olive Drab that I lightened with some Tamiya Dark Yellow. I then added some more Dark Yellow to the mix and airbrushed the centers of the panels to provide a little more contrast. Once everything was dry I sprayed Future all over in preparation for the decals.
Applying the Decals
The first set of markings I chose to apply were the lozenge decals for the wings. Though they are very accurately pre-sized, it took me three nights to apply all of them to the upper and lower surfaces of both wings. It then took me another four nights to apply all of the rib tapes to the wing spars – again on both surfaces of both wings. I actually am not sure if Lowenhardt’s yellow Fokker had the rib tapes, but in the end I decided to go ahead and use them.
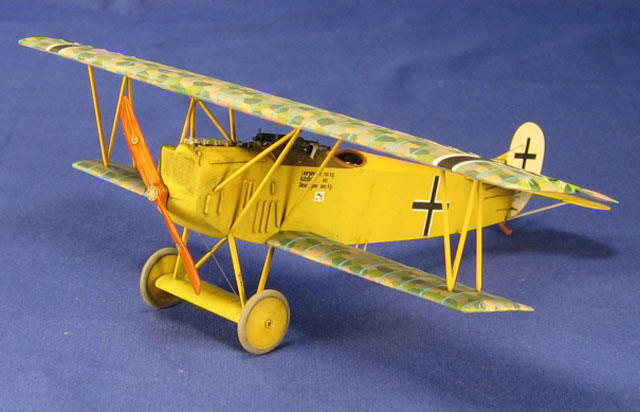
I used the black crosses from the kit for the tail, fuselage, and wings, and than applied the standard stencil-type markings from the kit decals as well. Eduard’s decals performed beautifully with the Walthers Solvaset solution that I tend to use.
With the decals in place it was time to complete the assembly of the model. I assembled the twin machine guns, which with the help of the photo etch cooling jackets and gun sights end up looking very detailed. They were painted Tamiya NATO Black, dry-brushed with some Gunmetal pigments from MIG Productions, and attached to the model. Next came the upper wing, and here Eduard provides strong locating pins and holes in the wing and fuselage for all of the struts. I was able to first tape the upper wing in place just resting on its outboard struts, and then glue them permanently in place. I set the model aside to dry overnight, and then next day the remaining inboard struts were attached without a problem.
I used the kit supplied masks to airbrush the tires Testors Panzer Gray, and then I dry-brushed them Testors Neutral Gray. The prop and tail skid were painted Testors Wood, followed by some wood grain-simulating streaks of Testors Leather, followed by a coat of Tamiya Clear Orange. The kit-supplied photo etch prop hub was attached to the prop, which was then glued to the model.
The final assembly step was the rigging, and mercifully on the D.VII there isn’t much! I used stretched sprue for the various wires that controlled the rudder, stabilizer flaps, upper wing flaps, and around the undercarriage. Once dry they were painted Testors Panzer Gray.
Final Weathering
Using a small brush I applied a thin wash of 50/50 Lamp Black/Raw Umber oils to accentuate the features around the cowling and the edges of the flaps. Up next was an airbrushed coat to Testors Lacquer Flat Finish, sprayed straight out of the bottle. I added some very subtle paint scuffs around the cockpit using some Testors Dark Green and some very subtle paint chips around the nose cowling using a Silver Berol pencil. My final step was to mist on a bit of Tamiya Desert Yellow around the wheels and rear skid to simulate some dust and dirt.
Eduard’s Fokker D.VII is a joy to build and I highly recommend it. The fit of the parts is excellent, and they have integrated the color photo etch parts beautifully into the construction process. The decals are very comprehensive, and the pre-cut lozenge decals make adding that unique form of camouflage to the model quite simple. There are so many different colorful D.VII’s to choose from, it’s a great way to add a little color and contrast to your lineup.
References
-
Osprey Publications, Aircraft of the Aces #53, “Fokker D.VII Aces of World War 1, Part 1”
-
Squadron/Signal Publications, Aircraft in Action #166, “Fokker D.VII in Action”
-
Wikipedia, the Online Encyclopedia
Model, Images and
Text Copyright © 2008 by Scott Lyle
Page Created 1 April, 2008
Last Updated
1 April, 2008
Back to HyperScale
Main Page |
 Home
| What's New |
Features |
Gallery |
Reviews |
Reference |
Forum |
Search
Home
| What's New |
Features |
Gallery |
Reviews |
Reference |
Forum |
Search