|
Hobbycraft's 1/48
scale
Avia S-199
by
Jon Bryon
|
 |
|
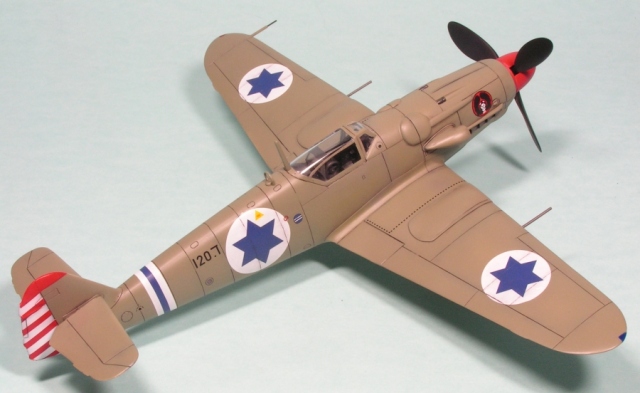
Avia S-199 |

Academy's 1/48 scale Avia S-199
is available online from
Squadron
I purchased this
Hobbycraft kit in 2001 and built it during 2007 alongside a sister kit,
Academy's Spanish HA-1112-M1L. It's a good kit. The surface detail was a
little inconsistent, so I rescribed the recessed detail. I didn't have
any references for this aircraft, so I relied upon what's on the various
modelling websites, used the excellent 109 Lair
http://109lair.hobbyvista.com/index1024.htm and 101 Squadron
http://101squadron.com/101/101.html websites, and what I could
find in the modelling magazines I have. Still, I let a few errors slip
through!
The overall fit of the kit
was good. I built the cockpit straight from the box, so the seat is
lacking belts, but the detail is good enough for me. Because the cockpit
is so dark not a lot can be seen. The upper wings were attached to the
assembled fuselage, to ensure the best fit possible, and then the lower
wing was attached. Assembly was fast and uneventful. The only major fit
issue I found was the canopy and windscreen, which are an appalling fit
to the fuselage. Not a lot one can do about that...

Some small changes were made to the kit.
I replaced the pitot tube
and underwing guns with brass tube and drilled out the barrels of the
fuselage guns and the engine exhausts. I was not convinced with the kit
instructions to attach the wheels vertical to the ground, since
contemporary photos of IDF S-199s show them canted. I would have used
the thinner wheels, but had to use the wider ones since the thinner
examples were in England and the model was built in China.
References led me to use
the short tailwheel and tall antenna mast, remove the smaller strake
from the cannon bulges, and use part D16 instead of D4.
Cameron Lees, in his
article on this model in Scale Models International (September 1995),
stated that Hobbycraft got the shape of the the wheel wells wrong; they
should be round. However, photos on the 101 Squadron website clearly
show (in my opinion) that at least some IDF Avia's had the wells as
shaped in the kit so I left them alone.
The assembled model was
cleaned in detergent and then primed using Mr Surfacer 1000.
I preshaded the model with
black followed by airbrushing white on the rudder and the rest of the
airframe Mr Color RLM02.
The spinner was sprayed
red and the prop black. Johnson's Klear was used as a clear coat
followed by a pin wash of black oil paint thinned with Zippo lighter
fluid.
 The kit decals were used,
but I sliced the red stripes from the rudder decal and applied them
separately. The kit instructions offer many choices for stencils and I
just guessed which ones to use. They also offer the rear fuselage stripe
in red or blue; I believe that, going by contemporary pictures, blue is
the correct colour. The kit decals were used,
but I sliced the red stripes from the rudder decal and applied them
separately. The kit instructions offer many choices for stencils and I
just guessed which ones to use. They also offer the rear fuselage stripe
in red or blue; I believe that, going by contemporary pictures, blue is
the correct colour.
The kit decals were thin
but lacked adhesion; I didn't like them. They did not react especially
well to Mr Mark Softer.
The finish was toned down
using Polly Scale Flat and Satin finishes mixed 50/50.
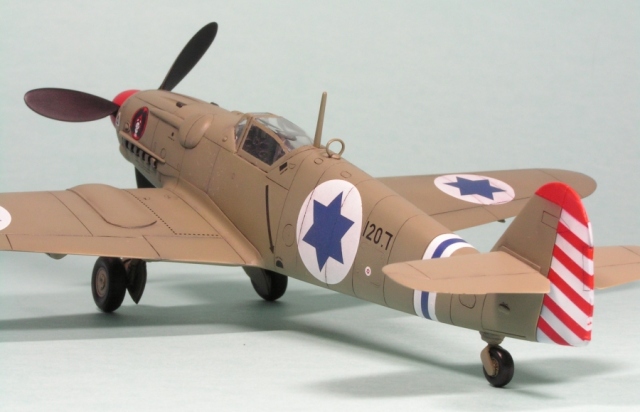
I read
Yoav Efrati's article on the S-199 in Model Aircraft Monthly (June
2007) two days before I finished the kit. This revealed several errors
in my build which, in hindsight, were obvious.
First, I painted the prop
black. Photos show a lighter tone, and Mr Efrati used the airframe
colour, so my propellor is the wrong colour.
My second major error is
that I may have used the wrong colour for the airframe. Mr Efrati
believes, on good authority, that RLM02 is incorrect (although it was
believed to be correct for many years) and that RAL6013 was the true
colour. We live and learn.

If Mr Efrati's information
on the stencils is also correct, I made some small errors here — I
should have used red for the handhold and step stencils and probably
some different triangles.
One further detail was the
wingtip lights. Photos of most Bf109Gs I could find on the 'Lair' showed
clear lenses with coloured bulbs, although I did find some pictures of
restored aircraft with coloured lenses. I thought about this detail too
late, and if I were building the kit again, would cut out the wingtip
lights and replace them with clear sprue.
This was a nice kit that was a fairly quick build.
Click on the thumbnails
below to view larger images:
[../../photogallery/photo00017348/real.htm]
Model, Images and Text
Copyright © 2007 by Dr Jon Bryon
Page Created 25 September, 2007
Last Updated
24 December, 2007
Back to
HyperScale Main Page |
 Home
| What's New |
Features |
Gallery |
Reviews |
Reference |
Forum |
Home
| What's New |
Features |
Gallery |
Reviews |
Reference |
Forum |