|
Aeroclub + Hasegawa
1/48 scale
Spitfire Mk.XII
by Fernando Rolandelli
|
 |
|
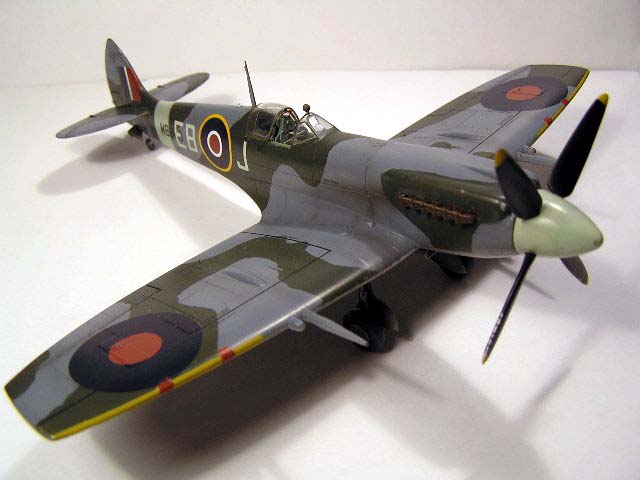
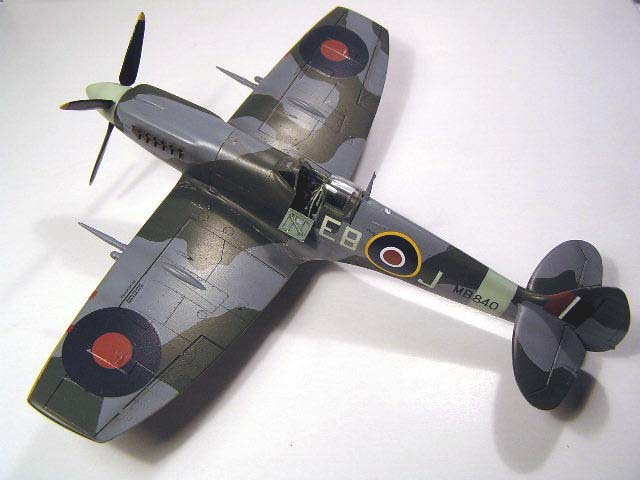
Supermarine Spitfire Mk.XII
MB840, 41st Sqn, RAF, February 1943 |

Hasegawa's 1/48 scale Spitfire Mk.IX is available from
Squadron.com
Background
The RAF’s constant quest to maximize performance for low-level
operations resulted in the Mk XII.
The first model Griffon engine –the single-stage, two speed supercharged
Mk II, giving a maximum output of 1735 hp - was mated to a Spitfire
Mk.Vc airframe, deciding on the Mk XII denomination after many comings
and goings. An ideal aircraft for intercepting 109s and 190s making
nuisance raids at low level, it was 14 mph faster than the IX at sea
level and 8 at 10.000 ft, with the IX gaining the edge as altitude
increased.
As noted elsewhere, the fact that the Griffon rotated in the opposite
direction to the Merlin gave the pilots fits, a problem aggravated in
the later F.XIV due to the increased power. One hundred machines were
ordered, later batches based on the Mk. VIII airframe, and issued to 41
and 91 Sqns. They were profusely used in anti-Jabo operations, for
intercepting V-1s and in fighter sweeps over occupied France.
Something of a hybrid machine, the Mk XII combined the longer Griffon
nose and spinner with a “straight” firewall (resulting in a shorter nose
than the XIV) with a prominent bulge for the Coffman starter, “short”
carburetor intake and round oil cooler; all had a “pointed” rudder and
“c” wings, though the first batch had the fixed tailwheel of the V and
the IX, while the later had the retracting unit of the VIII, and clipped
wings without position lights and “full span” ailerons.
The Kit
The heart of this model is the superb Aeroclub conversion kit. Made
to fit the Hasegawa Mk IX, it comprises a fuselage, propeller, radiator
and blanking plate, and tailwheel doors, just in case. However, it could
be mated to the wing of just any Mk IX kit of your choosing.
Myself, I used the Revell 04554, which is in fact the same kit with
different decals, and which may or may not be cheaper than the Hase’s
according to the vagaries of the market. I know the cockpit of the Hasegawa
Spits to be quite good, so I contented myself with an Eduard Zoom PE,
FE203, fundamentally because of the instrument panel and the seat
harness. Decals would have to be necessarily generic, and came from
several sources, Eagle Strike roundels, Ventura serials and Carpena code
numbers. More about this later.
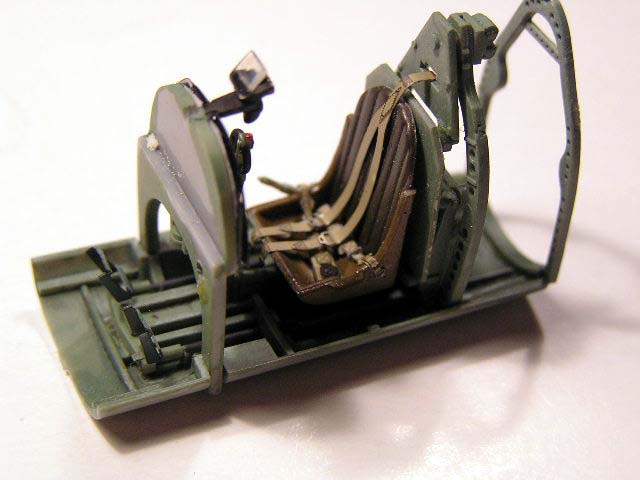
Fuselage
 After
a formal check on the compatibility of the Aeroclub fuselage with both
the wing and the interior components, the building of this started in
earnest. I opened the entry door, replacing the door itself with the one
taken from Hase’s fuselage. Instrument panel went without a problem, but
I used mostly the plastic parts for the rest. The PE parts I used I
repainted, the Interior Grey-Green shade in them being particularly
lurid and different from the Polly S I was using for the rest. The
bakelite seat I painted a mix of Japanese Red-Brown primer and Black. I
used the early reflector sight. I did not use the PE armor plates but
thinned the plastic ones. Extra detail was scratchbuilt. After
a formal check on the compatibility of the Aeroclub fuselage with both
the wing and the interior components, the building of this started in
earnest. I opened the entry door, replacing the door itself with the one
taken from Hase’s fuselage. Instrument panel went without a problem, but
I used mostly the plastic parts for the rest. The PE parts I used I
repainted, the Interior Grey-Green shade in them being particularly
lurid and different from the Polly S I was using for the rest. The
bakelite seat I painted a mix of Japanese Red-Brown primer and Black. I
used the early reflector sight. I did not use the PE armor plates but
thinned the plastic ones. Extra detail was scratchbuilt.
The fuselage parts require some preparation cleaning the flash and
straightening the mating surfaces, but nothing else. Carefully gluing
them in stages will suffice.
The fin is VERY thick, something I fully discovered when trying to
mate the Hasegawa rudder to it. I had to resort to energetically sanding
the exterior, but maybe preventive action by sanding the interior would
have been better.
The unsightly and unreachable gap in the roof of the tailwheel well
was blocked with a strip of Tamiya tape.
Windscreen fits well, though the “cheeks” under the sides are not evenly
molded in the fuselage. I erased them and replaced tem by strips of
styrene cut to shape. Rear quarter light window is a tad too small in
width (but my fuselages always go a bit wide), and too long; I worked
this area up with styrene and cyano.
The propeller seems daunting, but it is not. Once you get a good fit of
the two part spinner (maybe lots of putty here) the blades can be
inserted safely. The spinner fits well against the lip on the nose, even
without the backing plate. I binned the metal exhausts, and replaced
them by the kit’s; I placed blanking plates on the inside of the slots
in the fuselage to insert them later. The exhausts are too deep, and
some of them must be trimmed, taking care they do not fall apart!
Elevators came from the kit, but they depict the “extended balancing
horn” type; I rescribed them to backdate them to the earlier model. I
installed the fuel filler cap as a final fitting, though it would have
been much safer to do it earlier in the assembly; anyway, I am still
suspicion of this “Merlin fitting” in the Griffon powered machine; in
fact the plans in the SAMI book show a different arrangement; I actually
assumed that John was right, and that it was likely that the minimally
modified fuselage would still keep the cap in the same place, changing
probably in later models with the “cranked firewall”.
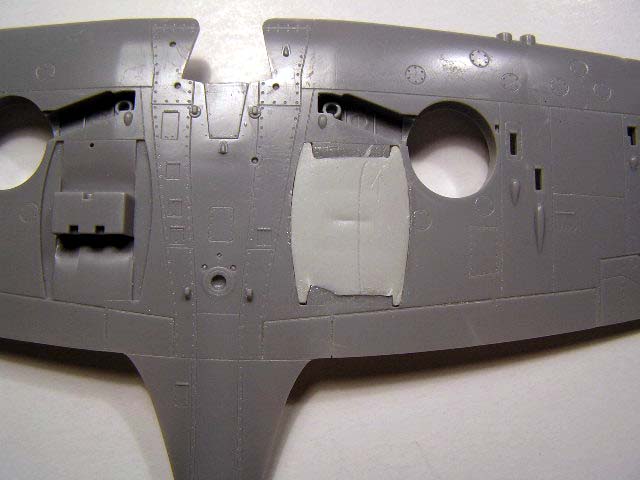
Wings
The wing radiator blanking plate works wonderfully, though
enthusiastic sanding is needed to keep it level. The plastic peels off
if becomes too thin, so I recommend backing it (actually, I would fill
the recess completely) with epoxy. I did not use the Aeroclub oil
cooler, which seemed too big, but an Airwaves resin unit made for the
Tamiya Vb. As in this kit, it stands a little proud of the wing’s
surface, so some sanding is necessary. I also blocked the view into the
cartridge ejector ports with small plastic rectangles. The mixed plastic
and metal carburetor intake and base plate looked awful, but after
several putty applications and more enthusiastic sanding it blended
really well. Hasegawa’s front plate fits well to its lip.
I erased some upper wing bulges that did not show in my plans, but some
more were killed during the vigorous sanding needed to blend the wing to
the Karman fairings. These were restored using “Parsecs” epoxy. The
underwing to fuselage join line also needed puttying and sanding, but
nothing out of the ordinary. I used the “plain” hubs in the wheels
(though there are pictures showing four-spoke ones) and did not install
the link in the oleos. Hydraulic lines were made out of wire.
Painting
The normal Day Fighter Scheme of Dark Green, Ocean Grey and Medium
Sea Grey is applicable to this machine, with a Sky spinner and fuselage
band, and Yellow ID in the outer leading edges.
I used Xtracrylix paints throughout (the MSG rendition is quite
dark), over Alclad Grey Primer (wonderful primer when it comes to
detecting seams and sanding over it, but sometimes its adherence is not
so good; masking tape can pull some bits of it).
Wheel wells and inner doors were painted undersurface color (MSG)
Decals
Well, I had a plan, but, as it is said, “no plan survives contact
with the enemy”.
I had an Eagle Strike sheet for F.XIVs, one of which, from no. 41 Sqn.,
bore the “EB-U” code, in exactly the same typo, size and color (Sky)
displayed on earlier Mk XIIs. Problem was that I had no picture of a “U”
coded machine, but, in the well-known photo of no. 41 cruising in
Squadron strength, an “EB-J” can be discerned. Cutting the upper left
arm of the “U” would do the trick. I managed to make out the serial
number MB840, which had to come from the Ventura sheet, and assessed
that the machine had retractable tailwheel, so it was a late batch
example, which was compatible to the serial. All seemed well, until I
discovered that the EA sheet was badly misprinted. I mean, not
misaligned, but the letters were completely out the backing film! Of
course they disintegrated when I tried to maneuver them into place and
of course the solution would have been ordering another sheet and
waiting, but who can wait with an almost finished kit sitting on his
desk! I resorted to a 1/72 sheet from Carpena, which had the exact size
and color, though the typo was slightly different (mostly in the “J”… I
should have taken a “U” and…) Other than that, I had problems with the
numerous bumps on both surfaces of the wing (I shall shave off the round
bulge over the outer .303 on my next Hasegawa wing) I mixed a good
representation of the Dull Red color in the decals out of Red and Black
and covered the gaps; the same was made on the tail flash.
Weathering
The aforementioned picture shows the machines well chipped but very
clean (at least of exhaust fumes); I wondered if all of them had been
cleaned for a “propaganda” picture, but I think it is unlikely.
Weathering began with some good preshading, which made its most on the
undersurfaces and the OG component. Then I made a heavy wash with oils
(there is another picture of a machine banking away showing vast amounts
of dirt here); after that some chipping and over it I airbrushed the
relatively light exhaust stains in a Brown/Black mix (no light powder
stains are visible) and the same mix over hinges and randomly as streaks
in the airflow’s direction and as light mottles.
I like Aeroclub conversions a lot; for a little more money and work,
you can have a different, accurate Spit, and Griffon Spits really look
the part. This Mk XII conversion has the advantage of being modeled on
the Hasegawa kit, especially regarding the interior parts; it is also a
bit tidier than the early F.21/XVIII conversions. Besides, man, this is
the way of making a “c” wing!
-
“The Supermarine Spitfire Part 2:
Griffon-Powered”, SAM Publications
-
“Late Mark Spitfire Aces, 1942-1945”,
Dr. Alfred Price, Osprey Publishing.
-
“Griffon Powered Spitfires”, Warbird
Tech Series volume 32, Kev Darling, Specialty Press.
Click the thumbnails below to view larger
images:
[../../photogallery/photo00011542/real.htm]
Model, Images and Text
Copyright © 2007 by Fernando Rolandelli
Page Created 05 October, 2007
Last Updated
24 December, 2007
Back to
HyperScale Main Page |
 Home
| What's New |
Features |
Gallery |
Reviews |
Reference |
Forum |
Home
| What's New |
Features |
Gallery |
Reviews |
Reference |
Forum |