|
Czech Master Resin's 1/72 scale
Spitfire HF.Mk.VII
by Brett Green
|
 |
|
Supermarine Spitfire HF.Mk.VII |

CMR's 1/72 scale Spitfire F/HF Mk.VII is available online
from Squadron.com
Background
The Spitfire Mk.VII was a dedicated high altitude fighter which
was fitted with the Rolls-Royce Merlin 60 series
engine. This high performance powerplant was equipped with a two-stage supercharger. The
Spitfire Mk.VII therefore required a longer nose than its predecessor, the
Spitfire Mk.VI, to accommodate the new engine. This lengthened fuselage also
applied to the Mk.VIII, Mk.IX (which actually preceded the Mk.VII into
service), PR.X, PR.XI and the Mk.XVI.
Other changes compared to the Mk.V included pointed and extended wing
tips, reduced span ailerons, fully retractable tail wheel, symmetrical
radiator / cooler housings under the wings, increased fuel capacity, a
narrow intake for the pressurised cockpit beneath the starboard exhausts
and the introduction of a new style rudder during production. The
Spitfire Mk.VII was fitted with the "C" wing as standard.
CMR's 1/72 scale Spitfire H/HF.VII in the Box
Czech Master Resin continues their relentless quest to produce every
Spitfire variant known to man with their latest, the Supermarine
Spitfire F/HF Mk.VII high altitude interceptor.
CMR's 1/72 scale Supermarine Spitfire F/HF Mk.VII comprises 56 resin
parts, a pre-painted photo-etch fret, four vacformed canopies, canopy
masks and markings for nine aircraft.
The resin parts are superbly cast with crisp, finely recessed surface
detail.
The wing is particularly noteworthy, being a single-piece casting with
ejector ports and deep wheel wells cast in place. This is the high
altitude "C" type wing with pointed wing tips. Trailing edges are
admirably thin, and the large castings are free of warpage. Cannon
barrels, machine gun stubs and "C" wing gun blisters are all supplied as
separate parts.
Smaller parts are packed securely in separate compartments of a
plastic bag. These are as impressively cast and as well detailed as the
wings and fuselage. Two options are supplied for the four-bladed
propeller. One is cast with the spinner and prop blades in place, while
the other provides separate parts for a more refined effect.
Control surfaces are cast in neutral positions except the alternate
rudders, which are supplied separately. One of each of the standard
rudder and the broad-chord pointed rudder are included. A choice of
either the early "unkinked" or later "kinked" elevators is also
provided. A slipper tank is another option.
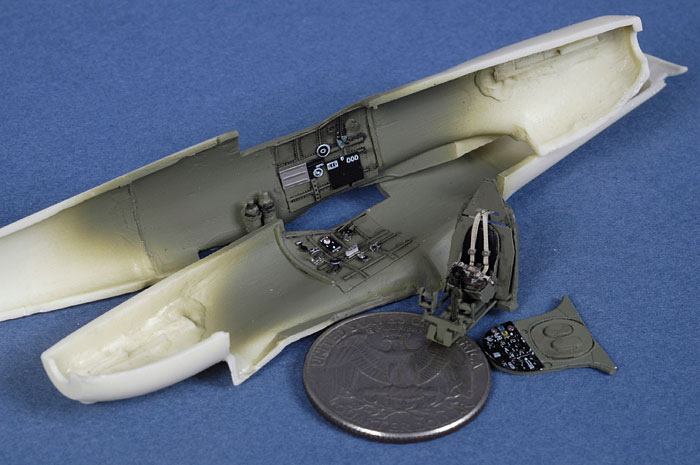
A nice bonus in recent CMR kit releases is the inclusion of an Eduard
colour photo-etched fret. These are not generic, but have been produced
for the specific models. In this case, we are supplied with a fabulously
detailed instrument panel and harness in full colour, with other
important details such as the sidewalls, pilot's armour, undercarriage
covers, radiator faces, wheel hubs, oleo scissors also being finely
rendered. Two styles of canopy are included.
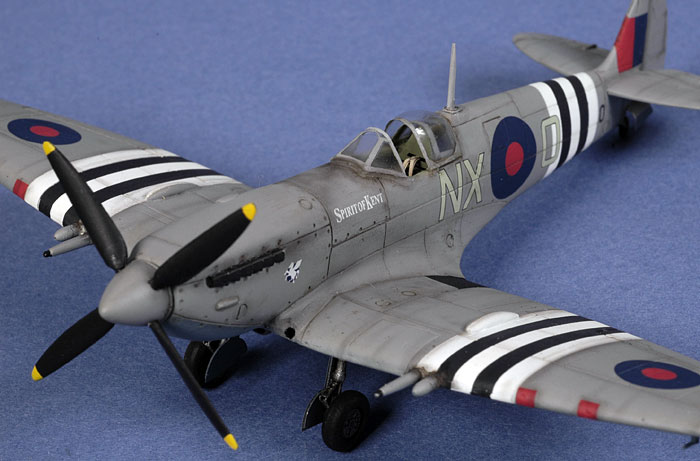
Markings are supplied for a whopping nine Spitfire F/HF Mk.VIIs. Five
are in Dark Green and Ocean Grey over Medium Sea Grey, one is in an
interesting early high altitude interceptor scheme of PRU Blue upper
surfaces and Deep Sky lowers, while the remaining three are painted
Medium Sea Grey on all upper surfaces and PRU Blue below. A number of
marking options include the narrow invasion stripes used by high
altitude fighters on and after 6 June 1944.
In common with most resin kits,
the first and most important task is preparation of the parts.
The fuselage halves are already separated from their casting blocks,
but some cleanup and thinning of the bottom fuselage was
required. The wings
were equally fast to remove from the their resin strips. A few
more minutes cleaning the flash from the leading edge, and these
major components were ready for assembly.
Remember, there are no locating pins on
major parts, so some extra care will be required during assembly to
ensure perfect alignment.
The
remainder of the smaller parts were quickly cleaned up and packed into a
re-sealable bag.
 The
resin areas of the cockpit were painted Xtracrylix XA1010 RAF Interior Grey/Green over a
base coat of Flat Black. I thinned this acrylic paint with Windex and
sprayed it through my Aztek airbrush fitted with the grey-coloured
medium tip. Weathering was by way of a thin oil wash and "chipping"
added with a dark brown artist's pencil. Coloured details were picked
out with a fine brush. The
resin areas of the cockpit were painted Xtracrylix XA1010 RAF Interior Grey/Green over a
base coat of Flat Black. I thinned this acrylic paint with Windex and
sprayed it through my Aztek airbrush fitted with the grey-coloured
medium tip. Weathering was by way of a thin oil wash and "chipping"
added with a dark brown artist's pencil. Coloured details were picked
out with a fine brush.
Eduard's
beautiful colour photo-etched parts were added once the painting and
weathering of the cockpit was complete. I used Micro Krystal Kleer to
secure the photo-etch to the resin sidewalls and bulkheads. This white
glue is more than strong enough for these tiny, lightweight parts, and
also permits the parts to be repositioned or even removed after they
have been applied.
A steady hand and a magnifying
glass were needed for this stage of construction!
Click the thumbnails below to view larger
images:
[../../photogallery/photo00002790/real.htm]
Test fitting of the painted cockpit floor with the
fuselage halves and the wings suggested that the bottom of the bulkheads
and the two lower cockpit rails would interfere with the inside of the
wing. I really should have checked this before painting the cockpit.
Nevertheless, I ground away some excess material from inside the centre
section of the wing, and sanded the bottom of the resin bulkhead and
rails. A good fit was eventually achieved.
The trailing edge of the fin appeared to be a bit
thicker than the rudder hinge line, so the insides of the resin fin
halves were thinned before the fuselage was assembled.
The balance of construction was blisteringly fast. The
fit of the fuselage halves and the wing was almost perfect. Super glue
was used for these large assemblies.
The only minor gaps were at the join of the empennage
and the horizontal tailplanes. These were quickly dispatched using
Milliput. A few faults of my own making (not taking sufficient care to
align the parts) were also dealt with using this two-part epoxy putty.
Click the thumbnails below to view larger
images:
[../../photogallery/photo00024376/real.htm]
A few smaller details were now dealt with. The bases of
the cannon barrels and machine gun stubs were drilled out with a pin
vise and short lengths of fine copper wire were inserted. Holes were
drilled into the corresponding areas of the wing leading edge to
reinforce the join for these potentially delicate parts. The antenna
mast received the same treatment.
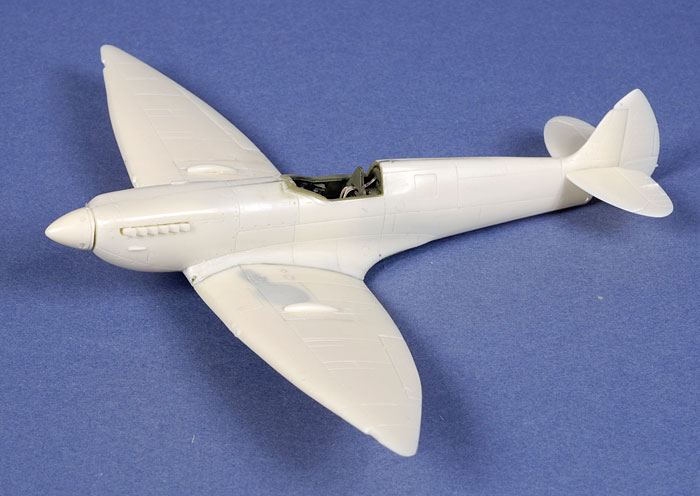
I primed the entire airframe with Tamiya Grey Primer
straight from the can. I like Tamiya primer, being fast
drying and a good way to quickly check for any persistent gaps or other
surface imperfections before the final colours are applied.
Click the thumbnails below to view larger
images:
[../../photogallery/photo00019249/real.htm]
 All remaining painting was
done with the Testor Aztek
metal bodied airbrush fitted with the "Fine"
tan tip. All remaining painting was
done with the Testor Aztek
metal bodied airbrush fitted with the "Fine"
tan tip.
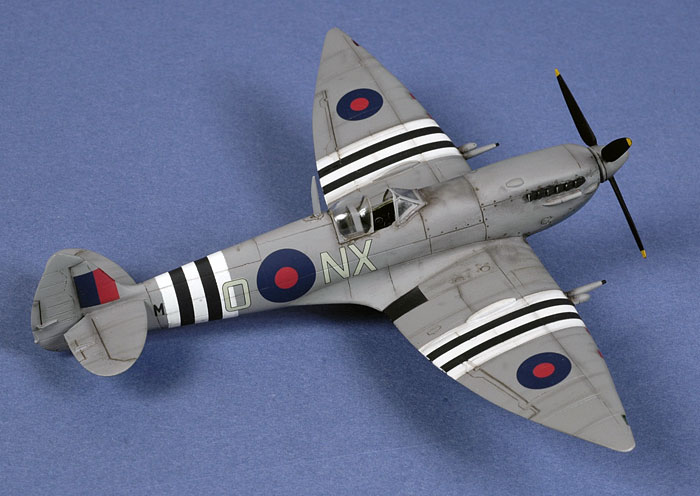
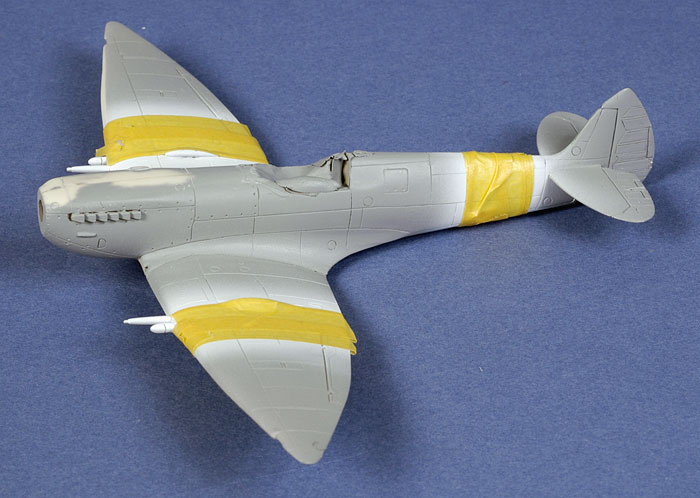
CMR's kit markings looked fantastic, but I was doubtful
that the supplied invasion stripes would conform to the high cannon
blisters on the top and bottom of the wings. I therefore decided to
initially paint the white areas of the stripes on the model. That way,
if the decals could not be used, I would easily be able to mask and
spray the black stripes. The white paint would also serve as a useful
base for the white decals in case of opacity problems.
First, wide white sections were painted in roughly the
areas of the invasion stripes. When the white paint was dry, these were
masked to the exact width using Tamiya tape.
Next, the lower surface was sprayed with a mix of Tamiya
paints to represent PRU Blue, as I did not have a stock paint available
in that colour. The mix was around 80% Tamiya XF-18 Medium Blue and 20%
XF-66 Light Grey.
The upper surface was painted using Xtracrylics Medium Sea Grey. This
went on over the primer coat very smoothly, resulting in a glossy sheen
when dry. I thinned the Xtracrylics with around 15-20% Windex.
A coat of Polly Scale Gloss prepared the kit for its
markings.
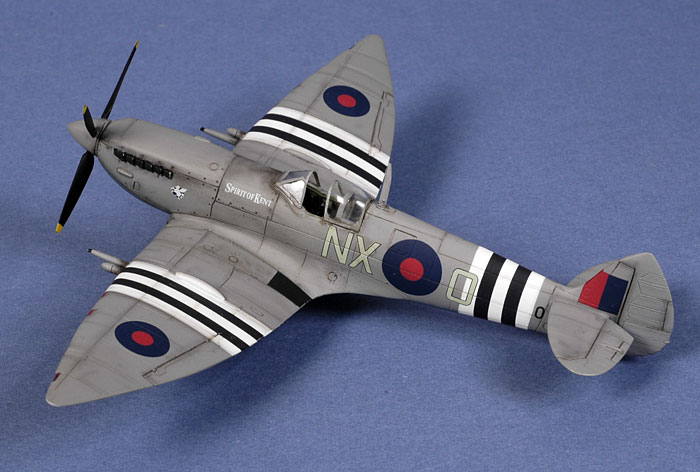
The decals, produced by Tally Ho!, performed flawlessly
in combination with Micro Set and Micro Sol. Even the invasion stripes
worked well. I used the entire decal over the white painted band for the
fuselage stripes. For the wings, I sliced the inboard white stripe from
each decal. This is the area that would have had to conform to the large
cannon bulge. The remaining 4/5ths of each decal were positioned over
the white painted areas of the wings. I was very happy with the result.
At this point I realised that I had forgotten to paint
the short wing walks. These were masked and carefully sprayed black.
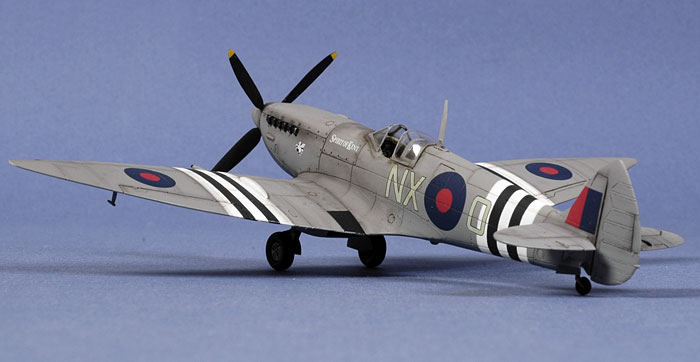
A thin layer of Polly Scale Flat Clear was sprayed over the
model before the airframe was shaded with a thin mix of Flat Black
and Red Brown. This was sprayed along control surface hinge lines,
selected panels, in a few random spots and streaks and along the
demarcation lines between camouflage and the invasion stripes, walkways,
the oily area behind the top of the engine cowling and along the
demarcation between the
Medium Sea Grey and PRU Blue. This slightly
reduces the harshness of the sharply masked lines.
A finishing coat of Polly Scale Flat sealed the
weathering.
Finishing Touches
The propeller, undercarriage, canopy and antenna mast were all painted
and added to the model. These presented no real problems, although I did
drill out the mounts for the main gear legs a little deeper to ensure a
firm join.
The canopy masks worked very well, but I was unhappy with the join
between the kit fuselage and the windscreen - my fault entirely though.
I used white glue (Krystal Kleer) to fix the canopy and fill some minor
gaps after the model was painted which resulted in a difference in gloss
level (the Krystal Kleer dries shiny). Repainting the area did not
completely eliminate the problem. Next time, I will dip the clear parts
in Future and secure them using super glue before painting. That way, I
can fill any gaps with Milliput and completely hide the repairs and the
join line.
I have a number of these Czech Master Resin kits in my stash, but
this is the first that I have actually built.
Czech Master Resin kits look fantastic in the box, and construction
reinforces the good impression. Parts cleanup was not difficult at all.
The detail, especially in the cockpit, is truly outstanding.
The only two challenging areas were thinning the bottom of the
cockpit to fit on top of the wing, and obtaining a clean fit for the
vacform windscreen.
The relatively simple parts breakdown and superb quality makes this
kit an ideal candidate for the modeller who wants to try their first
all-resin kit.
Czech Master Resin has delivered another gem with this 1/72 scale
Spitfire H/HF Mk.VII.
Thanks to Czech
Master Resin for the sample
kit.
The model was photographed in HyperScale's studio using a Nikon D70
digital SLR. Illumination was via two studio flash units - one Bowens 250
and a generic 100 flash - on stands and illuminating from a high 45º
angle from each side of the front of the photography table.
The camera was fitted with a Micro
Nikkor 60mm lens.
ISO was set to 250, and the manual
shooting settings were 1/100 of a second at f.29. The high aperture
ensures good depth of field.
The model was photographed against a
plain blue cardboard background.
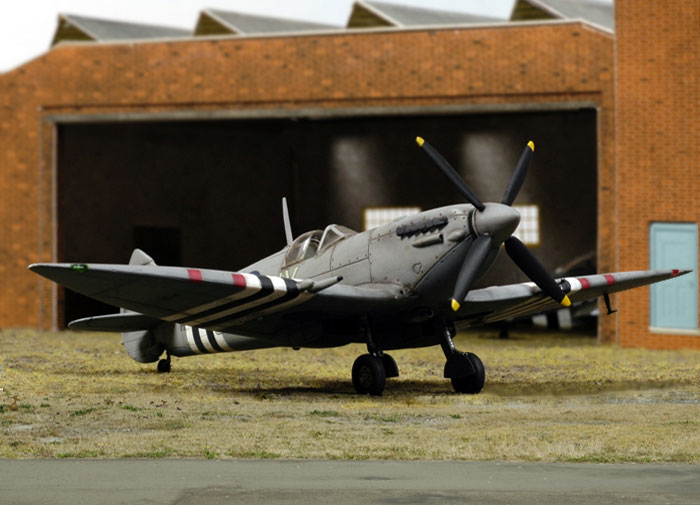
For the scenic images, the model was placed on a base of static
grass in front of an enlarged photograph of sky and a cardboard hangar. The model photo was merged with a photograph
of foreground grass taken
at Bankstown Airport in Sydney's south-western suburbs. The colour and tone of the grass in the airport photo and the
model photo were matched with Photoshop's hue and saturation tool. The demarcation
between the model static grass and the real grass in the foreground was
merged using the Clone Stamp tool.
A number of additional photos were taken
on plain blue cardboard.
All of the images were optimized
(brightness and contrast) in Photoshop CS, resized to 700 pixels in
width and saved as 75 dpi .jpg files using Photoshop's "Save for the
Web" option.
Model,
Images & Text Copyright © 2007 by
Brett Green
Page Created 21 July, 2007
Last Updated
24 December, 2007
Back to
HyperScale Main Page |
 Home
| What's New |
Features |
Gallery |
Reviews |
Reference |
Forum |
Home
| What's New |
Features |
Gallery |
Reviews |
Reference |
Forum |