|
Tamiya's 1/48
scale
P-51B Mustang
by Roger Fabrocini
|
 |
|
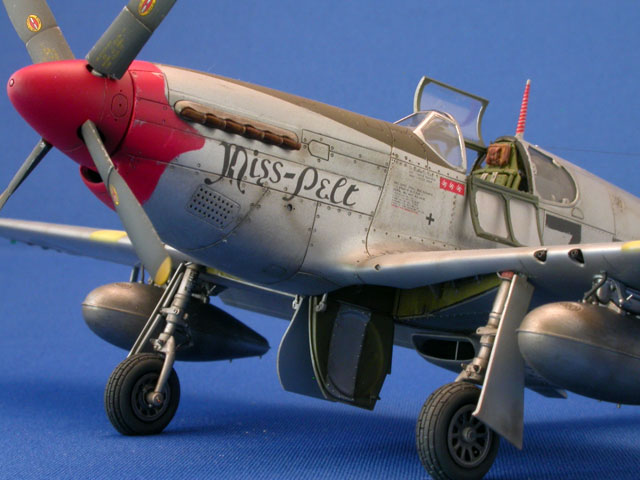
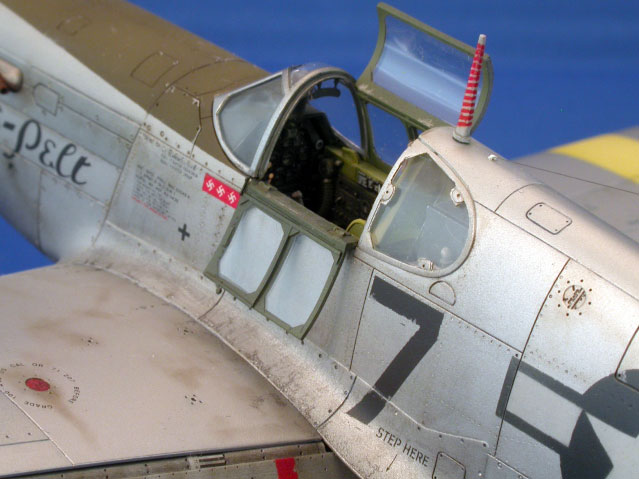
North American P-51B Mustang |

Tamiya's 1/48 scale P-51B Mustang is available online from Squadron
This is Tamiya's 1/48 N.A. P-51B, kit # 61042 done in
the markings of Lt. Clarence "Lucky" Lester's P-51c-5-NT, of the 100th
Fighter Squadron, 332 Fighter Group, 15th Army Air Force, operating in
the MTO, July, 1944.
On 18 July, 1944, Lt. Lester shot down three Me 109s on
one mission earning himself the Distinguished Flying Cross.
Tamiya's P-51B is typical Tamiya, well detailed and
engineered, but suffers from some inaccuracies. The most glaring are the
misshaped propeller blades, a curved cockpit floor that is more suited
for a P-51A, a cut out in the landing flaps and an inaccurate gear well.
I used the following aftermarket sets, whole or in part, to help correct
and detail my P-51.
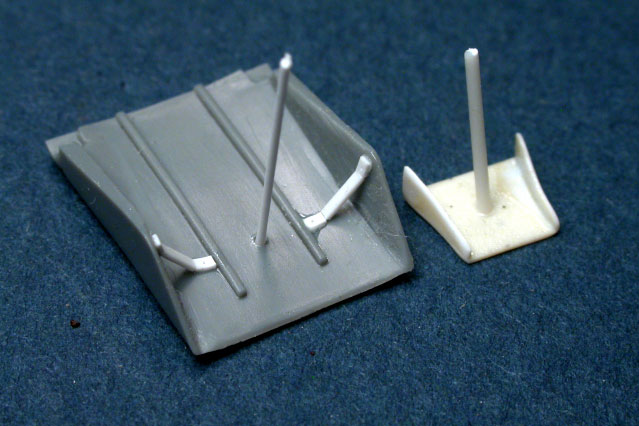
-
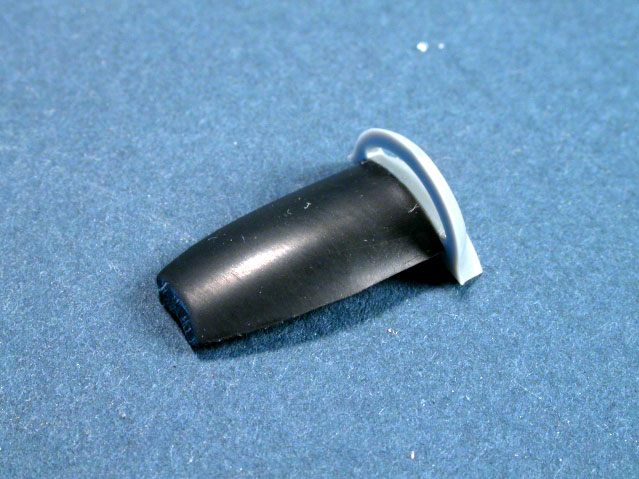
Ultracast corrected
flaps #48139 (I consider these a luxury. One could easily fill the
cut out in the kit flaps
-
Ultracast detailed
exhaust #48026 (this set includes both shrouded and unshrouded
exhausts)
-
Ultracast Hamilton
Standard cuffed propeller and spinner #48136 (in my opinion, has the
most impact on the kit's appearance.)
-
Ultracast Mustang wheels
(block tread) #48133 (another luxury, but I just love those block
treads)
-
Aires P-51B/C cockpit
set #4223 (careful with the Aires sets, originally they supplied the
incorrect curved floor in set # 4092. This is one of the few times
that I had little or no problems fitting an Aires cockpit/detail
set. Aires' set fits into the tabs in the fuselage meant for the kit
cockpit with minimum grinding of sidewalls needed)
-
Eduard Photo etched set
#49-219 (really helps detail the main landing gear struts and the
gear wells.)
-
M.V. Products light
lenses for the lower wing I.D. lights #LS502
-
Quickboost resin 50
calibur gun barrels from set #QB48 029
-
CMK navigation lights
from set #7031
There were a few areas that I scratch-built my own
detail. I never liked the way Tamiya molded the small exhaust door in
the lower fuselage, so I cut it out and built my own out of card stock
and plastic rod for the actuating rod.
I also added some detail into the radiator exhaust door
after thinning the door for a more scale appearance.
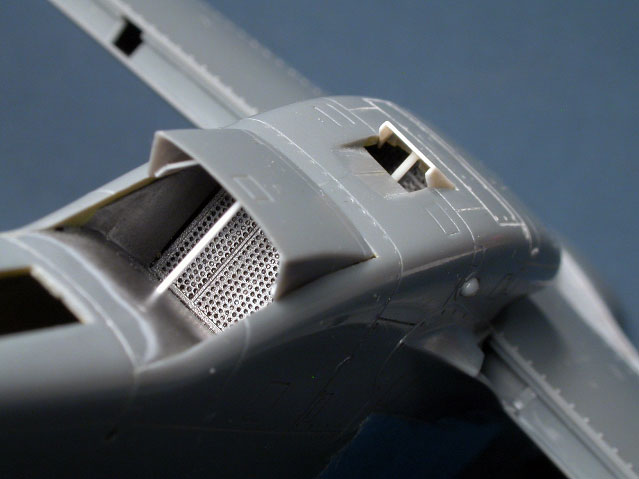
Tamiya fails to supply any ducting behind the carburetor
intake (something they addressed in their P-51D release). I fashioned
the upper duct interior out of a curved piece of plastic cut from an old
Phantom nose cone.
P-51 wings were puttied and painted silver lacquer so I filled the
appropriate panel lines with CA glue. I also removed the inaccurate
raised rivets on the top and bottom of the wings.
I wanted to experiment with natural metal finishes and riveting for a
future F-86 project. Seeing that the wings of the P-51 were puttied,
sanded and painted I thought this would be an easy aircraft to use,
seeing that I would only have to rivet the fuselage. I used a #1 beading
tool and drawings in the AJ PRESS monograph #57 on the P-51 as a
reference.

The last bit of extra detail was removing the molded in kit wing guns
and fashioning small mounts for their replacements (the QuickBoost gun
barrels) out of plastic stock.
Painting,
Markings and Weathering
|
 My
goal in finishing my Mustang was to replicate the difference between the
silver lacquered wings and the natural aluminum fuselage. I sprayed some
tests with different paints and settled on Mr. Color Super Silver
Lacquer for the wings (no surprise there, it's silver lacquer paint,
just like the original) and Tamiya's Rattle can #AS-12, bare metal
silver for my NMF base coat. My
goal in finishing my Mustang was to replicate the difference between the
silver lacquered wings and the natural aluminum fuselage. I sprayed some
tests with different paints and settled on Mr. Color Super Silver
Lacquer for the wings (no surprise there, it's silver lacquer paint,
just like the original) and Tamiya's Rattle can #AS-12, bare metal
silver for my NMF base coat.
The whole airframe was first primed with Mr. Surfacer 1200. Next a coat
of the Tamiya bare metal silver, decanted from the rattle can, was
airbrushed over the whole plane. I "stole" a technique from Jun Temma
and dry brushed Mr. Color stainless steel on the wing tips, wing
fillets, wing gun access doors, ailerons and lower wing fuel tank
covers. Allowing a short drying time I masked the dry brushed areas and
painted the wings with the Mr. Color Super Silver. I painted the panels
around the exhausts and the fuselage spine with Alclad II dark aluminum.
I also used the dry brush technique on panels under the nose, on the
fuselage sides under the canopy and on the tail. On some areas I
scrubbed the paint in. On others, specifically under and around the
cockpit, I created vertical streaks. A few other panels were sprayed
with Testor’s Metalizer "Buffing Aluminum".
At this point I contemplated painting on all markings and using Hobby
Decal dry transfers for the data, but there was just no getting around
using water slide decals for the data/serial number stencil and the
pilot's name. In hind sight, I think I may have been able to just gloss
the one panel where the decals were to be located, but I took the easy
route and gloss coated the model with Mr. Color Super clear gloss.
National insignias were painted on using Eduard's Vinyl masks #XF-526.
After the masks were removed I sanded down the markings using
MasterCrafter's polishing stick letting some of the aluminum show
through the white. The anti glare panel was painted using Gunze acrylic
O.D. The tail and nose are also Gunze acrylics, H327 fs11136, with some
flat red and white added. The yellow theater bands were painted using
Gunze yellow H4 and white.
I used TALLY-HO decal's sheet # 48-016 for the personal markings of Lt.
C. "Lucky" Lester's P-51C. I found one picture on the web of Lt.
Lester's a/c showing the name "MISS PELT" on the starboard side of the
nose. Pictures of other aircraft of the 100 FS/332nd FG show names
written on the port side as well, but TALLY-HO supplies only one MISS
PELT decal. I scanned the sheet in my printer, reproduced it in black
and white, then printed it on Testors clear decal paper. The remainder
of the decals were sourced from Techmod's sheet #48002D for N.A. Mustang
III.
Weathering was achieved using a post shading of Tamiya red-brown and
black, a steel Prismacolor pencil on the wings and a silver Prismacolor
pencil to create chipping on the red tail and nose, theater bands and
anti-glare panel. Paynes Grey and brown/black artist oil washes were
used to pick out detail and panel lines.

Final coat is Humbrol Matt Cote for the forward fuselage and Floquil
Flat finish for the wings and balance of the fuselage, I like the
semi-gloss sheen it produces.
This was a thoroughly enjoyable build without any
construction problems.
The finish was a good test bed for future natural metal models I have
planned. And I have finally learned my lesson and reset my Nikon CoolPix
4500 camera to its default settings, shooting in manual mode. I've come
to the inevitable conclusion that Nikon knows more then me about camera
settings. Pictures don't lie.
As always, thanks for the indulgence.
Click the
thumbnails below to view larger images:
[../../photogallery/photo00024563/real.htm]
Model,
Images & Text Copyright © 2007 by
Roger Fabrocini
Page Created 02 January, 2007
Last Updated
24 December, 2007
Back to
HyperScale Main Page |
 Home
| What's New |
Features |
Gallery |
Reviews |
Reference |
Forum |
Home
| What's New |
Features |
Gallery |
Reviews |
Reference |
Forum |