|
Tamiya's
1/72 scale
P-47D Thunderbolt
by
Marty Sanford
|
|
|
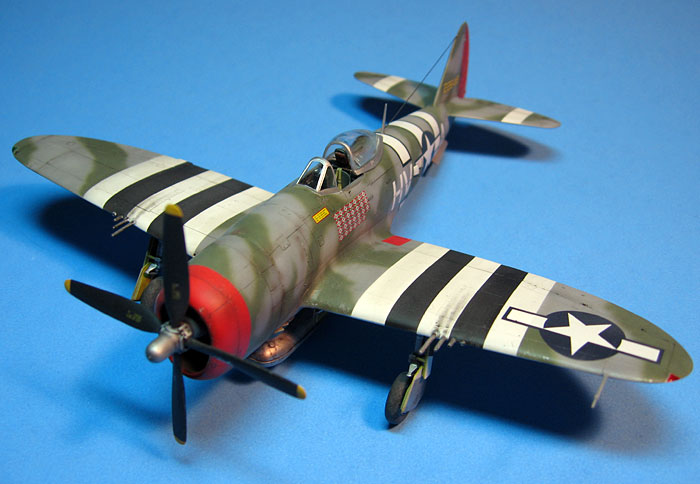
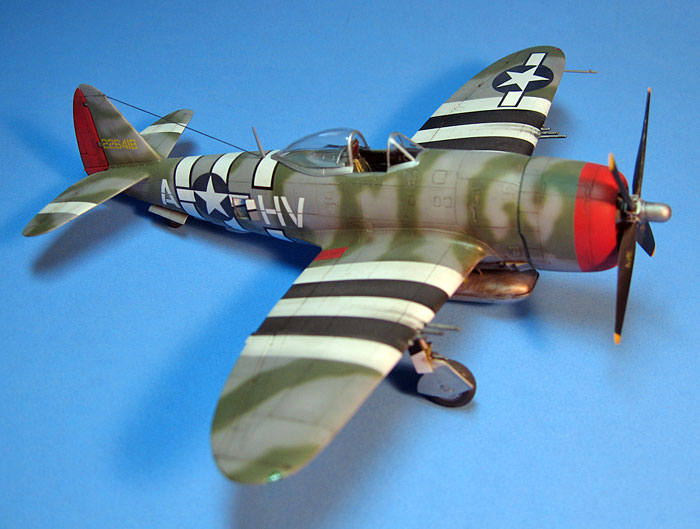
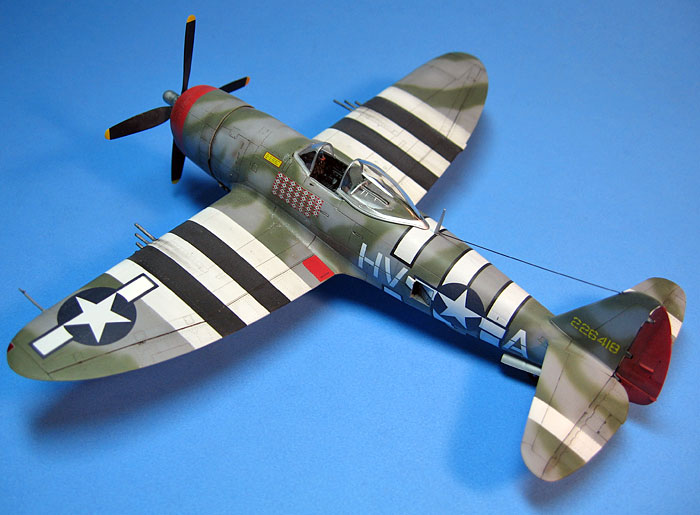
Republic P-47D-25
Thunderbolt
42-26418, HV – A, Lt Col Francis Gabreski
61st Fighter Squadron, 56th Fighter Group, 8th Air Force, England, 5
July 1944 |

Tamiya's 1/72 scale P-47D Thunderbolt is available online from
Squadron.com
Tamiya 1/72 Scale P-47D Thunderbolt, Kit #
60770
Modelers have universally sung the praises of Tamiya’s P-47 kits in
1/72 scale as a dream to build; my experiences with this fantastic kit
were no different. It is a well detailed, crisply molded and very well
engineered kit, certainly among the best fitting kits I have ever
encountered. The kit seems to capture the look, sit and dimensions of
the Jug very well. Tamiya’s 1/72 Thunderbolt is a scaled down and
slightly simplified version of their 1/48 Jug model, also a masterpiece.
“Simplification” however does not mean that the cockpit has any less
detail than the quarter scale version.
Aftermarket Items
-
Eduard 1/72 US WW2 color seatbelts,
73-004
-
Eduard 1/72 P-47D Masks, CX 046
-
Techmod Decal 72103
Research
Most sources and articles on the colors of Lt Col Francis Gabreski’s
last P-47D differ in a number of details. I settled on what I thought
was a “best guess” on this popular scheme, based upon the articles and
photo’s I was able to find both in print and on the internet. Interest
in this scheme has risen with the recent introduction of the Hasegawa
1/32 scale P-47D, which offers Gabreski’s famous markings as one of the
kit options. Incidentally, there was a great article in the July 2004
issue of Fine Scale Modeler magazine by Alfonso Martinez Berlana, in
which he detailed and painted a Bubbletop Hasegawa P-47D in 1/48 scale
in Gabby’s scheme. The article was reprinted in FSM’s Classic Combat
Aircraft special edition, Volume 2. Alfonso’s article played an
important role in inspiring my project.
The 56th Fighter Group reportedly received its new Bubbletop D model
Thunderbolts in Natural Metal finish, in the late Spring of 1944.
Previously, the 56th, known as “Zemke’s Wolfpack”, had flown P-47’s
Razorbacks finished in standard USAAF Olive Drab over Neutral Gray. When
they took delivery of the shiny new aluminum finished aircraft, a
decision was made apparently to paint a field applied camouflage at the
Group, and many of the aircraft of the 56th have been well documented as
bearing a streaked, mottled kind of brindle paint work, that has been
described as being in the “style” of both the Royal Air Force and the
Luftwaffe. It’s also been reported that these aircraft were painted with
stocks of RAF paint. An article from 2001 on HyperScale by modeler
Michael Dobrziecki was very helpful in working through these research
issues.
Photos
I found a picture of the left side of the aircraft in Squadron /
Signal’s long out of print “Aces of the Eighth”, and other pictures in
Osprey’s “P-47 Thunderbolt Aces of the Eighth Air Force” by Jerry Scutts
which shows several pictures of this aircraft – just not the whole
Thunderbolt. The Allied Expeditionary Air Force (AEAF) Invasion Stripes
on the upper surfaces lasted at least until 5 July 1944 – the date of a
picture in the Osprey book on page 69, which shows Gabreski walking away
from his aircraft with a throng of ground crew personnel looking on.
This picture clearly shows the black outlined Invasion Stripes on the
fuselage (rather than the more typical full Black stripes) and 27
Swastika flag “kill” marking; later pictures with 28 kills usually show
his T-Bolt with the invasion stripes removed from the upper surfaces of
the wings & fuselage. I chose to show my model of Gabby’s P-47 dated at
the time depicted with 27 kills, on or about the date shown with full
invasion stripes.
I could not however find conclusive and absolute evidence of all sides
of the aircraft, so to my thinking, representations of this aircraft’s
camouflage pattern are probably at least partly conjecture. Like I said,
I took my best guess. I would be very happy, and it would be to the
benefit of all modelers worldwide, to know otherwise. However, I have
not yet had a look at the Hasegawa 1/32 instruction sheet and coloring
guide yet either.
Cockpit
This kit was built straight “out of the box”, with the exception of
adding Eduard USAAF / USN World War II painted seat belts, set 73-004.
The Eduard belts offer a great way to dress up the wonderful cockpit
interior in this kit. I brushed on a thin coat of Vallejo Buff to the
belts, to tone down the stark contrast of Eduard’s painted stitching and
to cover the spots where paint had flaked away in my bending them to an
animated shape.
After painting the instrument panel Tamiya XF1 Flat Black, I used the
kit instrument panel decal. I then coated it with clear flat and picked
out the dial faces with Future acrylic floor polish and a toothpick to
represent a gloss to the dials. I painted my P-47 cockpit with a mix of
Tamiya acrylics, XF13 & XF22, to replicate Dull Dark Green. Finally,
everything in the cockpit was given a light wash of Grumbacher artist’s
water paints (from the tube) of Flat Black and Burnt Umber and dry
brushed before buttoning up.
All other assembly was per the instructions.
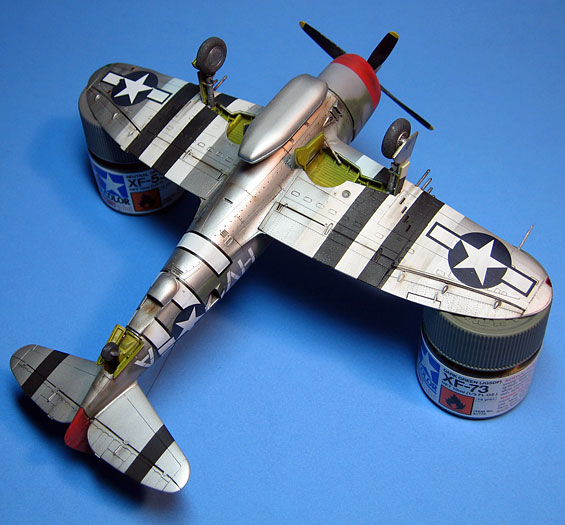
Painting
Undersurface of the model was painted with Tamiya AS-12 from their spray
can range. I took a tip from Jerry Scutt’s & Brett Green’s Osprey
hardcover book on US Army Fighter Modeling, and sprayed the paint from
the rattle can into a jar, then airbrushed the decanted paint on the
model. A little Gunze Mr. Color Thinner was used to help thin this
color. This same “Silver” was also used on the canopy frames (after
applying Eduard’s mask set for this kit) and deck area underneath the
canopy. These areas were then masked prior to spraying the upper surface
camouflage.
All upper surface colors and invasion stripes were custom mixed from
Tamiya acrylics, post shaded and panel faded. I masked all the wing
stripes with Tamiya tape, and sprayed the camouflage pattern “freehand”
with my trusty Paasche H single action airbrush. For the Grey, I used
Tamiya XF53 mixed with XF2 flat white and 91% Isopropyl alcohol. For the
Dark Green, I started with a mix based on a lightened XF73 (a modern
Japanese self defense force armor grey-green color). The Red on the cowl
band (indicating the 56th Fighter Group) and rudder (indicating the 61st
Fighter Squadron) are both in Tamiya XF7 Flat Red. All colors were
dressed with a darkened version at the panel lines, then lightened
versions of the base colors were sprayed on the panel interiors. A
highly thinned mix of Tamiya Flat Black and red Brown was sprayed for
additional weathering & grime effect afterwards. Fuel staining on the
drop tank was achieved by a streaked Grumbacher Burnt Umber water paint;
I waited for this to dry, then dragged a slightly wet brush over this to
wash away the excess, following the slipstream pattern I found in
photographs of P-47 belly tanks, including Gabreski’s.
This was followed up with several light coats of Future in preparation
for decals.
Decals
Decals came primarily from Techmod sheet 72-103, which offer an
accurately detailed representation of Gabreski’s markings. There is also
a beautiful full color drawing of the plane in the decal instructions,
but unfortunately my research led me to think the paint pattern is only
partially correct.
I really like Techmod decals. They are of a high standard in accuracy
and register, but they are very thin and somewhat brittle to use. One of
the national insignia actually became stuck and fractured, but I was
able to piece it back together before the final Micro Sol was applied.
With care and good decaling skills, they can be made to look very
convincing. All decals were applied over Future, using Micro Set and
Micro Sol solutions. Lesson learned: when using Techmod decals, be
generous with your Micro Set, to keep them from sticking before you are
ready. I sealed them with another coat of future before applying a light
Turpenoid oil wash of Lamp Black & Burnt Umber oils. One more note on
Techmod: The decals are so thin, that the undercoat of white in the
invasion stripes showed through the wing National Insignia Star & Bar
decal. This was apparent on close inspection of the model and in earlier
photographs. Later photographs show that I went back and carefully
masked these areas off with Post-it notes for another coat of thinned
Tamiya XF-2. Like Roy Sutherland says, it is never too late to find and
fix a problem.
From the decal sheet I used the national insignia, unit codes & serial
numbers, fuselage stripes, kill flags (I cut off the 28th kill, to show
the model dated to 5 July with a score of 27 per photographic
references) and the data block.
The final flat coat is Future, mixed with Tamiya Flat Base. I appreciate
the uniform smoothness that can be achieved to the final finish this
way. I like it better than any other commercially produced model Flat
coat.
After assembly, the canopy transparency was brush pained by hand with
Future acrylic floor polish and left to dry. The kit transparency then
takes on a very clear appearance, owing to the ability of Future to
perform it’s self leveling trick as it dries, not necessarily to my
skills as a brush painter.
To my never ending amazement, the model won a 1st Place in the 1/72
scale single engine propeller category, Allied radial engine split, at
the IPMS USA 2007 Nationals in Anaheim, California.
I hope you enjoy this look into the history of one of the great aircraft
and pilots of World War II.
Click on the thumbnails
below to view larger images:
[../../photogallery/photo00024799/real.htm]
Model, Images and
Text Copyright © 2007 by Marty Sanford
Page Created 13 December, 2007
Last Updated 24 December, 2007
Back to
HyperScale
Main Page
|
 Home
| What's New |
Features |
Gallery |
Reviews |
Reference |
Forum |
Home
| What's New |
Features |
Gallery |
Reviews |
Reference |
Forum |