|
Special
Hobby's 1/72 scale
Sikorsky JRS-1
by
James Kelly
|
 |
|
Sikorsky JRS-1 "US Flying Boat"
|

Special Hobby's Sikorsky JRS-1 Flying Boat is
available online from
Squadron for USD$39.96
Special Hobby
1/72 Sikorsky JRS-1 "US Flying Boat"
Kit Number: SH72111
MSRP: $47.99
Known primarily for the rotary-winged aircraft bearing his surname,
Igor Sikorsky's S-43 flying boat was a relatively successful civilian
airliner-type aircraft, spawned during the later period of the "Golden
Age" of aviation.
With war clouds darkening the horizons of the West, the Sikorsky "Flying
Boat" was adapted for use by the U.S. Military and put to work
immediately in each of the United States' branches; U.S. Army Air Force,
U.S. Marines, and the U.S. Navy, who designated the aircraft "JRS-1".
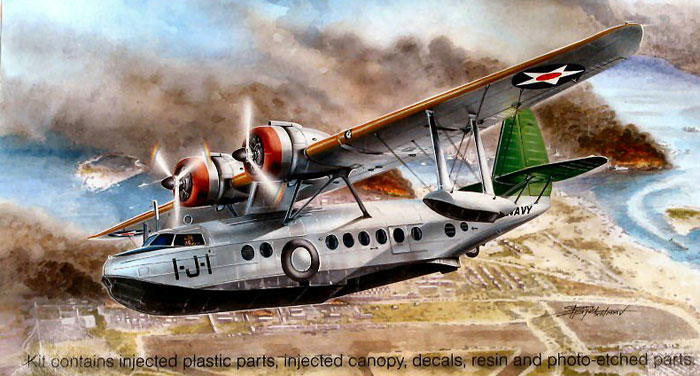
The kit contains three gray sprues with plastic parts, one sprue with
clear plastic parts, a small bag of resin parts, a small fret of
photo-etched parts, and an acetate instrument panel.
Click the thumbnails below to view larger
images:
[../../photogallery/photo00007368/real.htm]
The instruction manual is typical Special Hobby/MPM print. An
A4-sized folded manual, its black and white exploded-view drawings are
relatively clear and easy to understand and the few descriptions are in
both English and Czech.
The decal sheet, which appears to be in very good if not perfect
register, provides markings for four different ship. Anyone of the three
machines from VJ-1 can be chosen, one of which was sent to seek the
Japanese fleet after the Pearl Harbor attack in December of 1941, and a
set of markings to model the personal machine of Madame Chang Kai-Shek,
wearing Chinese insignia. The U.S. Navy variants are markings for the
colorful pre-war schemes, which are a favorite among modelers.
The sprues of gray parts are nicely detailed, particularly for a
limited-run kit, for which Special Hobby and its parent company, MPM
models, is known. The injection-molded instrument panel provides for
raised instrument dials, which can be sanded flat for use of the
detailed acetate insert.
Engraved panel lines round out the injection-molded pieces, and although
I found the panel lines a bit deep for scale, and the fabric details a
tad overdone, they were rendered nicely, overall, for an aircraft of
this scale. A bit of gentle sanding should bring the fabric surfaces
down to a stadium roar, and a coat of Future or the like for decal
preparation should tone down the panel lines' depths.
The PE fret provides numerous interior details, and a small bag of resin
detail parts completes the multimedia experience. The resin parts
largely comprise the 11 seats for passengers, along with a seat for the
pilot/co-pilot. Exhaust outlets and a few parts that I'm unfamiliar with
round out the polyurethane components, molded on small pour-stubs that
should remove with minimal effort.
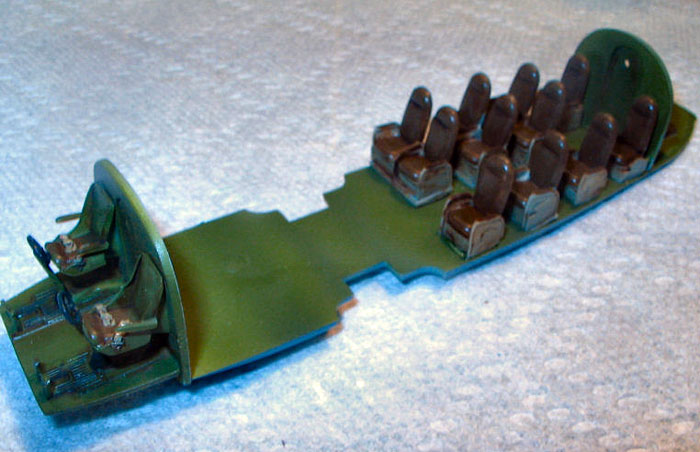
The project begins with the crew cabin. The pilot and copilot seats are
two of the resin items included, and are nicely detailed. The seat
harnesses are molded on, and catch the eye nicely after drybrushing. The
flooring and bulkhead appear a bit thick for scale, but when installed
don’t present any reason to suspect such. Other than the elevated
crewman’s seats, the only other detail provided is in the form of the
instrument panel. The choice of injection-molded or photo-etch (PE) is
offered. I typically opt for the PE choice, and this was no different.
The panel is very nicely rendered, although in 1:72, and through the
limited window view, it’s mostly lost in the tiny cabin.
Click the thumbnails below to view larger
images:
[../../photogallery/photo00025891/real.htm]
Working fore to aft, the passenger compartment follows a small
compartment just aft of the crew cabin (Galley?). There isn’t any
details in here at all, save for a PE louvered “blind” on the port side
window (since it’s a flying boat…is it a porthole?). Eleven resin seats
make up the passenger compartment. Each has a finely cast arm rest n
both sides, each with a cast-on leather pad. Very detailed seats,
really, even in this scale. No seatbelts back in those days, so a little
bit of work is saved through their absence. Each must be carefully sawed
from the pouring block, however, and each one requires a bit of cleanup
as a result. I used my powered, hand-held rotary tool (i.e., my Dremel!!!)
to make quick work of it. A cautionary note here: Resin dust is a known
carcinogen…wear a particle filtering mask, or at the very least, a
well-ventilated area with a cross breeze when you do this. I actually
wear a disposable particle-filtering mask, and do the grinding inside of
my spraybooth. I have to clean it out with my Shop-Vac afterwards, but
the resin dust is sucked out of the basement and into the outside air.
The small compartment aft of the passenger compartment is for the flight
attendants (Stewards? Stewardesses? Seaman Recruits?) complete with jump
seats and a staircase leading up to the topside of the aft fuselage. The
hatch can be cemented closed, or with 2 slices, can be opened in the
bi-fold fashion of the real thing. As with most of the flat pieces in
this kit, the hatch was a bit thick for scale, and I was slightly less
than successful on either side of it after the initial cuts. The one on
the model is cut from stock sheet styrene.
Photoetched or injection-molded grab handles festoon the aft fuselage,
and there is a styrene gunwale across the bow of the craft. This was
faired in to be made flush with the hull/fuselage, using Tamiya Putty,
Cyanoacrylate, and a lot of sanding and filing.
Have you noticed how this is the first mention of fit issues? In a
limited-run kit? That’s not because there are none….it’s because they
get their own section of the article! Read on.
Once the fuselage/hull halves are joined, the large support pylon for
the wing goes together (2 halves) then sits atop the airframe. The
instruction booklet calls for the cloudy, slightly opaque and mildly
discolored (amber) windscreen/cabin roof to be installed, but it was
left out, polished and dipped in Future, and set aside until the end.
The vertical stabilizer and horizontal flying surfaces are attached to
the aft end of the craft, each side with two support struts.
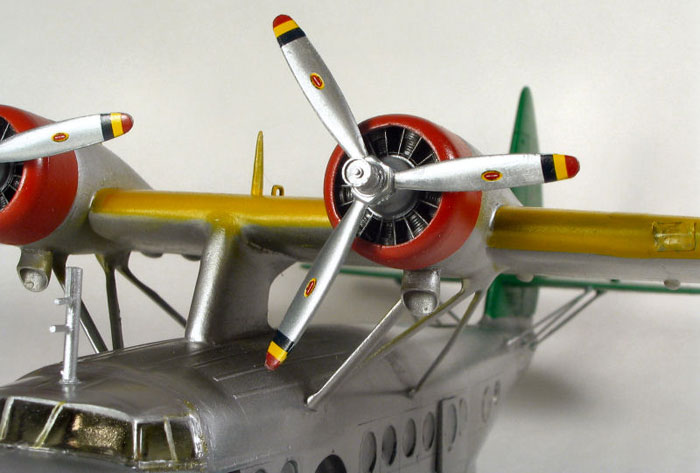
The nicely detailed resin replicates of the Pratt & Whitney R-1690-52
engines were painted with Vallejo Black Grey (056) and dry-brushed
silver. The cowlings are both 2-piece affairs, and don’t fit all the way
around the radial engines’ circumference. The resultant gaps were
shimmed in with stock styrene rodding. The propellers needed a fair
amount of cleanup, in the form of sanding of flash and general surface
smoothing. The one-piece wing required a bit of drilling in the
pre-existent locator holes, as they were too small to accept the pins on
top of the main support pylon. Once done, cyanoacrylate was used to
secure the wing to the pylon. Before doing so, however, the separate
wingtips had to be attached. Ever build the DML/Revell-ProModeler Ju-88?
Remember the fun you had with that kit’s separate wingtips? Good,
because these are less fun than that one. I am not sure why this kit has
two separate wingtips, as the one-piece wing would fit in the box if it
were truly one piece. But, there they are. Lots of sanding enjoyment for
you right here. The main support struts went on next, two to a side.
There were no problems with these struts, or with the ones holding the
tail planes level. These items are often cause for concern for a lot of
modelers, myself included…but this kit’s install with relative ease, so
long as you take your time and double-check placement.
The main landing gear can be assembled in the deployed or retracted
positions. I chose to deploy them, after some debate. I thought it would
look nice to have the model resting in a watery environment, but I’d not
done a base like that before, and this project was becoming a second
career. Down went the wheels, to sit along side all my other
land-lubbers in the collection. The pontoon rigging was strung using
2-pound fishing line attached into tiny drilled holes using-what else?-cyanoacrylate.
The windscreen/cabin roof mentioned earlier went on last. That’s
fortunate, as it would’ve caused me to quit the project entirely if
attempted sooner! The clear, injection-molded one piece affair is
cloudy, mildly jaundiced, and simply does not fit. The plastic here is
more brittle than expected in a clear piece, so extra caution is
warranted. After polishing it and dipping it in Future, I tacked in
place (sort of) with a few small beads of cyanoacrylate (I know, it’s
not funny anymore…and I’m almost out!). The resultant step across the
top back seam and the openings under the bottom front has to be seen to
be beloved. The only part of the front that touched the fuselage was the
point. I filled in the rest with more “Kristal Klear”, which didn’t cut
it here. Lots of superglue and sanding as needed to get it to closely
approximate the part to the fuselage. This is a real disappointment, as
it is a focal point of the whole model, and even after a lot of work,
the result is very unsatisfying.
Fit Issues
Let it be said that when one endeavors to construct a “limited-run”
scale model kit, he or she will find there modeling skills pushed to the
limit (pun intended). These kits are a far cry from the Tamiya and
Hasegawa kits we all love so much, but in the end, provide a sense of
accomplishment and satisfaction that you won’t get with any other
mainstream builds. Here is a summary of the fit issues I encountered
while building this limited-run kit.
-
The left and right fuselage halves,
while closely approximated, don’t quite fit. Particularly with the
interior stuffed inside. A little sanding along the edges of the
flooring parts will help here. So will about one dozen clamps, a
bunch of rubber bands (gumbands an’ ‘at), and some putty, sandpaper,
and…cyanoacrylate! Once together, the “heel” of the keel needs to be
filed even, as one side will sit “proud” of the other. This is
easier than lining them up evenly, and trying to file the bow to
fit.
-
The shafts for the control yokes
should be cemented about 1mm further forward than where the
instructions will have you do. The pilot and copilot seats won’t fit
without doing this, or a small pry bar
-
The fuselage portholes. The fuselage
has twenty (20) portholes, ten on either side. The clear plastic
“panes” for each are a bit thick, as expected, but retain a nice
lucidity when polished and dipped in Future (or painted with it
using a brush, like I did). However, they are a bit too large for
the corresponding portholes. Or maybe they’re just right, and the
portholes are too small. Doesn’t matter, because you face the same
choice; Either widen 20 portholes using your #11 hobby knife blade
(i.e., Exacto!) or individually sanding 20 round, tiny clear pieces
while maintaining their inherent shapes. I opted to widen the
portholes, and ran out of patience after exactly two holes. Although
unusual, I hit upon a really good idea; Microscale “Micro Krystal
Klear”. Thick and white like PVA glue (or, Elmer’s Glue-All here in
the States), it dries clear, and wipes up easily with a dampened
cotton swab. I dipped a toothpick into the stuff, and quickly traced
the outline of each porthole, working inwards as I went. I found
that each “window” took two passes; the first pass would set up a
continuous bead around the perimeter, and the second would span the
open window, clinging to itself due to the high surface tension
provided by it’s own inherent compositions. A quick swipe or two
around the outside of each to get rid of the excess, and viola! 18
more windows done in about an hour.
-
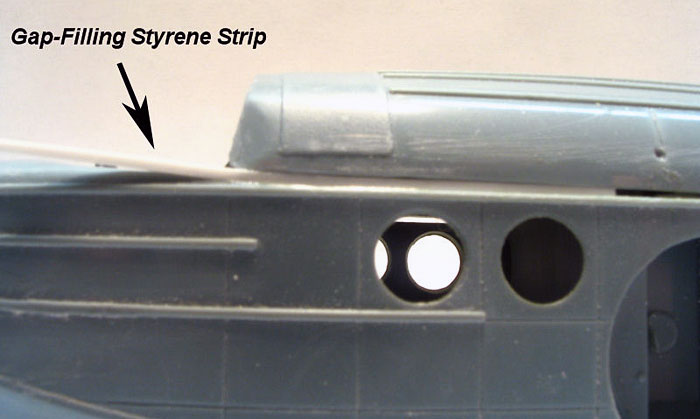
The fuselage cabin roof. Two pieces,
which fit nicely together, and not to anything else. I melded mine
into the rest of the fuselage with stock styrene sheet, putty,
sanding, and; Say it with me…Cy-Ano-Acrly-Late! The main support
pylon, which sits atop this section, fit pretty well on it’s own.
Click the thumbnails below to view larger
images:
[../../photogallery/photo00008109/real.htm]
-
The gunwale. The fuselage has a
nicely rendered gunwale, which is sort of like a bumper, or an
old-school bug-deflector shield you see on trucks today. OK, not
really, but you get the idea. Attached at the tip of the bow, the
ends can be cemented to the hull as well, but everything else in
between the apex and the ends won’t hold water. (I’m on a roll,
now!). Again, it was filled, sanded, filled, sanded, superglued,
sanded, superglued, sanded numerous times, then finally smoothed out
with various grades of Micromesh polishing pads/cloths.
-
The astern, topside access hatch.
This probably fits OK, but I destroyed mine trying to cut it so it
could be opened, so I never got that far. Go figure. The one I made
from sheet styrene fits pretty good, though, too.
-
The engine cowlings. As mentioned
previously, they just don’t go all the way around. It was easier to
fill in the gaps with plastic stock and sand it flush than to sand
down all of the cylinder heads to the point where everything would
fit. Besides, the engines were really nice pieces, and I wanted them
as intact as possible.
-
The undercarriage. There weren’t any
real “fit issues” here, per se; it’s just that the assembly is a bit
complex, and a lot “fiddly”. A lot of care and patience is required
here. There is a large pin-ejector mark smack in the middle of each
wheel well. The wells are narrow and deep, and these scars are
difficult to remove. I tried with several files, and different
grades of sandpaper rolled up tightly, all with very limited
success. Ultimately, a small rectangle of sheet styrene went into
each wheel well, providing a “false wall” and a scar-free wheel
well, which is a prominent feature on the kit.
 The
color callouts provided by Special Hobby seem to be fairly accurate,
based on what I can tell from black & white archival photos. I used
Vallejo Model Air acrylics on all non-natural metal finish *(NMF) areas.
The majority of the interior was airbrushed Interior Green (010). The
high-backed, leather seats were brushed with Cam. Medium Brown (038)
with seat frames done in Light Grey (050). The seat belts were brushed
in Khaki Brown (024). The
color callouts provided by Special Hobby seem to be fairly accurate,
based on what I can tell from black & white archival photos. I used
Vallejo Model Air acrylics on all non-natural metal finish *(NMF) areas.
The majority of the interior was airbrushed Interior Green (010). The
high-backed, leather seats were brushed with Cam. Medium Brown (038)
with seat frames done in Light Grey (050). The seat belts were brushed
in Khaki Brown (024).
The exterior was primed with Tamiya Fine Surface Primer in a rattle can.
After I polished the surfaces with Micromesh pads, a thin coating of
Future was airbrushed overall to fill in any tiny flaws that were
missed. An overall coating of SnJ “Platinum” was then applied over
several, thin coats. All of this was done with an Iwata HP-C airbrush,
with a variable-control pressure setting of 20 psi. A light coating of
“Platinum” polishing powder, also from SnJ, was applied and buffed out
to a light sheen. Another light coating of Future sealed all of this in.
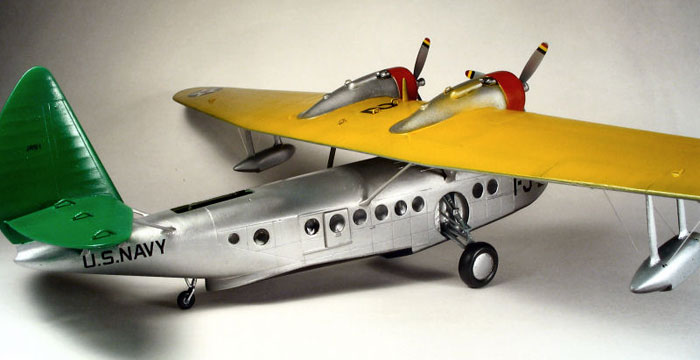
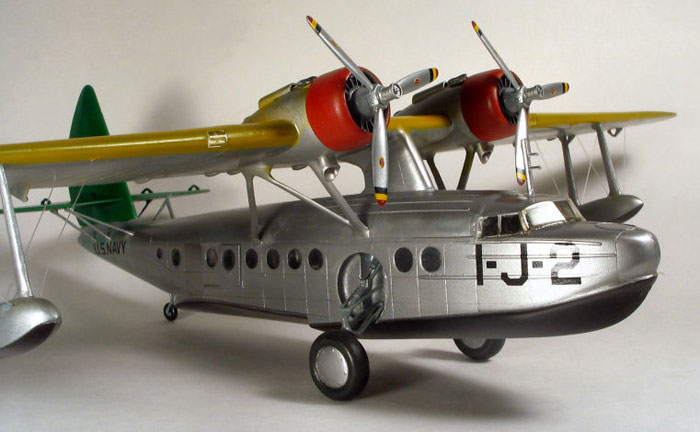
The hull beneath the waterline was masked off and airbrushed with Tamiya
Black (X-1). The bright, pre-war colors the U.S. Navy painted their
aircraft with were replicated with Tamiya Yellow (XF-3) on the wing’s
upper surfaces, and Testor’s Model Master Acryl Gloss Green (4669.)
The kit provides, as earlier described, the options for six different
aircraft (Three of which comprised VJ-1). I chose the Number Two
aircraft of VJ-1, which had three aircraft at Pearl Harbor on December
7th, 1941. Although the actual squadron aircraft that participated in
the post-sneak attack search for the Japanese forces was “IJ-1”, I
thought that the large “2” on the port and starboard bow had more visual
appeal. The decals went down without drama, and their fate was secured
with Gunze-Sangyo “Mr. Mark Softer” (GUNMS 231). After a final light
coating of Future, the model was polished with some spray-on automobile
wax.
This 1/72 kit, which sports an average MSRP of $50.00, is more of an
investment in your aircraft collection than a model airplane kit, and is
not for beginning or novice modelers. In fact, I’d recommend it only to
those modelers with advanced skills, or at least a couple of other
multimedia projects completed first. It’s a kit that although it may not
appear to be a difficult build, certainly has it’s stages of difficulty.
And, those stages are additive; get one wrong, and the ones that follow
will also be wrong.
Having said that, I recommend this kit without reservation to those
modelers who have worked in multimedia or limited-run kits before, or
the experienced modeler with advanced skills.
My thanks to Special Hobby for the opportunity to review this kit.
Click the thumbnails below to view larger
images:
[../../photogallery/photo00022939/real.htm]
Model, Images and Text Copyright © 2007
by James Kelly
Page Created 16 February, 2007
Last Updated
24 December, 2007
Back to
HyperScale Main Page
|
Home
| What's New |
Features |
Gallery |
Reviews |
Reference |
Forum |