|
Eduard's 1/32 scale
Focke-Wulf Fw 190 A-6
by Jared Taylor
|
 |
|
Focke-Wulf Fw 190 A-6 |

Eduard's 1/48 scale Focke-Wulf Fw 190 A-6
is available
online from Squadron.com
I have been waiting awhile now for someone to post an article on
Eduard's fabulous 1/48 scale Focke-Wulf Fw 190 kit.
With but a few scant images in HyperScale's Gallery, I finally got
the nerve to write my own after getting my hands on one of the Royal
Class kits. Folks, if you have not yet seen one they are a sight to
behold. Yes, the price is steep but in my opinion if you are only a
moderate fan of the Butcher Bird this is a must have kit. If you can
pony up for this one, do it. It is well presented and chock full of
extra goodies, let alone two of the best engineered plastic injected
kits I have ever built.
I'm gushing now so I will move on.
Eduard's 1/48 scale Wurger, while it fits together as well as a
Tamiya kit, has many more pieces and if not careful will bite you badly.
Much care is needed in the area of the engine firewall (kit part #
H3 and I4) in the way it fits in the fuslage as well as how it lines up
with the wing spar (part I16). If these are not lined up correctly -
well I hope you like sanding.
Also, of lesser consequence, if the wing stiffeners go unnoticed,
they to can wreak havoc with the build. I say all of this not to scare
but to advise.
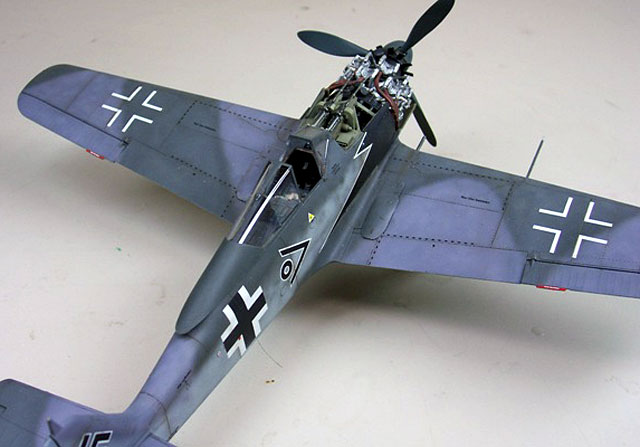
I prefer to treat each one of my builds as models with in a model.
What I mean by that is the engine assembly was built and treated as a
separate model. built sanded painted, and weathered separately. I
started by assembling the entire engine. Next it received a coat of
XF-16 flat aluminum. The cylinders then received a quick wash of black
oils. The rest of the details where then picked out in appropriate
colors namely flat black. I like Tamiya red brown XF-64 for a base rust
color. This was used on the exhaust stacks. A slight dry bush of all of
the details and the engine was set aside to begin work on the cockpit.
Eduard makes good use of their previous experience with photo etching
and include lots of it for the cockpit, in color and bare metal.
Some say that the pre-painted photo etch is cheating. If you fall in
this category Eduard has you covered. They have molded separately the
same detail in plastic for purists. As you can see I take advantage of
every bit and piece of the color photo etch. Cockpit build was strait
forward. A little post shade with the airbrush and a wash does it for
me. Onward.
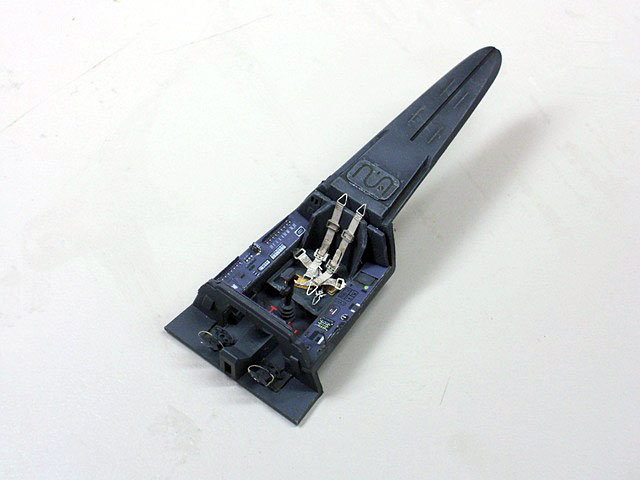
The basic airframe was assembled with the cockpit in place then
adding the engine firewall/fuselage gun assembly. Again test fitting is
a must. Though there are guides, it is critical to get this aligned. I
had the wings already assembled and lots of dry fitting was done to the
fire wall and the fuselage along with the wing assembly before finally
glueing everything together. If proper care is taken this thing fits
together almost seamlessly. For me only minor filling and sanding was
required.
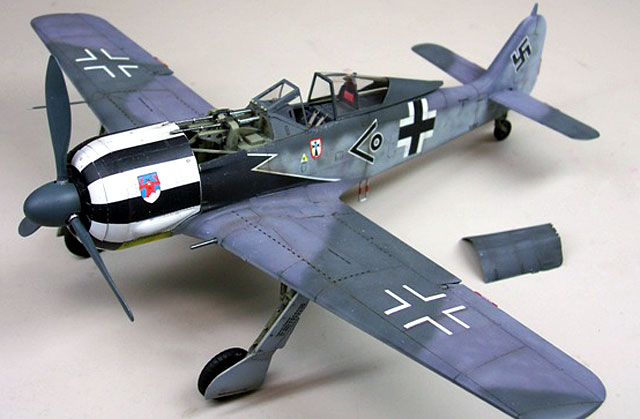
At this stage I am getting itchy to paint something so I assembled
the cowl and pulled out my piece (trusty badger 150) and gave it a
glossy coat of Tamiya X-2 with a little future added. With the cowl dry
I began decaling it. The Eduard decals sit down better than any other
decals I have used to date. More on this later.
I am closing in on the fun stuff only a few more things left to
assemble. The engine mount is very delicate and finicky and again one of
those things if not thought out well can create some headache's with how
the engine sit and the cowl fits over that. As you can see by now all of
these little things can snow ball into much bigger things later on if
not careful. I glued the engine braces to the fire wall then the the
engine mount all together rather hastily in hoping that I could catch
everything before it sets in hoping that the braces could be
triangulated into fitting properly. Opps not the case. The engine mount
itself while flush with the fuselage sat at about 11 o'clock.
Fortunately for me the the accessory pack that sits behind the engine
and is the part that actually mounts to the brace has quite a bit of
play in the fit. My guess is for this reason and again lucky for me it
had not been attached to the engine yet. A close call and I almost had
to eat my own words.
In the meantime, the canopy had a bath in Future and was set aside to
dry for a couple of days. When dry the forward windscreen was glued into
place and the canopy masks were applied. another nice addition to this
kit. With all of this done it was time to paint.
I have very poor luck airbrushing Model Master acrylics. Conversely I
love airbrushing Tamiya paints. However with no RLM colors pre mixed I
began pouring over old Tamiya instruction sheets to find RLM mixes.
This bird wears standard 74/75/76. I Found some color mixing guides
and decided these will work, more on this later. First though I mixed
Tamiya basic putty with lacquer thinner and sprayed this as a primer. I
suspect this is basically Gunze Mr. Surfacer that everyone raves about.
Next I preshaded the model with XF-2 black. The mix I found for RLM 76
is Tamiya guide which calls for XF-23:1, XF-66:2, and XF-2:7. I find
this mix to be a very convincing 76 color. Also acceptable is there
interpretation of RLM 74 which is XF-24:3, XF-27:2 and, XF-2:3.
Now there idea of RLM 75 that is a different story. I sprayed this
color and with not seeing it on a model it looks possible, but sitting
down next to the other colors it appeared way to blue. Back to the
drawing board. I finally found something I liked after a few attempts
this time on scrap styrene. With that hiccup out of the way the model
was coated with future sprayed at 12psi thinned very lightly with
alcohol. It was then left to cure for a couple of days.
Decals
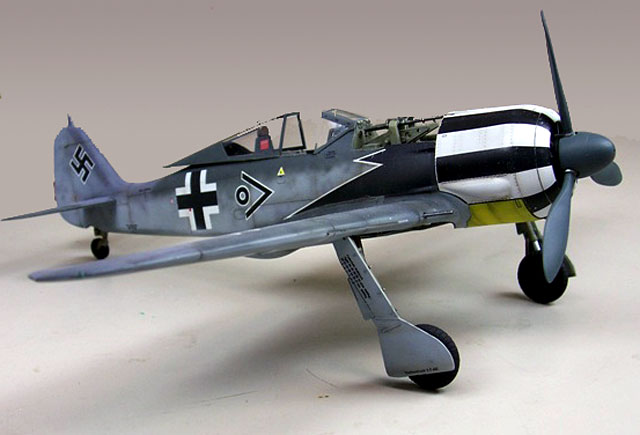
All of the decal options are quite handsome for the A-6, but I
finally settled on the black and white nosed JG-1 aircraft. Again the
decals settle down with very little effort in most cases a final decal
solution is not even needed. I began by applying all of the big decals
first fuselage crosses then upper and lower wings. I sat this aside for
a few hours to dry and when I returned, to my horror one of the crosses
on the lower wings had slid quite far on me. No matter I have spares.
Something inside me said lets try to save this one. So I began working
it with micro set. I finally got it lifted and to my amazement it was in
good condition so I squared it up where it needed to be and left it
alone. When I came back the decal had settled down just as well as the
opposite wing. A good sign indeed.
Again I eat my own words - check your references. I had applied a few
more personal decals to the model before the night was through.
The next day I realized that I had the one of them not even close to
the right place in fact it was to be covered by the exhaust stain shield
decal. Gahhh! After this decal had set all night long I began again by
using more Micro Set to lift the decal. After much work I finally
removed the decal and discarded it in my dish of decal water to be dealt
with later or replaced.
After finally getting the decal exhaust shields where I wanted them I
thought about trying to salvage the recently discarded decal. Having
been inspired by the previous days work, I plucked the decal from its
watery grave and began to fit it to the aircraft.
With a little bit of Micro Sol and setting solution not only did it
stick to the model it also sat down in the finely molded rivet detail!
I have never used decals that preformed so wonderfully.
Final Touches
With all of the major hurdles out of the way I began weathering the
model. A wash of raw umber oils followed by post shading Tamiya XF-64
red brown mixed with XF-1 flat black, heavily thinned with alcohol.
Chipping was done with a silver prisma colored pencil. All the small
bits and pieces were then attached like landing gears and pitot tube.
Home stretch nothing left to do but flat coat and pull off the canopy
masks. I love that feeling of peeling off the masks. Its like unwrapping
a present at Christmas.
This model was a commission build and I almost did not let it go. I
cant say enough great things about this kit. If you have been thinking
of building one do so especially if you can get your hands on a royal
class.
Click on the thumbnails
below to view larger images:
[../../photogallery/photo00012923/real.htm]
Model, Images and Text Copyright ©
2007 by Jared Taylor
Page Created 11 September, 2007
Last Updated 24 December, 2007
Back to HyperScale
Main Page
|
 Home
| What's New |
Features |
Gallery |
Reviews |
Reference |
Forum |
Home
| What's New |
Features |
Gallery |
Reviews |
Reference |
Forum |