|
Special Hobby's 1/48 scale
F2G Super Corsair
by
Andrew Garcia
|
 |
|
F2G Super Corsair |

Special Hobby's 1/48 scale F2G Super Corsair is available online from
Squadron
Special Hobby's
1/48 scale SH48049 F2G Super Corsair
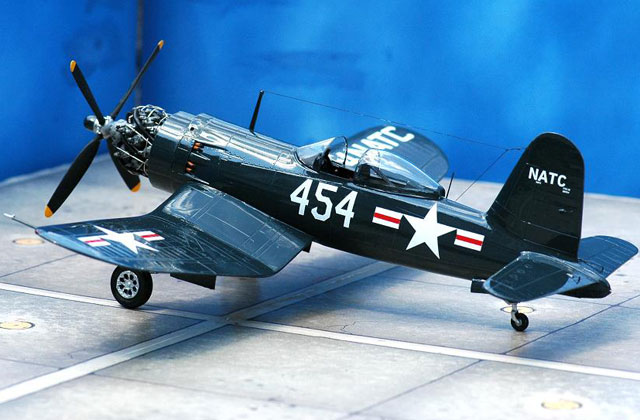
F2G Corsair Racer converted to F2G-1 # 454
using Eduard Etched Metal, War Eagle Decals, Quickboost Resin
This model represents a modest conversion to the Special Hobby F2G
Super Corsair “Racing 57” model. I chose to modify it to the F2G-2 U.S.
Navy military version.
A secondary purpose of this article is to collect the various bits and
pieces that have been written and photographed on the subject of the
“Super Corsair”. Although the aircraft seemed to never have this title
when originally conceived and produced, in later years the term “Super
Corsair” appears in many articles and photograph by-lines. My goal was
to create a genealogy of aircraft in Naval Bureau of Aeronautics Number
(Bu No) order that would allow me to keep track of references,
photographs and model various versions of the “Super Corsair”. The
“Super Corsair” has appeared in various guises starting with a number of
“X” for experimental aircraft versions and ending with the two
production batches of five aircraft in each batch, representing the land
based version (F2G-1) and the "Navalized" version (F2G-2) of the Super
Corsair.
In order to properly model any given aircraft you need good resource
material. The Super Corsair frequently appears as an afterthought or
historical note. It is usually buried in the text of the many F4U
Corsair books and articles as a general comment or interesting picture.
This made it difficult to understand the entire context of the subject.
So I set about piecing together the many sections of text and
photographs to allow me to understand the variations and model the
aircraft.
This document should be helpful in assisting identification of the super
corsair airframes and to model the F2G “Super Corsair”. I want to thank
the folks at War Eagle (Ron Kowalczk the owner of War Eagle died
4-1-2005) for providing a number of wonderful conversion sets and decals
in the 1990’s. His great output stimulated me to build a number of
“unavailable” kits with his vac formed conversions, resin bits and decal
sets. This article is dedicated to him, a great man and terrific modeler
who died at an early age.
In order to better understand my subject, the P&W R-4360 engined
Corsair; I started to accumulate a number of references, kits and
pictures to allow me to make a selection of several color schemes in
preparation of a 1/48th scale aircraft build. I started the quest first
with the War Eagle vac-form conversion set. Later, I bought some of the
Pend Oreille resin F2G kits. The first Pend Oreille release featured a
complete P&W resin engine. Within one month of its release I ordered a
second one and found the kit price had increased and the box contents
were modified to feature only an engine front - gone was the complete
R-4360 “corncob” powerplant.
I purchased Otaki kits for use with the War Eagle vac form conversions.
I purchased the Engines and Things R-4360 resin engine. I also purchased
True Details F4U-4 cockpits and resin wheels. The F2G had a different
cockpit than the F4U-1D Corsair. When I build I am prone to accepting
less than perfection for a better looking model. Again, “authoritative”
comments in a variety of sources cause confusion. In one text I read the
test pilot commenting on the different cockpit instrument layouts of the
F4U and F2G. In the Motorbooks International – Warbird History, F4U
Corsair by Nicholas A. Veronico with John M. and Donna Campbell,
published in 1994, page 81 states - “Production F2G’s maintained the
same cockpit arrangement and instrumentation as the Vought F4U-4”. The
Warbird Tech book Vought F4U Corsair Volume 4, on page 93 states: “The
R-4360 engine, an entirely new design over the R-2800, came with
different induction, exhaust, supercharger, and intercooler controls
which in turn altered some of the cockpit layout.” I tried to synthesize
all the commentary into a generalization supported by Steve Muth’s F2G-1
Photo Essay booklet. The F2G has a cockpit that is very similar to the
F4U-4. The shape is more or less the same. The layout is slightly
different. The sub-panel has the same shape but different controls and
layout particularly at the top. Look at the photos in his booklet and
make the minor changes to create a better model if you decide to rework
a resin F4U-1 or –4 cockpit.
Wow – I can use the great after-market resin cockpits in the War Eagle
vac form after all! So, no hecklers or mini flashlight rivet counter
fanatics tearing apart my F2G build, lamenting I used the “wrong”
cockpit – please. If you are a perfectionist I recommend going to one of
the museums that have the aircraft and take a picture. Use this for your
model and you will be fulfilled. I am going to use the color photograph
found in the F2G-1 Super Corsair photo essay book by Steve Muth. On the
cover is a full page clear photograph that works for me. Page four and
five of this reference book has the side consoles. Many aircraft
cockpits have been altered over the years from their original release
due to avionics upgrades and obsolete instruments requiring replacement
so choose your path and don’t look back.
Later, when they were released, I started buying Tamiya F4U-1D kits as
potential sources for the vac form conversion (and great OOTB builds).
Some were destined for the “big build” of what I found to be a
fascinating subject – the P&W R4360 engine stuffed into the Corsair
fuselage. Some vac form canopies (P-47D bubbletops) were also found in
the hopes of someday building the F2G in its initial test configurations
using the P-47 bubble canopy.
Yet, despite my fascination with the subject, none of them made it to
the top of a huge build pile. I had gone through a modeling phase in the
1980’s where I focused on the 1/48th Corsair building the available
Otaki and Hasegawa 1/48th releases with a variety of after-market
decals. The final batch in 1992 used some of the very nice Missing Link
resin conversion sets. I did this in the early 1990’s in order to model
the then unavailable versions of the Corsair such as the AU-1 and F4U-5
and –5NL night fighters. It only took about ten years for Hasegawa to
finally release these versions (and the Hasegawa Corsair kits are very
nice models by the way!) Then, there it was – an announcement that Hobby
Craft was going to come out with a mainstream injection moulded version
of the Super Corsair. Great news – but they have yet to be released.
Special Hobby’s is now released and the F2G is appearing on tables at
model contests.
In 2005 or 2006, I noticed Special Hobby made the long awaited
announcement of their release of a 1/48th scale Super Corsair. Yes, a
dream fulfilled - the Special Hobby kit, # SH48049 was released and
acquired through my favorite source, Roll Models. But, this release is
for the Thompson Trophy race aircraft and not the ones I really want to
model – the US Navy versions.
Although I think the race versions are wonderful and I will definitely
build several in this scheme my priority is to complete several of the
aircraft in US Navy markings that featured the “Corncob” engine. But –
do not lose hope – the Special Hobby release almost has all the parts
you need to build both the race versions and the US Navy versions! The
lack of an early military intake scoop and F2G decals are the current
problem.
I have found conflicting statements regarding Bu No’s and airframe
details gleamed from the variety of published sources. For example,
there are “authoritative” quotes stating the F2G was equipped with four
.50 caliber MG’s and other sources stating they still carried the
standard Corsair armament of six .50 caliber guns. I saw photographic
evidence that the four gun layouts – i.e. two .50 cal MG per wing were
in fact produced. From the photos it appears the standard wing was used
and the “extra” gun port sealed or covered over.
My apologies for any such errors that arise from errors in the source
documents I used. Forgive my own weak research – I am an amateur in a
sea of plastic perfection fanatics. Any errors are unintended and I look
forward to correcting them, as more credible and correct information
becomes available, so please don’t flame me on the Internet for
volunteering a start on the subject. Your help is needed.
The Super Corsair had major modifications from earlier Vought Corsairs:
-
Bubble canopy (initially copied from
the P-47 Thunderbolt bubbletop).
-
P&W R-4360 Wasp Major engine which
also caused changes to the induction, exhaust, supercharger and
intercooler systems.
-
Larger prop – it used a larger
Hamilton Standard “Super Hydromatic” 14’ four blade propeller.
-
Increased (taller) Vertical tailfin
with a special “auxiliary or split rudder” which had a
counter-torque spring tab at the base of the rudder. It was deployed
12.5 degrees to starboard whenever the tail wheel was extended. The
rudder was fabric covered.
-
New air induction intake and cowling.
Three versions of the intake were created. Two were short and one
was a long version.
-
New wing tanks increasing fuel from
234 US gallons to 309 US Gallons.
-
Redesigned tail wheel using a solid
rubber tire
-
Reduction in armament to four .50
caliber wing guns.
-
Smaller wing root intakes than
earlier Corsairs
I cataloged US Navy Bureau of Aviation (Bu No) Bu Numbers associated
with this program. I then gleamed details, which were available from a
variety of published sources. In time, I started to get a better idea of
what Chance Vought and the “real manufacturer” of the F2G, which was
Goodyear Aircraft, accomplished late in WW II with this “Super Corsair”.
The below list I compiled to help sort out and match the various photo
references that I could link back to the F2G program.
My favorite F2G reference source was the Motorbooks International –
Warbird History, F4U Corsair by Nicholas A. Veronico with John M. and
Donna Campbell, published in 1994. They have dedicated some great
full-page photographs to the subject and given much better insight into
the genealogy of the aircraft than any other reference I have read.
Using this reference as a starting point they indicate the program
started with a BuAer Contract, Number 2971, dated March 22, 1944. For
the sum of $ 39,094,097.12 , the U.S. Navy wanted 418 F2G Corsairs
developed and produced. The first production aircraft was BuNo 14691 to
be delivered in April 1945 to NAS Patuxent River, Maryland.
Seventeen Goodyear-built aircraft would receive the XF2G or F2G
designation representing seven pre-production airframes for XF2G-1
aircraft, BuNos 13471, 13472, and 14691 to 14695. This was to be
followed by ten production aircraft F2G-1 BuNos 88454 to 88458 and F2G-2
BuNos 88459 to 88463. The Goodyear Flight-test department contributed
nine other aircraft that were involved in supporting the F2G project.
These aircraft did not receive the XF2G nor F2G designation as each
plane was only given specific F2G modifications, none of which alone
brought the aircraft up to F2G specifications. That’s why you will find
a photo, for example, of a birdcage Corsair with the R-4360 engine! For
example, BuNo 12992 appears in some texts as an XF2G but it is actually
an FG-1A that had been stricken from the US Navy inventory and was used
by Goodyear as a shake and bake airframe for static tests.
I don’t like the Corsair more than any other aircraft. I have many
“favorites”. I do think it was one of the best WWII aircraft and a
classic fighter so join me in building a few of these brutes. Also, I
hope Aires, Vector or CMK will release a resin super detail set of the
P&W R-4360 engine, engine compartment and cockpit area. Also –
after-market decal makers – we await you!
Now that I have put together some information to help you get moving
with that long awaited F2G build, go to your work bench to complete the
Special Hobby F2G in U.S. Navy colors!
The Special Hobby Kit, SH 48049, F2G-1/2 Super Corsair is a limited
run kit with nice details such as a resin engine, etched metal
instrument panel and cockpit details, and two vac form canopies.
It is a straightforward build. The cockpit is very simple and
sufficient. I would prefer a more complete resin cockpit such as the
ones coming from Aires, Cutting Edge or Avionix as a replacement. I
added some Eduard F4U Corsair placards to the cockpit and engine. I then
moved on to adding some 3D to the flat etched parts such as the throttle
controls. Remember to fill in the extra mg port on the wing leading edge
and also the un-needed 3rd wing gun port and spent gun casing chute
underneath the wing. You only want two per wing for the military
version.
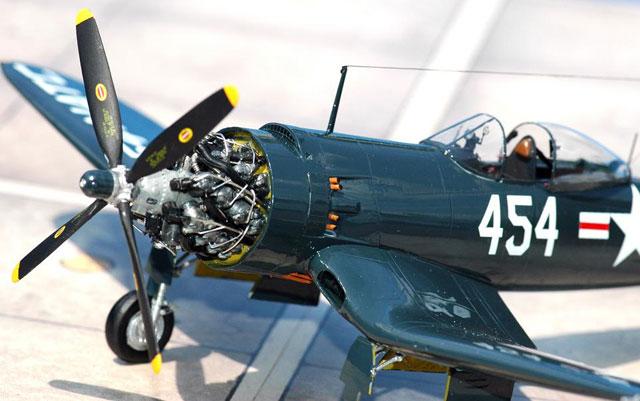
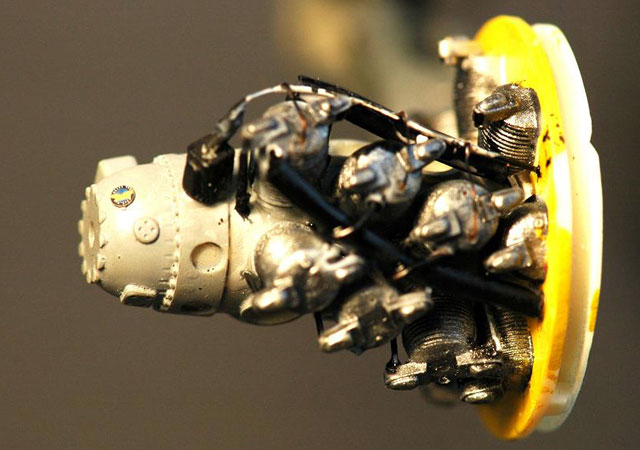
Initially I was going to do a fast, straight-from-the-box build. The
very nice resin engine had too much detail for me to button it up and
enclose it in a cowl. So, for this effort I decided to add a bit of wire
and miscellaneous detail to the engine to see if it could look more like
an R-4360. There were some great color photos of the R-4360 in Replic
Magazine, No. 189, May 2007 on pages 16 and 17. Since I had read cover
to cover the wonderful book “R-4360 Pratt & Whitney’s Major Miracle” by
Graham White I had to add some detail and expose this resin component.
There is a mixture of exposed metal parts and some black rubber hoses in
the engine that is covered in detail in Mr. White’s book. I tried to
enhance the kit engine but really look forward to a 1/48th scale R-4360
release from Aires, Vector or Cutting Edge. That would be some piece of
resin!
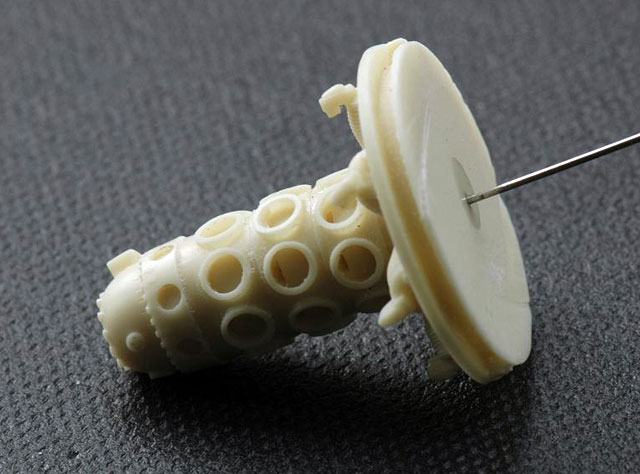
I used a thick metal rod taken from a large metal paper clip to insert
into the engine firewall and crankcase. Since I was going to hang the
engine out front I wanted to avoid a “handling separation” that
sometimes occurs when you use cyanoacrylate glue with resin parts. By
using a reinforcing rod inside (see photo) it made for a strong bond
that resisted snapping apart while I was drilling and attaching the
cylinder heads, push rods and metal wire used for the engine intake,
exhausts and ignition cabling. I used the R-4360 book for guidance as
well as the superb color engine photos in the May 2007, F2G Replic
magazine article. The engine intake pipes are painted black to represent
the rubber hoses with Testors steel for the metal connectors. The
exhaust pipes are a combination of bare metal with some pastel chalk
rust. I used thin natural metal guitar wire for the ignition wires with
some occasional black segments and thin wire for the spark plug wiring
leads.
The key military component not used in the racer version of this kit was
the carburetor intake. It was hiding on the “A” sprue as part # 8. This
release of Special Hobby’s F2G provides the late racer version of the
air intake.
The kit does provide an etched metal intake grill so it helped the
appearance. Part #8 has the square intake overflow doors seen on page
321 of the Graham White R-4360 text. They are an air bleed exhaust
opening used to tune and manage the air intake flow pressure. The intake
passed the two-foot test – meaning it looked OK from two feet away
without improving this area.
I used the front fuselage antenna mast which was on the plastic sprue,
part # 27, but is not used on the # 57 racer version. You also need to
add a metal wire whip antenna behind the canopy, and two whip antennas
under the fuselage.
The F2G, #454 that I modeld had a gunsight and two cockpit coaming
switch panels. I confirmed this in some photos courtesy of Rodney
Williams. The kit does not have a gunsight so I sourced one from
Quickboost QB48016 Mk. VIII resin gunsights.
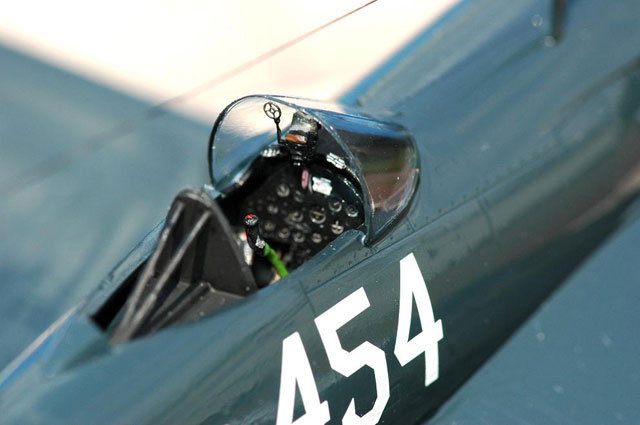
Thank you Special Hobby for including two vac-form canopies. The first
canopy split during preparation since it is a delicate part, especially
when cutting it from the form. This was my fault since I tried cutting
it loose using plastic sprue nippers. You should use a sharp knife
scoring or outlining the separation several times before snaping it
loose or a dremel rotary saw blade at a very slow speed. It looks very
nice once installed due to the thin scale effect and clarity after a
future wax coating.
The etched parts were fine except for PP15, the canopy mirrors. The
mirrors are only the frames and lack the “glass mirror” portion. I
thought of workarounds like gluing on a sheet of aluminum metalized
helium balloon plastic and took the easy way out using another full
mirror from a spare Eduard detail set.
You may want to scribe in the round gas tank panel lines in front of the
windscreen on top of the cowl. The kit has the square panel but within
this panel there should be a round panel with the gas tank cap. It is an
easy job with a metal panel template. A good reference is the schematic
drawing on page 95 “Sheet 50” of the AJ Press Monograph # 19 F4U
Corsair.
The wingtip lights can be improved by cutting out the solid platic wing
tip light notches and replacing them with a small rod or pin head light
and using clear epoxy or you favorite alternative to replicate the clear
lens cover and colored lights combination used in Corsair wing tips.
Most modelers just paint the wingtip lights red and green as though they
are solid colors when it appears they are actually colored lights inside
clear covers.
Another small detail that was missing, which I could not understand why
it was omitted, was the lack of a connecting shaft between the resin
engine and the prop. The notation on the assembly instructions -
“scratch build” - says it all. I am a forgiving person thankful just to
get a model released but this part should be part of the prop or on the
styrene fret or extended from the resin engine.
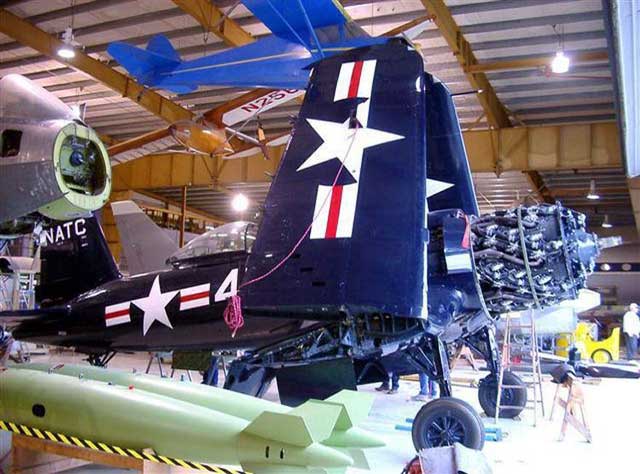
The military versions of the F2G used at least two tail antenna
configurations. The main difference is some have the wire attached to
the front tip of the vertical stabilizer (mainly F2G-1 versions) and
some are connected to an extension protruding from the top edge of the
rudder (F2G-2).
Some other finishing touches:
-
If you model the F2G-2 carrier
version do not use part # C25 and add the tail hook. If you build an
F2G-1 use part # 25 t cover the notch needed for a tail hook.
-
Add a gunsight based on your
photographic references (a Mk. VIII version).
-
Add the stall prevention wedge on the
starboard (right side) wing just past the covered over outside
(unused) gunport.
-
Add a small silver or white tail
light at the end of the rear fuselage tail cone and one just after
the top fuselage whip antenna.
-
Add two whip antennas to the rear
underside of the fuselage
-
Detail the inside of the landing gear
bay – it is sparse OOB.
-
The landing gear covers may have a
mis-shaped component. Quickboost 48-112 Corsair Undercarriage Covers
may be your best solution for a fix.
-
F2G production line photos show under
wing rocket launcher stubs and six machine gun ports. The extra gun
port was later covered with a round disk.
The release of this kit was a dream come true – it gave me a styrene
F2G. I do not want to count rivets or complain about a manufacturers
fine effort to fill a big gap in 1/48th scale modeling so my
appreciation goes to Special Hobby.
For the advanced modelers, I wanted to provide some constructive
comments from a very dedicated professional modeler. Rodney Williams,
who in my opinion is an expert on building F2G Corsairs, and just about
any aircraft he sets his mind on building, provided some feedback on the
kit. His comments summarized were:
-
The cockpit is too simplified and
missing some key components.
-
The exhaust underbelly system and
flaps are not correct.
-
The canopy fin tip is too short, as
it should be 23" long.
-
Both the wing span and fuselage are
too short. (Wing: 41'0" Fuselage: 33'10").
-
The prop should be a scale 14'0" in
diameter; it is undersized in the kit.
-
The carb intake cowl shape racer
version - needs to be widened behind the intake if you are building
the #57 Race version.
-
Some key panel lines are missing such
as the circular gas tank section on the upper cowling.
-
“The resin and etched wing inlets
look darn good.”
-
One of the landing gear front covers
may have a flawed shape at the bottom.
Rodney has built several showstopper F2G's in a variety of scales and
based his work on in depth research. Search the Internet for his F2G
builds in several scales and you can appreciate his attention to detail.
I appreciate his constructive comments and photographs on the kit. It
really helped me improve it.
I am very grateful Special Hobby created this kit because it gave me
hours of modeling fun and the end result fills in a huge gap in my
Corsair modeling collection. I am not a contest capable modeler and for
a hobby creation I enjoyed building this kit so I can overlook some
shortcomings – count on it I will build several more! I would however
welcome some resin correction kits because this kit would be stunning
with some minor fixes or a complete engine bay!
 I used Aeromaster enamel paints, # 9057 Gloss Sea Blue FS 15042 overall.
I usually use Gunze acrylics or Testor's enamels but I still have some
Aeromaster in the paint stash. For the engine I used Testor's enamels. I used Aeromaster enamel paints, # 9057 Gloss Sea Blue FS 15042 overall.
I usually use Gunze acrylics or Testor's enamels but I still have some
Aeromaster in the paint stash. For the engine I used Testor's enamels.
Decal markings came from the excellent 1/48 scale War Eagle F2G vac-form
conversion set. It has a variety of F2G versions.
The Stars and Bars were from Superscale 48-899 USN Insignia white/red
bars.

This aircraft initially wore the all white USN stars and after the
close of WWII red bars were added to all glossy sea blue U.S. Navy
aircraft.
Bureau of
Naval Aeronautics F2G-1/2 Bu No Index
|
Bu No Comments
2312 F4U-1WM with original birdcage canopy proof of concept aircraft
used by P&W for R4360 engine conversion tests. On May 23, 1944 it was
used for ground run up testing. Using the P&W XR-4360 test engine, it
was first run-up on May 23, 1944.
02460 F4U-WM with original birdcage canopy used by P&W for R4360 engine
conversion testing on May 23, 1944.
12992 FG-1A not brought up to F2G standards. Used as a shake test
airframe.
13007 FG-1D for spin demonstration tests.
13374 FG-1D used to simulate and test F2G scoop and single disc-brakes
13471 First true XF2G-1 and totally up to F2G modified specifications
except it had NO bubble canopy. It used the standard FG-1D domed canopy.
It appears in markings as Dark Blue or Black “# 5” on a yellow nose. All
of the F2G modifications were incorporated into this aircraft. Its
engine was transferred to BuNo 14691.
13472 Second true XF2G-1, after tests it was stricken on April 30, 1946.
It was scrapped on April 30, 1946 at NAS Pensacola. All of the F2G
modifications were incorporated into this aircraft. After tests were
completed it went to NATTC Memphis and finally to its final destination
of NATTC Pensacola where it was stricken on April 30, 1946.
13703 FG-1 used to test weight stability and trim tabs. Delivered to US
Navy September 1945 after use by Goodyear flight test department.
13704 Used for brake testing and dive practice tests and later turned
over to the US Navy.
14062 Used by P&W for engine cooling tests and intake induction testing.
14091 First in the prototype series XF2G-1. It is actually a FG-1
modified for bubble canopy tests using a P-47D Thunderbolt canopy. No
P&W R4360 engine was installed and it used a three-blade prop. Delivered
to Goodyear on April 17, 1944 for proof of concept testing.
14092 Second prototype in the XF2G-1 series. It is actually a FG-1A
modified for bubble canopy tests and also continued use of the
three-blade prop. NO P&W R4360 engine was installed. It was delivered to
NAS Anacostia for US Navy evaluation on October 11, 1944. It was
returned to Goodyear’s plant in Akron, Ohio on February 1945. It was
scrapped on November 30, 1945. It appeared in markings as white “092” on
its nose section.
14691 XF2G-1 used the engine from Bu No 13471. It was the third XF2G-1
airframe and has the R4360 engine with a bubble canopy. It was accepted
on September 29, 1944 as the first aircraft completely manufactured as
an F2G-1 and was scrapped on June 30, 1947 at NAS Norfolk, VA. It was
the first manufactured as an F2G-1. It appears in markings as Black “#
9” on a yellow nose. One reference said this aircraft was a repossessed
FG-1D Corsair UK S/N KD260 and was converted to the XF2G-1
configuration.
14692 XF2G-1 was the fourth XF2G and was used to test the new wing fuel
tanks, split rear rudder configuration and final dive tests. It was lost
in flight due to a hydraulic pressure problem causing the pilot, Arthur
Chapman, to bail out and resulted in the total loss of this airframe. It
had a blue and yellow checkered cowling.
14693 XF2G-1 was the fifth XF2G-1 production model and P&W used it for
water injection engine testing and two different carburetor types. It
was also used to test the extended engine carburetor scoop, which was
later used on racing aircraft. It was the first F2G to use the extended
carburetor intake fairing. The aircraft was stricken from the Navy
inventory on July 31, 1949. Cook Cleland purchased this airframe. Dick
Becker used it in 1947 in the Thompson Trophy race as N5590N, black #
94. It was used by Cook Cleland in the 1949 race as # 94 and flown to a
1st place finish in that memorable race.
14694 XF2G-1 was the sixth XF2G-1 and was used at NAMC Philadelphia for
carrier platform testing. It was transferred to NAS Patuxent for testing
where it was scrapped on May 31, 1947 and sold to Cook Cleland for
racing as # 18, reg # N91092. It was then sold to Ron Puckett and raced
as white # 18 and took 2nd place in the 1949 Thompson Trophy Race. It
appears in a photo in the Veronico & Campbell Corsair text on page 113.
14695 XF2G-1 was the seventh and final prototype configuration. It was
damaged in a crash landing and scrapped. A photo can be found in the
Veronico & Campbell Corsair text on page 79 in what appears to be an all
aluminum finish with the exception of the top of the vertical tail which
is in standard dark Navy blue. This could be attributed to their use of
this aircraft to develop and test the “split rudder” modification.
14985 KD554 - UK Corsair airframe used for carbon monoxide tests to
check for firewall carbon monoxide leaks from R4360 engine. KD554 was
taken from a batch of FG-1 and FG-1D airframes, sequence KD161 to KD560,
a 400 unit batch production run of UK bound Corsairs using BuNo 14592
through 14991.
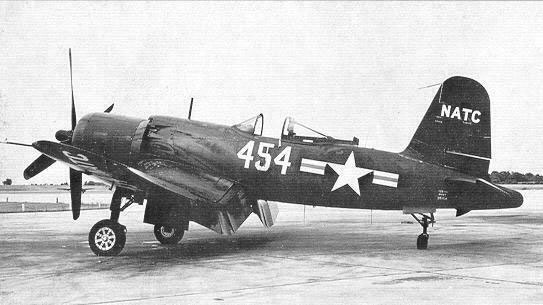
88454 This was the first true production F2G-1 (the land based version
of the Super Corsair). It used the larger 14’ Hamilton Standard Super
Hydramatic prop. It went into storage on May 31, 1948 and later appeared
at the Champlin Fighter Museum in Mesa, Arizona. It was accepted by the
US Navy on June 30, 1945. It appears in US Navy markings as White “#
454”. It is now at the Champlin Museum of Flight in Seattle, Washington.
88455 F2G-1 Scrapped on August 31, 1946.
88456 F2G-1 Scrapped on May 31, 1947.
88457 F2G-1 which was sold to Cook Cleland and raced by Tony Janazzo as
N5588N. It crashed at the 1947 race and killed Tony Janazzo. It appeared
with a small white # 32 on the vertical tail and nose, with a small “TT”
on the nose as well signifying “tactical tests”. It was race number 84
in the Cleveland races.
88458 F2G-1 was scrapped January 1948. This may have been flown by Ben
McKillan as race # 57. There are claims the 88457 and 88458 data plates
were switched. This aircraft was used to test the large, bulging,
extended air intake scoop.
88459 F2G-2 NATC Test and Evaluation Aircraft. This was the first F2G-2
(carrier based configuration) “Super Corsair” which featured folding
wings, tail hook, and shortened propeller. It served as a ground target
when it was scrapped in January 1948. It appears in markings with a dark
blue or black & yellow checkered nose.
88460 F2G-2 served at NAMC Philadelphia, as a test aircraft in October
1945 for carrier aircraft platform testing. It was scrapped on May 31,
1948 at NAS Norfolk.
88461 F2G-2 served at the Carrier Aircraft Service Unit for sea tests.
It was scrapped in January 1947 at NAS North Island, San Diego.
88462 F2G-2 serving at the Carrier Aircraft Service Unit for sea tests.
This F2G-2 was scrapped in May 31, 1947.
88463 F2G-2 used as an instructional aircraft by the US Navy until sold
to Cook Cleland on February 28, 1947. He used it for air racing at the
Thompson Trophy Race in 1947 as race white # 74, N5577N. It won the 1947
Thompson Trophy Race with Cook Cleland at the controls. It was flown by
Dick Becker at the 1948 and 1949 Thompson Trophy Races. It failed to get
airborne for the 1949 race and was retired. It is owned by the Western
Reserve Historical; Society of Cleveland, Ohio and is under restoration.
88464 Status unknown
88465 Status unknown
88466 Status unknown
88467 F2G-2 flown by the US Navy. It appears with the yellow “C51”
markings in several photos. It has small white stencils “88467” and
F2G-2, with a small white “51” on the tail
88468 Status unknown
Click the thumbnails below
to view larger images:
[../../photogallery/photo00026799/real.htm]
F4U Corsair - Warbird History Veronico , J. &. D. Campbell (Motorbooks)
1994
Corsair – Thirty Years of Filibustering 1940 –1970 by Bruno Pautigny –
Histoire & Collections Books 2003
Airpower Jan. 1974 Vol. 4 No. 1 pgs. 18 – 27 The Ultimate Corsairs by
Bob Grinsell
Airpower Jan. 1990 Vol. 20 No. 1 page 37 Racing Unlimited! by Kennedy &
Hiatt
Modelling the F4U Corsair by Brett Green , Osprey Modelling # 24, 2005
R-4360 Pratt & Whitney’s Major Miracle by Graham White Specialty Press
2006
F4U Corsair – AJ Press Aircraft Monograph 19 by Adam Jarski 2005
Chance Vought F4U Corsair Volume 2, #26 (3026) by Andre R. Zbiegniewski
2006 Kagero Books
Warbird Tech Series Vought F4U Corsair Volume 4 by Barrett Tillman
Specialty Press 1996
Replic Magazine, No. 189, May 2007 pages 10 to 19.
Click the thumbnails below to view larger images:
[../../photogallery/photo00030856/real.htm]
Model, Images and Text Copyright © 2007
by Andrew Garcia
Page Created 19 September, 2007
Last Updated
24 December, 2007
Back to
HyperScale Main Page
|
 Home
| What's New |
Features |
Gallery |
Reviews |
Reference |
Forum |
Home
| What's New |
Features |
Gallery |
Reviews |
Reference |
Forum |