|
IMGUR Photo Hosting Tutorial
by Matt Odom
IMGUR Photo Hosting Tutorial
|
In light of all the recent problems that people seem to be having with Photobucket, I have decided to make a brief tutorial on how to use my favorite image hosting site IMGUR.com
I too had lots of problems with photobucket way back when I used to use it. Then my friend introduced me to imgur and I have never gone back.
Advantages:
-
No need to create an account! None whatsoever, just head to the website, upload your photos and you’re good to post!
-
I have been using Imgur for years, and I have never had one of my photos bandwidth out
-
You can select multiple files at once to upload! I don’t know if PB is still the same way, but it was frustrating to have to click ‘add file’ select a single file and repeat for every photo you wanted to share (in my build blogs, there were always tons of photos).
-
You can set the size of the image to be shared AS A THUMBNAIL!!! So you can post an image that doesn’t ‘break the tables (go wider than the screen), but it’s still a clickable thumbnail which will take users to the full size image.
-
Last but not least, it is painfully easy to use!!!
So why a tutorial? Because you’re already frustrated with 3rd party image hosts, so I’m going to make it as easy as possible for you.
-
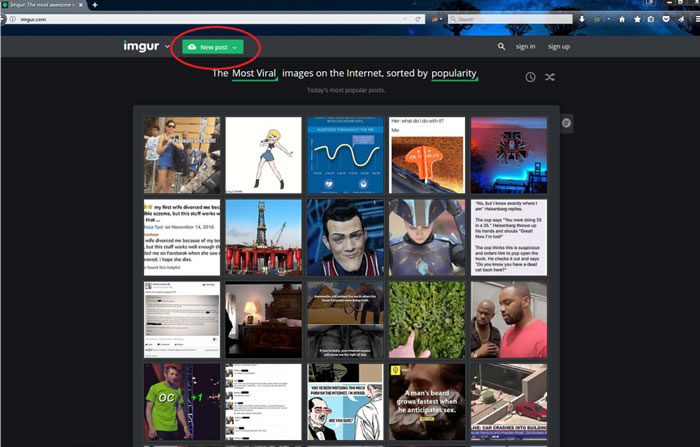
Open up www.imgur.com in your web browser.
-
Click the green button at the top that says “New post.”
- That will bring up the upload screen
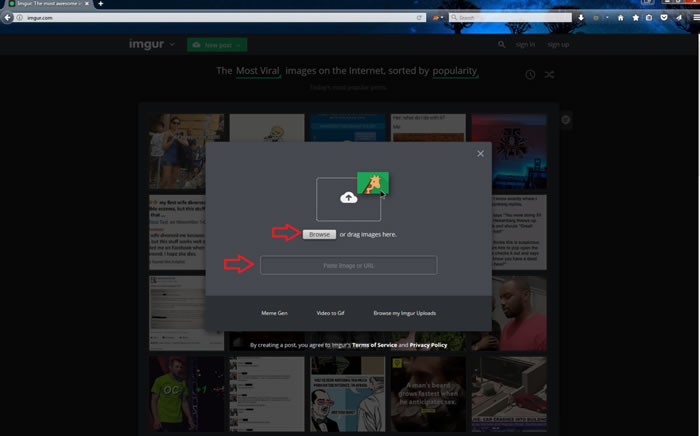
You have a couple of options now. You can select ‘Browse’ to search for the images you want to upload on your hard drive. If you prefer you can drag and drop the images onto the cloud just underneath the giraffe’s head. If you’re sharing an image from another website, you can copy and paste the image, or copy its URL (address) and paste that info. Select all of the images you want to upload at once. Go ahead and click Open, here comes the magic.
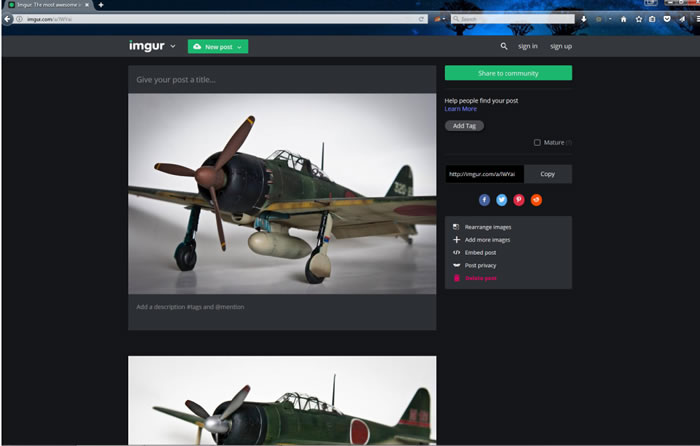
- Once you click ‘Open’ you’ll see the gallery open up. All of the images are there, scroll down for the rest. There are plenty of options on the right hand side of the screen, but for the purpose of this tutorial, we will KISS and ignore them.
- Hover the cursor (mouse) over the image that you want. You will see a box pop up in the upper right hand corner of the image. The address there is the address of the hosted image in full size. You can click the ‘Copy’ button and it does exactly that. Switch to your post and paste it (Ctrl-V). Hyperscale accepts images in this form now, instead of the traditional BB Code.
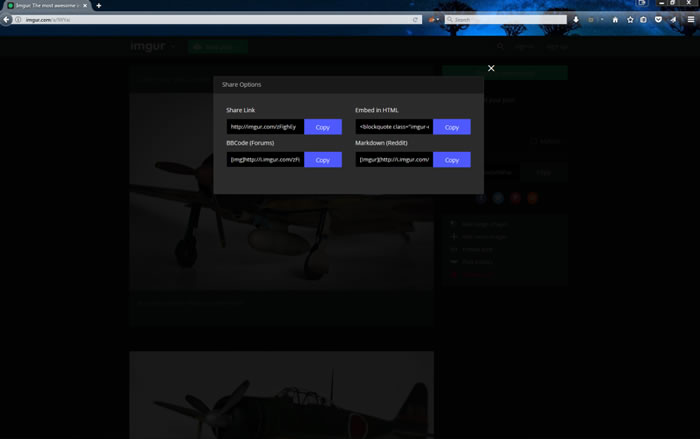
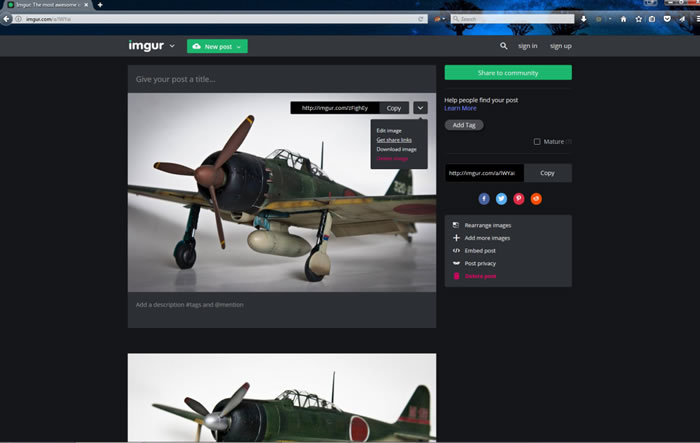
If you need or want the BB code link for other forums as it saves some time, then hover the cursor over the down arrow next to the word ‘copy’. If you click on ‘Get share links’ a new screen will come up with a few handy addresses including the original URL you just had, BBCode, HTML and Markdown for Reddit. Copy and paste to your hearts content! If clicking the copy button doesn’t work for you, just highlight the link you want and copy it manually (right click copy, or Ctrl-C).
Paste the address you copied into your post, exactly as you did before.
- Didn’t I mention something about resizing and thumbnails? Yes, that’s actually what prompted this tutorial. Imgur used to have a handy thumbnail button on the share options page, but it has gone the way of the dodo. The feature is still alive and kicking though. You simply have to add a letter in the address of the image between just before the .jpg For example if you wanted a medium sized thumbnail your photo becomes http://imgur.com/filenameM.jpg (not case sensitive)
Here are all the dimensions and letters to choose from:
-
s = Small Square (90×90) as seen in the example above
-
b = Big Square (160×160)
-
t = Small Thumbnail (160×160)
-
m = Medium Thumbnail (320×320)
-
l = Large Thumbnail (640×640) as seen in the example above
-
h = Huge Thumbnail (1024×1024)
I know that this has been long and wordy, but I hope I have made the transition seamless and easy for anyone who wishes to switch hosts.
Images and Text Copyright © 2007 by Matt Odom
Page Created 7 July, 2017
Last Updated
7 July, 2017
Back to HyperScale Main
Page
|