|
Yak-7V & Yak-7B
by Jose R. Rodriguez
|
 |
|
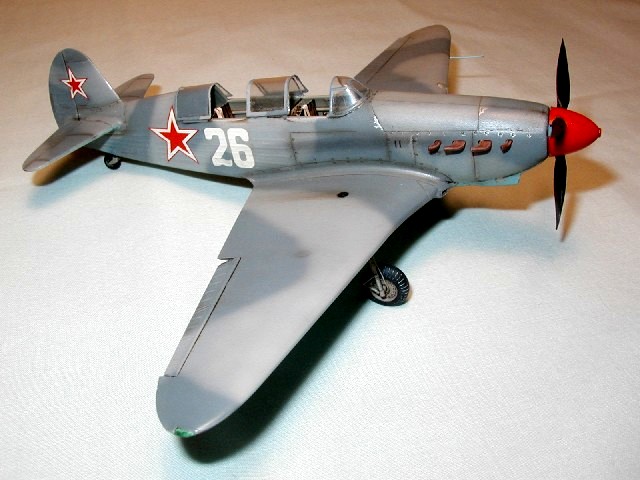
Yakovlev Yak-7V |

HyperScale is proudly supported by
Squadron.com
I have always had an itch to build VSS aircraft since I was a kid.
However, before the arrival of this much-heralded golden age of modeling,
WWII Soviet aircraft were not available unless you were satisfied with
slapping red starts on a western aircraft. It was with great joy when I
re-entered the hobby to find that Soviet aircraft were now available
under our capitalist market system. Not only that, but some of these
kits came from “over there”, like the ICM kits from the Ukraine.
Of course, I jumped at the opportunity to buy ICM’s Yak-7V for U.S.
$4.99 and the Yak-7B for less than ten bucks!
The 7 series of Yak fighters was the “heavy” fighter version of the
Yak-1, the “light” version (further developed into the Yak-3 series).
Concerned with the high numbers of Yaks lost due to accidents on the
hands of inexperienced pilots, and I’m sure that there was some concern
about the pilots too, Aleksander Sergheievic Yakolev decided that a
two-seater trainer might be a good idea to bring green pilots up to
speed in a high performance aircraft. Out of this concern the Yak-7UTI
trainer was born. It had to be bigger to accommodate a second seat, and
used a more powerful engine to handle the increased weight.
Alas, the unthinkable happened, the two-seater flew better and had
better performance than the Yak-1. Because the Yak-7 was different
enough from the Yak-1, it would necessitate its own assembly line, at
the expense of the Yak-1.
In the name of expediency and simplicity, Yakolev came with the idea of
stopping Yak-1 production and converting all assembly lines to produce
the seven series trainers, and most importantly, fighters. The first
fighter became the Yak-7A. 261 of these aircraft were built. After
upgrading to the more powerful Klimov M-105PA and some aerodynamic
refinements the seven series became the 7B. In August of 1942 a yet more
powerful engine was given to the 7B, the Klimov M-105PF and 5120 of
these aircraft were built before production ended in July of 1944. For
some reason the series continued to be the 7B even though the VSS had
the habit of renaming a series with an engine upgrade occurred.
The most visible external difference from the A model was the machine
gun blisters on the cowling of the B model. Because of its two-seater
background, the seven series fighters had a funky looking aft section
behind the canopy. Yakolev just pulled the rear seat out, replaced the
rear glass with plywood, and put guns on a two-seater to create his
fighter. In no time Yakolev was churning out the new “heavy” fighter to
the delight of the comrade pilots. The 7V was born from a request from
training squadrons for a tougher and simpler airframe that could handle
green pilots better, and I’m sure Yakolev was more than willing to
simplify fabrication. The 7V had a reinforced airframe and fixed landing
gear, and no radio. 697 of these aircraft were built.
I think it is noteworthy to say that these fighters had a 20 mm ShVAK
cannon shooting through the propeller hub, a la P-39. The Germans tried
something similar in their early versions of the BF109 and had to give
up because the excessive heat kept on jamming the cannon. The Soviets,
as low tech as they might have been, pulled it off beautifully.
|
ICM's
Yak-7 Kits in 1/48 Scale |
Because of their common origin I’m reviewing both the 7V (two-seater)
and the 7B (single-seater) at the same time. I built the two-seater
first and the when I started the single-seater I discovered that it was
déjà vu all over again.
Let’s start with the box art. It is excellent and it provided me with
clues about some of the details. One thing you learn about VSS aircraft
is that their pictures are hard to find, and when you find them, they
are usually low quality. The Soviets allowed their propaganda machine to
photograph their heroes as a way of keeping the morale of those fighting
in the Great Patriotic war. Every body else was barred from owing or
carrying a camera in the front lines, or any where for that matter.
Camera toting comrades freely snapping pictures at their pleasure under
the Stalinist regime was not the norm; you would probably end up shot
accused of spying.
Once you open the box, you will find sprues of light gray injected
plastic. The two-seater had a very light coat of mold release grease;
the single-seater had a much heavier coat. I used dish soap and an old
toothbrush to take care of this problem under the kitchen sink. The
amount of flash is minimal and the quality of the molding is good with
beautifully engrave panel lines and a fine texture on the fabric
sections of the fuselage. The plastic is soft and very amenable to
cutting, gluing and sanding. The clear parts are not good and here is
where Squadron comes to the rescue with their vacuum form canopies
(SQ9611). ICM’s canopies are thick, opaque and the frames are way too
wide, and the canopies are one piece that only let you build a closed
cockpit.
ICM’s 7V, 7A, 7B and 7UTI (two-seater with retractable landing gear)
share 95% of their parts. As a matter of fact, you can buy the 7V and
build the 7UTI because the landing gear doors and parts required to
build the 7UTI are present, and vice versa. All kits come with a basic
Klimov engine, an engine cradle and the cannon. I left my engines out
because I could not find a single picture of a Yak with the cowling
open. I have read on other reviews that with the engine in is hard to
make the cowling top fit in place, so beware.
Both kits had the option for wheels and for skies.
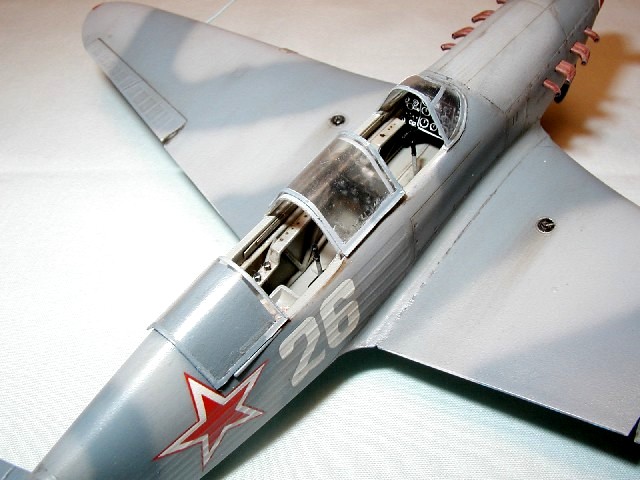
Building the Yak-7V
Two-Seater
Let me start with the two-seater.
The cockpit provides the steel tubular structure as a separate part,
a very nice detail. I attached to this tubing the usual things such as
throttle quadrants and trim wheels. I added control lines running
through the floor and the sides and I added the plumbing for the
instructor’s instrument panel. The back of the seats is too thick and
out of scale so I made my own seat backs out of beer can aluminum. I
glued copper wire in a vertical pattern to the seat’s back and
upholstered it with masking tape; the wire gave the tape the texture I
needed. Seatbelts were scratch built from dental floss.
For the instrument panel I used the kit’s decal. This is the trick -
the decal is black and the dials are clear so if you paint your
instrument panel black guess what is going to happen? Black on black
doesn’t look good. Paint the instrument panel white if you are going to
use the decal. The gluing of the components is difficult because there
are no locating pins or any hints of where stuff is supposed to go so
dry fit every part before putting the glue to it – dry fit twice, glue
once.
I painted the cockpit with RLM02 Gray. Don’t let the pundits confuse
you about which interior gray to use because it seems that every factory
had their own flavor. The instruction sheet for the Accurate Miniatures’
Yak-1 suggests RLM02 and that is good enough for me.
ICM’s suggests that the exhaust pipes be glued from the inside of the
fuselage before gluing the fuselage halves together. I didn’t do it
because it is a real pain to paint them once they are in place so I
blocked the fuselage holes with a strip of – what else – beer can
aluminum. I cut the exhaust pipes from their common carrier and drilled
their openings and painted them rust brown and set them apart to be
glued individually after the aircraft had been painted.
The airframe assembly is easy and there are no major fit problems. An
area to watch for is the chin radiator; dry fit this part to death
before you bring the glue out. It will fit, but you are going to work on
it. The wing root inlet ducts are the worst part of this kit. I have no
idea what ICM is trying to depict in here, but it doesn’t match the box
art and the few grainy pictures I found. These inlets are square so get
you putty and your knife and carve yourself the right shape. Hey, this
ain’t a Tamigawa, and what do you expect for five bucks anyway? Because
of the eagerness of the plastic to react with liquid cement, be careful
not to overdue the glue thing or you may mar the plastic’s surface.
The landing gear in the 7V is fixed so it doesn’t use a lateral brace.
This makes the landing gear very delicate in the kit as there is no a
solid attachment point in the wheel well for the strut to go in. I would
recommend drilling the top of the strut and using brass wire to
reinforce the bonding to the wing. I did this in the single-seater and
it worked rather well. As a bonus, you can let this brass wire stick out
pass the top of the wing to replace the plastic landing gear position
indicator. The landing gear doors were nailed shut over the wheel wheels
and the fit is not too good so it is time for more sanding and filler.
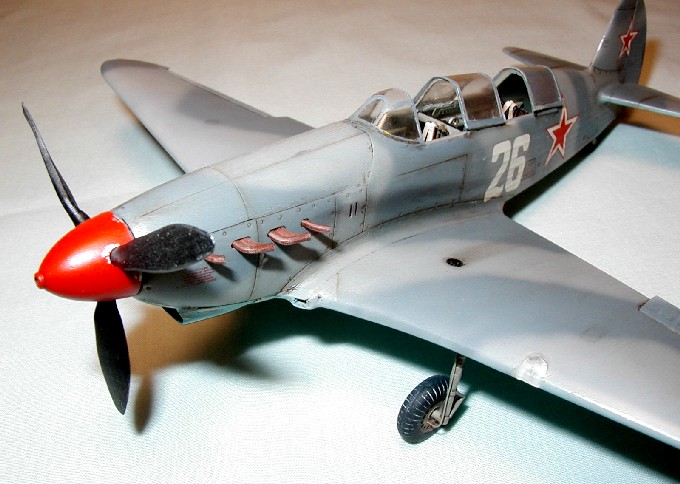
The propeller in these aircraft is rather odd looking. I don’t think
that ICM did a good job with them. These kits would greatly benefit from
an aftermarket resin prop. As a matter of fact, there is a review in
this site on a resin conversion kit for the ICM Yak that includes the
propeller. This set is made by Gremlin. Take a look at
http://www.kitreview.com/reviews/yak7correctionreviewbg_1.htm
Building the Yak-7B
Single-Seater
At this point let me comment about the single-seater.
Everything that applied to the two-seater is still good for the
single-seater. This time I used Extratech’s photo etched set (EX48087)
for the 7A. This set didn’t do much for the cockpit other that it saved
me having to make a seat out of beer can aluminum. It was difficult to
glue flat brass parts to a plastic tubular frame. I ended up using the
kit’s instrument panel because I had an impossible time trying to make
the Extratech panel fit.
Where Extratech shines is in the landing gear doors. They are
beautiful and worth the money I paid for the set.
For the single-seater I decided to scratch built the split flaps out
of – guess what – beer can aluminum. The flaps in these aircraft are not
high lift devices but drag devices, like an air brake, and they don’t
reach to the trailing edge of the wing like more conventional split
flaps do. I cut thin strips of aluminum to make the inner structure of
the flap that was an aluminum flat piece. Superglue and aluminum go so
well together that once it dries, you cannot break the bond without
ripping through the metal. I carved the plastic around the bottom of the
wing to make room for my creation. I’m not claiming that my flaps rival
something made by any of the Czechoslovakian masters of photo etching,
but they look the part. Remember, in this business everything is
appearance.
I replaced the thick tail wheel door with one made out of beer can
aluminum. The torsional brace on the tail wheel is also beer can
aluminum.
For the single-seater exhaust pipes I used the Moskit pipes from Russia.
These things are a beauty and are ready to rock-and-roll right out of
the package; no painting and no drilling. I separated my pipes into
individual pieces and glued them to the airframe after all the painting
was done. It couldn’t have been easier.
I used the kit’s decals for both aircraft. For the two-seater with
its light camouflage, they worked like a charm. For the single-seater
with the black-on-green camouflage, the red starts could not show their
red color over the dark paint. If you opt for this scheme, using
aftermarket starts maybe a good idea.
The two-seater comes options for two aircraft, White One with
black/green/blue camouflage from the 1st IAP Warsaw Fighter Regiment,
Grigorjevskoje, winter 1943-1944. The second aircraft light gray/dark
grey/blue from an unknown unit. I decided on the second option because I
like the gray scheme better. The 26 ID number came from the
single-seater decal sheet. Sue me for cheating.
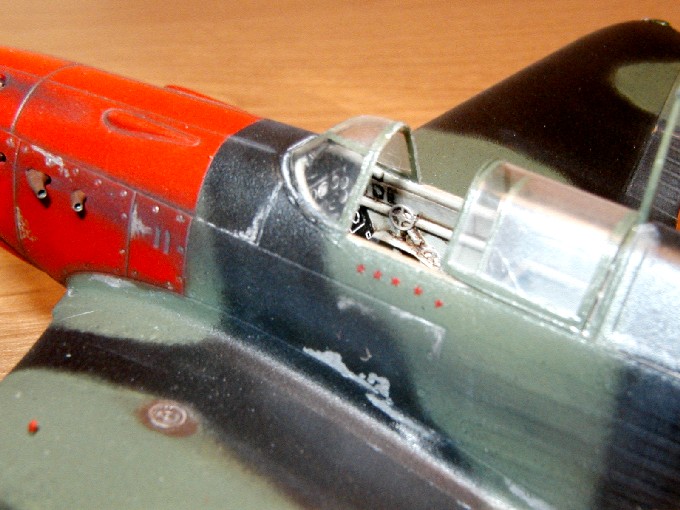
The single-seater came with option for four aircraft: White 26, 3rd IAK,
Cuban, May 1943. I stole this 26 to put in the two-seater. White One,
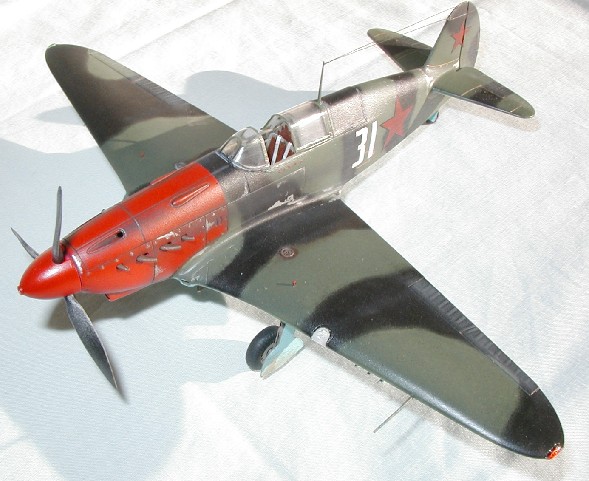
summer 1942. White 31, 434 IAP, Stalingrad, September 1942, belonging to
Sn. Lt. Orehov. All these aircraft have black/green/blue schemes. The
last option is for Red 17, 434 IAP, winter 1942, white/blue scheme. I
opted for Orehov’s mount, with the big red nose.
The paints are as follows: two-seater, USSR light topside gray, USSR
dark topside gray acrylics from Polly Scale. The single-seater used red
and black acrylics from Tamiya, Russian topside green enamel from Model
Master. Both aircraft used USSR underside blue acrylic from Polly Scale.
I mix enamels and acrylics with no fear; just make sure that at least 24
hours of drying and curing time go in between coats.
I applied a coat of Future floor wax before decaling. The decals
responded quite well to Microsolvent and Microset. I sealed the decals
and the paint with a coat of polyurethane furniture varnish (let it dry
for at least 48 hours) and weathered with oil pastels diluted in
turpentine. Chipping was done with silver paint and a very fine brush.
Yaks had wood wings covered with plywood and fabric covered fuselage
sides. Aluminum was a prized Soviet commodity only used where it was
absolutely necessary so be careful when you chip. The nose and parts of
the tail were metal so that is where my chipping went. Dry chalk pastels
finished the weathering process. A coat of semi-gloss Testor lacquer
sealed everything in place.
These kits are best suited for the intermediate modeler because they
lack locator pins and they don’t fall together but I highly recommend
them because they are interesting subjects and fun to build. Their soft
plastic makes them ideal for conversion projects and scratch building
ideas, and they cost just a few coins. Toss the original canopies and
get the Squadron ones. ICM has done a great job in bringing these
classics to life and I have their Mig-3 in my sights (who doesn’t want
to build a white and red aircraft?)
By the way, the aluminum I used is not from beer cans but from root beer
cans. Beer cans got me through college but now as a middle aged dude, my
beer comes out of imported green bottles. Here it is to the good life.
Cheers!
Click the thumbnails below
to view larger images:
Text, Images and Model Copyright © 2002 by
Jose R. Rodriguez
Page Created 20 March, 2002
Last Updated
04 June, 2007
Back to HyperScale Main Page
Back to Features Index |
 Home
| What's New |
Features |
Gallery |
Reviews |
Reference |
Forum |
Search
Home
| What's New |
Features |
Gallery |
Reviews |
Reference |
Forum |
Search


