|
XF-103 "Thunderwarrior"
by Phil Brandt
 |
|
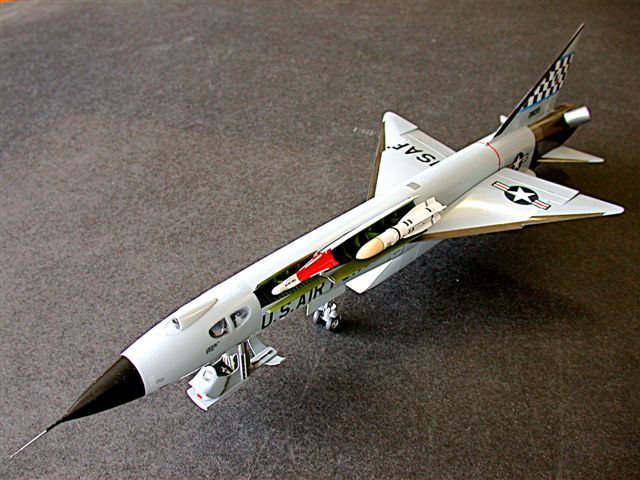
Republic XF-103 "Thunderwarrior" |
Collect-Aire 1/48 Scale XF-103 "Thunderwarrior"
Number 4834
model completed 9 Aug 2002

HyperScale is proudly supported by
Squadron.com
The Fifties and Sixties were a veritable hotbed of American aviation
development, a highwater mark achieved by everyday "outside the box"
engineering. The stillborn Republic Aviation XF-103 "Thunderwarrior" exemplifies
this developmental frenzy, perhaps matched only by the later, wildly successful
design and construction of the A-12/SR-71 Lockheed Blackbirds.
The XF-103 was envisioned as an extremely high performance (Mach 3.7/100,000
feet!) interceptor follow-on to the F-102/F-106. Although the XF-103 was
originally in the same 1951 design competition with the proposed F-102, the
F-102 won, and a Convair interceptor dynasty of over twenty years was launched.
The Air Force, however, directed Republic to push ahead with three experimental
prototypes. A full scale mockup was completed, and one airframe was partially
completed when the axe fell in August 1957, the AF citing cost as the reason.
Not only were the prototypes cancelled, but also the XF-103's innovative Wright
turbojet/ramjet engine and Hughes intercept radar.
The Thunderwarrior was loaded with cutting edge features: dual cycle powerplant
(license-built Bristol Olympus turbojet in tandem with a Wright Aeronautical
XRJ-55-W-1 ramjet) providing an impressive 37,400 pounds of thrust in a 55,000
pound gross weight aircraft; totally enclosed ejection capsule from which the
airplane could be flown; periscopic viewer in place of a conventional windshield
and canopy; variable incidence wings; an all-flying stabilator, and wing 'tiperons'
in lieu of ailerons.
|
Collect-Aire's 1/48
Scale XF-103 |
As with many Collect-Aire releases, the joy of obtaining such eclectic
subjects in 1/48 can be substantially tempered by quality issues which often
require moderate to heavy effort to correct.
Although major XF-103 component shapes are generally correct, delicately
engraved and free of warpage, my kit was plagued with literally hundreds of
micropits in the otherwise smooth wing and fuselage surfaces. This seems to be a
continuing resin production problem that has been solved by other limited
production manufacturers.
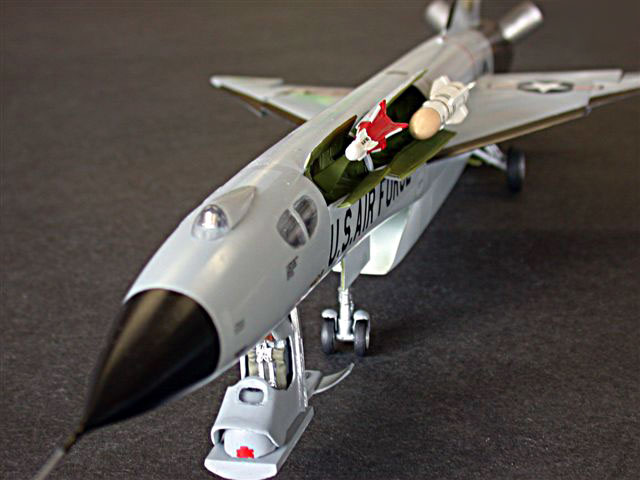
Capsule and Cockpit
I looked and looked at the ejection capsule configuration and instrument
panel, comparing them with the enclosed Republic line drawings included with the
Collect-Aire assembly pamphlet. Something seemed amiss, and it wasn't until I
obtained pix of the cockpit mockup from Fotios Rouch that I realized that the
master modeler had created major inconsistencies with the real thing: firstly,
the ejection capsule as modeled is at least 1/8" too wide and had to be
'sectioned' down the center and the halves reattached; same, same for the
sliding capsule hatch. This, BTW, made it necessary to also decrease the width
of the movable ejection stabilization platform upon which the capsule is
mounted...and also the width of the fuselage opening for the capsule. The
capsule lowering rails were scratchbuilt.
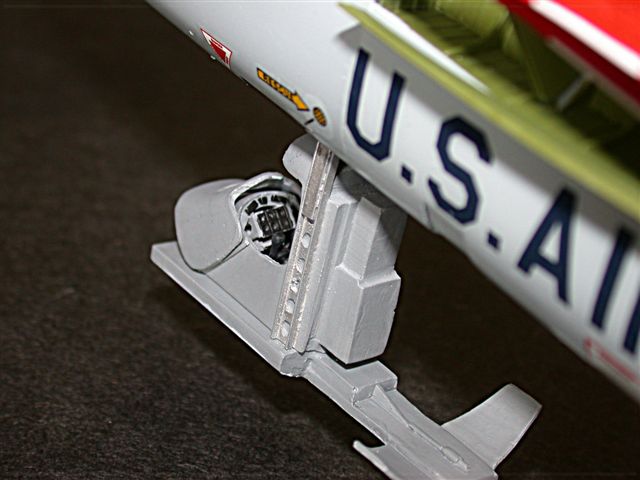
From the mockup pix, the only instrument panel in the capsule itself is very
small (much smaller than the one in the kit), accompanied by a few ejection
switches around the coaming, and the F-102-style, twin-handled stick. There
should be no consoles in the capsule. The side consoles, the throttles, flap
lever and the main instrument panel w/periscopic viewer appear to be outside the
capsule, mounted on 'ledges' in the fuselage sides and in front of the capsule.
Strangely, the master modeler molded these side ledges, albeit mis-proportioned.
I scratchbuilt the capsule and fuselage interiors and periscopic viewer using
kitbashed Monogram F-89 consoles and modified front main instrument panel. A
thinned, modified True Details Aces II seat replaced the too wide and much too
plain kit seat.
Fuselage
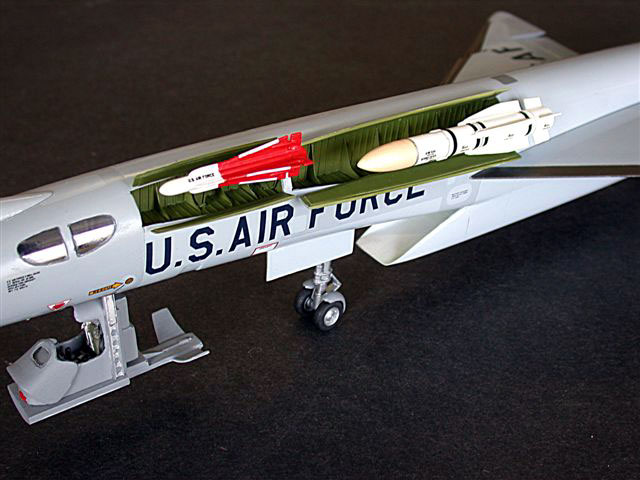
An enclosed cutaway drawing in the construction pamphlet shows the intended
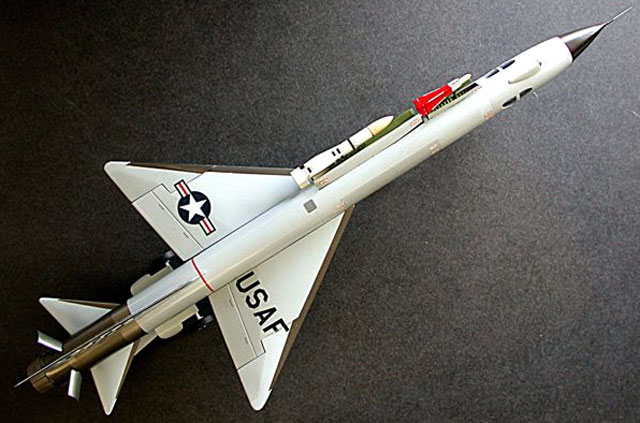
missiles, so I elected to scratchbuild missile bays and display missiles on
their launchers. The Hasegawa weapons kit AIM-54 was modified into its
predecessor, the AIM-47 (also intended for the YF-12), by decreasing fin areas,
etc. The smaller AIM-4 Falcon (and launchers) were 'cannonballed' from a
Monogram F-102. The thick chunks of resin cutout for the missile bays were
thinned into the bay doors with a Dremel tool and an inner layer of plastic
sheet laminated for strength.
Mating of the fuselage halves required much adjustment and filling, especially
in the region of the "sugar scoop" intake and missile bays. I found the fit of
the maingear well very poor and had to shim the fuselage sides approximately
1/8." The interior afterburner tube and turbine wheel were replaced by the same
components from an OEZ Su-7 kit. This gave more depth and IMO, realism.
The pitot tube was taken from an ESCI Mig-27 parts kit and mounted into
concentric brass tubing glued into a hole drilled in the radome.
Flying Surfaces
The wings are smooth and nicely cast with the exceptions of the micropits
mentioned above. I elected to cut off the "tiperons" and display them slightly
deployed. The very fine toothed Hasegawa saws are perfect for the smooth cuts
needed. The relative massiveness of the resin wings and the fact that the
incidence was variable caused me to use lengths of concentric brass tubing as a
carry through structure and pivot in the fuselage. This guaranteed that the
heavy wings would line up and be well supported. Plus, they could be separately
finished! I used the same scheme on a smaller scale for the stabilators. The
vertical fin was CA-ed to the fuselage with no problems.
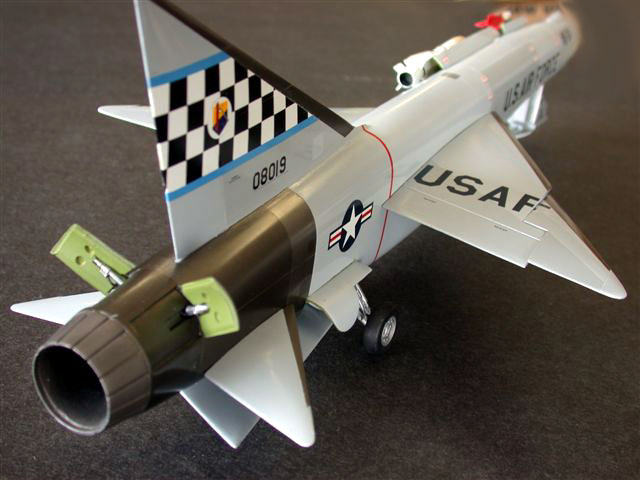
No pivot mechanism is shown or included for the large, foldable ventral strake
(much like that in the YF-12!) so it was Scratchbuild City again.
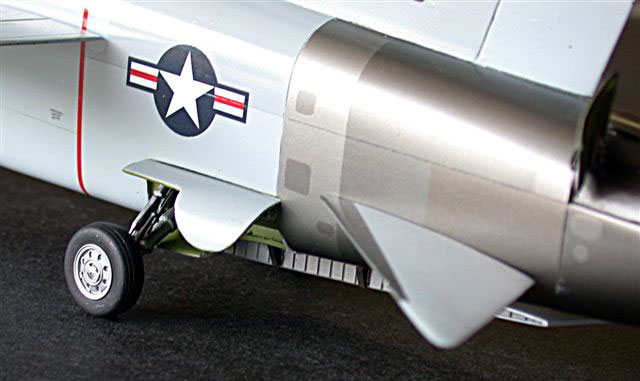
Landing Gear
Monogram F-105 main wheels were substituted because of their size--the
Collect-Aire wheels seemed too puny for such a long airframe--and molding
quality. After all, the wheels are a Republic Aviation design anyhow! Nose
wheels came from the F-4 Monogram kit.
Finishing
After coating all components with gray automotive lacquer primer, the
aforementioned pitted resin surfaces were filled with repeated iterations of my
favorite lacquer putty, 3M Blue Acryl. Although it does shrink if applied too
thickly, its quick drying and sandabilty are IMO unmatched. I also used Mr.
Surfacer and slow drying CA glue for major discrepancies. Panel lines were
rescribed and added as needed.
Since the F-103 was originally slated to replace the F-106 fleet in the
Sixties, I elected to use the same ADC gray scheme overall--the Collect-Aire
pamphlet mentions that Republic hinted at an eventual pale blue anti-corrosion
color scheme--except for the Natural Metal Finish flying surface leading edges
and afterburner section all of which would have been very hot, especially during
the ramjet, Mach 3.7 operational envelope.
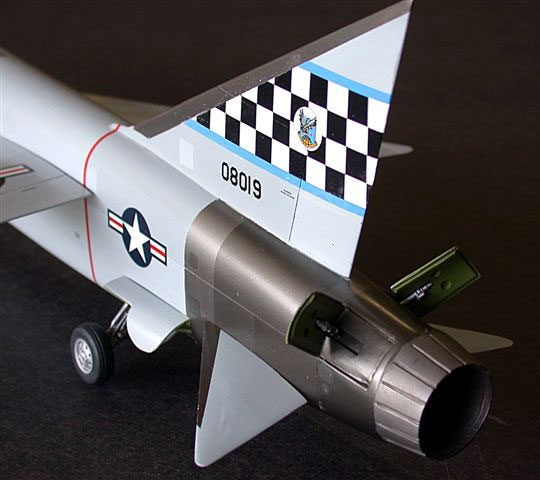
Two very close gray shades of custom-mixed Polly Scale acrylic flats were
created by substantially whitening Light Gunship Gray and adding a few drops of
Intermediate Blue. Before decalling, I shot two coats of gloss clear acrylic.
NMF surfaces were done in various custom shades of Alclad II shot over a base
coat of Steel and were masked to protect from the clear gloss.
The Collect-Aire decals were rather thick and somewhat yellowed, plus they were
for the XF airframe, so I substituted SuperScale decals from an old F-102 sheet
since there's no reason that the follow-on F-103 wouldn't have used flashy tail
logos as did the Deuces and Sixes. The checkered tail scheme is from the 16th
FIS at Naha in the Fifties. After sealing the decals, I wetsanded with micro
sanding cloths of 8000 grit, transitioning to 12,000 to bring up the gloss.
Ol’ Bondo is weak after fourteen days of concentrated building and painting
on this hummer. But, I’m still glad esoteric releases such as this are
available, so I’ll keep stepping up for my Collect-Aire ‘beatings’!
Click the
thumbnails below to view larger images:
Model and Article
Copyright © 2002 by Phil Brandt
Images Copyright © 2002 by Milton Bell
Page Created 09 April, 2002
Last updated 04 June, 2007
Back to HyperScale
Main Page
Back to Features Page |
 Home
| What's New |
Features |
Gallery |
Reviews |
Reference |
Forum |
Search
Home
| What's New |
Features |
Gallery |
Reviews |
Reference |
Forum |
Search