|
X-15A-2
by
Kelly Jamison
|
|
|
X-15A-2 |

HyperScale is proudly supported by
Squadron.com
The X-15 was one of the most exotic and successful
of the entire X airplanes.
The X-15 aircraft can trace its origins back to the
24th of June 1952. NACA decided to expand its research into the exo-atmospheric
designs capable of Mach 4 to Mach 10 and up to 50 miles high. NACA, Air
Force, Navy and North American worked together to design a vehicle to
provide information on thermal qualities and high speed
control/stability and re-entry characteristics.
X-15A-2 was born following an accident on the 9th
of November 1962 when aircraft 56-66671 was damaged. The aircraft was
surveyed by the USAF, Navy and NASA and deemed repairable. It was also
decided to incorporate modifications to expand its performance envelope.
It was planned to fly the aircraft to Mach 8+ or until Vmax was reached.
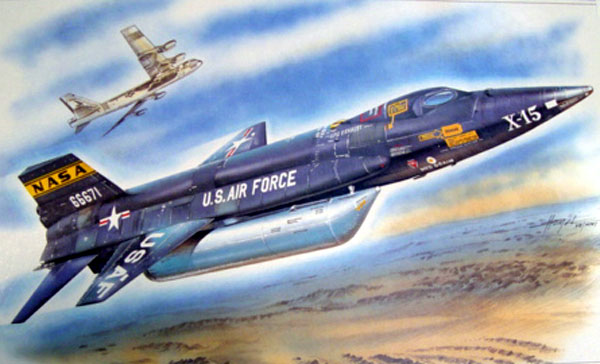
On the 3rd of October 1967, with Pete Knight at the
controls, 56-6661 was launched from its B-52 mothership with a dummy
scramjet engine attached to its lower ventricle. The aircraft reached an
amazing Mach 6.72 at 4,534 at an altitude of 102,100 feet. This was to
be the last flight of 56-66671 due to damage caused through severe
heating through the mounting position of the dummy Scramjet. It was so
severe that it was deemed unrepairable and the plane was retired to the
United States Air Force Museum where it can still be seen today.
I started this kit by washing off all the resin parts. They got a coat
of gray primer to show any flaws or pin holes. I found a few that needed
filling but not too many.
I painted the cockpit light gray and highlighted
the side panels in black with knobs and switch covers painted red. The
different attitude controls, throttle and stick were added and painted
up according to my reference material. The seat was painted a slightly
darker shade of gray and the headrest and seat pan were painted dark
red. There are two high-speed stabilizing fins that are glued to the
seat. The directions are vague at best as to where to place them. Use
your reference material here again. The instrument is painted light gray
with black faced gauges and white details. A drop of Krystal Clear
finished off the panel. I superglued it into place.
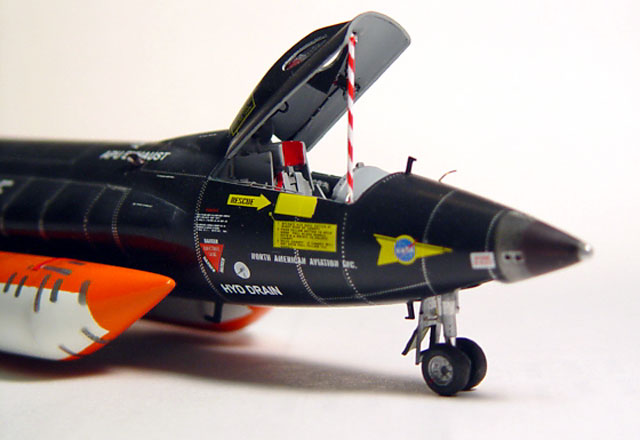
The windscreen is next. It is made of two pieces
and split right down the middle. It is the weakest part of this kit. I
tried to vac-u-form the canopy a couple of times but could never get the
right shape. One of my failed attempts became the donor glass for the
inside of the oval shaped lenses.
Back to the books.
I detailed the inside of the canopy using photos of
the real thing then scratch built hinge lugs out of plastic. The kit
doesnít have any way for you to pose the canopy open. You are up to your
own on how to do it. I set it off to the side and started on the tail.
To make the lower portion of the tail the short version you have to cut
it along one of the panel lines. The instructions show you where to do
it. You have to thin out the tailpieces to get them to fit right and
place triangle shaped pieces to give the tail its wedge shape. There is
some nice little resin pieces in the tail that replicate the air brakes
that need painting and gluing into place. The instructions are a bit
vague in this area also but you can see how it all goes together.
I test fitted the top and bottom half of the fuselage together many
times with the resin cockpit tub and the nose wheel well to make sure
they would fit properly. I drilled out the small rocket holes in the
nose and used plastic card to block any light from shining through. Once
I was satisfied I superglued them into place and put the halves
together.
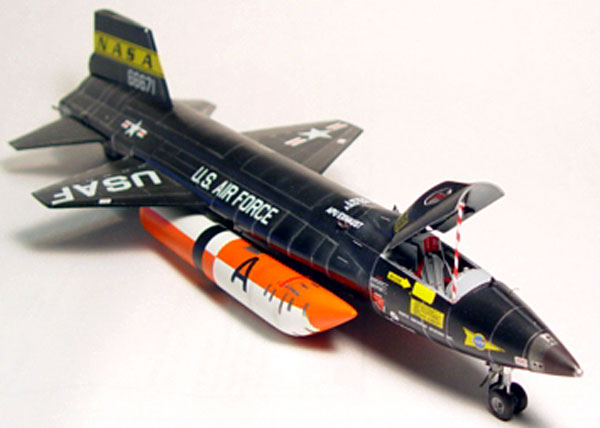
I had to sand the fuselage many times to get the
shape of the nose right and the curve on the sides of the fuselage
right. You need to re-scribe all the lost detail. It took a few weeks to
get the fuselage ready for the wings. I made a small rig using cardboard
to make sure the wings would be absolutely level with the fuselage and
superglued the wings on. While I had it in this state I finished the
wing roots and glued the tail sections together. The tail doesnít want
to sit flush with the gentle sloping aft fuselage so some sanding needs
to be done here.
At this point I painted the model a mix that is an
extremely dark blue. The color was almost a black blue. I got the color
match from scraps of the X-15A #3 that are in the Edwards Flight Test
Museum so I am confident with my source material for the color. Donít
forget to paint the two piece landing gear cover, tailskid rails, and
any antennas while you have the airbrush loaded up. Once dry I masked
off panel areas and painted it a slightly lighter shade of the same
black-blue mixture. I also painted the elevator surfaces and put them
aside.
A friend printed up a series of silver dots on his
ALPS printer for me to replicate the complex rows of rivets that run all
over the aircraft. On hindsight after placing all those rivets I would
have sprayed a light coat of black-blue over the rivets to tone them
down a bit. They are very noticeable on the real aircraft but not THAT
shiny.
I took extra care in aligning the elevators at a 20į
down slope by using a modified version of my earlier rig I used to get
the wings aligned. The landing skids went on next then I turned my
attention to the nose gear area. It is kind of plain and can be spruced
up by using bare metal foil for the strut and silver with a coat of
future over it to tone down the color a bit. The wheels are resin and
need to have the center drilled out so they will fit on the nose gear
axle. Be careful and donít drill all the way through like I did. You can
shorten the axle a bit so you will not have to drill so deep but
remember the front of the plane is heavy with the resin cockpit tub and
resin nose wheel well so you need that extra support.
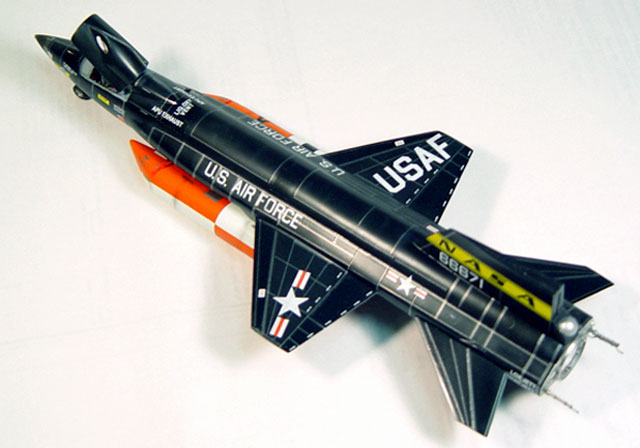
The external tank mounts are painted Alclad 2 silver and glued into
place. The external tanks are oval in shape when glued together and
needed to be brought back to round by lots and lots of sanding and
re-scribing. There is some small detail on the back of the tanks that
needs looking after. So follow kit instructions as far as location and
follow your research to add the plumbing that makes the externals look
much better. I painted the tanks white then used Testors International
Orange in the large checkered pattern. It was difficult to paint and
spend a few minutes looking at pictures prior to taping off and spraying
the orange.
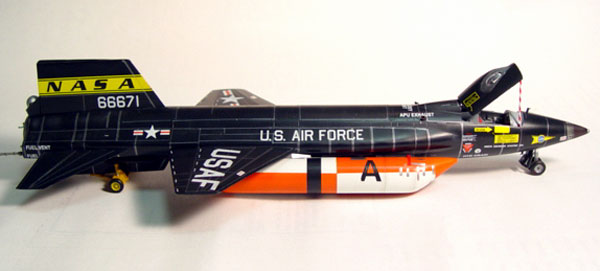
The towing dolly is a nice little piece of work. It needed some cleaning
up and took a few minutes to figure out how it goes together but once
done it looks great and really helps to set the model up real nice. I
spent some extra time detailing out the nose with different shades of
silver and burnt metal colors then turned my attention to the tail
again. I added the pressurized canister to the tail of the plane
painting the ball silver and the two dump manifolds that I painted
Alclad aluminum. Drill out the dump manifolds and drill out holes where
they mount then place them on small brass wire. You will be knocking
them off all the time if you glue them. If they are held in place by the
wire then they can be bent then re-straightened. You will thank me for
this advice as many times as I cussed about breaking them off to begin
with. The whole rocket area got the Alclad treatment.
Then I used a circle template to mask off the
silver area and sprayed white into the rocket motor to simulate the
ceramic material in the bell of the exhaust. Black streaks were added
and an orange outline around the lip of the bell gave it the final touch
according to my reference photos.
The decals were outstanding on this kit. Thin and
opaque. I really enjoyed the decal process, except for all those rivets.
The whole plane got a thin coat of semi-gloss clear and was set off to
the side to dry.
This kit was a bear. I put it down many times and
started it over many times.
I could not recommend this kit to beginners or even
to some mid-level builders. If you have experience with short run kits
then you will feel right at home. I might build another one in the
future in the white ablative material as seen on its last flight.
Click the thumbnails below
to view larger images:
[photogallery/photo29671/real.htm]
Model, Images and Text Copyright © 2002 by
Kelly Jamison
Page Created 24 November, 2002
Last Updated 04 June, 2007
Back to HyperScale
Main Page
Back to
Features Index
|
Home
| What's New |
Features |
Gallery |
Reviews |
Reference |
Forum |
Search